

MY CROCHET UNIVERSE · FREE CROCHET PATTERN
Mini Bunny Amigurumi Keychain Pattern: Easy Step-by-Step Tutorial
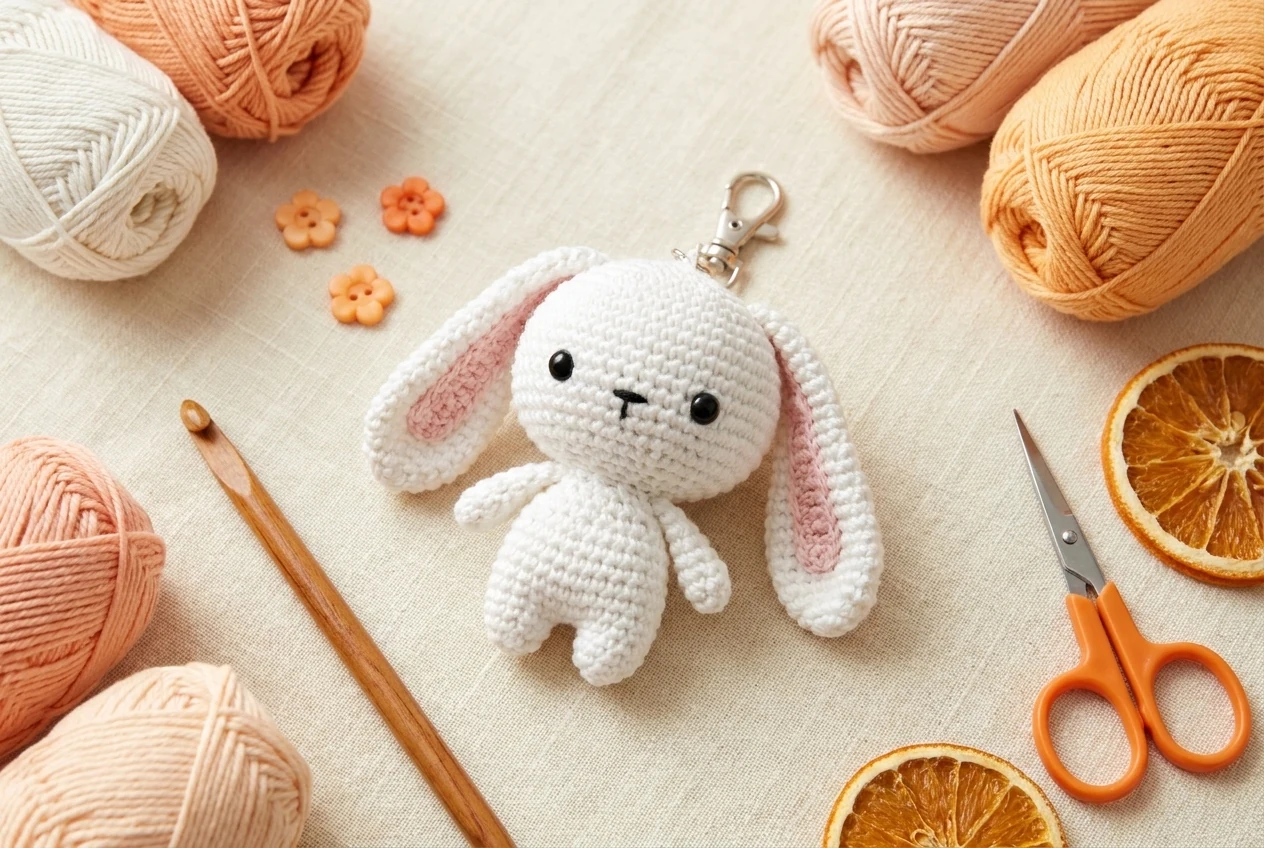
This mini bunny amigurumi keychain pattern is a compact beginner-friendly project made from a round head, two long ears, a small body, tiny arms and feet, one round tail, and keychain hardware. The supplied pattern uses 4-ply combed cotton with a 2.0 mm crochet hook and is worked in continuous spiral rounds.
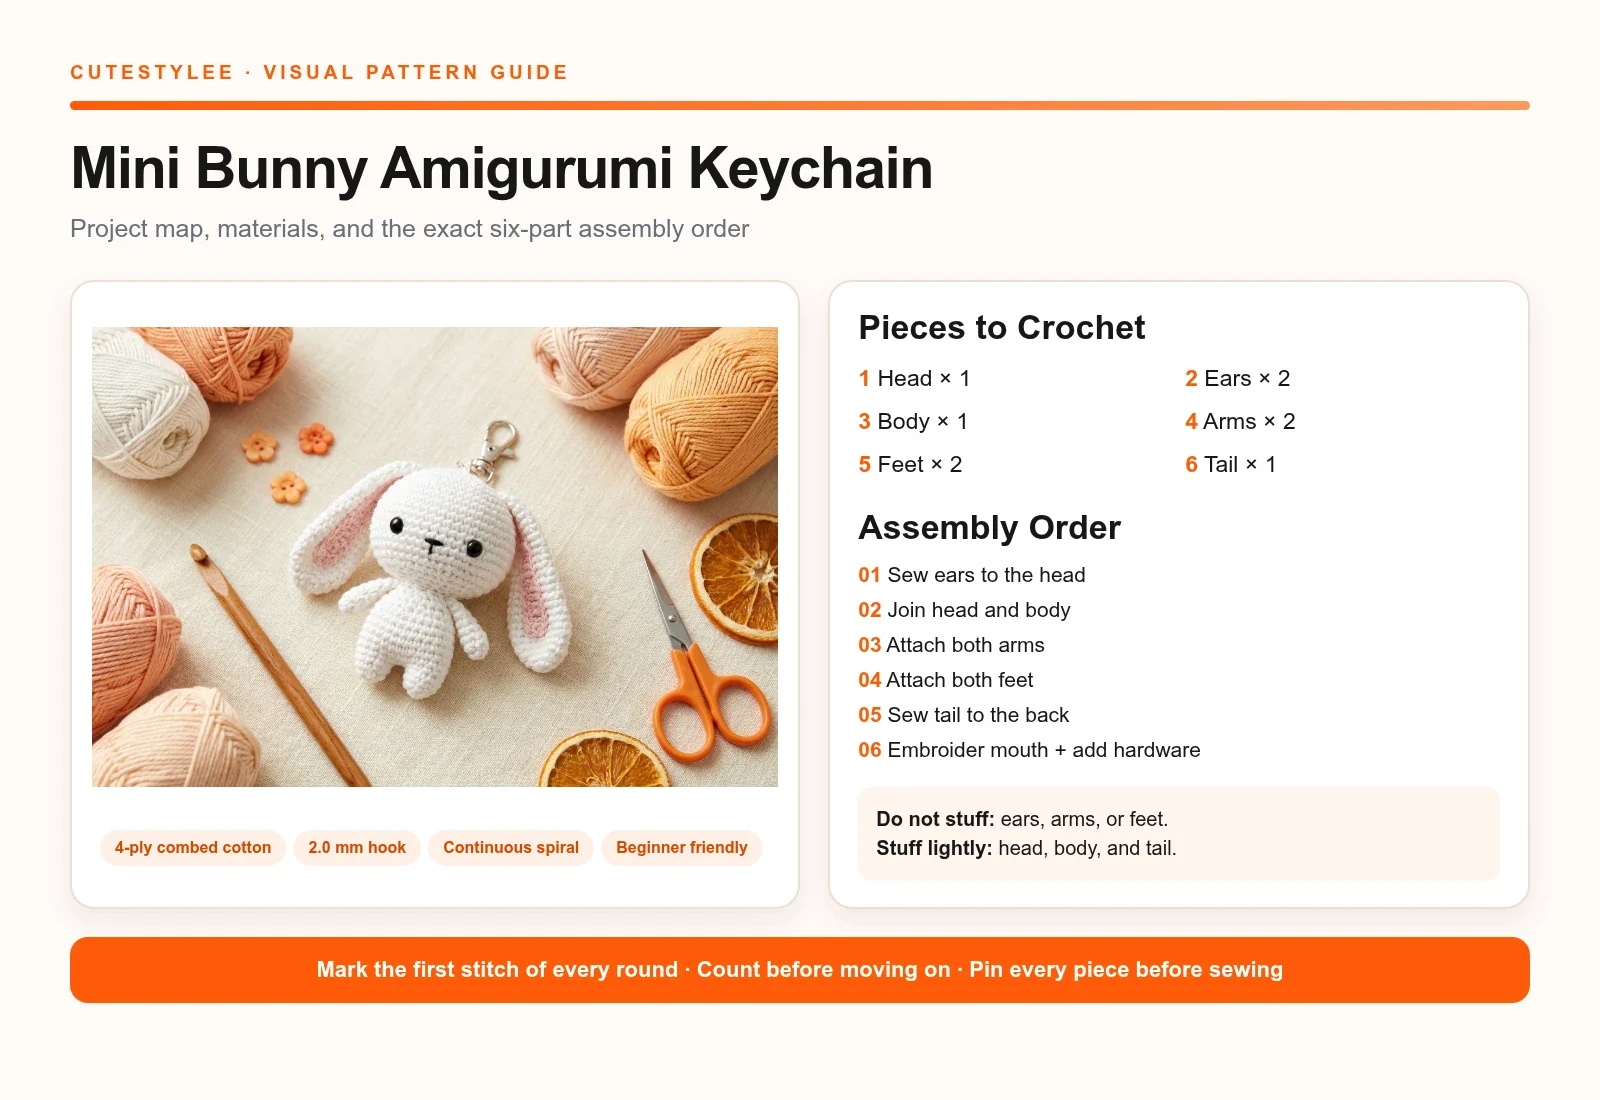
The pieces are intentionally simple. You will crochet them separately, stuff only the head, body, and tail, then assemble them in a clear six-step order. The mini bunny amigurumi keychain pattern is small enough for a quick project, but neat counting and careful placement make the finished bunny look balanced.
Table of Contents
- Project overview
- Before you begin
- Materials and tools
- Crochet abbreviations
- How to read the pattern
- Written pattern
- Step-by-step tutorial
- Finishing and safety
- Troubleshooting
- FAQ
Project Overview
| Detail | Pattern information |
|---|---|
| Focus project | Mini bunny amigurumi keychain |
| Skill level | Beginner / confident beginner |
| Yarn | 4-ply combed cotton |
| Hook | 2.0 mm crochet hook |
| Construction | Continuous spiral rounds |
| Main stitches | Single crochet, increase, decrease, chain, slip stitch |
| Pieces | Head, 2 ears, body, 2 arms, 2 feet, round tail |
| Finishing | Embroidered mouth and attached keychain hardware |
The mini bunny amigurumi keychain pattern uses only basic amigurumi shaping. The head grows from 6 to 30 stitches, stays even for three rounds, then decreases to close. The smaller parts repeat the same magic-ring, increase, even-round, and decrease logic.
Before You Begin
Read the entire mini bunny amigurumi keychain pattern once before making the first magic ring. Wind a small ball of white yarn, prepare the hook and stitch marker, and place each completed part in a tray so the tiny pieces do not disappear.
- Mark the first stitch of every round and move the marker upward as you work.
- Count at the end of every round; the number in parentheses is the required total.
- Stuff in small amounts rather than pushing in one large piece of filling.
- Leave long sewing tails on the head, ears, body, and tail.
- Make matching pieces one after the other so your tension stays consistent.
- Pin every part before sewing permanently.
Materials and Tools
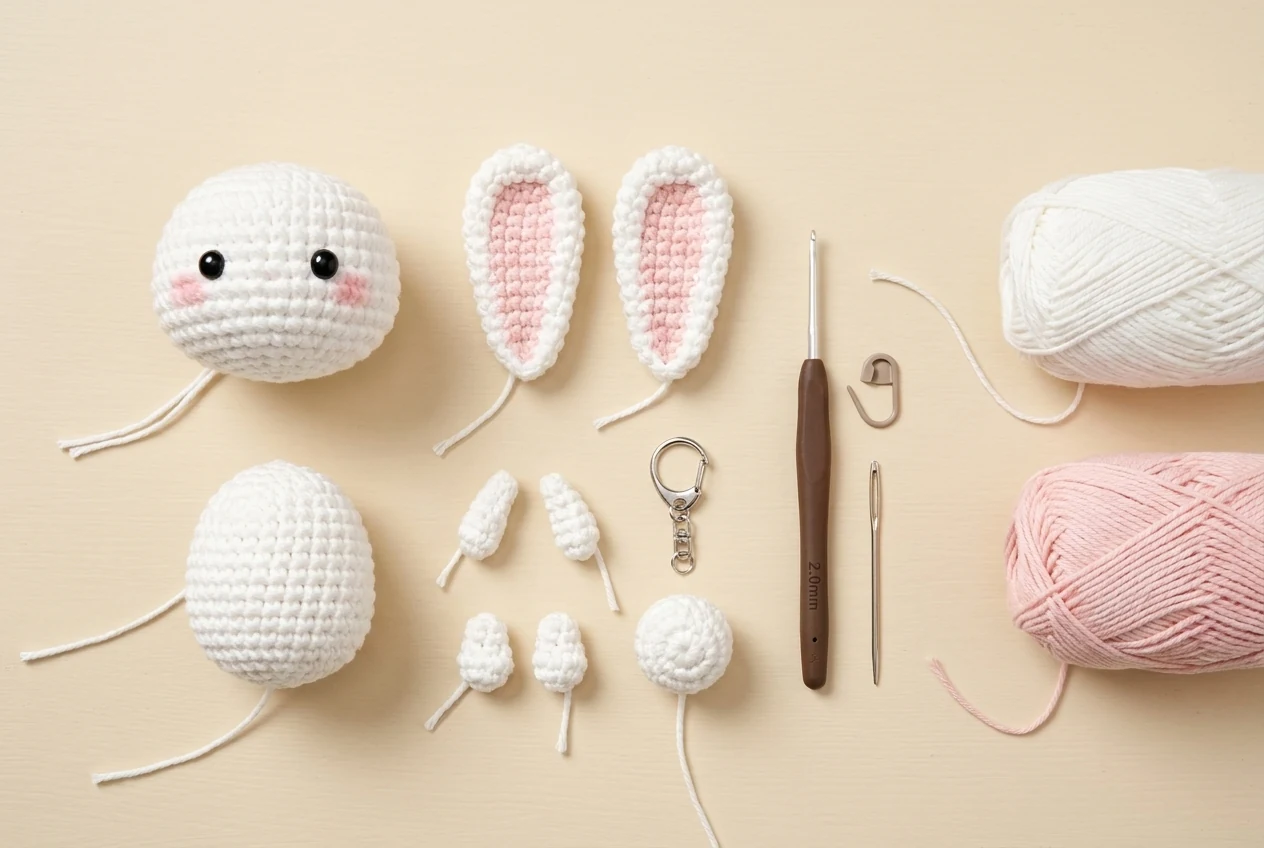
For the mini bunny amigurumi keychain pattern, use a hook small enough to create a firm fabric that keeps the stuffing hidden. The 2.0 mm hook in the source is a practical match for fine 4-ply cotton, but your tension still matters.
| Material | Amount or specification | Purpose |
|---|---|---|
| White 4-ply combed cotton | Small amount | Head, ears, body, arms, feet, and tail |
| 2.0 mm crochet hook | 1 | Creates tight amigurumi fabric |
| Fiberfill | Small amount | Lightly fills the head, body, and tail |
| Stitch marker | 1 | Marks the first stitch of spiral rounds |
| Tapestry needle | 1 | Sews the pieces and hides yarn tails |
| Scissors | 1 pair | Cuts yarn and embroidery thread |
| Black embroidery thread | Small amount | Embroiders the mouth and optional eyes |
| Small safety eyes | 1 pair, size not given | Optional face detail for display-only use |
| Keychain hardware | 1 clasp with ring or short chain | Turns the bunny into a keychain |
| Pins | Several | Checks placement before sewing |
| Optional pink yarn or blush | Small amount | Adds inner-ear or cheek detail if desired |
Keep all yarn the same thickness. If you substitute a heavier yarn, the finished bunny will become larger and the keychain hardware may need to be stronger.
Crochet Abbreviations
The mini bunny amigurumi keychain pattern uses the source symbols below. This article expands them into standard US crochet language.
| Source abbreviation | Meaning used in this tutorial |
|---|---|
| R | Round |
| X | Single crochet (sc) |
| V | Increase: 2 sc in the same stitch |
| A | Decrease: single crochet 2 stitches together |
| CH | Chain |
| SL | Slip stitch |
| MR | Magic ring |
You can compare unfamiliar terms with the Craft Yarn Council crochet abbreviations. The yarn label can also be compared with the standard yarn-weight system, although the source identifies the yarn simply as 4-ply combed cotton.
How to Read the Pattern
Work the mini bunny amigurumi keychain pattern in a continuous spiral unless a section says otherwise. Do not slip stitch at the end of each round. Place the marker in the first stitch, complete the round, check the total, and move the marker into the first stitch of the next round.
A repeat such as (X, V) × 6 means one single crochet followed by one increase, repeated six times. The final number in parentheses is the total number of stitches after completing that round.
Helpful Skills
You should know how to make a magic ring, single crochet, increase, decrease, fasten off, stuff a small piece, and sew crochet components together. An invisible decrease is helpful because it closes gaps and keeps the fiberfill from showing.
Mini Bunny Amigurumi Keychain Pattern Written Instructions
Follow the mini bunny amigurumi keychain pattern piece by piece. Finish the head first because it becomes the size reference for the ears, body, arms, feet, and tail.
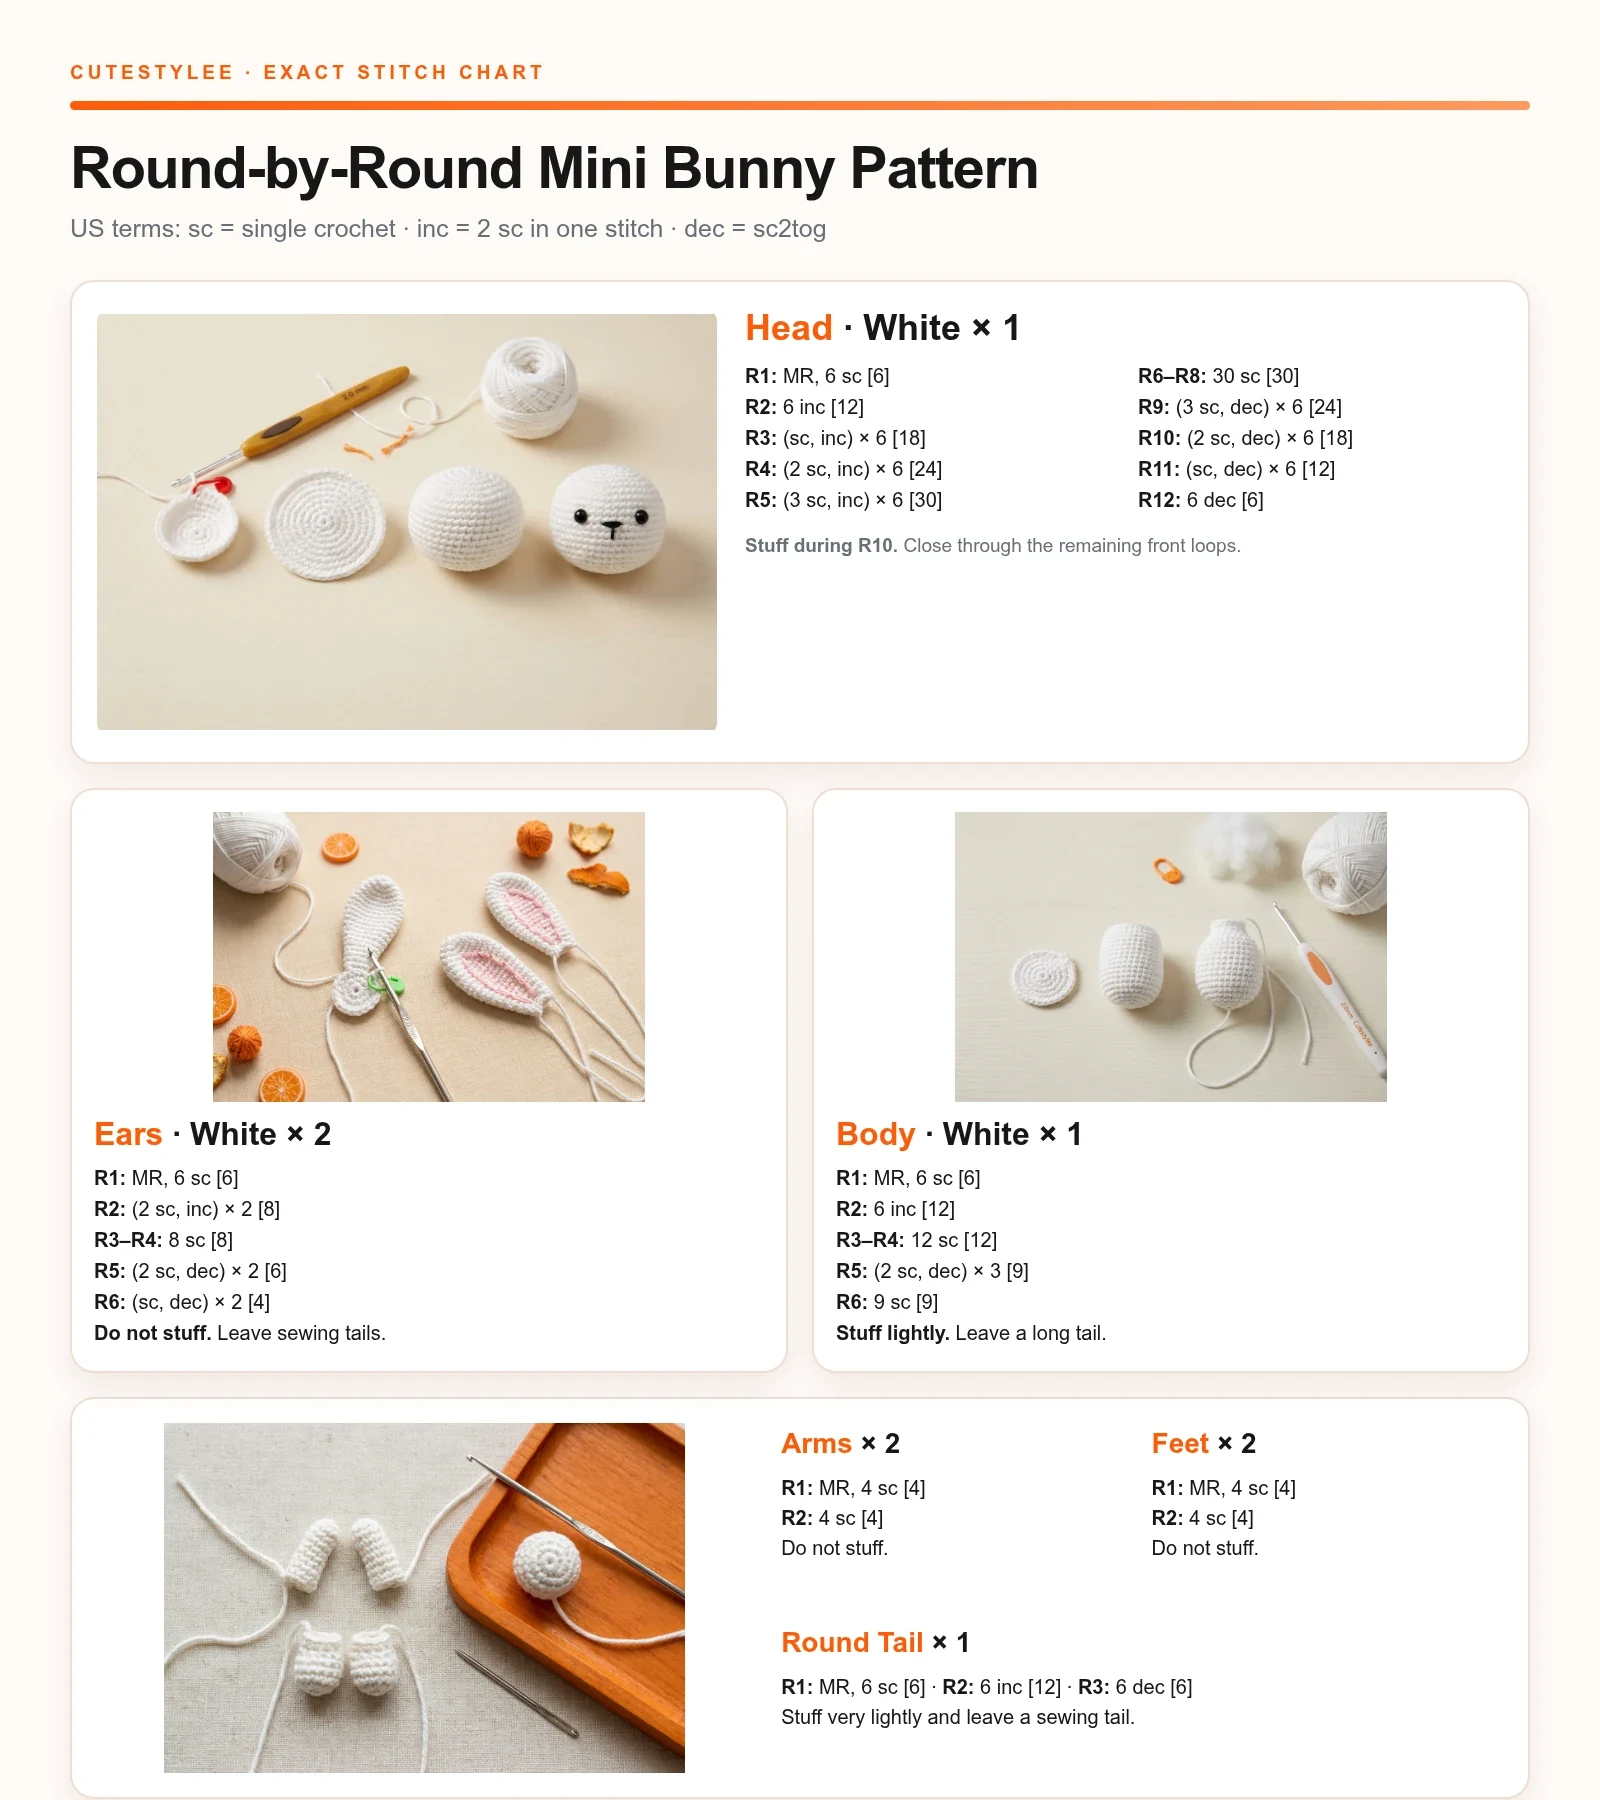
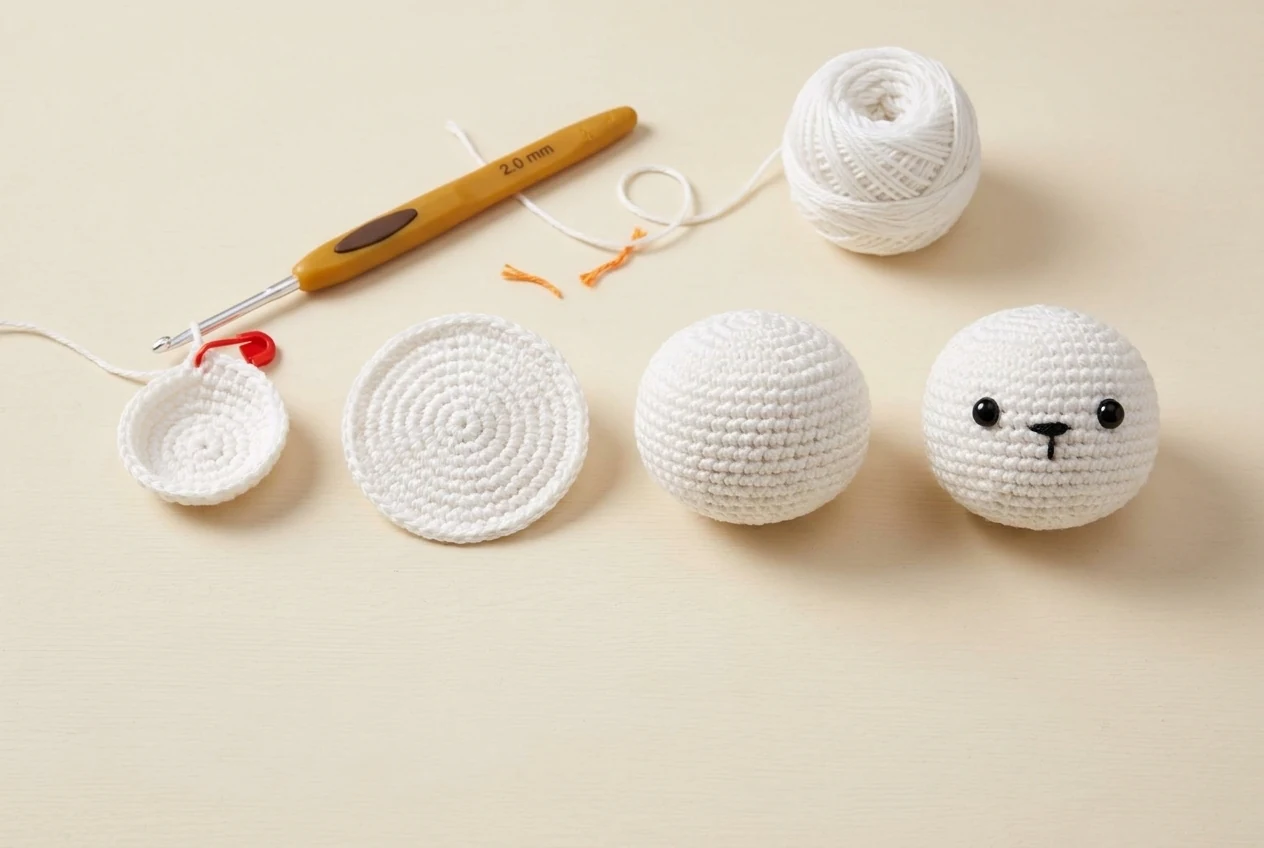
Head — white, make one
- R1: Magic ring, 6 sc. [6]
- R2: Increase in every stitch. [12]
- R3: Repeat (1 sc, inc) 6 times. [18]
- R4: Repeat (2 sc, inc) 6 times. [24]
- R5: Repeat (3 sc, inc) 6 times. [30]
- R6–R8: Sc in every stitch. [30]
- R9: Repeat (3 sc, dec) 6 times. [24]
- R10: Repeat (2 sc, dec) 6 times. [18] Add stuffing gradually and attach the eyes if you are using them.
- R11: Repeat (1 sc, dec) 6 times. [12]
- R12: Decrease 6 times. [6]
Fasten off, leaving a long tail. Add the last small amount of stuffing, thread the tail through the front loops of the remaining stitches, and pull the opening closed.
Ears — white, make two
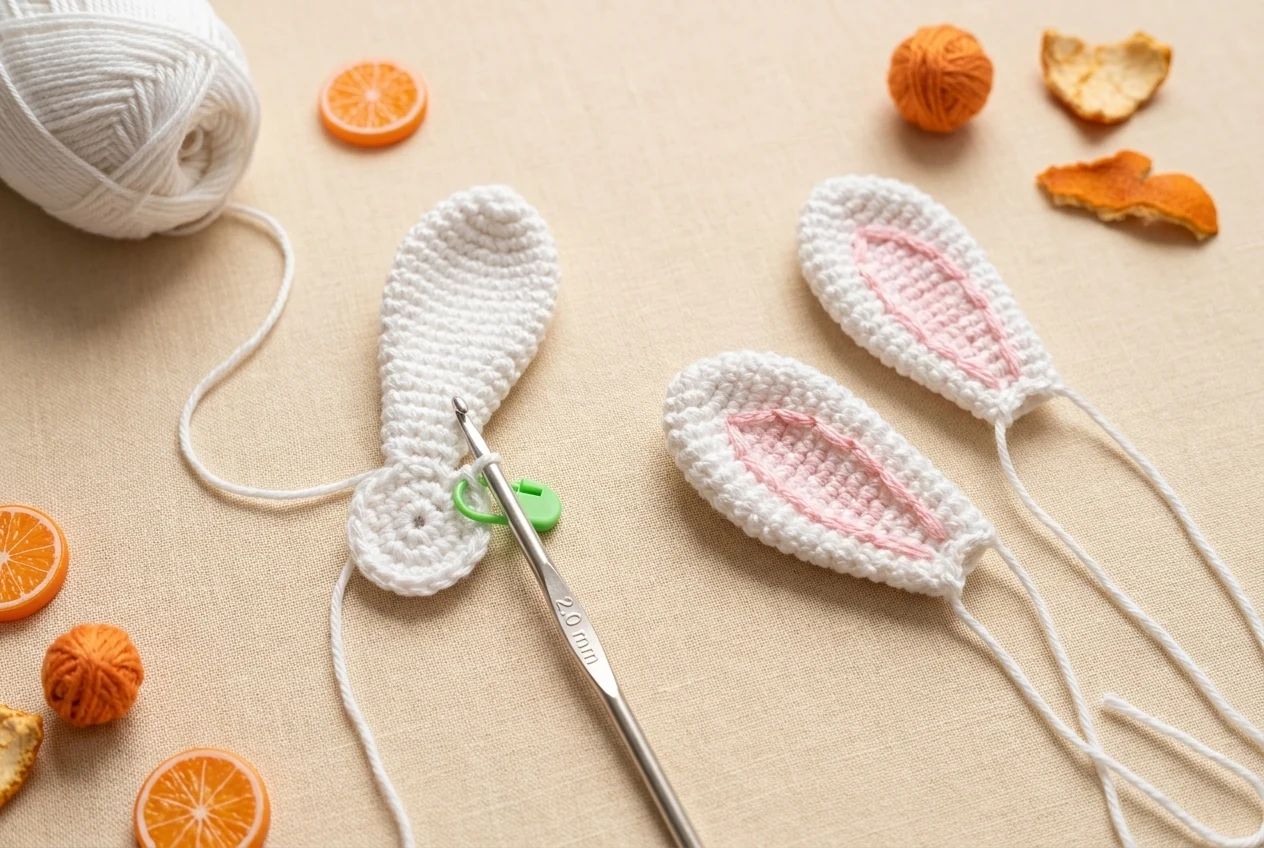
- R1: Magic ring, 6 sc. [6]
- R2: Repeat (2 sc, inc) 2 times. [8]
- R3–R4: Sc in every stitch. [8]
- R5: Repeat (2 sc, dec) 2 times. [6]
- R6: Repeat (1 sc, dec) 2 times. [4]
Do not stuff. Fasten off each ear with a long sewing tail. Flatten the openings before pinning them to the head.
Body — white, make one
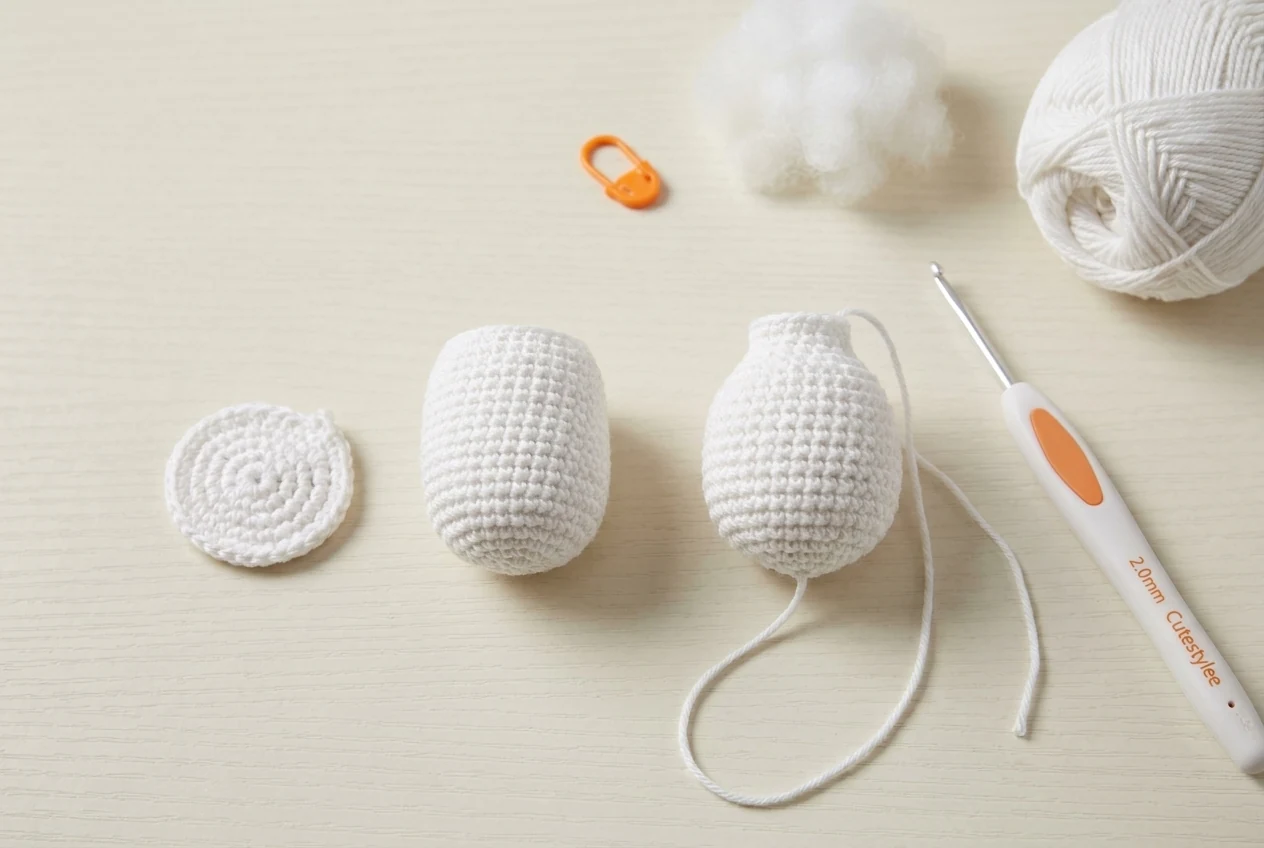
- R1: Magic ring, 6 sc. [6]
- R2: Increase in every stitch. [12]
- R3–R4: Sc in every stitch. [12]
- R5: Repeat (2 sc, dec) 3 times. [9]
- R6: Sc in every stitch. [9]
Stuff lightly. Fasten off and leave a long tail to sew the body to the head.
Arms — white, make two and do not stuff
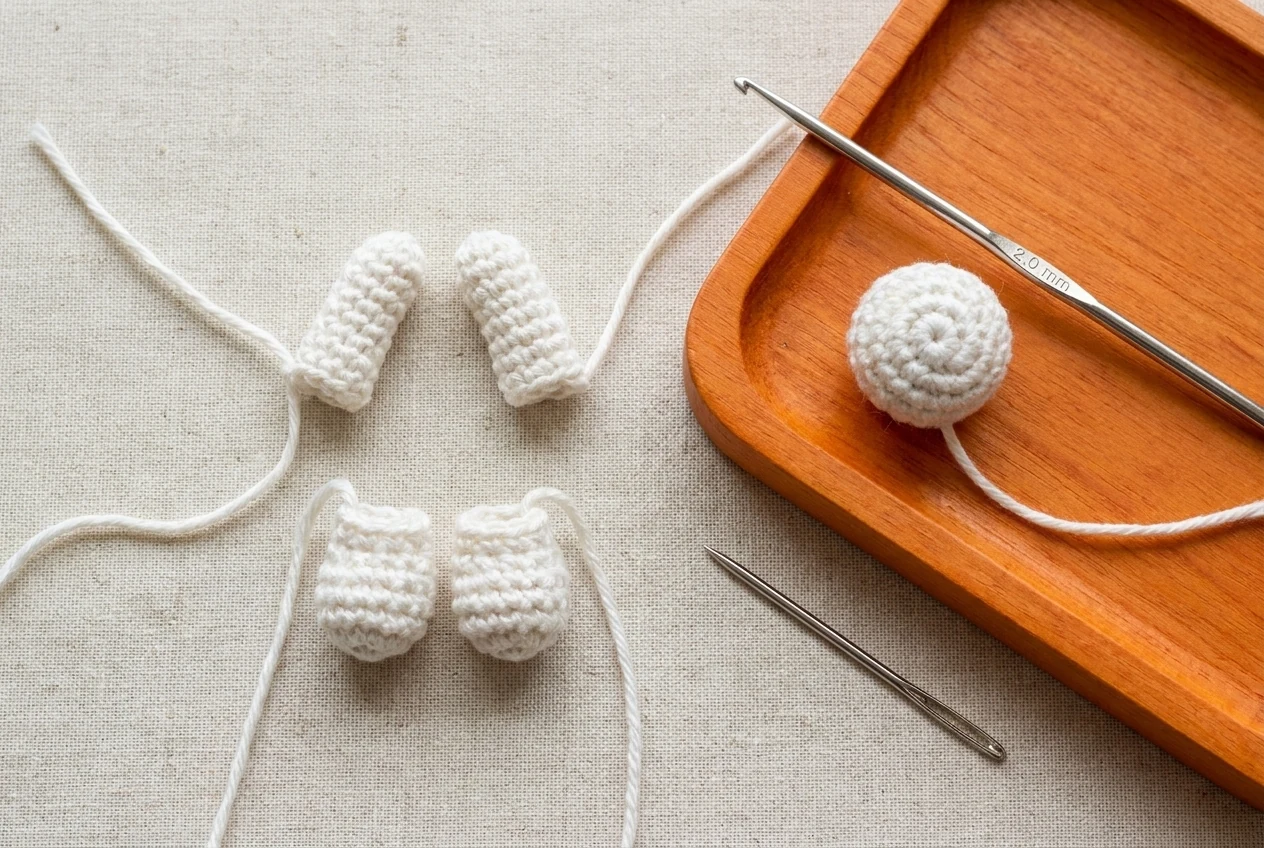
- R1: Magic ring, 4 sc. [4]
- R2: Sc in every stitch. [4]
Fasten off and leave a sewing tail. Flatten each arm gently.
Feet — white, make two and do not stuff
- R1: Magic ring, 4 sc. [4]
- R2: Sc in every stitch. [4]
Fasten off and leave a sewing tail. Make the second foot immediately so both pieces match.
Round Tail — white, make one
- R1: Magic ring, 6 sc. [6]
- R2: Increase in every stitch. [12]
- R3: Decrease 6 times. [6]
Stuff very lightly, fasten off, and leave a tail for sewing to the back of the body.
Mini Bunny Amigurumi Keychain Pattern Step-by-Step Tutorial
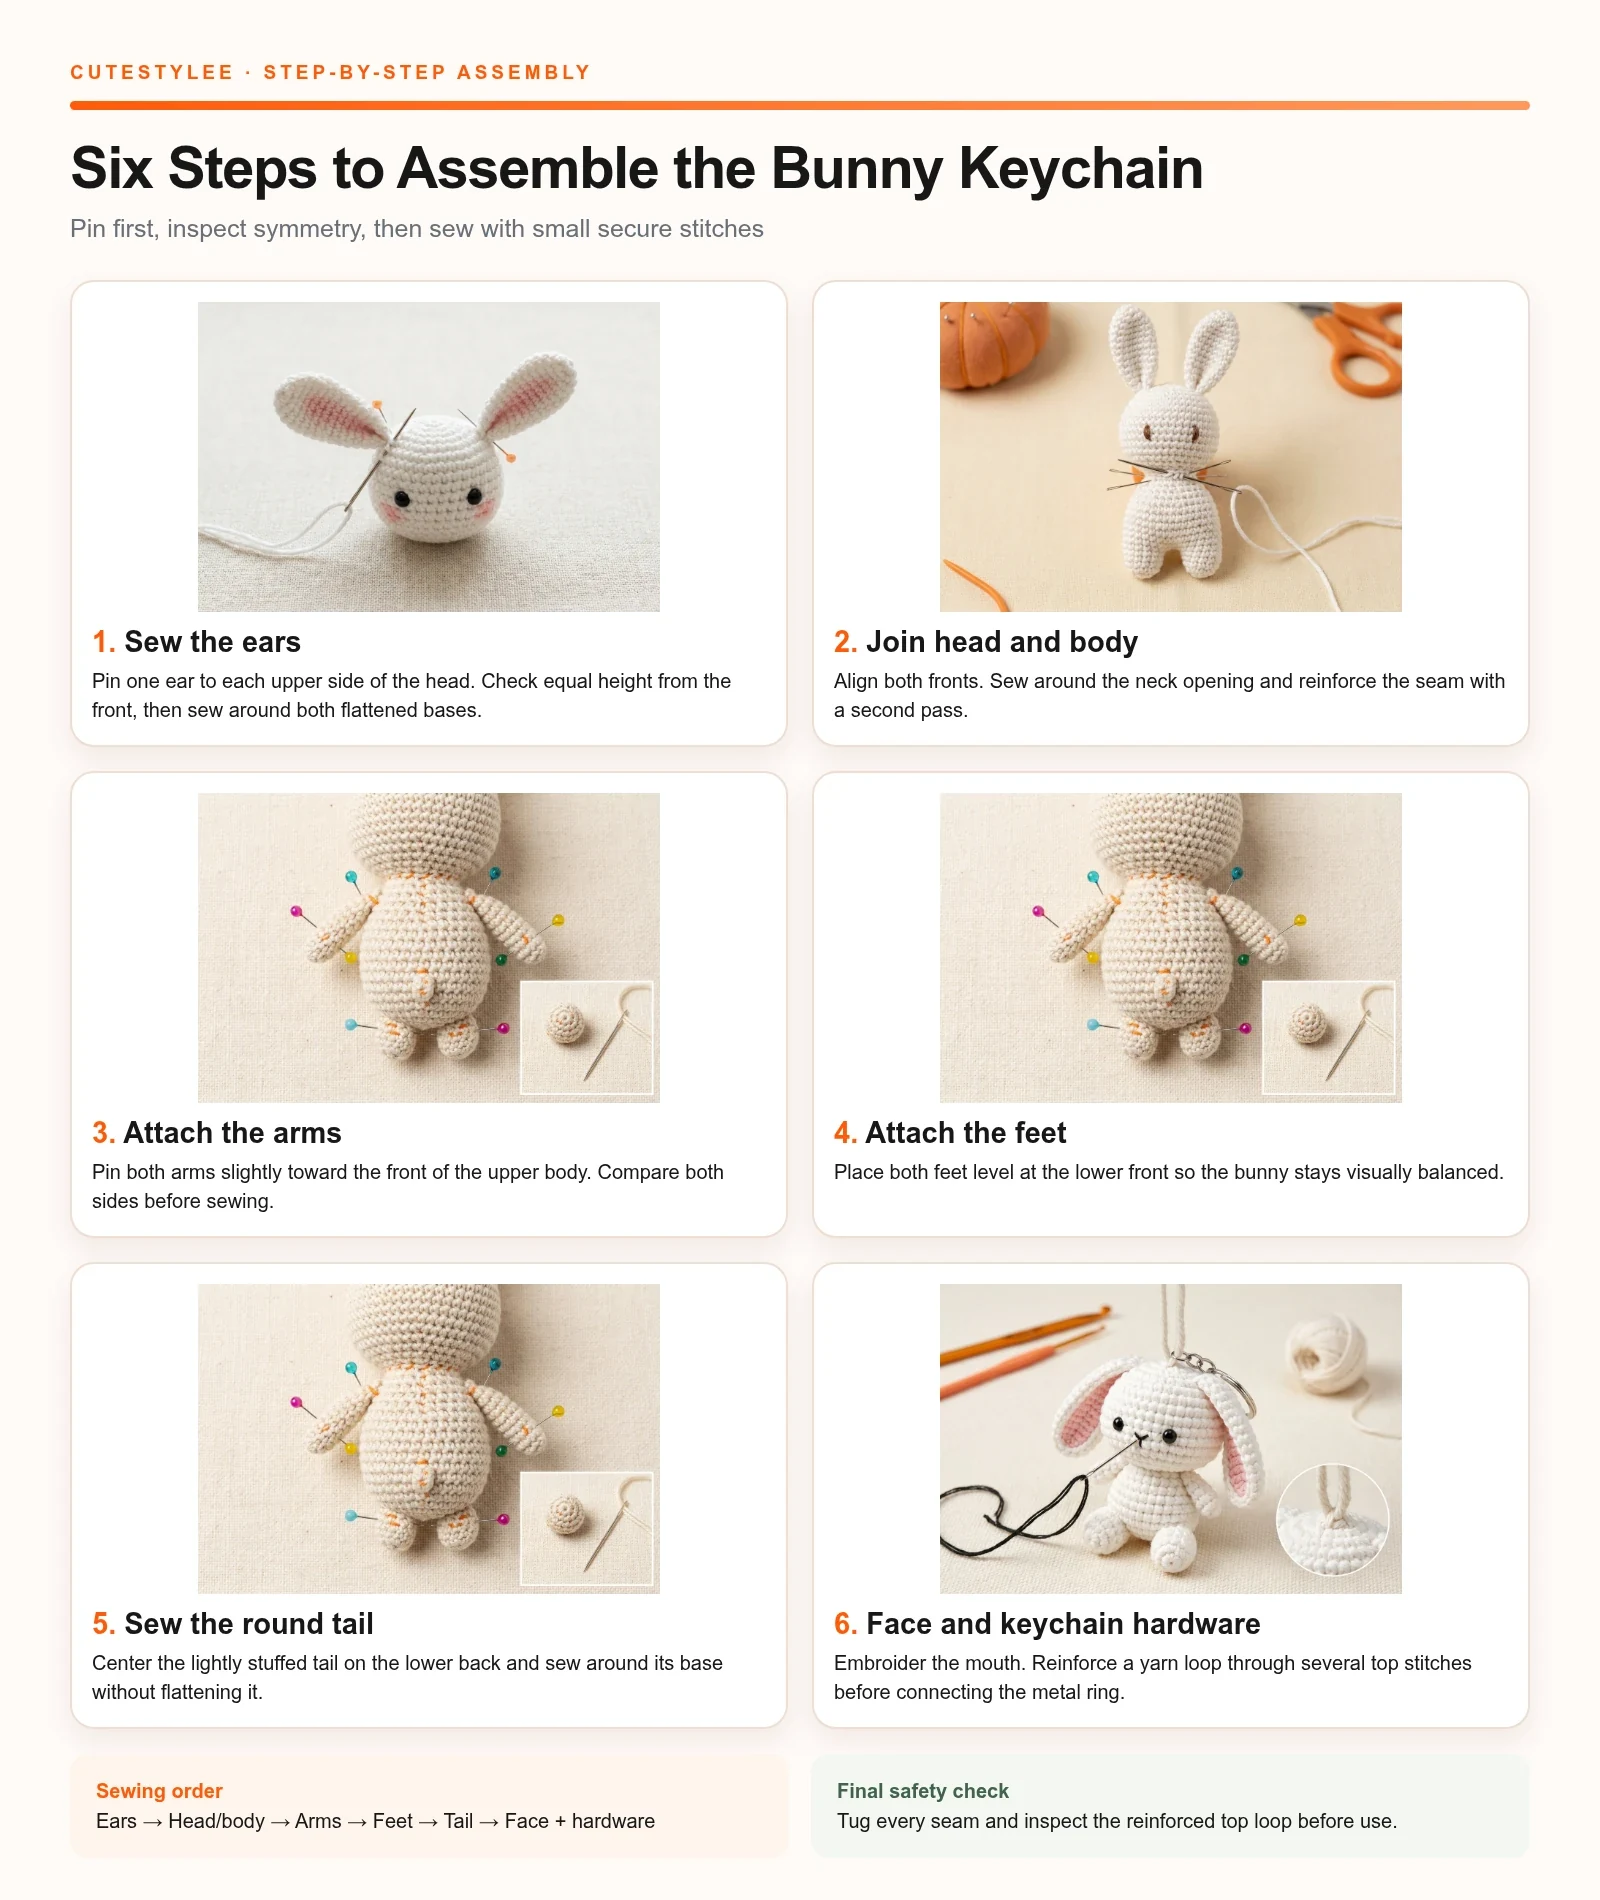
Lay out every completed piece before beginning the mini bunny amigurumi keychain pattern assembly. The supplied diagram gives a six-step order: ears, head and body, arms, feet, tail, then face and hardware.
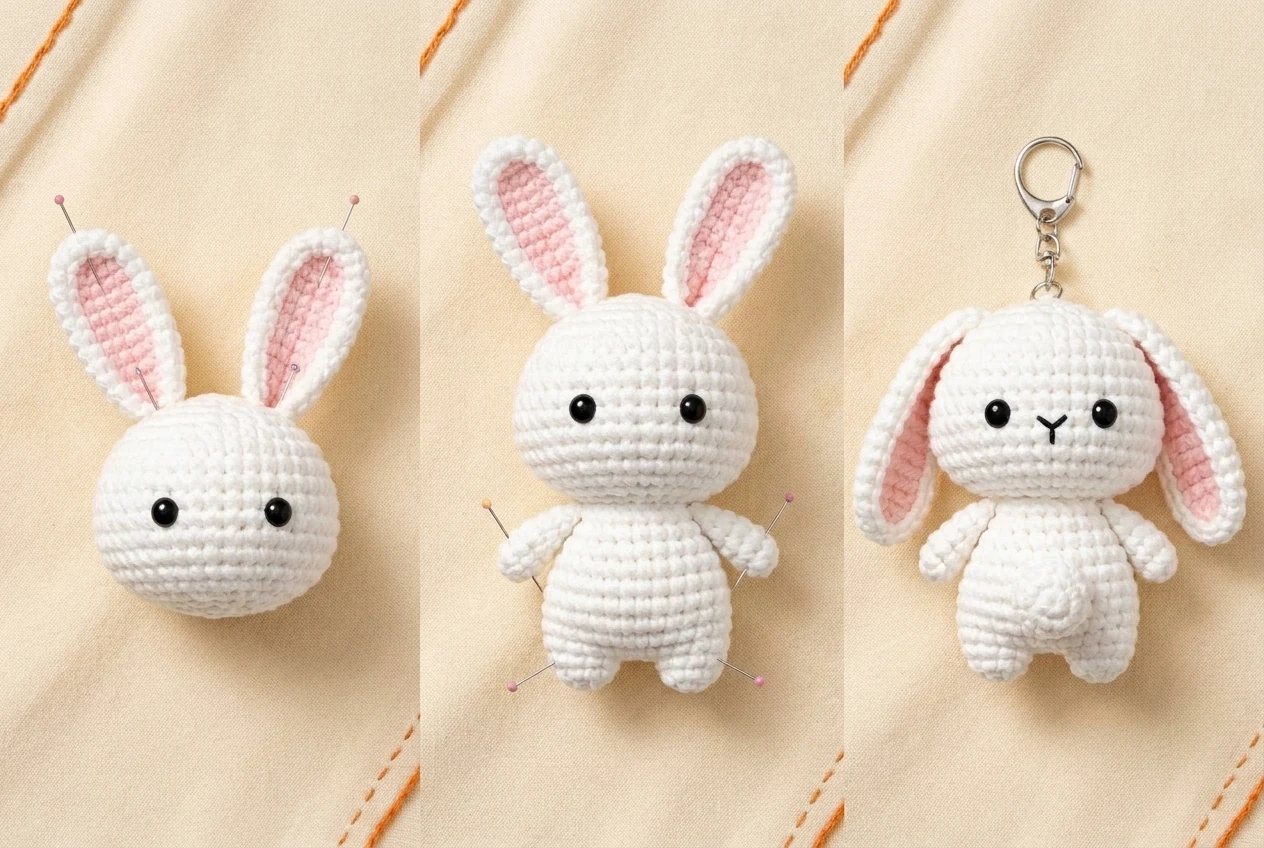
Step 1 — Mini Bunny Amigurumi Keychain Pattern: Sew the ears
Pin one ear on each upper side of the head. View the head from the front and check that the ear bases sit at the same height. Sew around each flattened base with small stitches, hiding the final knot inside the head.
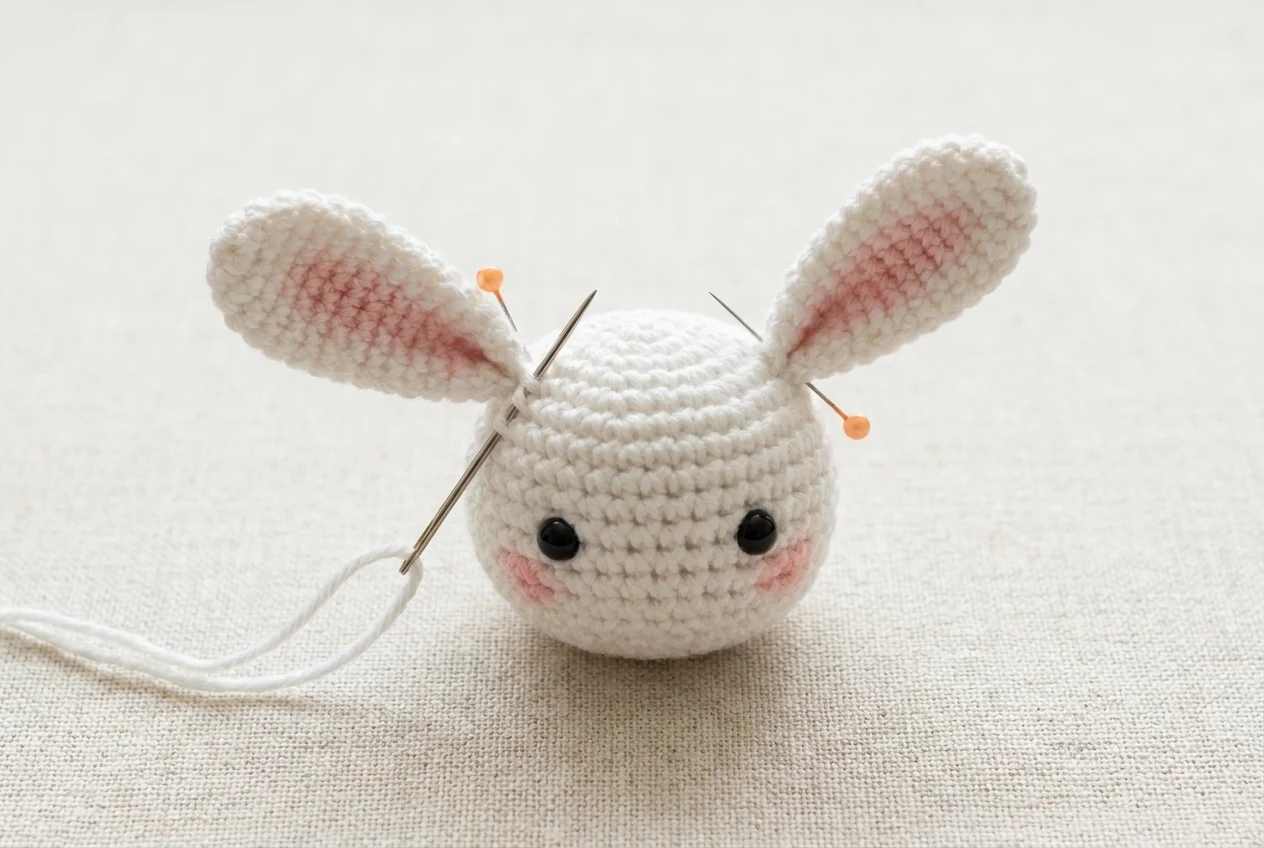
Step 2 — Mini Bunny Amigurumi Keychain Pattern: Join head and body
Place the head directly above the stuffed body with the front of both pieces aligned. Sew around the neck opening one full time, then reinforce the join with a second pass so the keychain can handle gentle movement.
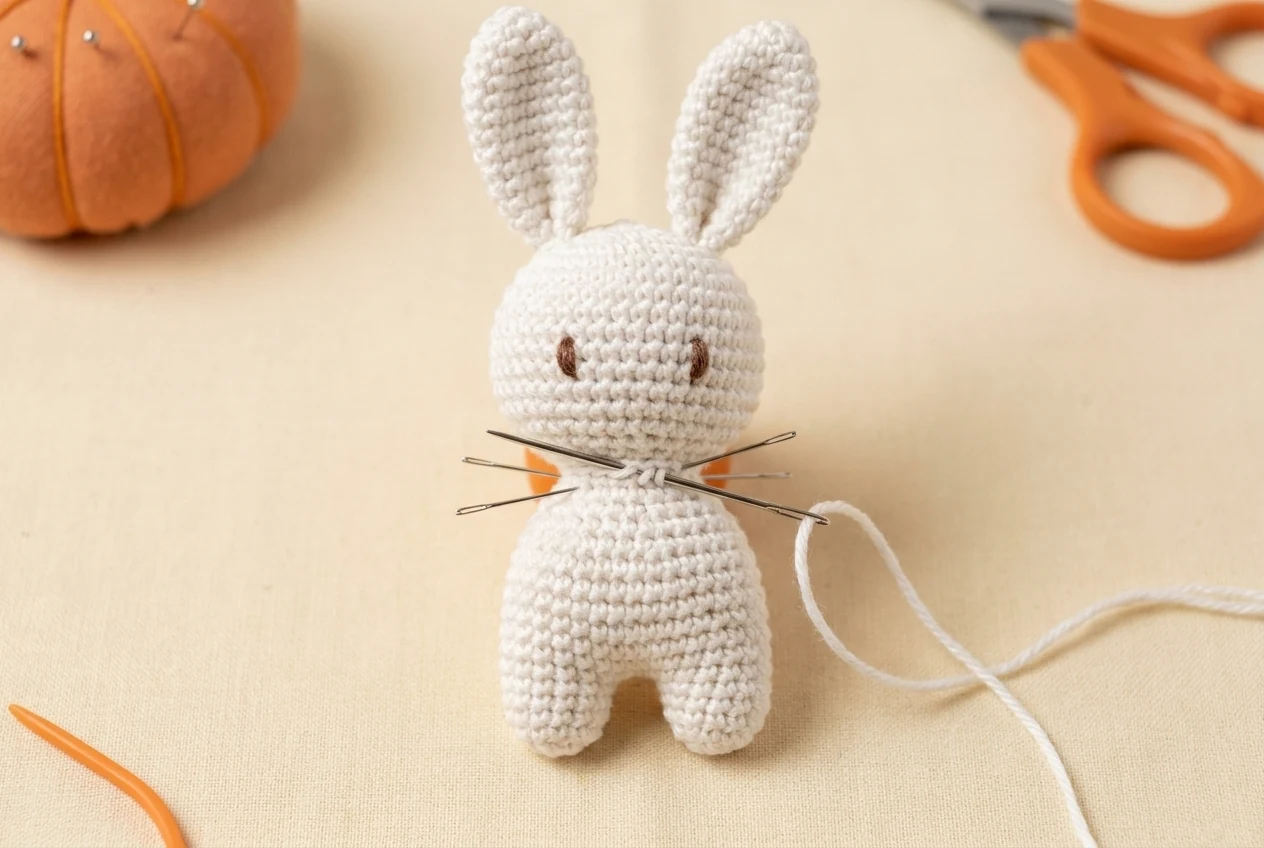
Step 3 — Mini Bunny Amigurumi Keychain Pattern: Attach the arms
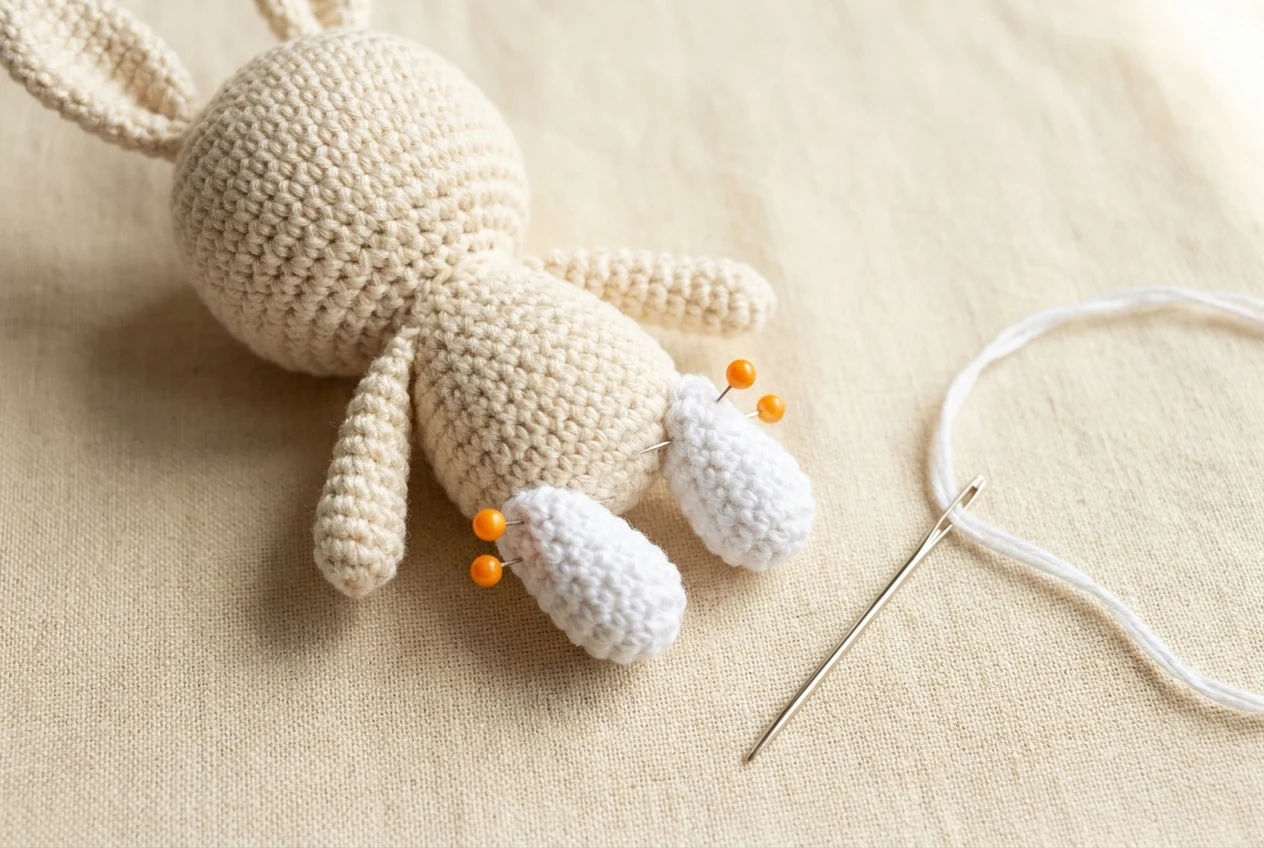
Pin the arms to the upper sides of the body, slightly toward the front as shown in the assembly diagram. Check symmetry from the front and side, then sew each flattened arm securely.
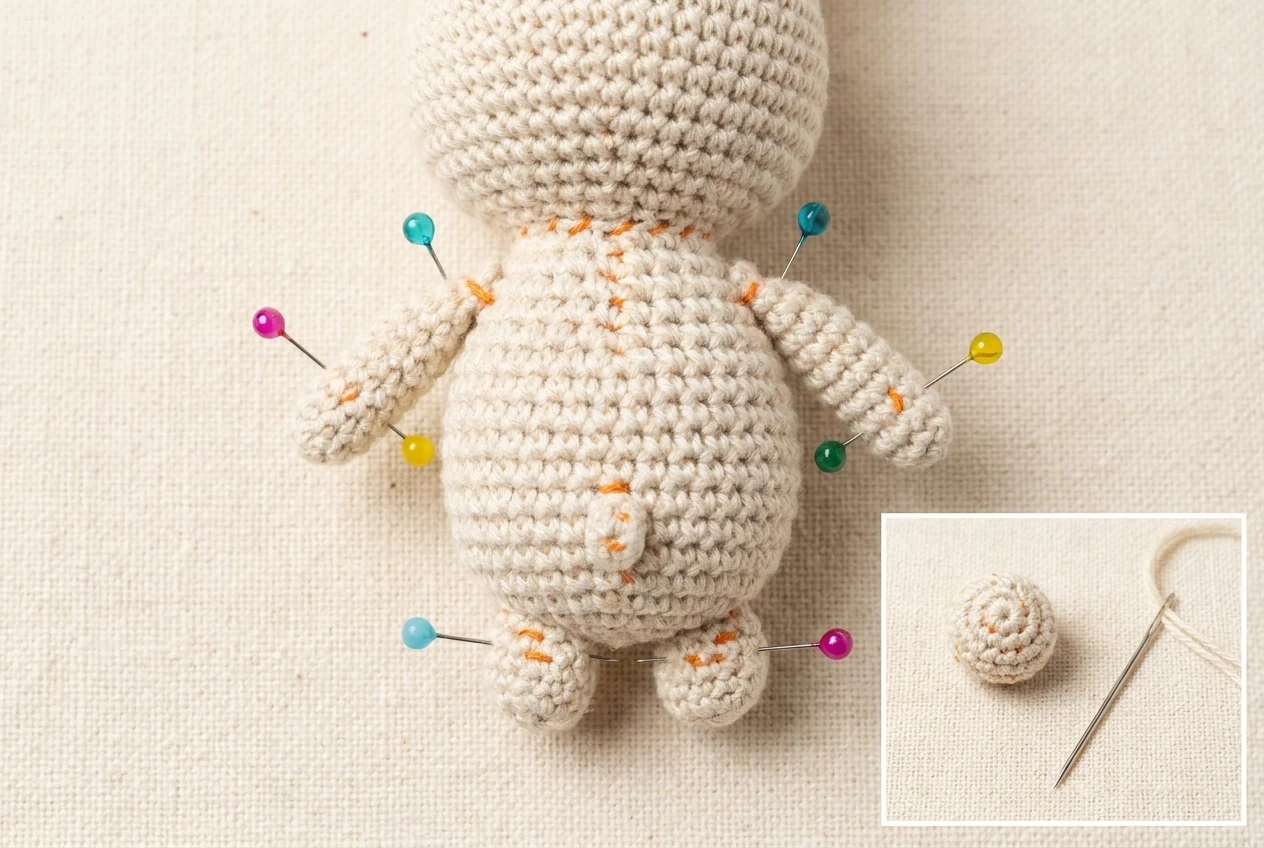
Step 4 — Mini Bunny Amigurumi Keychain Pattern: Attach the feet
Sew the feet to the lower front of the body. Keep the pair level so the bunny looks balanced. Pass the sewing thread through several body stitches before trimming the tail.
Step 5 — Mini Bunny Amigurumi Keychain Pattern: Add the tail
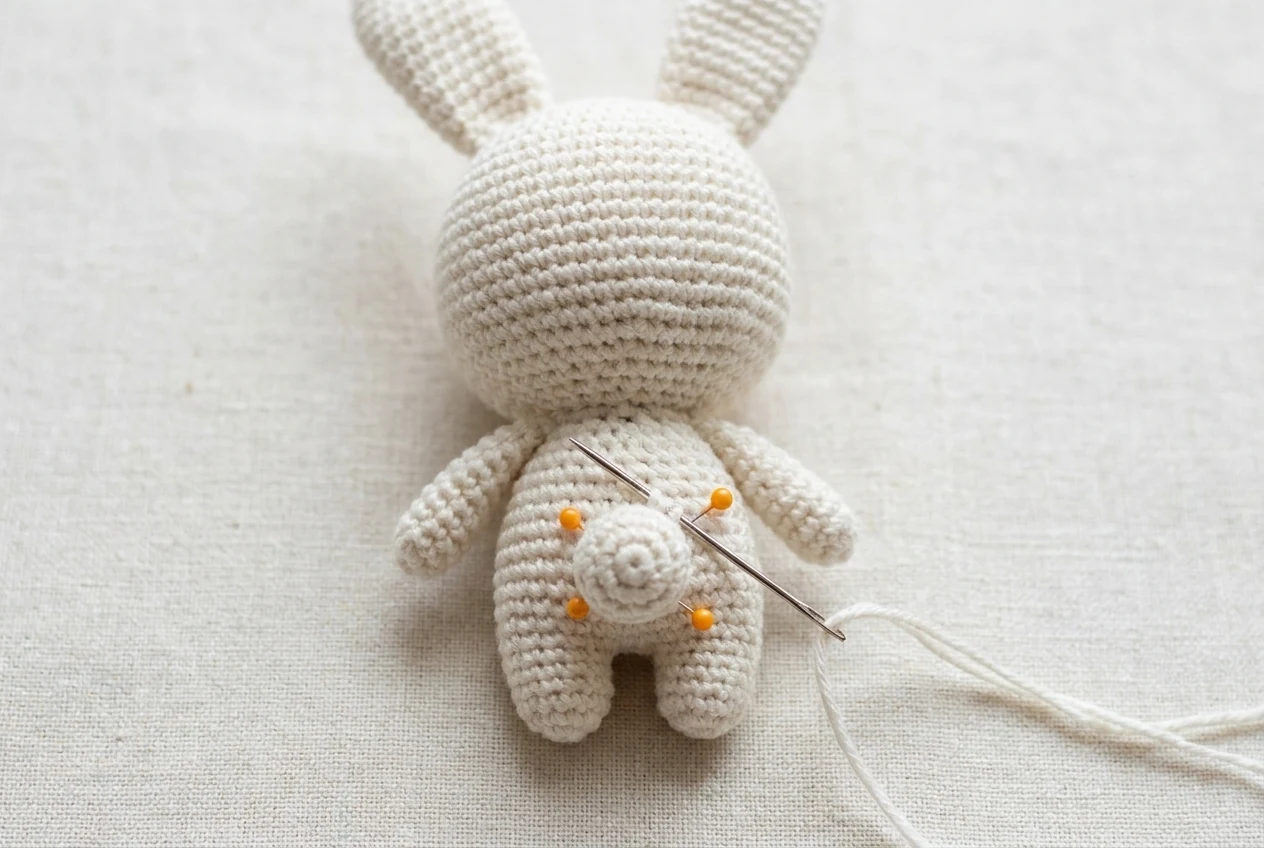
Center the round tail on the lower back of the body. Sew around its base, keeping the small stuffed shape rounded. Check that the tail does not twist the body sideways.
Step 6 — Mini Bunny Amigurumi Keychain Pattern: Finish the face and hardware
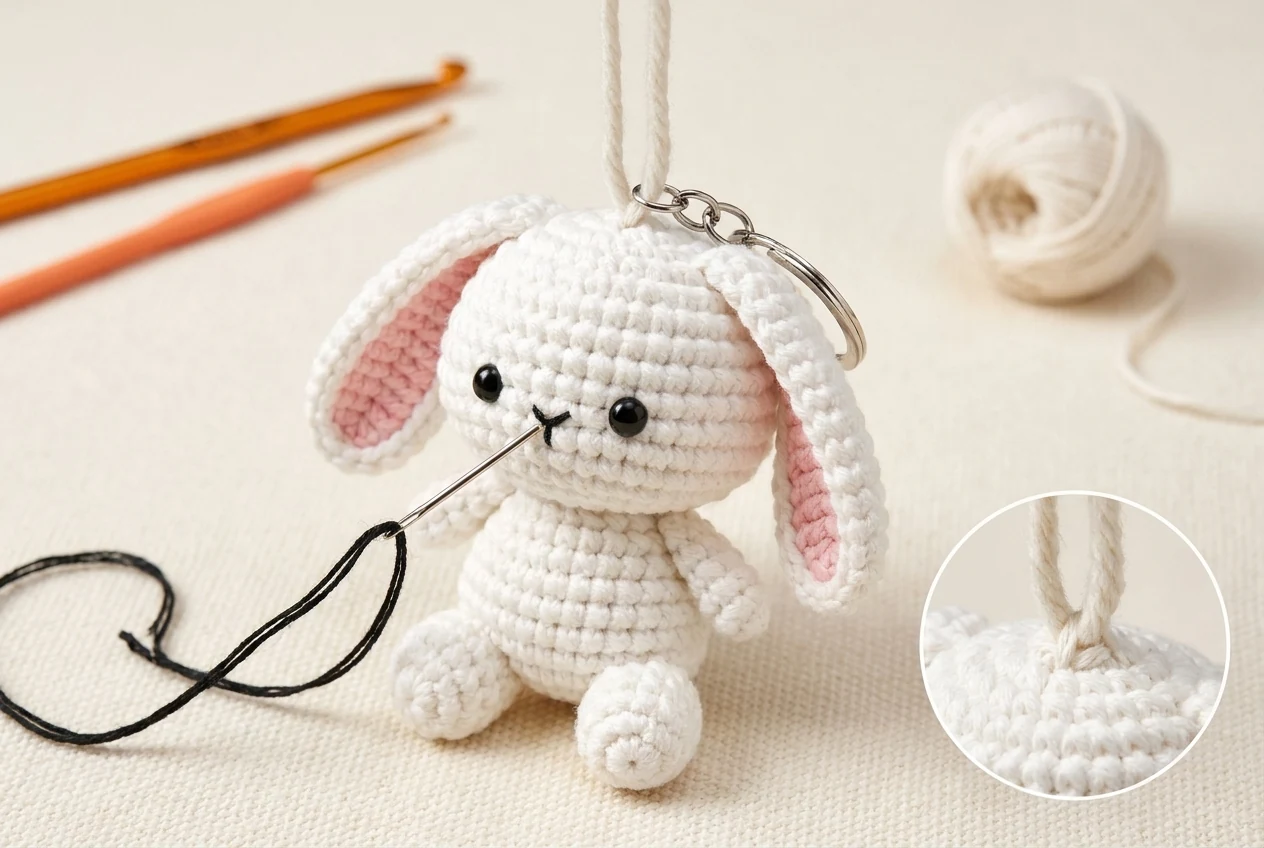
Use black embroidery thread to stitch a small mouth. If the keychain is intended for a child, embroider the eyes as well. Attach the keychain ring or short chain at the top center of the head through several strong crochet stitches, not through a single loop.
Beginner Tips
The mini bunny amigurumi keychain pattern becomes neater when you focus on round counts and controlled stuffing rather than speed.
- Work continuously without slip stitching at the end of each round.
- Keep the stitch marker in the first stitch at all times.
- Stuff a little at a time so the head and body stay smooth and rounded.
- Pull decrease stitches snugly to prevent visible gaps.
- Roll each stuffed piece gently between your palms to smooth lumps.
- Leave generous sewing tails; short tails are difficult to secure on tiny pieces.
- Compare matching ears, arms, and feet before assembly.
- Pin first, then inspect the bunny from the front, side, and back.
Finishing and Safety
Finishing the mini bunny amigurumi keychain pattern carefully is especially important because a keychain receives more movement than a display toy. Weave each tail through several stitches, reverse direction once, and trim only after tug-testing the join.
If you use safety eyes, remember that “safety” eyes can still detach and are not suitable for babies or children who may mouth the item. Embroidered eyes are the safer choice for a child’s accessory. Inspect the metal clasp, jump ring, and top attachment regularly. Stop using the keychain if the yarn frays or the hardware opens.
Do not overload the bunny with a heavy bundle of keys. The crocheted top attachment is best for a light bag charm, zipper charm, or decorative keychain.
Troubleshooting
The head is not round
Count every increase and decrease round in the mini bunny amigurumi keychain pattern. Uneven stuffing can also distort the shape, so add small tufts and smooth them around the inside wall.
Stuffing shows between stitches
Your hook may be too large, your tension may be loose, or the piece may be overfilled. Try the specified 2.0 mm hook with the 4-ply cotton and stop adding fiberfill before the stitches stretch apart.
One ear is longer
Make the second ear immediately after the first and compare after every round. Check that both ears finish with four stitches and are flattened in the same direction.
The body hangs crooked
The head-to-body seam or hardware attachment may be off-center. Find the front and back center lines, repin the join, and distribute the sewing stitches evenly.
The keychain loop feels weak
Do not attach metal hardware to one crochet stitch. Pass a strong yarn loop through several stitches at the top center, knot it inside the head, and connect the hardware to that reinforced loop.
FAQ
Open a question for a concise answer about skill level, time, size, colors, and safe use.
Final Checklist
- All round totals match the written instructions.
- Head, body, and tail are stuffed smoothly without gaps.
- Ears, arms, and feet are paired and symmetrical.
- Mouth and optional embroidered eyes are secure.
- Tail is centered on the lower back.
- Keychain hardware is reinforced through several stitches.
- Every yarn tail is woven in and every join passes a gentle tug test.
The finished mini bunny amigurumi keychain pattern makes a charming small gift, bag charm, or quick crochet project. Save the tutorial with your project photos, then try another beginner-friendly keychain or amigurumi pattern.




