

BLACK CAT TOTE • REAL PROCESS PHOTOS • US CROCHET TERMS
Crochet Cat Bag Pattern: 10 Steps to a Charming Tote
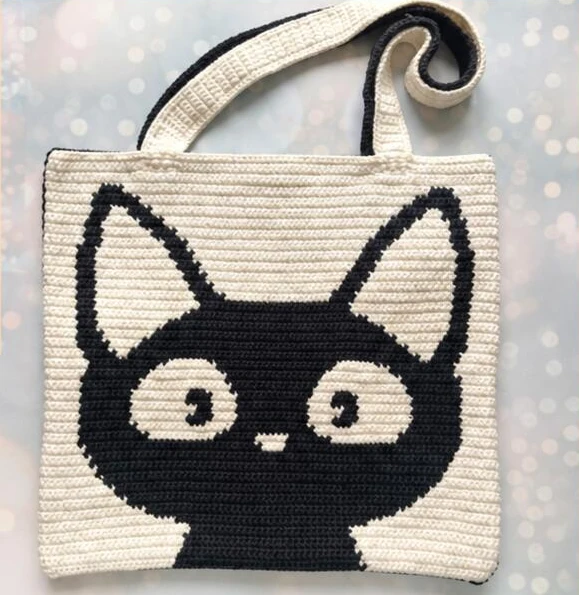
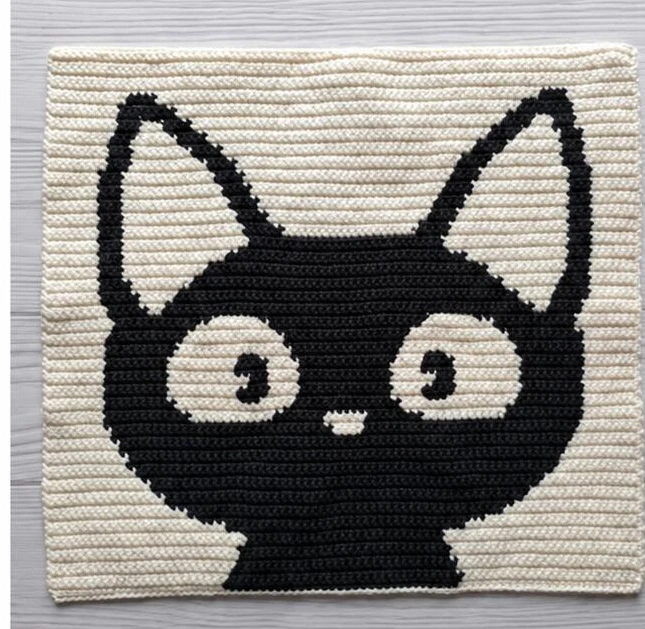
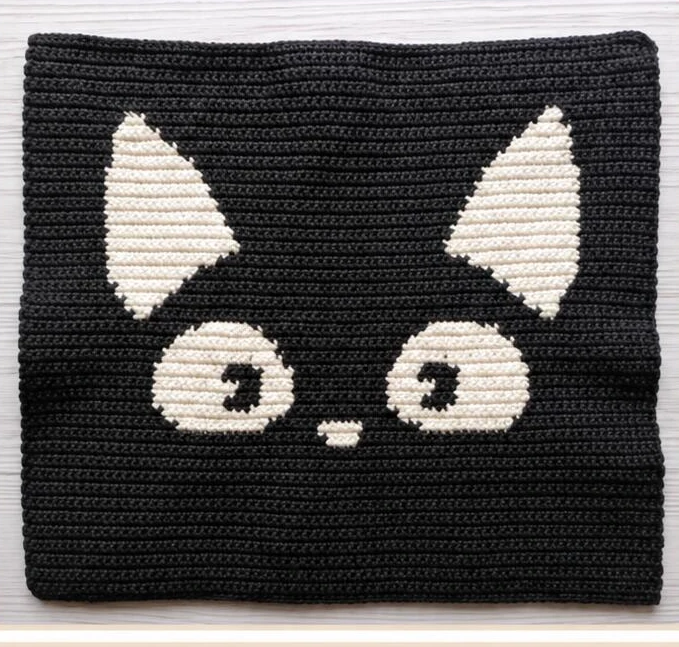
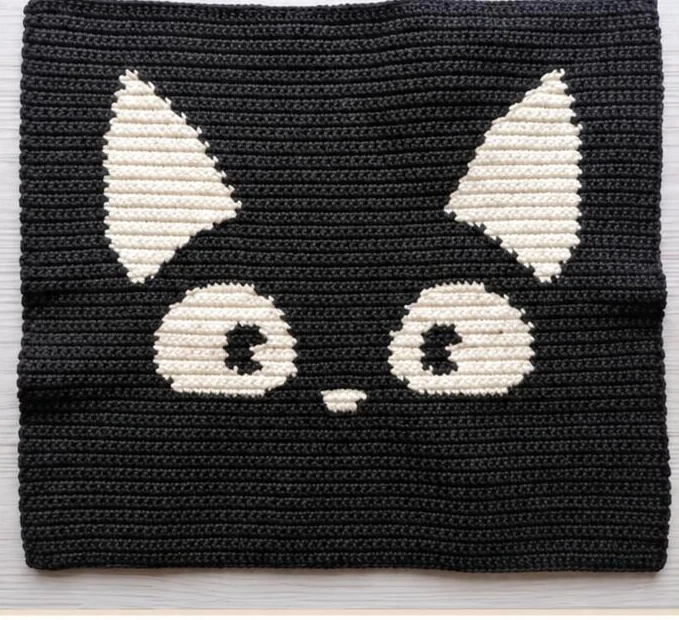
This crochet cat bag pattern makes a two-sided tote with a cream-and-black cat face on the front and cream features against black on the reverse. The ears, eyes, pupils, and little nose are worked directly into single-crochet fabric, so there is no separate face to sew on later.
Below, the supplied PDF is organized into ten practical stages, with its real close-up photographs beside the color-change instructions. Work the two panels flat, make one cream and one black handle, then sew everything together. Keep the printable pattern nearby if you prefer following the original page layout.
Step 1 — Gather the Materials
For the crochet cat bag pattern shown here, the PDF specifies DK / size 3 yarn and a 2.75 mm hook. Using those materials, it gives an approximate bag size of 31 cm (12.2 in) tall by 33 cm (about 13 in) wide. Your tension can change those measurements.
| Item | Source specification |
|---|---|
| Yarn | Alize Cotton Gold Pratica; 55% cotton / 45% acrylic |
| Ball label | 100 g (3.53 oz), 220 m (240 yd) per ball |
| Colors | Light cream 62 and black 60 |
| Hook | 2.75 mm crochet hook |
| Notions | Scissors, tapestry needle, and small bobbins or cardboard yarn holders |
Keep both yarns similar in thickness and behavior. Swapping only one color for a noticeably thicker yarn can make the cat features uneven. Make a small sample before starting the crochet cat bag pattern, especially if you are substituting the recommended yarn.
Step 2 — Read the Stitch and Color Key
The crochet cat bag pattern uses US terms: ch means chain and sc means single crochet. RS is the right side, which faces outward on the finished bag; WS is the wrong side. Each chart square equals one sc.
- C = light cream; B = black.
- C24 · B32 · C24 means 24 cream sc, 32 black sc, then 24 cream sc.
- Read the original graph from bottom to top: odd RS rows right to left, even WS rows left to right.
- The written sequences below are already in working order. Do not reverse the even rows again.
- At each row end, turn and ch 1. This turning chain does not count as a stitch.
Both panels in this crochet cat bag pattern have 80 stitches across and 80 rows. A row-count marker and a running note beside the printed chart are useful once the eyes introduce several small color blocks.
Step 3 — Prepare Bobbins and a Practice Swatch
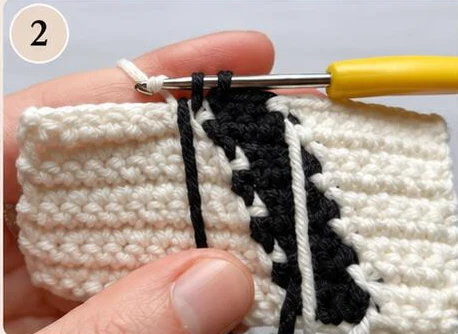
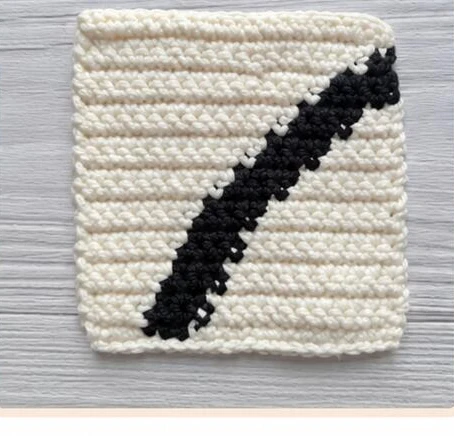
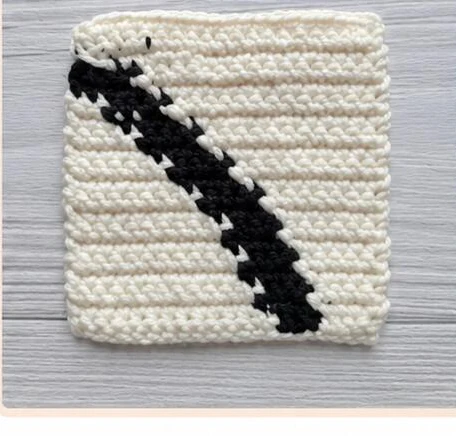
Intarsia uses separate yarn supplies for disconnected blocks of color. Wind small cream and black bobbins rather than carrying a long strand across the whole panel. The practice photographs in the crochet cat bag pattern show a diagonal stripe, not the first ten rows of the actual bag.
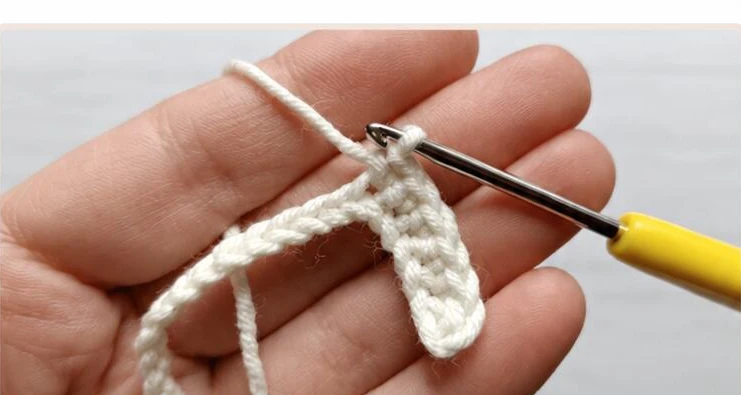
Use the sample to rehearse changing color and turning without tangling the yarn. Follow its diagonal placement visually, but do not use its stitch count for the tote. The actual panels begin with 81 chains and produce 80 sc in Row 1.
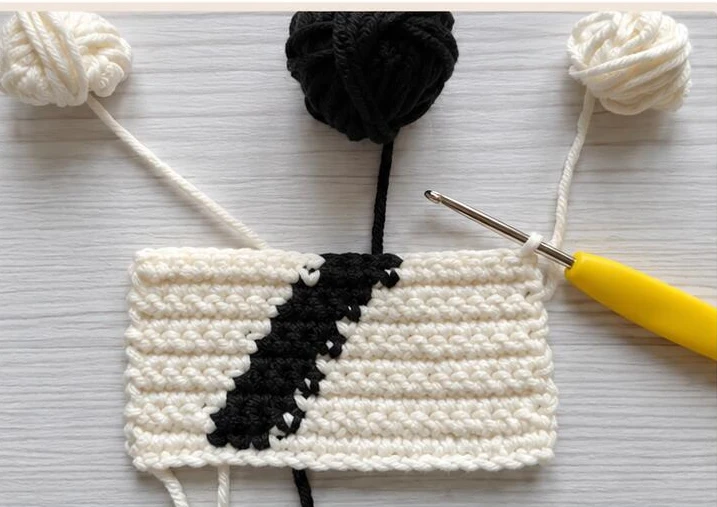
Before beginning the crochet cat bag pattern, decide where the wrong side is and keep every loose tail there. Turn the work consistently and untwist the bobbins whenever they start crossing. This small habit makes later rows much easier to manage.
Step 4 — Change Color on Right-Side Rows
The right-side sequence in the crochet cat bag pattern demonstrates the ninth row of the practice sample. At the last stitch before a new color block, insert the hook and draw up a loop in the old color. Complete the final pull-through with the new color; the next stitch is then ready to begin in that shade.
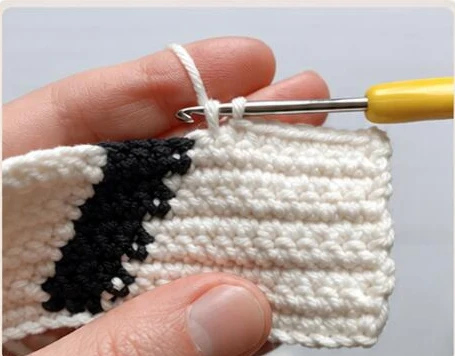
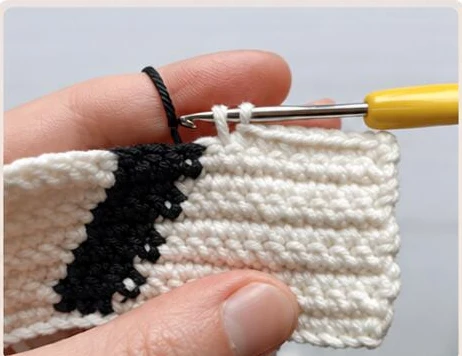
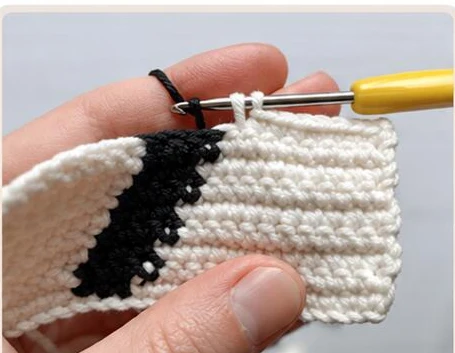
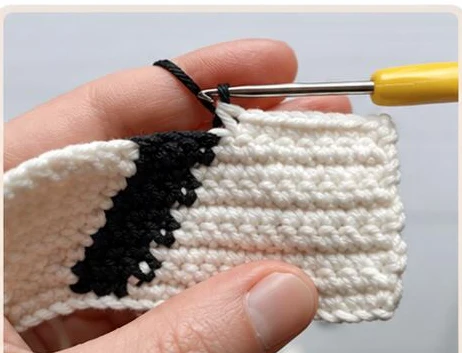
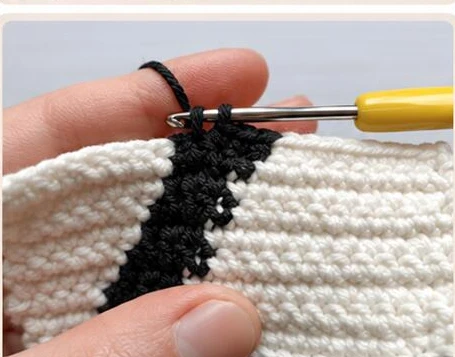
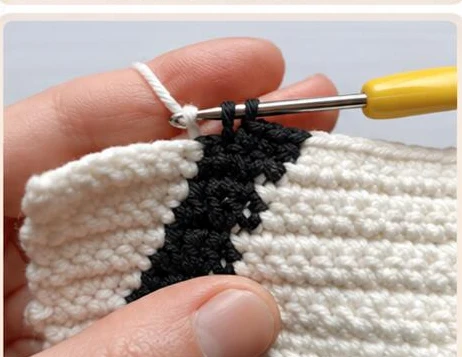
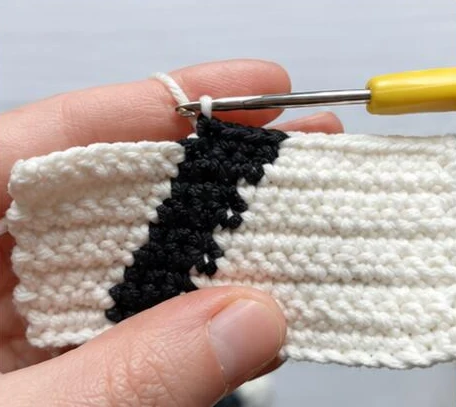
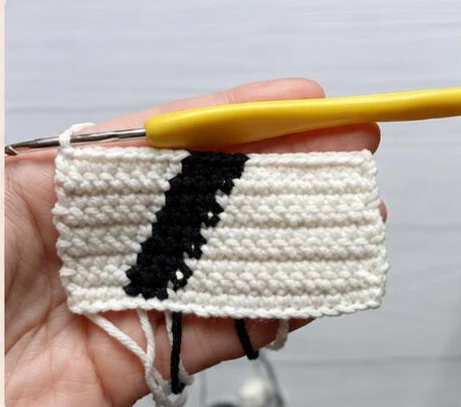
Follow the color sequence of your current row rather than copying the number of stitches visible in these close-ups. The crochet cat bag pattern needs a clean join, but pulling hard on either bobbin will narrow the fabric at that point.
Step 5 — Change Color on Wrong-Side Rows
After turning, the wrong side faces you. Keep the old yarn, the new yarn, and the loose ends on this side while changing color on the final pull-through. The tenth sample row in the crochet cat bag pattern shows how the strands sit while the cream and black sections are worked back across.
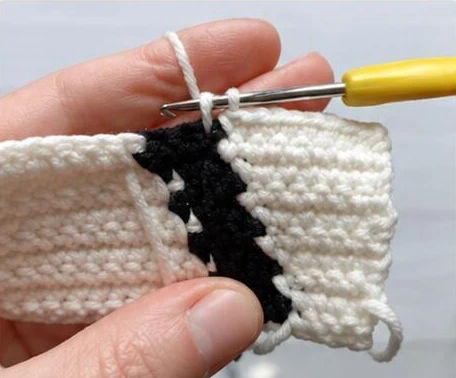
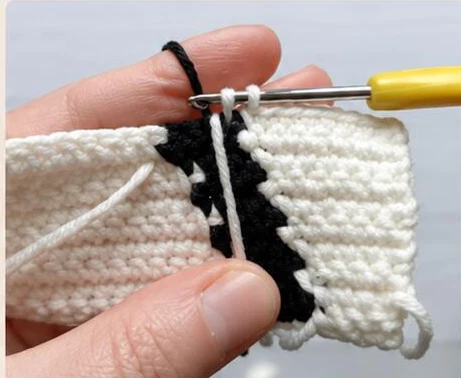
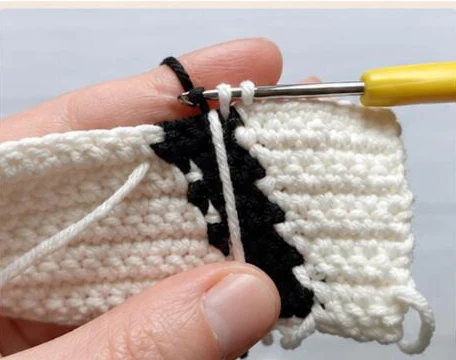
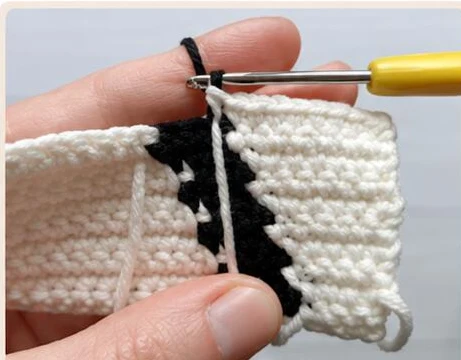
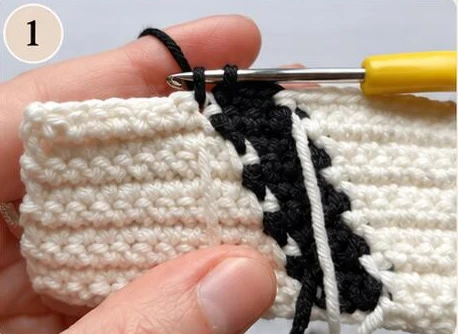
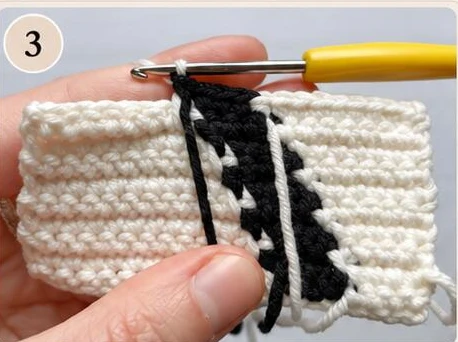
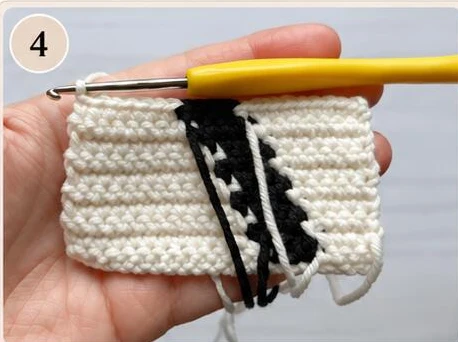
A common difficulty with the crochet cat bag pattern is letting a loose end drift to the outside after turning. Pause at each change and check the fabric face. Correct a misplaced strand immediately rather than hiding it under later stitches.
Step 6 — Check Tension and Finish the Tails
Lay the practice piece flat. The color boundary should lie smoothly rather than forming a tight ridge or an open ladder. In the crochet cat bag pattern, all tails are hidden on the wrong side with a tapestry needle. Work them into the fabric without pulling the sample out of shape.
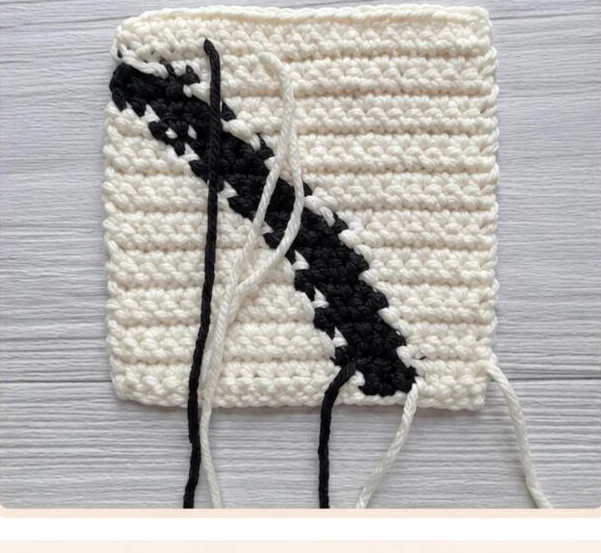
Use this check again as your crochet cat bag pattern project grows. Count 80 stitches before turning, inspect the edges, and untwist the bobbins. These are more useful checkpoints for the crochet cat bag pattern than trying to judge every curve from a small photograph.
Step 7 — Crochet the Cat-Face Front Panel
Start the front of the crochet cat bag pattern with 81 chains in light cream. Work Row 1 into the second chain from the hook and across the remaining chains. There are 80 sc in every row. Turn and ch 1 between rows; do not count that chain.
Front rows 1–28: shape the lower face
The lower section of the crochet cat bag pattern begins with a central black block, narrows briefly, then widens into the cheeks. Follow each row separately even when the shape seems symmetrical.
| Row | SC color sequence | Total |
|---|---|---|
| 1–2 | C24 · B32 · C24 | 80 |
| 3–4 | C25 · B30 · C25 | 80 |
| 5–7 | C26 · B28 · C26 | 80 |
| 8–9 | C27 · B26 · C27 | 80 |
| 10 | C24 · B32 · C24 | 80 |
| 11 | C21 · B38 · C21 | 80 |
| 12 | C19 · B42 · C19 | 80 |
| 13 | C17 · B46 · C17 | 80 |
| 14 | C16 · B48 · C16 | 80 |
| 15 | C15 · B50 · C15 | 80 |
| 16 | C14 · B52 · C14 | 80 |
| 17 | C13 · B54 · C13 | 80 |
| 18 | C12 · B56 · C12 | 80 |
| 19–20 | C11 · B58 · C11 | 80 |
| 21–22 | C10 · B60 · C10 | 80 |
| 23 | C9 · B62 · C9 | 80 |
| 24 | C9 · B29 · C4 · B29 · C9 | 80 |
| 25 | C8 · B29 · C6 · B29 · C8 | 80 |
| 26 | C8 · B11 · C11 · B7 · C6 · B7 · C11 · B11 · C8 | 80 |
| 27 | C8 · B10 · C14 · B16 · C14 · B10 · C8 | 80 |
| 28 | C8 · B9 · C16 · B14 · C16 · B9 · C8 | 80 |
Front rows 29–53: eyes and ear outlines
The eyes create short cream and black blocks. Keep a separate bobbin for each disconnected section in the crochet cat bag pattern rather than drawing a long float across the back. Rows 31 and 32 are not identical; use their listed working order.
| Row | SC color sequence | Total |
|---|---|---|
| 29 | C8 · B8 · C10 · B3 · C5 · B12 · C5 · B3 · C10 · B8 · C8 | 80 |
| 30 | C8 · B8 · C9 · B5 · C4 · B12 · C4 · B5 · C9 · B8 · C8 | 80 |
| 31 | C8 · B8 · C9 · B3 · C6 · B12 · C4 · B3 · C11 · B8 · C8 | 80 |
| 32 | C8 · B8 · C11 · B3 · C4 · B12 · C6 · B3 · C9 · B8 · C8 | 80 |
| 33–34 | C8 · B8 · C9 · B5 · C4 · B12 · C4 · B5 · C9 · B8 · C8 | 80 |
| 35 | C8 · B8 · C10 · B3 · C4 · B14 · C4 · B3 · C10 · B8 · C8 | 80 |
| 36 | C8 · B9 · C16 · B14 · C16 · B9 · C8 | 80 |
| 37 | C8 · B9 · C15 · B16 · C15 · B9 · C8 | 80 |
| 38 | C8 · B10 · C14 · B16 · C14 · B10 · C8 | 80 |
| 39 | C9 · B10 · C12 · B18 · C12 · B10 · C9 | 80 |
| 40 | C9 · B11 · C10 · B20 · C10 · B11 · C9 | 80 |
| 41 | C9 · B13 · C7 · B22 · C7 · B13 · C9 | 80 |
| 42 | C8 · B5 · C2 · B50 · C2 · B5 · C8 | 80 |
| 43 | C8 · B4 · C4 · B48 · C4 · B4 · C8 | 80 |
| 44 | C7 · B5 · C5 · B46 · C5 · B5 · C7 | 80 |
| 45 | C7 · B4 · C7 · B44 · C7 · B4 · C7 | 80 |
| 46 | C7 · B4 · C8 · B42 · C8 · B4 · C7 | 80 |
| 47 | C7 · B3 · C10 · B40 · C10 · B3 · C7 | 80 |
| 48 | C7 · B3 · C11 · B38 · C11 · B3 · C7 | 80 |
| 49 | C7 · B3 · C12 · B36 · C12 · B3 · C7 | 80 |
| 50 | C7 · B3 · C14 · B32 · C14 · B3 · C7 | 80 |
| 51 | C7 · B3 · C16 · B28 · C16 · B3 · C7 | 80 |
| 52–53 | C7 · B3 · C17 · B26 · C17 · B3 · C7 | 80 |
Front rows 54–80: finish the ears and top edge
The ear outlines taper as the cream background opens between them. The final six rows of the crochet cat bag pattern front are entirely cream. Fasten off after Row 80 and hide the final tail on the wrong side.
| Row | SC color sequence | Total |
|---|---|---|
| 54 | C7 · B3 · C16 · B5 · C18 · B5 · C16 · B3 · C7 | 80 |
| 55 | C7 · B3 · C16 · B4 · C20 · B4 · C16 · B3 · C7 | 80 |
| 56 | C7 · B3 · C15 · B4 · C22 · B4 · C15 · B3 · C7 | 80 |
| 57 | C7 · B3 · C15 · B3 · C24 · B3 · C15 · B3 · C7 | 80 |
| 58 | C7 · B3 · C14 · B4 · C24 · B4 · C14 · B3 · C7 | 80 |
| 59 | C7 · B3 · C14 · B3 · C26 · B3 · C14 · B3 · C7 | 80 |
| 60 | C7 · B3 · C13 · B4 · C26 · B4 · C13 · B3 · C7 | 80 |
| 61 | C7 · B3 · C13 · B3 · C28 · B3 · C13 · B3 · C7 | 80 |
| 62 | C7 · B3 · C12 · B4 · C28 · B4 · C12 · B3 · C7 | 80 |
| 63 | C7 · B3 · C12 · B3 · C30 · B3 · C12 · B3 · C7 | 80 |
| 64 | C8 · B3 · C10 · B4 · C30 · B4 · C10 · B3 · C8 | 80 |
| 65 | C8 · B3 · C9 · B4 · C32 · B4 · C9 · B3 · C8 | 80 |
| 66 | C8 · B3 · C8 · B4 · C34 · B4 · C8 · B3 · C8 | 80 |
| 67 | C8 · B3 · C7 · B4 · C36 · B4 · C7 · B3 · C8 | 80 |
| 68 | C8 · B3 · C6 · B4 · C38 · B4 · C6 · B3 · C8 | 80 |
| 69 | C9 · B3 · C4 · B4 · C40 · B4 · C4 · B3 · C9 | 80 |
| 70 | C9 · B3 · C3 · B4 · C42 · B4 · C3 · B3 · C9 | 80 |
| 71 | C9 · B3 · C2 · B4 · C44 · B4 · C2 · B3 · C9 | 80 |
| 72 | C9 · B8 · C46 · B8 · C9 | 80 |
| 73 | C9 · B7 · C48 · B7 · C9 | 80 |
| 74 | C10 · B4 · C52 · B4 · C10 | 80 |
| 75–80 | C80 | 80 |
Step 8 — Crochet the Black Back Panel
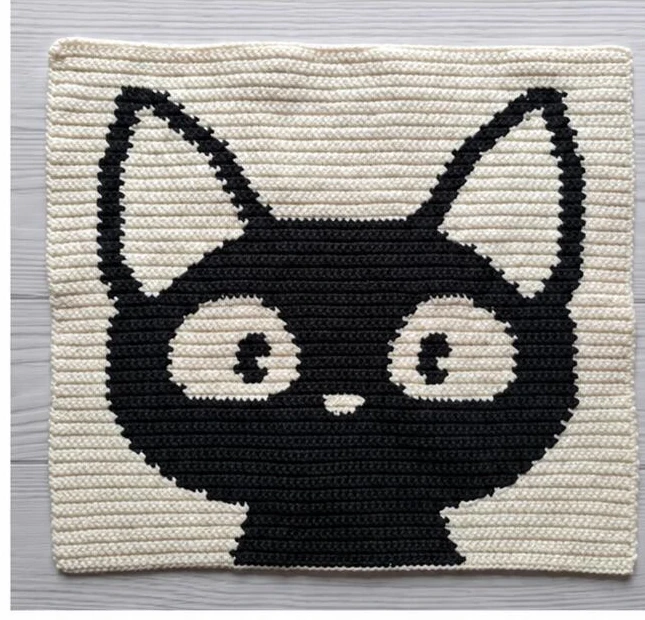
Begin the back of the crochet cat bag pattern with 81 chains in black. Starting in the second chain from the hook, work 80 sc for Row 1. Keep the same turning method and the same 80-stitch width throughout.
The back of the crochet cat bag pattern is not a plain black rectangle: the cream ears, eyes, and nose are worked into the fabric. Use the separate back sequences below. Reversing the front colors would add outlines that are not part of this panel.
Back rows 1–28: black base and the first cream details
| Row | SC color sequence | Total |
|---|---|---|
| 1–23 | B80 | 80 |
| 24 | B38 · C4 · B38 | 80 |
| 25 | B37 · C6 · B37 | 80 |
| 26 | B19 · C11 · B7 · C6 · B7 · C11 · B19 | 80 |
| 27 | B18 · C14 · B16 · C14 · B18 | 80 |
| 28 | B17 · C16 · B14 · C16 · B17 | 80 |
Back rows 29–53: form the eyes and ears
Match the row number carefully before each change. As with the front of the crochet cat bag pattern, the asymmetric eye details on Rows 31 and 32 need the exact written order.
| Row | SC color sequence | Total |
|---|---|---|
| 29 | B16 · C10 · B3 · C5 · B12 · C5 · B3 · C10 · B16 | 80 |
| 30 | B16 · C9 · B5 · C4 · B12 · C4 · B5 · C9 · B16 | 80 |
| 31 | B16 · C9 · B3 · C6 · B12 · C4 · B3 · C11 · B16 | 80 |
| 32 | B16 · C11 · B3 · C4 · B12 · C6 · B3 · C9 · B16 | 80 |
| 33–34 | B16 · C9 · B5 · C4 · B12 · C4 · B5 · C9 · B16 | 80 |
| 35 | B16 · C10 · B3 · C4 · B14 · C4 · B3 · C10 · B16 | 80 |
| 36 | B17 · C16 · B14 · C16 · B17 | 80 |
| 37 | B17 · C15 · B16 · C15 · B17 | 80 |
| 38 | B18 · C14 · B16 · C14 · B18 | 80 |
| 39 | B19 · C12 · B18 · C12 · B19 | 80 |
| 40 | B20 · C10 · B20 · C10 · B20 | 80 |
| 41 | B22 · C7 · B22 · C7 · B22 | 80 |
| 42 | B13 · C2 · B50 · C2 · B13 | 80 |
| 43 | B12 · C4 · B48 · C4 · B12 | 80 |
| 44 | B12 · C5 · B46 · C5 · B12 | 80 |
| 45 | B11 · C7 · B44 · C7 · B11 | 80 |
| 46 | B11 · C8 · B42 · C8 · B11 | 80 |
| 47 | B10 · C10 · B40 · C10 · B10 | 80 |
| 48 | B10 · C11 · B38 · C11 · B10 | 80 |
| 49 | B10 · C12 · B36 · C12 · B10 | 80 |
| 50 | B10 · C14 · B32 · C14 · B10 | 80 |
| 51 | B10 · C16 · B28 · C16 · B10 | 80 |
| 52–53 | B10 · C17 · B26 · C17 · B10 | 80 |
Back rows 54–80: taper the cream sections
| Row | SC color sequence | Total |
|---|---|---|
| 54–55 | B10 · C16 · B28 · C16 · B10 | 80 |
| 56–57 | B10 · C15 · B30 · C15 · B10 | 80 |
| 58–59 | B10 · C14 · B32 · C14 · B10 | 80 |
| 60–61 | B10 · C13 · B34 · C13 · B10 | 80 |
| 62–63 | B10 · C12 · B36 · C12 · B10 | 80 |
| 64 | B11 · C10 · B38 · C10 · B11 | 80 |
| 65 | B11 · C9 · B40 · C9 · B11 | 80 |
| 66 | B11 · C8 · B42 · C8 · B11 | 80 |
| 67 | B11 · C7 · B44 · C7 · B11 | 80 |
| 68 | B11 · C6 · B46 · C6 · B11 | 80 |
| 69 | B12 · C4 · B48 · C4 · B12 | 80 |
| 70 | B12 · C3 · B50 · C3 · B12 | 80 |
| 71 | B12 · C2 · B52 · C2 · B12 | 80 |
| 72–80 | B80 | 80 |
After Row 80, fasten off and weave in the tail. Compare the two panels from the crochet cat bag pattern without stretching either one. Their top and bottom edges should align before you begin seaming.
Step 9 — Make the Cream and Black Handles
The crochet cat bag pattern photographs show one cream handle and one black handle. Work the same five-stitch strip in each color. Leave a long tail at the beginning and, after the edging, another tail for sewing.
| Stage | Instructions |
|---|---|
| Foundation | Ch 6 in the chosen color. |
| Row 1 | Starting in the second chain from the hook, work 5 sc; turn. |
| Rows 2–135 | Ch 1, work 5 sc; turn. |
| Row 136 | Ch 1, work 5 sc. Keep the yarn attached. |
| Edging | Work one round of sc around the entire handle. Fasten off with a sewing tail. |
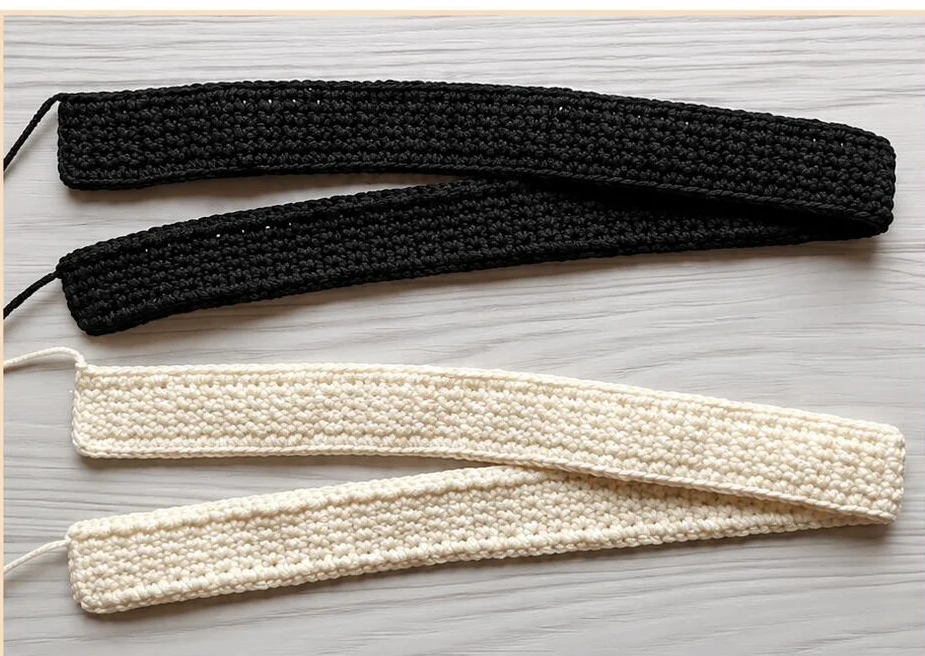
The stated handle length in the crochet cat bag pattern is approximately 60 cm (23.6 in) with the listed materials. Adjust the number of strip rows if you want a different length, but keep the two handles equal. The crochet cat bag pattern does not give an exact edging stitch total or corner count.
Step 10 — Sew the Panels and Attach the Handles
Place the right sides of the panels together so the wrong sides face outward. Match the lower corners and row ends. The crochet cat bag pattern specifies a running stitch for joining; sew the sides and bottom while leaving the top opening unsewn.
- Pin or mark the matching corners before sewing.
- Sew along one side, across the bottom, and up the other side.
- Turn the tote so both right sides face outward.
- Position a handle on each face, keeping the ends level and the handles untwisted.
- Check that both handles sit evenly, then sew their ends securely to the bag.
- Hide remaining tails and inspect every attachment before using the tote.
The assembly page does not state exact handle spacing, overlap depth, or a load rating. Use the finished photographs of the crochet cat bag pattern as placement references, align both sides consistently, and avoid claiming a tested carrying capacity.
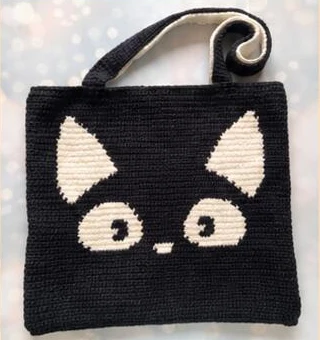
If you prefer another palette, keep a strong contrast between the background and facial details so the eyes remain readable. Changing yarn or hook size can change both the bag dimensions and handle length; the crochet cat bag pattern is not a graded size range.
For more projects, browse My Crochet Universe. To check US stitch terminology before you start, use the Craft Yarn Council crochet abbreviation reference.
Your Cat Tote, Ready for the Finishing Check
A neat crochet cat bag pattern result comes from steady stitch counts, relaxed joins, and matching panels. Before putting the bag to use, check the seam line, remove any visible loose ends, and make sure both handle attachments are secure. The contrasting cat faces are the detail to let shine.
Crochet Cat Bag Pattern FAQ
Is this crochet cat bag pattern suitable for a complete beginner?
The stitches are basic, but managing several bobbins and reading changing color sequences adds complexity. If you are new to colorwork, make the practice swatch first. No formal difficulty rating is stated in the PDF.
Are the close-up photos the first rows of the tote?
No. The close-ups show a small diagonal practice swatch for right-side and wrong-side color changes. The actual bag has 80 stitches and 80 rows in each panel.
How much yarn does the crochet cat bag pattern need?
The PDF lists 100 g / 220 m balls of DK yarn but does not give the total yarn requirement or number of balls. Ball size must not be presented as project consumption.
Does the turning chain count as a stitch?
No. Turn and ch 1 between rows, then keep 80 single crochets across each panel. The handles have 5 single crochets per row.
Why does front Row 43 differ from the written PDF list?
The list omits a black block. The numerical graph on page 14 supplies C8 · B4 · C4 · B48 · C4 · B4 · C8, which totals 80. This guide uses that graph-supported correction.
Can I change the size of the crochet cat bag pattern?
A different yarn or hook can scale the finished fabric, but the source provides no graded sizes or gauge. Make a sample, check the resulting dimensions, and keep the front and back counts matched.




