

TINY TOT • FIVE SIZES • STEP-BY-STEP TUTORIAL
Crochet Baby Romper Pattern: Tiny Tot in 5 Sizes
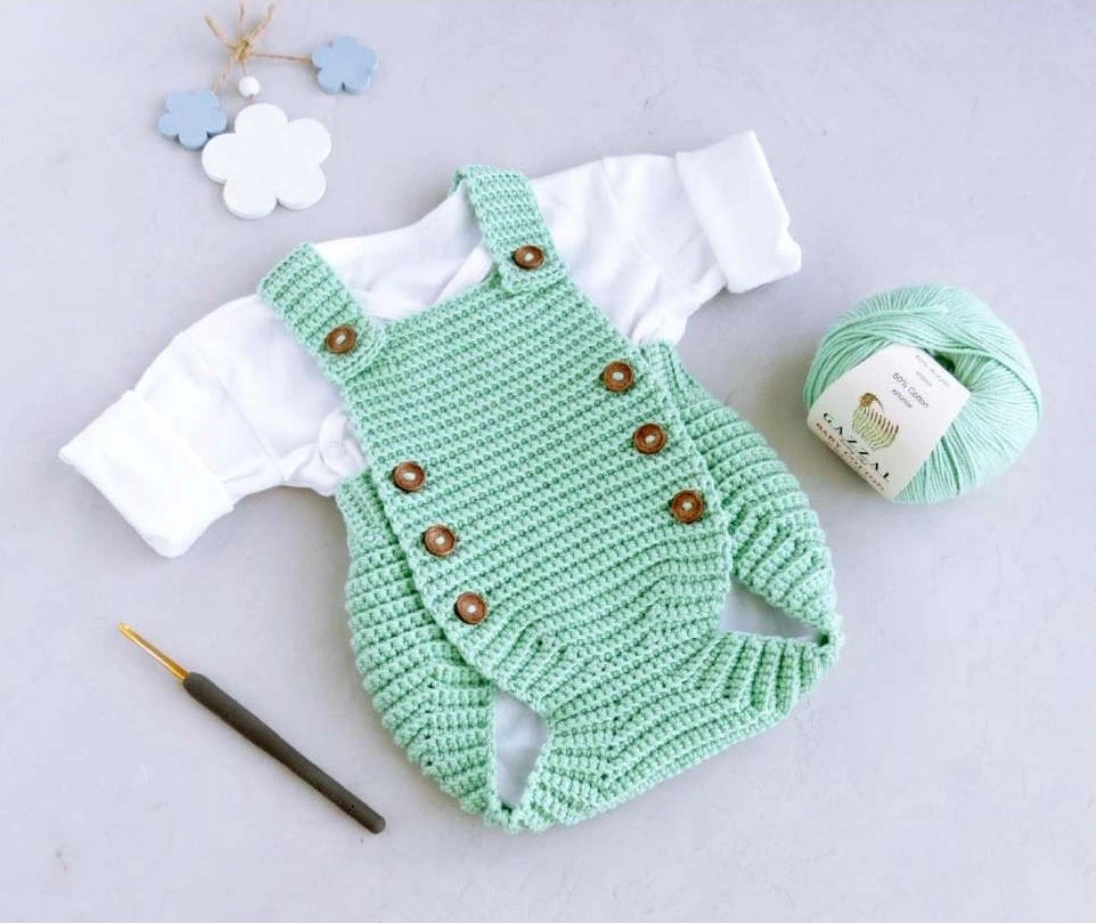
This crochet baby romper pattern makes the mint-green “Tiny Tot” romper shown in the supplied photographs. A ribbed body, buttoned sides, and adjustable-looking shoulder straps give it a neat overall-style finish. The tutorial below includes the written rows for newborn through 9–12 months, the shaping sequence, and the smaller-hook borders and straps.
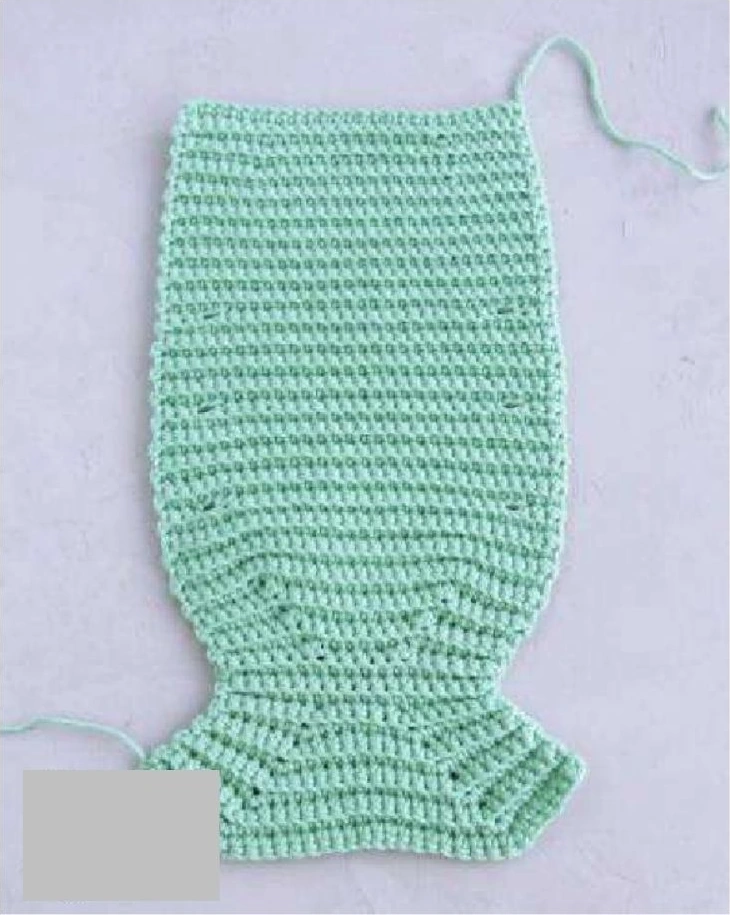
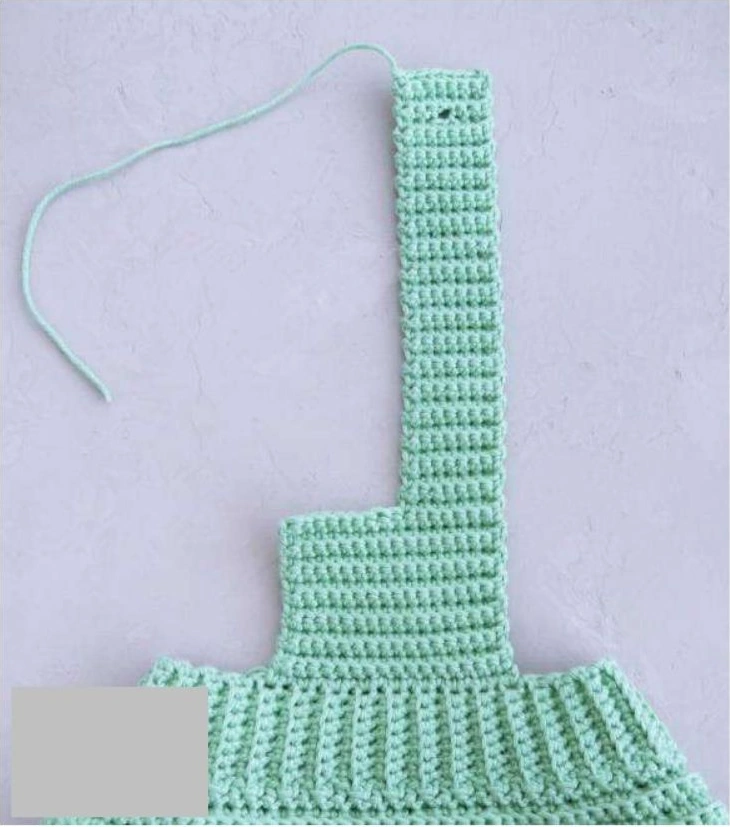
Choose your size first and keep that column throughout. The supplied pattern uses US crochet terms and single crochet worked in the back loop only. Its photographs show the finished romper, the materials, and two construction views; no additional process photographs have been invented.
Step 1 — Choose Your Size
The crochet baby romper pattern lists five sizes. The measurements below are reproduced from the supplied size chart; compare the finished measurements rather than relying only on an age label. Waist and hip widths are listed as widths, not circumferences. On mobile, swipe tables sideways.
| Size | Length | Waist width | Hip width | Approx. yarn |
|---|---|---|---|---|
| Newborn | 28 cm | 18 cm | 20 cm | 234 yd |
| 0–3 months | 31 cm | 20 cm | 23 cm | 273 yd |
| 3–6 months | 33 cm | 21 cm | 24 cm | 312 yd |
| 6–9 months | 35 cm | 22 cm | 25 cm | 346 yd |
| 9–12 months | 39 cm | 25 cm | 27 cm | 423 yd |
Throughout the tutorial, numbers in this order mean newborn (0–3, 3–6, 6–9, 9–12 months). For example, 26 (28, 30, 32, 34) means 26 stitches for newborn and 34 for the largest size.
Keep the crochet baby romper pattern size order beside your row notes.
Step 2 — Gather the Materials
For this crochet baby romper pattern, the source specifies sport-weight yarn, approximately 12 wraps per inch, in cotton or a cotton blend. Its suggested yarn length is approximately 180 yd per 50 g. Match the gauge rather than choosing by yarn appearance alone.
- Main hook: 3.5 mm, or the size needed to obtain gauge.
- Border and strap hook: 3 mm.
- Buttons: eight, approximately 12–15 mm (½–⅝ inch).
- Stitch markers, scissors, and a yarn needle for finishing.
- Sport-weight yarn in the quantity for your chosen size.
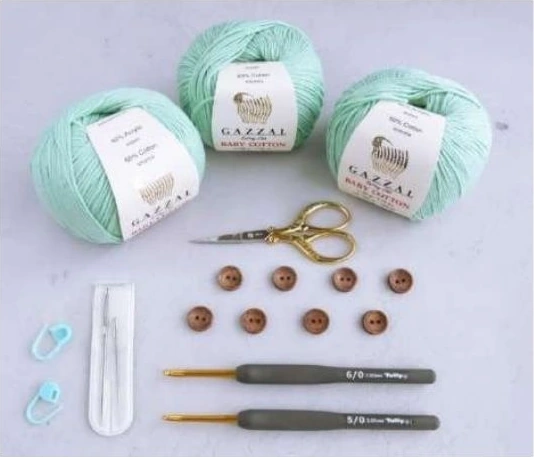
Sew buttons securely and check them regularly: detached buttons can be a choking hazard. Keep spare buttons, tools, and yarn tails away from babies. The cotton-content label on the photographed yarn does not replace the written gauge check.
Step 3 — Check Gauge and Read the Stitch Key
The gauge for the crochet baby romper pattern is 23 stitches and 26 rows = 10 × 10 cm in single crochet worked BLO, using the 3.5 mm hook or the size needed to match it. Make and measure a swatch before starting the garment.
- ch: chain.
- sc: single crochet.
- sl st: slip stitch.
- st / sts: stitch / stitches.
- BLO: back loop only.
- inc: 2 sc in the next stitch.
- dec / sc2tog: decrease two single crochets into one stitch.
The main rows are worked in sc BLO. At the end of each row, chain 1 and turn unless a border-joining instruction says otherwise. The turning chain does not count as a stitch. Stitch totals appear in square brackets below.
How to Work the Decrease
The source describes sc2tog through the back loops: insert the hook into the back loop of the next stitch, pull up a loop, then insert into the back loop of the following stitch and pull up another loop. Yarn over and pull through the three loops. This joins two single crochets into one stitch.
The abbreviation list in the supplied crochet baby romper pattern mistakenly calls sc2tog “2 dc together.” This tutorial follows its written single-crochet decrease method, not that inconsistent abbreviation label. The Craft Yarn Council abbreviation guide is a useful general reference.
A gauge swatch keeps the crochet baby romper pattern measurements meaningful.
Step 4 — Start the Bib
Begin the crochet baby romper pattern with the 3.5 mm main hook. The first six rows establish the bib width; the two largest sizes then have another increase row.
Row 1: Ch 27 (29, 31, 33, 35). Starting in the second chain from the hook, sc in each chain; ch 1 and turn. [26 (28, 30, 32, 34)]
Row 2: Sc in each stitch; ch 1 and turn. [26 (28, 30, 32, 34)]
Row 3 — increase: Sc in the next 6 sts, 2 sc in the next st, sc in the next 12 (14, 16, 18, 20) sts, 2 sc in the next st, sc in the next 6 sts; ch 1 and turn. [28 (30, 32, 34, 36)]
Rows 4–5: Sc in each stitch; ch 1 and turn. [28 (30, 32, 34, 36)]
Row 6 — increase: Sc in the next 6 sts, 2 sc in the next st, sc in the next 14 (16, 18, 20, 22) sts, 2 sc in the next st, sc in the next 6 sts; ch 1 and turn. [30 (32, 34, 36, 38)]
Extra Bib Increases: 6–9 and 9–12 Months Only
Rows 7–8: Sc in each stitch; ch 1 and turn. [36 (38)]
Row 9 — increase: Sc in the next 6 sts, 2 sc in the next st, sc in the next 22 (24) sts, 2 sc in the next st, sc in the next 6 sts; ch 1 and turn. [38 (40)]
For newborn, 0–3 months, and 3–6 months, do not work that extra increase row. Continue directly into the straight-row schedule for your size.
Count both increases before moving through the crochet baby romper pattern.
Step 5 — Crochet the Front and Make the Buttonholes
The front of the crochet baby romper pattern has three buttonhole rows. Each buttonhole row makes one hole near each side. The four chain stitches replace the four skipped stitches, so the width stays the same.
| Size | Straight rows after bib | Stitches |
|---|---|---|
| Newborn | 7–19 | 30 |
| 0–3 months | 7–21 | 32 |
| 3–6 months | 7–21 | 34 |
| 6–9 months | 10–26 | 38 |
| 9–12 months | 10–29 | 40 |
Work sc in each stitch for those straight rows, then ch 1 and turn after every row. The following size cards give the remaining front rows before leg shaping.
Newborn
For the crochet baby romper pattern in this size, use the following buttonhole and straight-row sequence.
Row 20 — buttonholes: Sc in the next 3 sts, ch 2, skip 2 sts, sc in the next 20 sts, ch 2, skip 2 sts, sc in the next 3 sts; ch 1 and turn. [30]
Rows 21–27: Sc in each stitch; ch 1 and turn. [30]
Row 28: Repeat buttonhole row 20. [30]
Rows 29–35: Sc in each stitch; ch 1 and turn. [30]
Row 36: Repeat buttonhole row 20. [30]
Rows 37–42: Sc in each stitch; ch 1 and turn. [30]
0–3 Months
For the crochet baby romper pattern in this size, use the following buttonhole and straight-row sequence.
Row 22 — buttonholes: Sc in the next 3 sts, ch 2, skip 2 sts, sc in the next 22 sts, ch 2, skip 2 sts, sc in the next 3 sts; ch 1 and turn. [32]
Rows 23–30: Sc in each stitch; ch 1 and turn. [32]
Row 31: Repeat buttonhole row 22. [32]
Rows 32–39: Sc in each stitch; ch 1 and turn. [32]
Row 40: Repeat buttonhole row 22. [32]
Rows 41–47: Sc in each stitch; ch 1 and turn. [32]
3–6 Months
For the crochet baby romper pattern in this size, use the following buttonhole and straight-row sequence.
Row 22 — buttonholes: Sc in the next 3 sts, ch 2, skip 2 sts, sc in the next 24 sts, ch 2, skip 2 sts, sc in the next 3 sts; ch 1 and turn. [34]
Rows 23–30: Sc in each stitch; ch 1 and turn. [34]
Row 31: Repeat buttonhole row 22. [34]
Rows 32–39: Sc in each stitch; ch 1 and turn. [34]
Row 40: Repeat buttonhole row 22. [34]
Rows 41–49: Sc in each stitch; ch 1 and turn. [34]
6–9 Months
For the crochet baby romper pattern in this size, use the following buttonhole and straight-row sequence.
Row 27 — buttonholes: Sc in the next 3 sts, ch 2, skip 2 sts, sc in the next 28 sts, ch 2, skip 2 sts, sc in the next 3 sts; ch 1 and turn. [38]
Rows 28–35: Sc in each stitch; ch 1 and turn. [38]
Row 36: Repeat buttonhole row 27. [38]
Rows 37–44: Sc in each stitch; ch 1 and turn. [38]
Row 45: Repeat buttonhole row 27. [38]
Rows 46–54: Sc in each stitch; ch 1 and turn. [38]
9–12 Months
For the crochet baby romper pattern in this size, use the following buttonhole and straight-row sequence.
Row 30 — buttonholes: Sc in the next 3 sts, ch 2, skip 2 sts, sc in the next 30 sts, ch 2, skip 2 sts, sc in the next 3 sts; ch 1 and turn. [40]
Rows 31–38: Sc in each stitch; ch 1 and turn. [40]
Row 39: Repeat buttonhole row 30. [40]
Rows 40–47: Sc in each stitch; ch 1 and turn. [40]
Row 48: Repeat buttonhole row 30. [40]
Rows 49–60: Sc in each stitch; ch 1 and turn. [40]
Step 6 — Shape the Leg Openings
The crochet baby romper pattern narrows the front with a decrease near each side on every shaping row. Follow the same method for each size, changing only the row range and starting width.
Decrease row: Sc in the next 6 sts, sc2tog, sc in each stitch until 8 sts remain, sc2tog, sc in the next 6 sts; ch 1 and turn. Each row removes 2 stitches.
| Size | Decrease rows | Ending count | Then work straight |
|---|---|---|---|
| Newborn | 43–48: 6 times | 18 | 49–51 [18] |
| 0–3 months | 48–54: 7 times | 18 | 55–56 [18] |
| 3–6 months | 50–57: 8 times | 18 | 58–60 [18] |
| 6–9 months | 55–62: 8 times | 22 | 63–65 [22] |
| 9–12 months | 61–69: 9 times | 22 | 70–72 [22] |
For each straight row in the final column, sc in each stitch, ch 1, and turn. Check the narrowest stitch count before you start increasing again.
Step 7 — Widen the Lower Front Again
Continue the crochet baby romper pattern by adding two stitches on each increase row. This opens the lower front out after the narrow section.
Increase row: Sc in the next 6 sts, 2 sc in the next st, sc in each stitch until 7 sts remain, 2 sc in the next st, sc in the next 6 sts; ch 1 and turn. Each row adds 2 stitches.
| Size | Increase rows | Ending stitches |
|---|---|---|
| Newborn | 52–60 | 36 |
| 0–3 months | 57–65 | 36 |
| 3–6 months | 61–70 | 38 |
| 6–9 months | 66–75 | 42 |
| 9–12 months | 73–85 | 48 |
The source gives approximate front lengths of 23, 25, 27, 29, and 33 cm in size order. Those are front-stage measurements, not the finished garment lengths in the size chart.
Step 8 — Crochet the Back
The back of the crochet baby romper pattern continues from the front without fastening off. First repeat the same increase-row method, adding 2 stitches per row, until the back reaches its listed width.
| Size | Increase rows | Back width | Straight rows |
|---|---|---|---|
| Newborn | 61–80 | 76 sts | 81–92 |
| 0–3 months | 66–91 | 88 sts | 92–100 |
| 3–6 months | 71–97 | 92 sts | 98–110 |
| 6–9 months | 76–100 | 92 sts | 101–115 |
| 9–12 months | 86–110 | 98 sts | 111–134 |
On each straight row, sc in every stitch, ch 1, and turn. The source then reduces the back twice, with one plain row after each decrease row.
Newborn — Back Decreases
Use these back-shaping rows for the crochet baby romper pattern; do not mix their counts with another size.
Row 93 — decrease: Sc 10, (sc2tog, sc 4) × 9, sc2tog, sc 10; ch 1 and turn. [66]
Row 94: Sc in each stitch; ch 1 and turn. [66]
Row 95 — decrease: Sc 10, (sc2tog, sc 3) × 9, sc2tog, sc 9; ch 1 and turn. [56]
Row 96: Sc in each stitch; ch 1 and turn. [56]
0–3 Months — Back Decreases
Use these back-shaping rows for the crochet baby romper pattern; do not mix their counts with another size.
Row 101 — decrease: Sc 8, (sc2tog, sc 8) × 8; ch 1 and turn. [80]
Row 102: Sc in each stitch; ch 1 and turn. [80]
Row 103 — decrease: Sc 8, (sc2tog, sc 7) × 8; ch 1 and turn. [72]
Row 104: Sc in each stitch; ch 1 and turn. [72]
3–6 Months — Back Decreases
Use these back-shaping rows for the crochet baby romper pattern; do not mix their counts with another size.
Row 111 — decrease: Sc 9, (sc2tog, sc 6) × 9, sc2tog, sc 9; ch 1 and turn. [82]
Row 112: Sc in each stitch; ch 1 and turn. [82]
Row 113 — decrease: Sc 9, (sc2tog, sc 5) × 9, sc2tog, sc 8; ch 1 and turn. [72]
Following plain row: Sc in each stitch; ch 1 and turn. [72] The source labels this “Row 104”; see the discrepancy notes.
6–9 Months — Back Decreases
Use these back-shaping rows for the crochet baby romper pattern; do not mix their counts with another size.
Row 116 — decrease: Sc 10, (sc2tog, sc 8) × 7, sc2tog, sc 10; ch 1 and turn. [84]
Row 117: Sc in each stitch; ch 1 and turn. [84]
Row 118 — decrease: Sc 10, (sc2tog, sc 7) × 7, sc2tog, sc 9; ch 1 and turn. [76]
Row 119: Sc in each stitch; ch 1 and turn. [76]
9–12 Months — Back Decrease Needs Clarification
The source reaches 98 stitches after row 134. It then prints the following lines:
Printed Row 135 — decrease: “Sc in the next 7 sts, repeat (sc2tog, sc in next 8 sts) 9 more times, ch 1 and turn. =88 sts.”
Printed Row 135 — plain: “Sc into each stitch, ch 1 and turn. =88 sts.”
This crochet baby romper pattern tutorial preserves that gap rather than inventing a tested-looking row. For the other four sizes, the decrease-group totals shown above match the supplied ending stitch counts.
Do not fasten off the completed back before the border. The original 3–6-month “104 rows worked” summary appears copied from the preceding size; its surrounding sequence reaches row 113 before the final plain row.
Step 9 — Add the Ribbed Border
Switch to the 3 mm hook for the crochet baby romper pattern border. The ribbed strip is eight stitches wide and joins to the garment as you work.
Row 1: Ch 9. Starting in the second chain from the hook, sc in each chain. Join to the back edge with a sl st, then sl st in the next 2 sts. Turn without chaining.
Row 2: Skip the two joining slip stitches, sc in the next 8 sts, ch 1 and turn.
Row 3: Sc across the ribbing. Join to the back edge with a sl st, then sl st in the next 2 sts. Turn without chaining.
Repeat rows 2 and 3 until you have worked 56 (72, 72, 76, 88) border rows. Fasten off. The source suggests leaving a longer tail if you want to use it to sew on a button on this side.
Keep the crochet baby romper pattern joining stitches separate from ribbing stitches.
Step 10 — Crochet the Back Strap Panel
Keep the smaller 3 mm hook for the crochet baby romper pattern straps. On the back, mark the central 17 (17, 17, 21, 21) stitches. The source says to count one row end as one stitch along this edge.
Row 1: Join with a sl st to the first marked stitch, ch 1, sc in the next 17 (17, 17, 21, 21) sts, ch 1 and turn. [17 (17, 17, 21, 21)]
Row 2: Sc in each stitch; ch 1 and turn. [17 (17, 17, 21, 21)]
Repeat row 2 until the wider panel has 14 (14, 16, 20, 22) rows. Do not fasten off; continue into one of the narrower straps.
Step 11 — Work the Narrow Straps and Buttonholes
The crochet baby romper pattern uses two eight-stitch-wide straps. The first continues from the wider back panel; work the second in the same way.
Narrow strap Row 1: Sc in each stitch across the strap, ch 1 and turn. [8]
| Size | Plain strap rows | Buttonhole row | Final plain rows |
|---|---|---|---|
| Newborn | 1–33 | 34 | 35–37 |
| 0–3 months | 1–41 | 42 | 43–45 |
| 3–6 months | 1–38 | 39 | 40–42 |
| 6–9 months | 1–41 | 42 | 43–45 |
| 9–12 months | 1–45 | 46 | 47–49 |
Buttonhole row: Sc in the next 3 sts, ch 2, skip 2 sts, sc in the next 3 sts. Continue the final plain rows for your size by repeating the eight-stitch strap row.
Finish the second strap in the same way, weave in the ends, and sew on the eight buttons. Align the buttons with the six side buttonholes and the two strap buttonholes shown in the finished reference.
Step 12 — Check the Source Notes and Finish
Before using the crochet baby romper pattern, check that the straps sit evenly, the borders lie flat, and the buttonholes meet the buttons without pulling the fabric. Recheck the gauge and the finished widths if the garment feels unexpectedly large or small.
- Decrease repeats: the source uses “repeat … more times” inconsistently. For the first four sizes, this tutorial writes explicit × 7, × 8, or × 9 groups whose arithmetic matches the supplied before-and-after stitch totals.
- 0–3-month front: rows 57–65 conflict with the printed “60 rows” summary.
- 3–6-month back: the final plain row is mislabeled 104 after row 113.
- 9–12-month back: the ambiguous decrease, duplicate row 135, and missing second decrease require confirmation.
- Photo labels: hook markings in the materials photograph differ from the written hook sizes. Follow the written 3.5 mm / 3 mm instructions and gauge.
No missing technical rows have been supplied as if verified. The larger-size discrepancy must be resolved from the pattern source; a finished product photograph cannot establish the missing stitch sequence.
Recheck each closure before calling the crochet baby romper pattern finished.
Frequently Asked Questions
Which sizes are included?
The crochet baby romper pattern includes newborn, 0–3, 3–6, 6–9, and 9–12 months. The supplied 9–12-month back-shaping instructions require clarification before that size can be followed completely.
What creates the ribbed texture?
Single crochet worked in the back loop only creates the main texture. The attached border uses a smaller hook and an eight-stitch ribbed strip.
Does the turning chain count as a stitch?
No. The source states that the chain 1 at the end of each row does not count as a stitch.
Which hook sizes should I use?
The crochet baby romper pattern specifies a 3.5 mm main hook and a 3 mm hook for the border and straps. Adjust the main hook if needed to obtain the stated gauge.
Are there real step-by-step photographs for every row?
No. The supplied pages include a finished reference, materials photograph, and two construction photographs. The row-by-row tutorial is written; no extra instructional photos are fabricated.
Can I rely on the largest-size back rows as printed?
Not yet. Their repeat count, duplicated row label, and missing second decrease need confirmation. Do not substitute an invented stitch sequence.




