

FESTIVE AMIGURUMI • ORIGINAL PROCESS PHOTOS • US TERMS
Crochet Snowman Pattern: 12 Charming Steps + Photo Guide
This crochet snowman pattern pairs a soft white figure with a dark gray hat, a red-and-white scarf, and a tiny holly-style decoration. The carrot nose and three dark buttons give it a cheerful winter look without covering up the crochet texture.
Follow the source-based instructions below to make the head and limbs, join the arms and legs into the body, and finish the small accessories. The real process photos show the joining points, hat band, leaves, berry, and facial details—not generated stand-ins for the making stages.
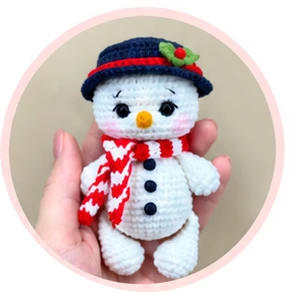
Step 1 — Supplies and Crochet Snowman Pattern Key
The crochet snowman pattern uses white yarn for the head, body, arms, and legs; orange for the nose; dark gray for the hat and buttons; red for the band, berry, and scarf stripes; green for the leaves; and black for the embroidered facial details. Red and white are carried between the scarf stripes rather than cut after every change.
- A hook appropriate to your chosen yarn; the source does not state its size.
- Fiberfill, a yarn needle, scissors, and a round marker.
- A pair of 7 mm eyes if making a display piece, as specified in the source.
- A blunt stuffing tool for the narrow limbs; use it gently so it does not split stitches.
US abbreviations in this crochet snowman pattern: MR = magic ring; sc = single crochet; inc = 2 sc in one stitch; dec = decrease two stitches to one; ch = chain; sl st = slip stitch; BLO = back loop only. Parentheses followed by × 6 mean repeat that whole group six times.
Use a marker to keep track of the round start and check the stated total before continuing. The crochet snowman pattern pages do not explicitly specify a joining method for every ordinary round; do not add an extra counted chain or joining stitch to the totals.
Step 2 — Crochet and Stuff the Head
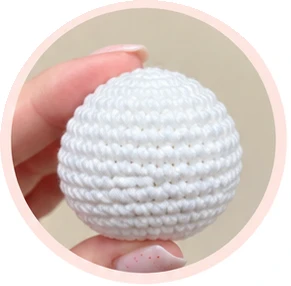
Begin the crochet snowman pattern head in white yarn. The staggered increase rounds spread the shaping around the sphere. Work the complete sequence in order; do not turn the extra single crochets at the beginning or end of a round into additional repeats.
| Round | Instructions | Total |
|---|---|---|
| 1 | 6 sc in MR. | 6 |
| 2 | 6 inc. | 12 |
| 3 | (Sc 1, inc) × 6. | 18 |
| 4 | Sc 1, inc, (sc 2, inc) × 5, sc 1. | 24 |
| 5 | (Sc 3, inc) × 6. | 30 |
| 6 | Sc 2, inc, (sc 4, inc) × 5, sc 2. | 36 |
| 7–9 | Sc 36 in each round; three rounds. | 36 |
| 10 | (Sc 5, inc) × 6. | 42 |
| 11–15 | Sc 42 in each round; five rounds. | 42 |
| 16 | (Sc 5, dec) × 6. | 36 |
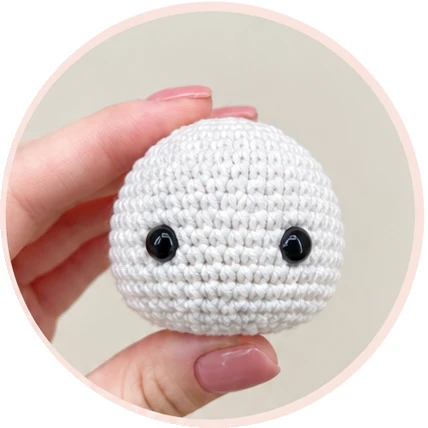
Place the 7 mm eyes between Rounds 12 and 13, leaving a visible distance of 6 sc between them. Check the front view before securing them. The crochet snowman pattern says to stuff the head firmly while keeping the area between the eyes more lightly filled for later shaping.
| Round | Instructions | Total |
|---|---|---|
| 17 | Sc 2, dec, (sc 4, dec) × 5, sc 2. | 30 |
| 18 | (Sc 3, dec) × 6. | 24 |
| 19 | Sc 1, dec, (sc 2, dec) × 5, sc 1. | 18 |
| 20 | (Sc 1, dec) × 6. | 12 |
Fasten off with a long sewing tail and add more stuffing if needed. Keep the lower opening available for the neck seam; the crochet snowman pattern ends the head at 12 stitches rather than giving another closing round.
Step 3 — Make Two Arms
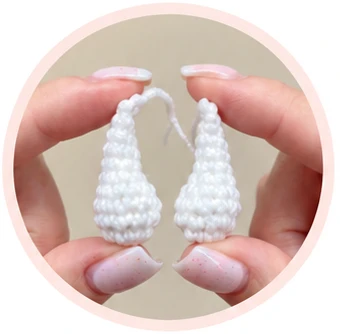
Work both arms of the crochet snowman pattern in white. Fill about the lower two-thirds as you crochet and leave the upper section unstuffed so the attachment edge can fold flat.
| Round | Instructions | Total |
|---|---|---|
| 1 | 6 sc in MR. | 6 |
| 2 | 6 inc. | 12 |
| 3–4 | Sc 12 in each round; two rounds. | 12 |
| 5 | Dec 2, sc 8. | 10 |
| 6 | Dec 2, sc 6. | 8 |
| 7–10 | Sc 8 in each round; four rounds. | 8 |
Fold each opening in half and work 4 sc through the paired layers to close it. Fasten off and cut the yarn. These four closure stitches will be joined into the upper body later in the crochet snowman pattern.
Step 4 — Make Two Legs
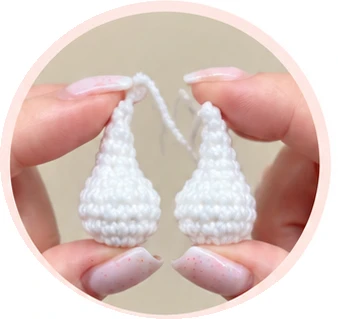
The feet of the crochet snowman pattern are slightly fuller than the arms. Again, use white yarn and stuff about the lower two-thirds, leaving the upper part flexible for flattening.
| Round | Instructions | Total |
|---|---|---|
| 1 | 6 sc in MR. | 6 |
| 2 | 6 inc. | 12 |
| 3 | (Sc 2, inc) × 4. | 16 |
| 4–5 | Sc 16 in each round; two rounds. | 16 |
| 6 | Sc 3, dec 5, sc 3. | 11 |
| 7 | Sc 3, dec 3, sc 2. | 8 |
| 8–11 | Sc 8 in each round; four rounds. | 8 |
Work about 3 additional sc to place the fold so the feet point inward when flattened; the source says this alignment count may vary. Fold the opening and work 4 sc through both layers. Fasten off. Do not treat the alignment stitches as a new full round in the crochet snowman pattern.
Step 5 — Begin the Body and Join the Legs
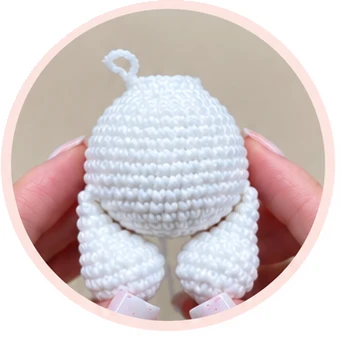
Begin the body of the crochet snowman pattern in white and add fiberfill as the shape develops. Make the rounded base first, then attach the flattened legs during Round 7 rather than sewing them on afterward.
| Round | Instructions | Total |
|---|---|---|
| 1 | 6 sc in MR. | 6 |
| 2 | 6 inc. | 12 |
| 3 | (Sc 1, inc) × 6. | 18 |
| 4 | Sc 1, inc, (sc 2, inc) × 5, sc 1. | 24 |
| 5 | (Sc 3, inc) × 6. | 30 |
| 6 | Sc 2, inc, (sc 4, inc) × 5, sc 2. | 36 |
| 7 | Sc 7; sc 4 joining the first leg; sc 14; sc 4 joining the second leg; sc 7. | 36 |
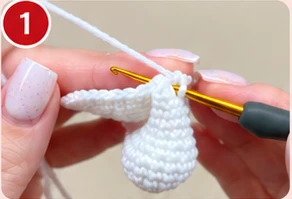
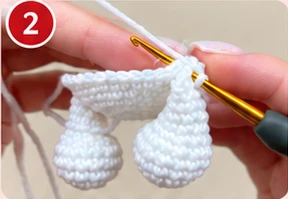
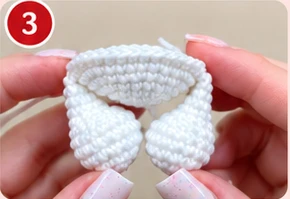
For each four-stitch attachment, work through the leg’s closed edge and the corresponding body stitches together. These are four body stitches, not four extra stitches. Round 7 of the crochet snowman pattern still ends with 36 stitches.
Step 6 — Shape the Body and Join the Arms
The crochet snowman pattern narrows the upper body gradually. Keep filling the body without packing the limb attachment edges so tightly that the arms and legs lose their shape.
| Round | Instructions | Total |
|---|---|---|
| 8–10 | Sc 36 in each round; three rounds. | 36 |
| 11 | Sc 2, dec, (sc 4, dec) × 5, sc 2. | 30 |
| 12–13 | Sc 30 in each round; two rounds. | 30 |
| 14 | Sc 4, dec, (sc 8, dec) × 2, sc 4. | 27 |
| 15 | (Sc 7, dec) × 3. | 24 |
| 16 | Sc 3, dec, (sc 6, dec) × 2, sc 3. | 21 |
| 17 | (Sc 5, dec) × 3. | 18 |
| 18 | Sc 4; sc 4 joining first arm; sc 5; sc 4 joining second arm; sc 1. | 18 |
| 19 | (Sc 1, dec) × 6. | 12 |
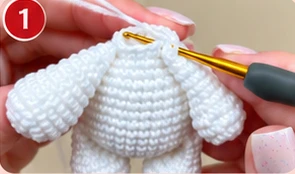
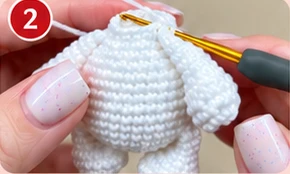
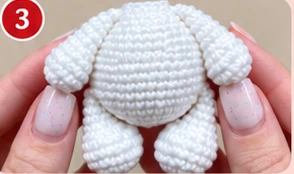
The source notes that the stitch distribution for the arms may vary to keep them inward-facing and symmetrical with the legs. Keep a total of 18 in Round 18, then reduce to 12 in Round 19. Fasten off and cut the yarn as directed in the crochet snowman pattern.
Step 7 — Crochet the Carrot Nose
Use orange yarn for the crochet snowman pattern nose. This tiny piece needs no stuffing. Keep a long tail so it can be sewn between the face rounds later.
| Round | Instructions | Total |
|---|---|---|
| 1 | 4 sc in MR. | 4 |
| 2 | Sc 4. | 4 |
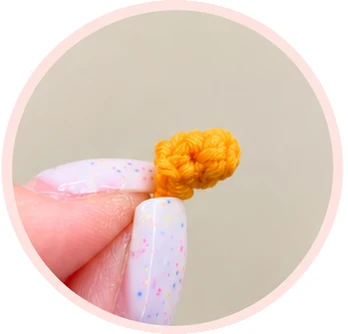
Fasten off without closing away the sewing tail. Set the nose aside until the facial placement is ready; forcing it onto the head now can make later embroidery awkward.
Step 8 — Make the Hat and Red Band
Work the crochet snowman pattern hat in dark gray. The crown expands to 42 stitches, followed by a special turning round, straight sides, and a wider brim.
| Round | Instructions | Total |
|---|---|---|
| 1 | 6 sc in MR. | 6 |
| 2 | 6 inc. | 12 |
| 3 | (Sc 1, inc) × 6. | 18 |
| 4 | Sc 1, inc, (sc 2, inc) × 5, sc 1. | 24 |
| 5 | (Sc 3, inc) × 6. | 30 |
| 6 | Sc 2, inc, (sc 4, inc) × 5, sc 2. | 36 |
| 7 | (Sc 5, inc) × 6. | 42 |
| 8 | 42 stitches using the source’s “inverted (or concave) single crochet.” See caution below. | 42 |
| 9–12 | Sc 42 in each round; four rounds. | 42 |
| 13 | BLO: (sc 1, inc) × 21. | 63 |
| 14 | Sc 63, then sl st to finish. | 63 |
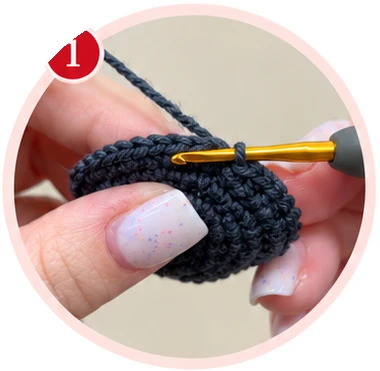
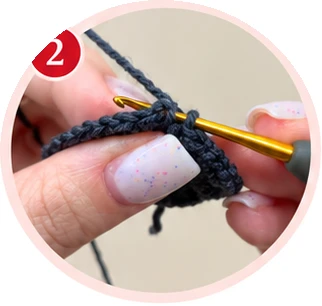
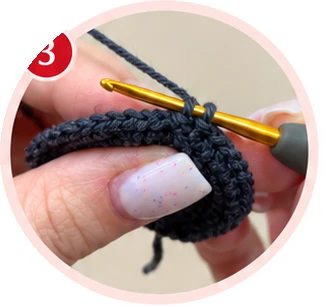
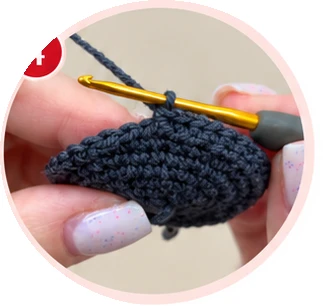
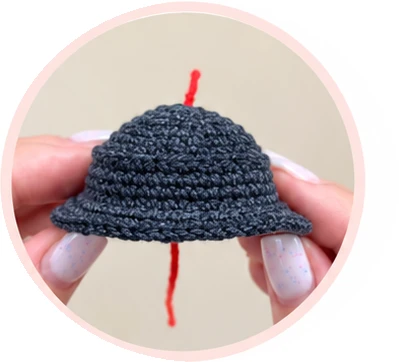
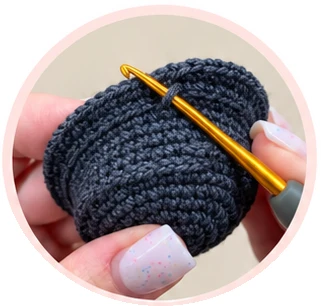
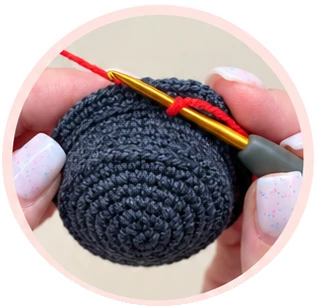
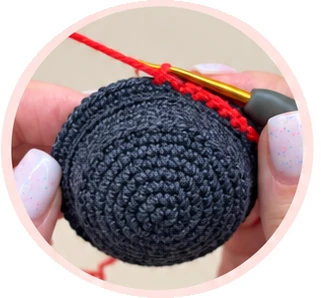
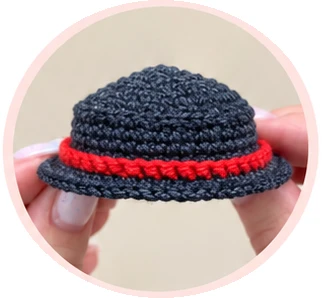
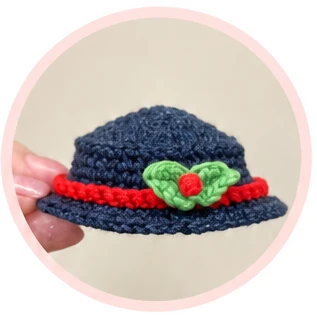
After Round 14, fasten off and hide the gray yarn end. Attach red yarn to the unused front loops of Round 12 and work 42 sc for the band, then fasten off and hide the tail inside. The crochet snowman pattern leaves those loops available when the brim is worked in BLO.
Step 9 — Make the Green Leaves and Red Berry
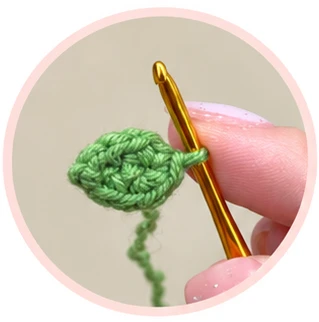
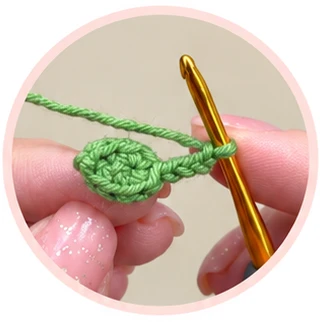
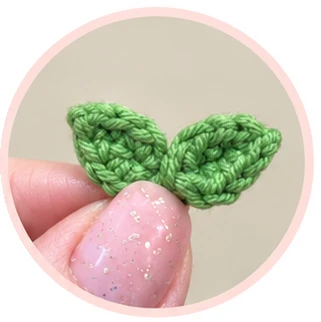
The source labels the green pieces “petals,” though the finished decoration looks like two leaves and a berry. Use green yarn for the paired piece in the crochet snowman pattern, working the second lobe without cutting the yarn.
- First lobe: Ch 4. Starting in the second chain from the hook, work inc, sc 1, sl st in the last chain, ch 1. Along the opposite side of the chain, work sl st, sc 1, inc, then sl st in the first stitch of the round.
- Second lobe: Without cutting, ch 4. Starting in the second chain, work sl st, sc 1, inc in the last chain. Along the opposite side, work inc, sc 1, sl st.
- Fasten off with a long sewing tail.
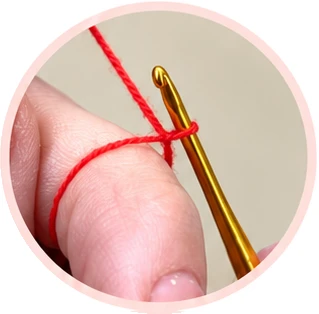
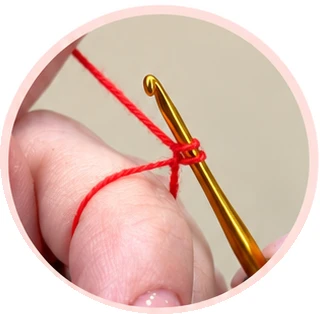
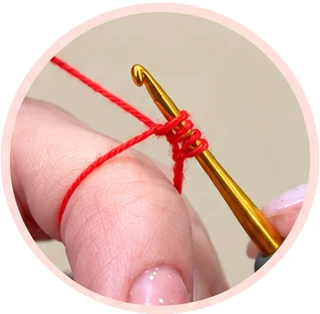
For the crochet snowman pattern berry, cut a 30 cm length of red yarn and separate out one thin strand. Make a magic ring. Repeat (yarn over, insert the hook into the ring, pull up a loop) × 6, leaving 13 loops on the hook. Pull the yarn through all loops, fasten off without trimming the ends, and pull both ends tight to shape the berry.
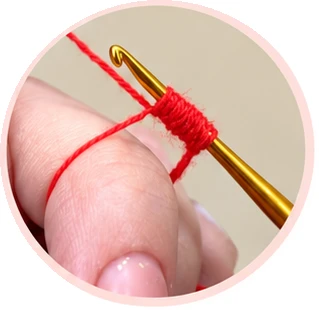
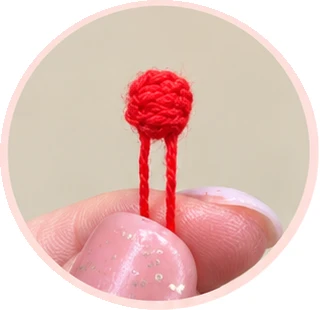
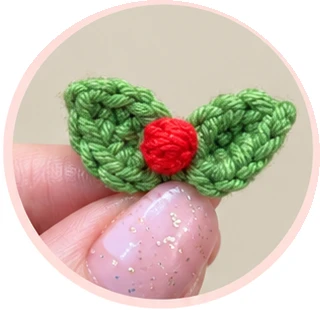
Sew the completed decoration to the hat beside the red band. Check the front view of the crochet snowman pattern before securing the tails so the leaves do not cover the brim unevenly.
Step 10 — Work the Red-and-White Scarf
The crochet snowman pattern scarf is only two stitches wide. Begin with red yarn and ch 3. Starting in the second chain from the hook, work 2 sc. Continue in rows, using a ch 1 turning chain that does not count as a stitch.
| Rows | Instructions |
|---|---|
| 1–2 | Red: 2 sc in each row. |
| 3–4 | White: 2 sc in each row; keep red attached. |
| Repeat | Alternate red and white every two rows; carry the unused color at the edge. |
| Length | The source gives 70 rows and an approximate finished length of 21 cm. |
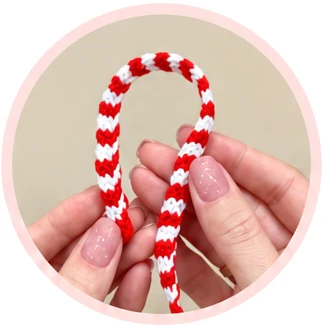
Fasten off and hide the ends inside the scarf. A relaxed color change at the edge helps the crochet snowman pattern stripes lie flat instead of drawing the strip into a curve.
Step 11 — Make Three Crochet Buttons
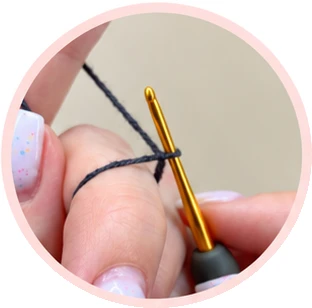
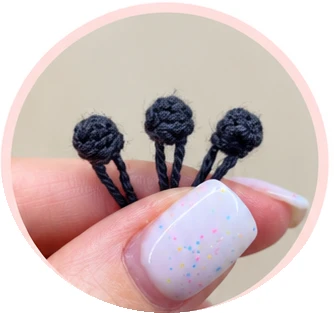
The crochet snowman pattern buttons use the same clustered-loop idea as the berry. Use dark gray yarn; the source calls for a 30 cm piece separated so that two thin strands are used together. Make three buttons and keep their yarn ends for attachment.
- Make a magic ring with the prepared thin strands.
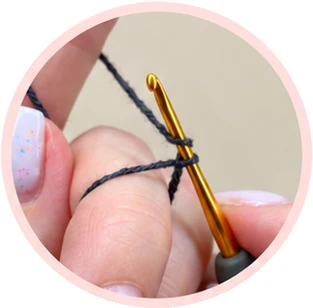
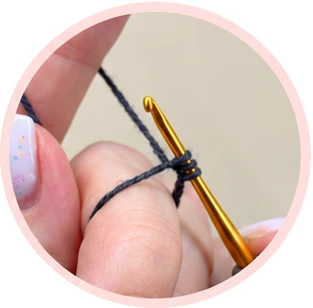
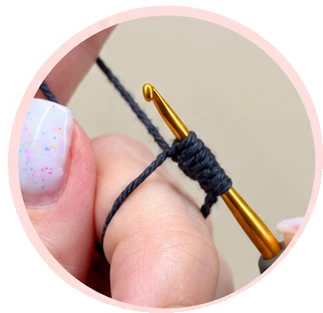
- Repeat (yarn over, insert hook into the ring, pull up a loop) six times. There should be 13 loops on the hook.
- Pull the yarn through every loop, then fasten off without cutting away the ends.
- Pull both ends firmly to form the small button.
Step 12 — Finish the Face and Assemble the Snowman
The finishing page of the crochet snowman pattern refers to shaping “as you did for the Gingerbread Man and Santa.” Those earlier instructions are not included in the supplied images. The shaped-face photo is a reference only; it does not verify a needle-sculpting route, entry points, or tension.
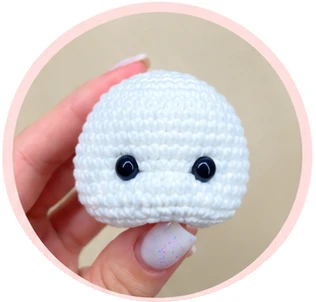
Once any shaping method has been clarified, sew the carrot nose between head Rounds 13 and 15. Center it between the eyes before tightening the stitches. Do not draw the orange sewing thread so tightly that it pulls the whole face inward.
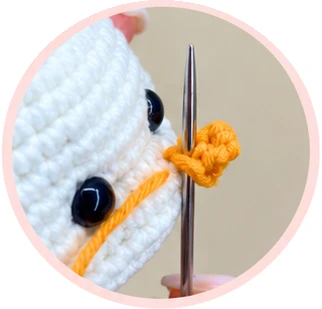
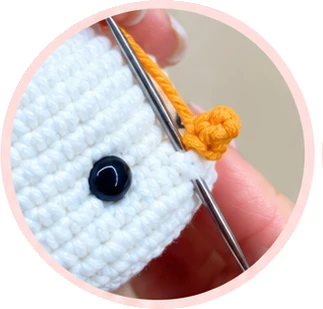
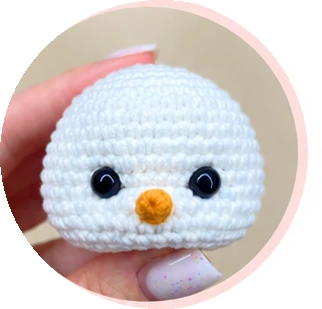
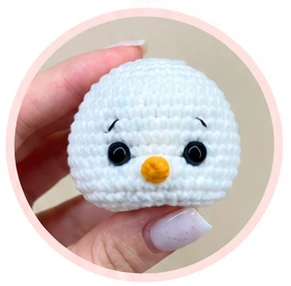
Use black yarn to embroider the eyebrows and upper eyelids. The crochet snowman pattern places the eyebrows on Round 10, each one stitch wide and separated by 6 sc. The photos also show pink cheeks; coloring is optional, and any pigment should be appropriate for the intended use. Do not assume cosmetic blush or dry pastel is suitable for a child’s toy.
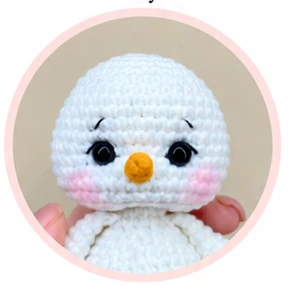
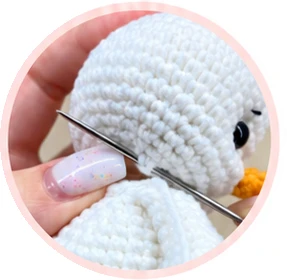
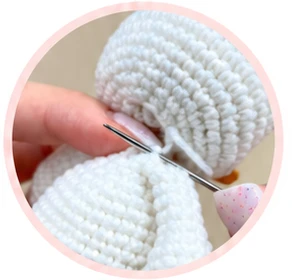
Sew the head to the body all the way around the neck. Before closing the final small opening, add stuffing to the body and neck as needed, then complete the seam. Match the front of the face to the limb placement in the crochet snowman pattern.
| Detail | Placement |
|---|---|
| First button | Between body Rounds 8 and 9. |
| Second button | Between body Rounds 11 and 12. |
| Third button | Between body Rounds 14 and 15. |
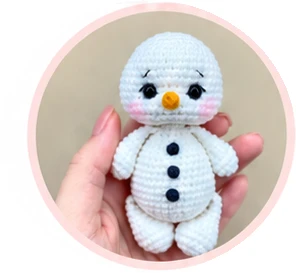
Place the hat on the head and sew it in position if desired. Tie the scarf around the neck and inspect all attachment points. The crochet snowman pattern does not provide a finished height, so do not advertise a particular size from these photographs alone.
For a different look, change the scarf and hat-band colors together while keeping the carrot orange and the face easy to read. Browse My Crochet Universe for more projects, and check the Craft Yarn Council stitch abbreviations if you need a US terminology reference.
A Final Check Before Displaying Your Snowman
A tidy crochet snowman pattern result depends on even stuffing, correctly counted joins, and secure finishing. Check the neck seam, nose, buttons, and hat decoration for loose tails. Keep your actual hook, yarn, scarf length, and clarified stitch notes with the project so a second snowman is easier to reproduce.
Crochet Snowman Pattern FAQ
Is this crochet snowman pattern complete on its own?
The supplied pages include the rounds for the main parts and accessories, but they omit the referenced facial-sculpting method and do not fully define the inverted or concave hat stitch. Both gaps need source clarification for an exact reproduction.
What yarn and hook does the crochet snowman pattern use?
No yarn brand, fiber, weight, yardage, hook size, or gauge appears in the nine supplied images. Choose a compatible yarn and hook, sample the fabric, and do not present an assumed specification as a source fact.
Are the arms and legs sewn on later?
No. Close each limb with 4 sc through both folded layers. Join the legs during body Round 7 and the arms during body Round 18, keeping the stated body totals unchanged.
Where are the eyes and nose positioned?
The source specifies 7 mm eyes between head Rounds 12 and 13 with a visible distance of 6 sc. Sew the nose between Rounds 13 and 15. For a toy intended for a child under three, use embroidered rather than plastic eyes.
How long is the scarf?
The target is approximately 21 cm. The guide interprets the source as 70 total rows at two stitches per row, alternating colors every two rows. Adjust the row count to the stated length if needed.
Is the finished snowman a certified safe toy?
No safety certification is established by this crochet snowman pattern guide. Plastic eyes, small accessories, loose scarf ends, and optional pigments need special care. A decorative reference photo is not proof of toy-safety compliance.




