

Floral Crochet Tunic Pattern: Technical Step-by-Step Guide
Build the lace panels, deep V back, layered flowers, leaves, pointed hem and decorative cords
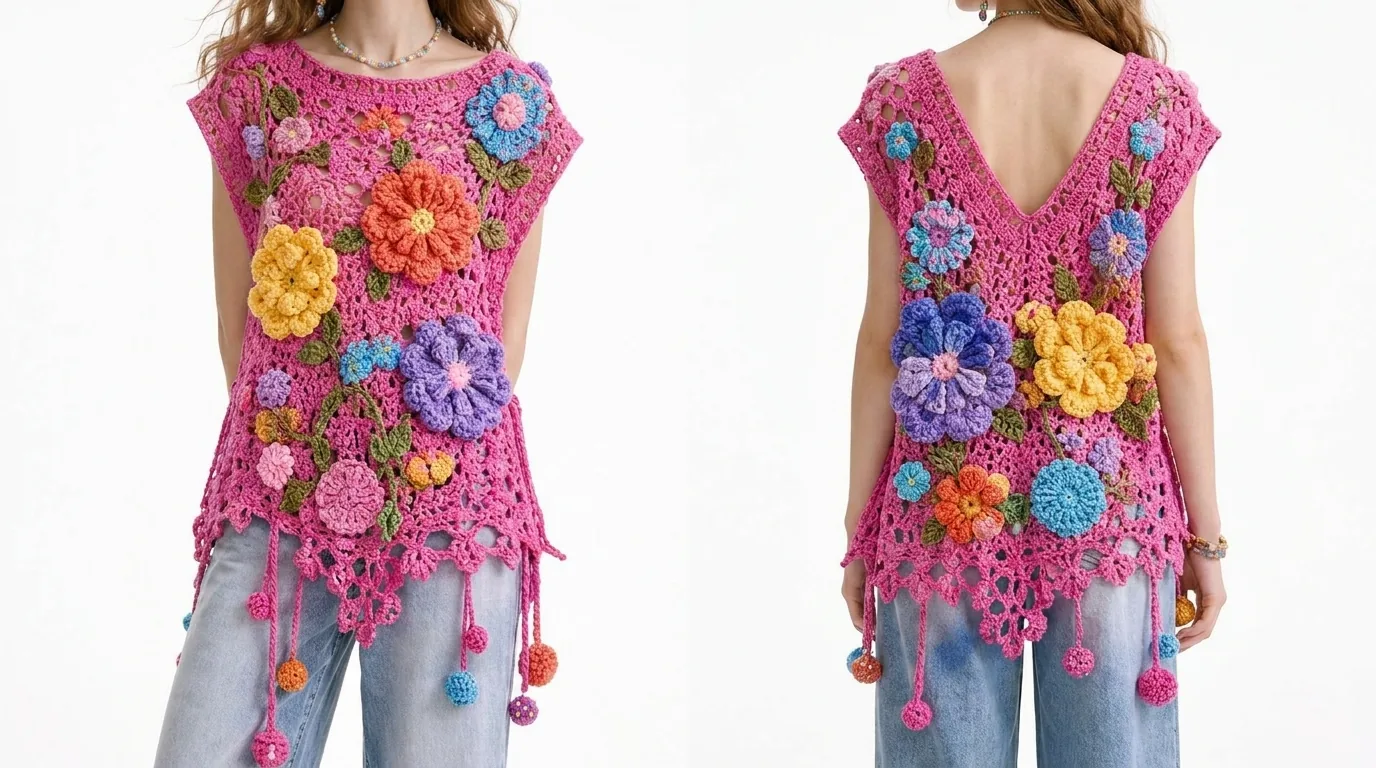
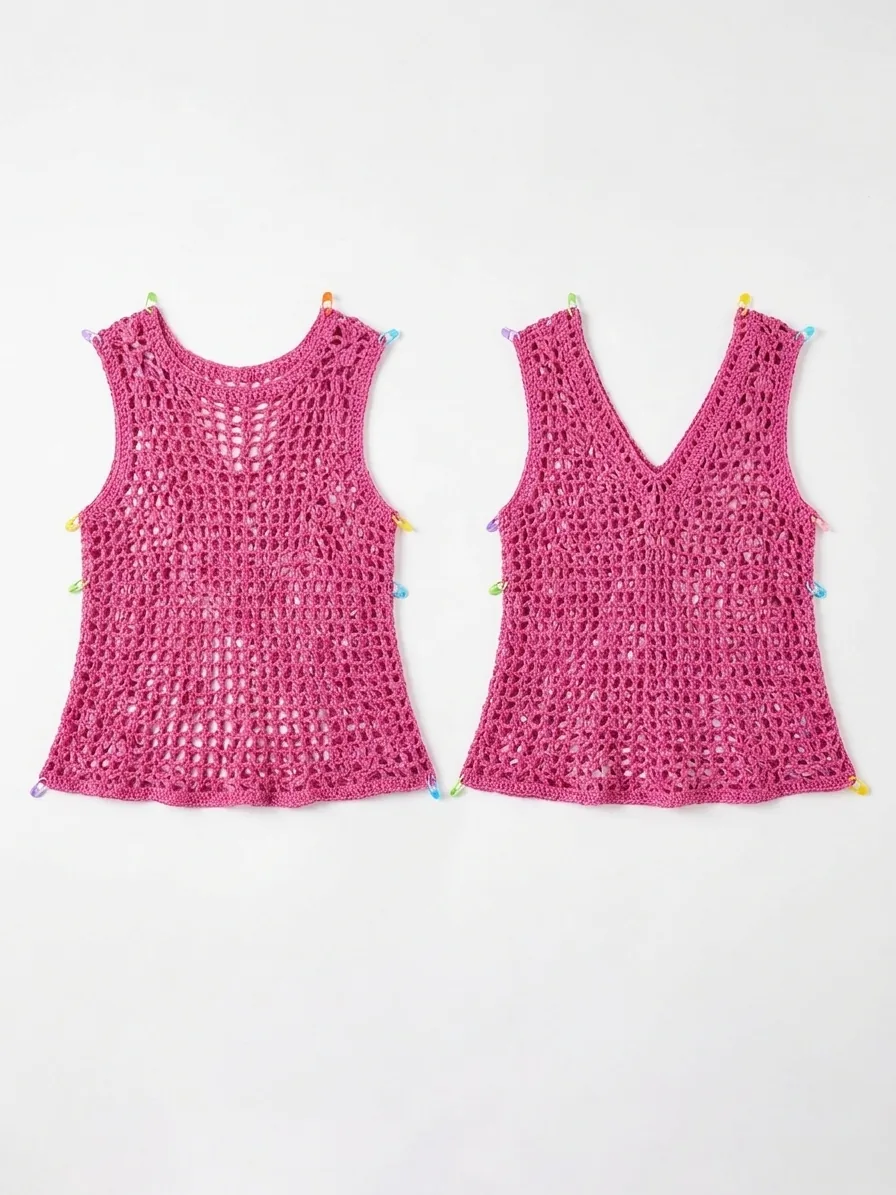
This floral crochet tunic pattern recreates the visual structure shown in the supplied reference: a vivid fuchsia openwork tunic with a rounded front neckline, deep V back, dimensional flowers, green leaves, a decorative floral border and long cords ending in small crochet balls. The garment is made as two lace panels, finished at the neckline and armholes, then transformed with appliqués after blocking.
Floral Crochet Tunic Pattern Overview and Dimensions
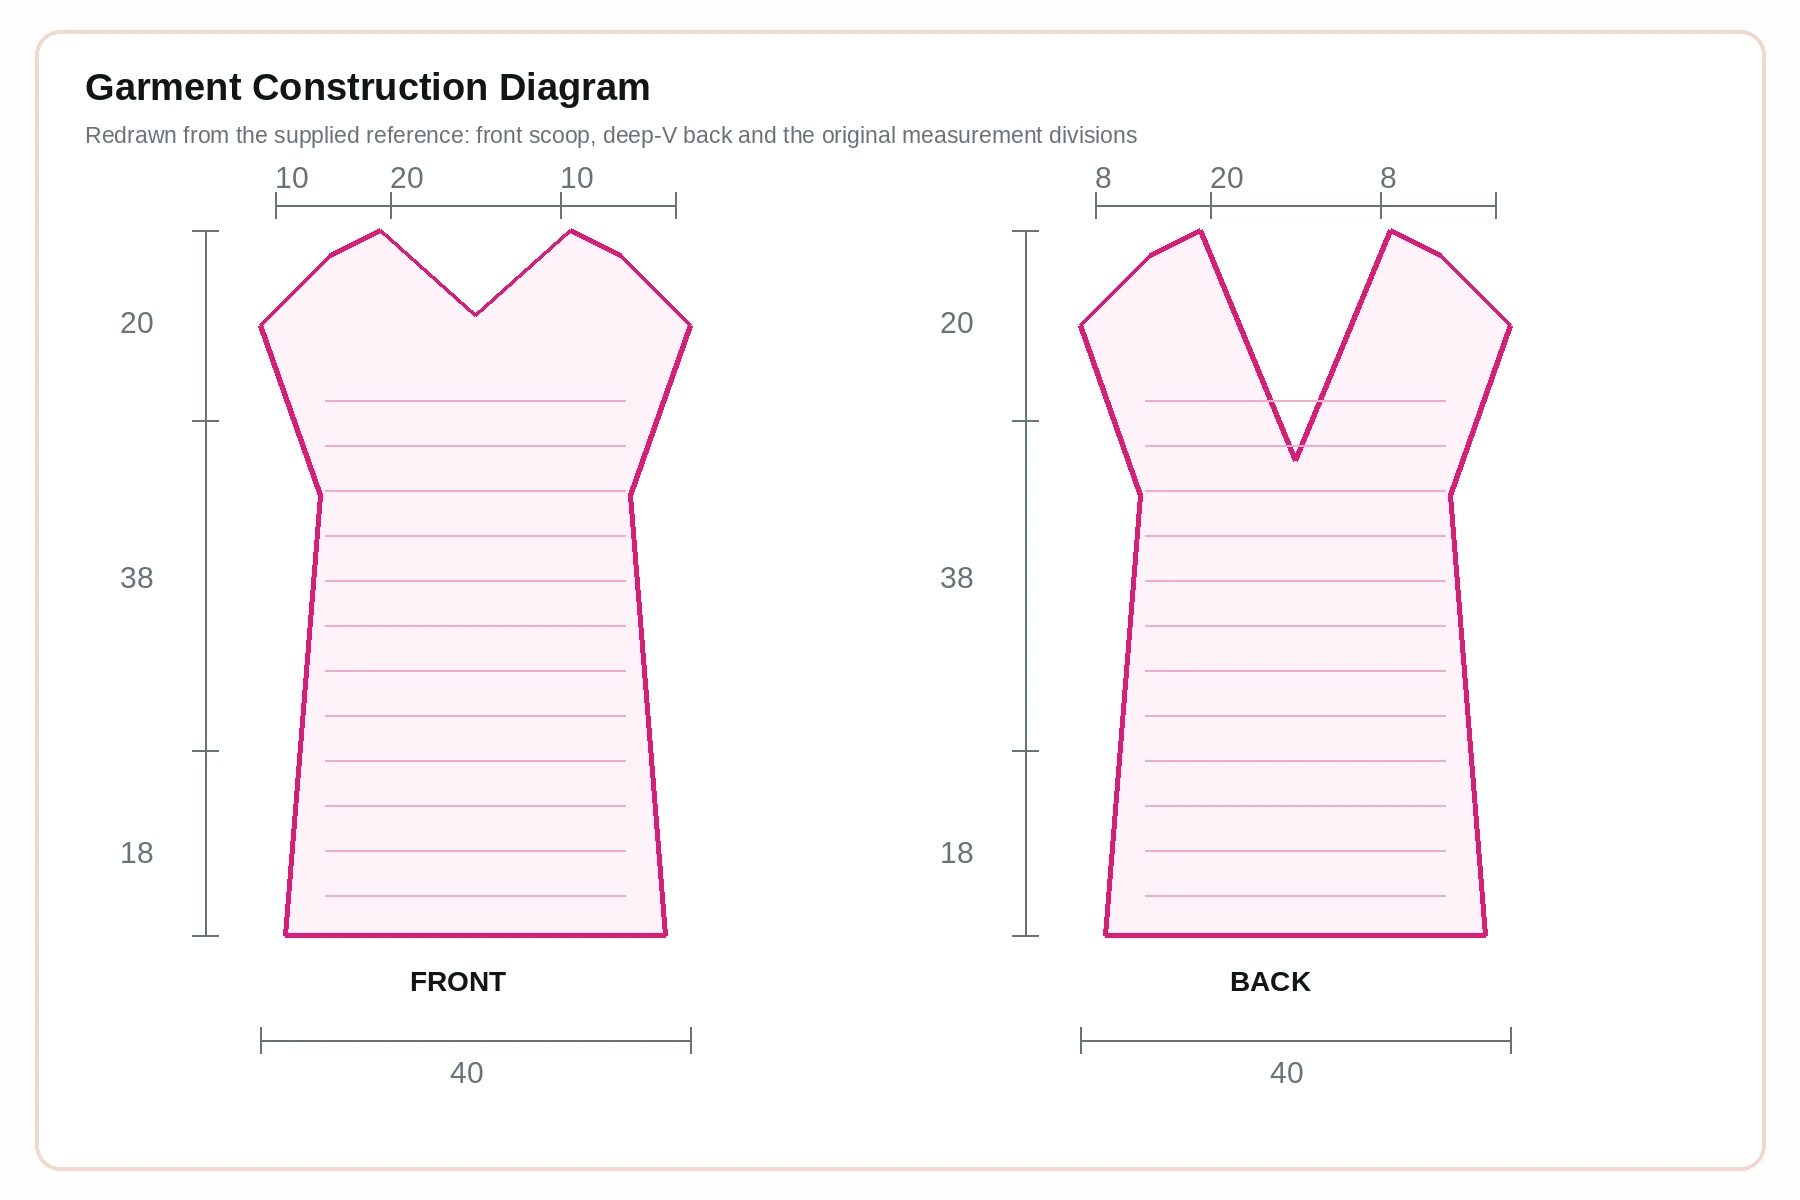
The source diagram shows a long sleeveless shape with a flared lower body. The front measures approximately 40 cm across: 10 cm shoulder, 20 cm neckline and 10 cm shoulder. The back neckline diagram uses approximately 8 cm shoulder sections around a 20 cm opening. Vertically, the chart divides the garment into about 20 cm for the upper armhole area, 38 cm for the main body and 18 cm for the decorative lower section. Treat these as blocked targets.
| Area | Reference target | How to use it |
|---|---|---|
| Front width | 40 cm | Choose finished width from bust plus desired ease. |
| Front neckline | 20 cm | Center the scoop and leave equal shoulder sections. |
| Back neckline | 20 cm | Shape a deep V while preserving secure shoulders. |
| Upper section | 20 cm | Shoulder to base of armhole. |
| Main body | 38 cm | Work lace straight or add slight flare. |
| Decorative hem | 18 cm | Include lace border, points and hanging cords. |
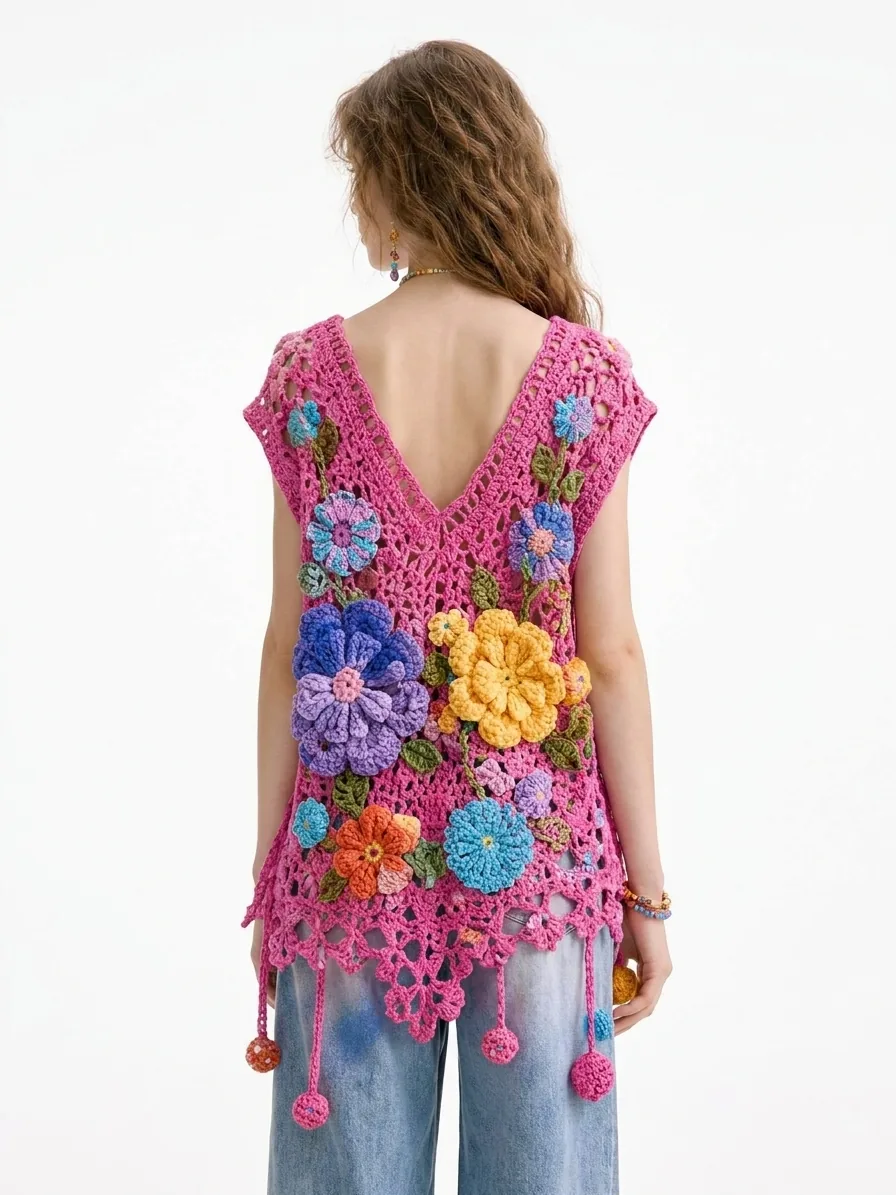
The photographed sample is worn with substantial positive ease and long side openings. For an airy tunic, aim for 8–16 cm total ease at the bust. For a closer vest, use 4–8 cm. The floral crochet tunic pattern looks best when the lace can hang vertically without stretching across the body.
Materials, Yarn and Blocked Gauge
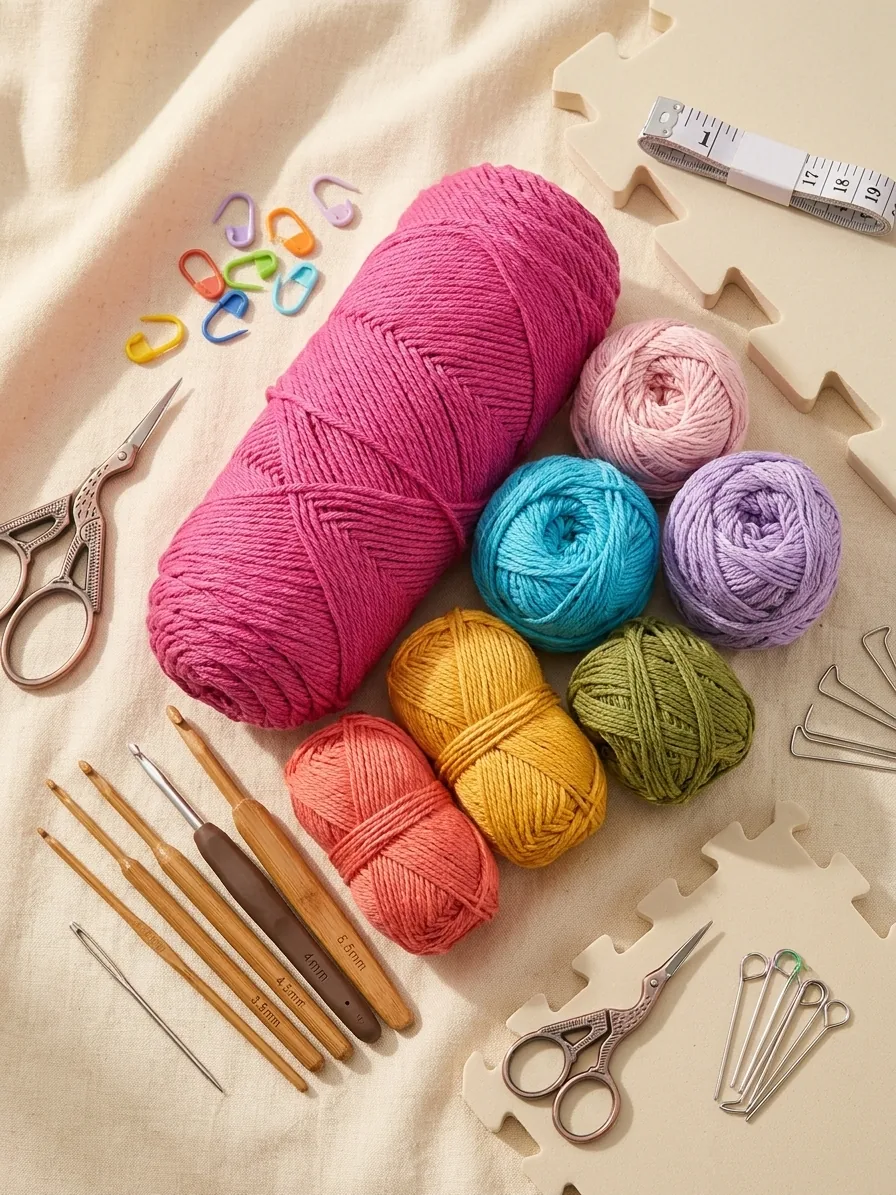
- Main color: approximately 700–1,000 m of sport or light-DK smooth cotton/cotton-blend yarn in fuchsia, depending on size and length.
- Flower colors: 25–60 m each of coral, golden yellow, turquoise, lavender, pale pink, orange and magenta.
- Leaf color: 80–140 m of olive or moss green.
- Crochet hooks: one hook that produces drapey lace and a hook 0.5 mm smaller for firm motifs; 3.0–4.0 mm is a practical starting range.
- Yarn needle, locking markers, sharp scissors, measuring tape, rustproof blocking pins and mats.
- Optional: clear elastic thread for stabilizing the shoulders and neckline on a heavy appliqué layout.
Gauge target
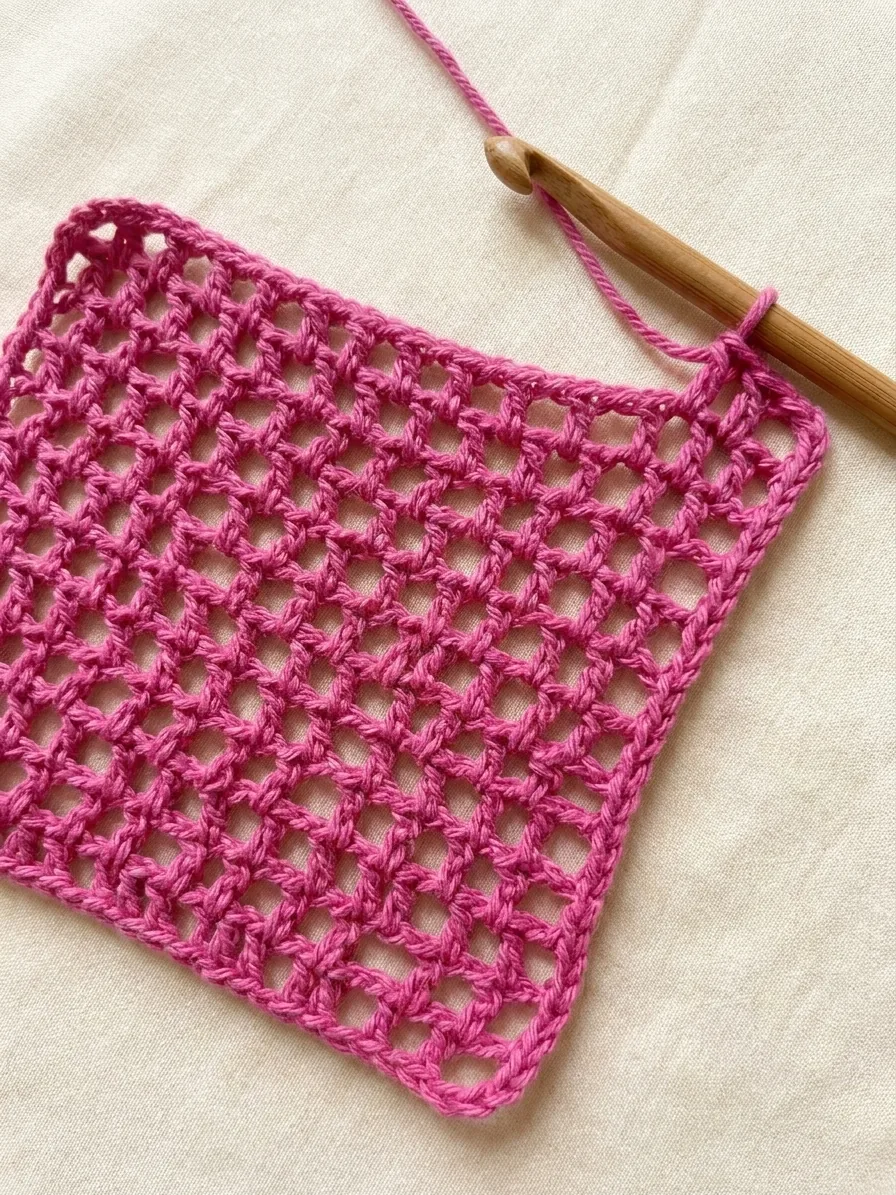
Create at least a 15 cm square in the main lace. Wash and pin it to shape without overstretching. A useful planning gauge is approximately 16 pattern blocks and 10–12 rows per 10 cm, but your actual blocked gauge controls every calculation. Count complete repeats, not individual chain loops.
Stitches and Main Lace Repeat
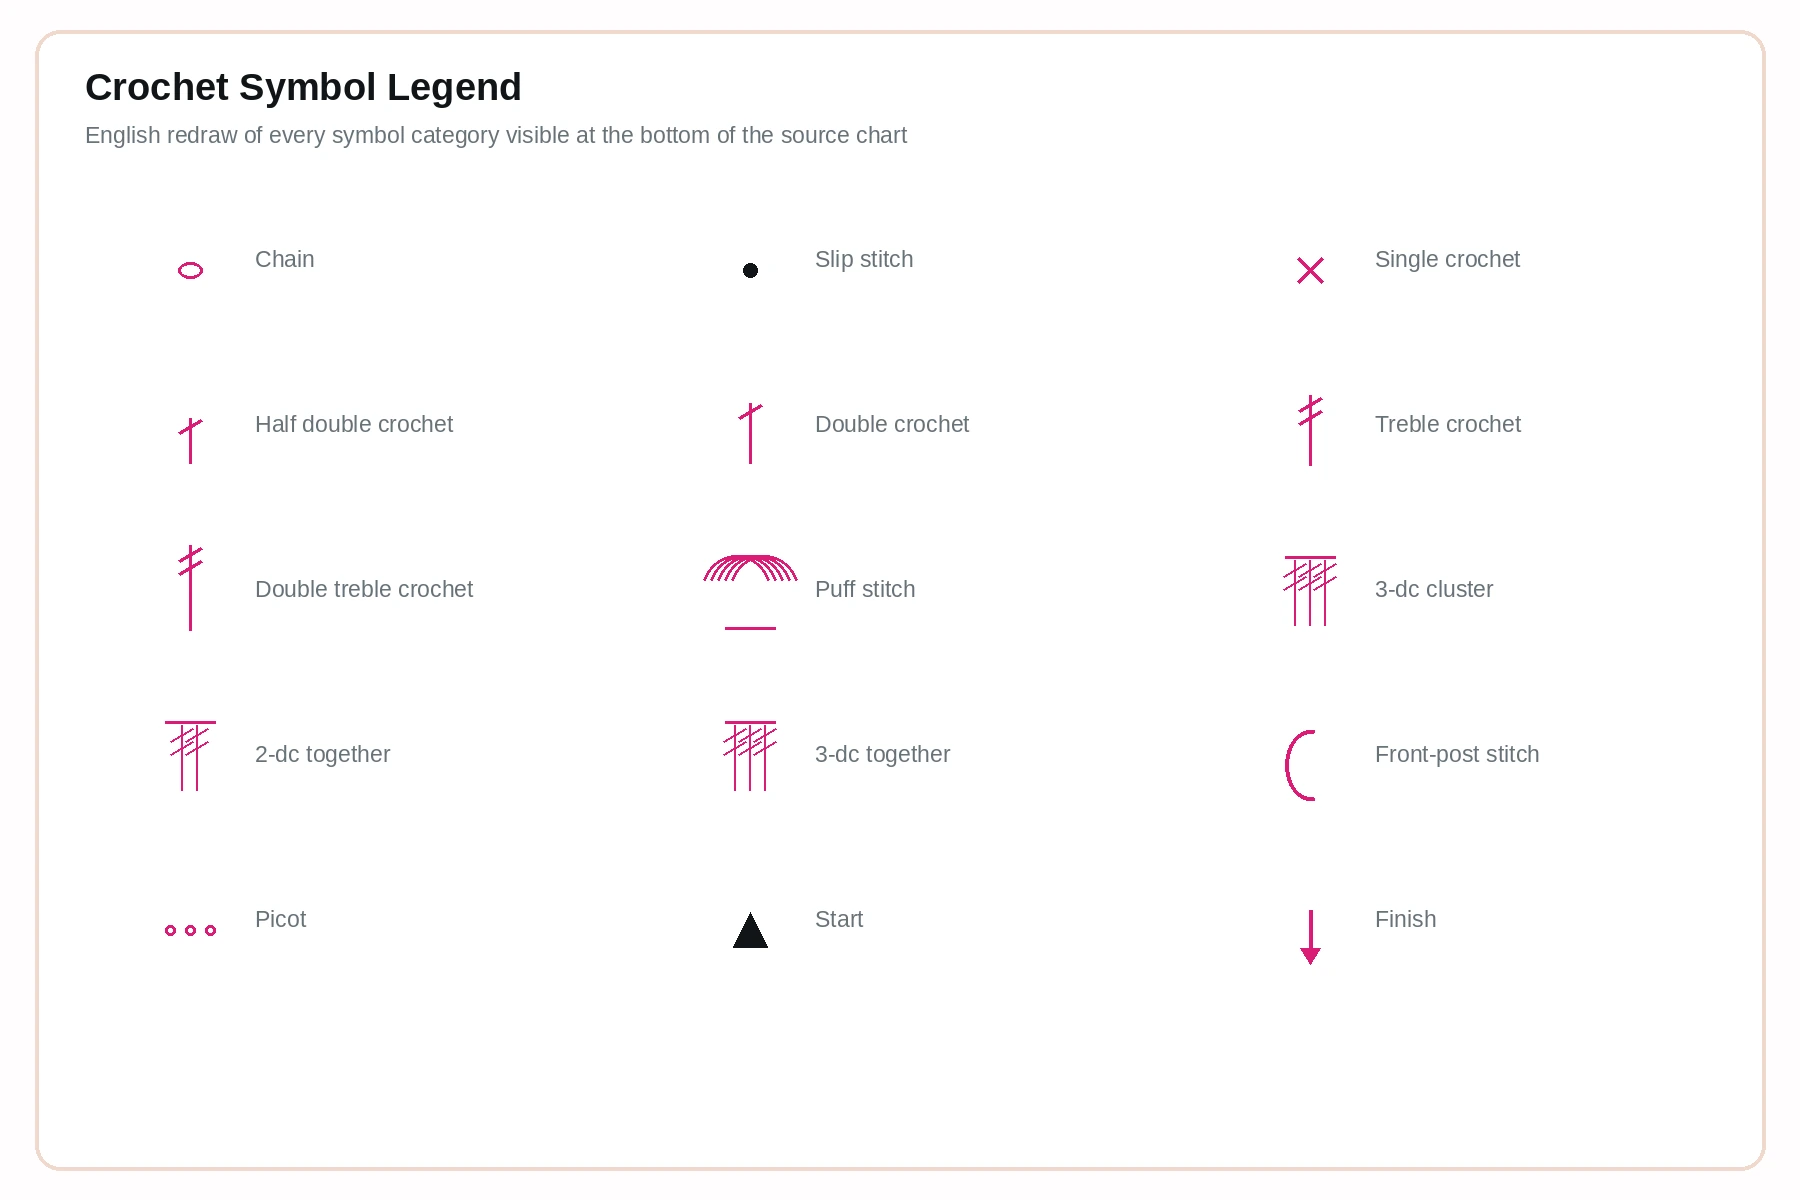
US terminology is used: ch = chain, sl st = slip stitch, sc = single crochet, hdc = half double crochet, dc = double crochet, tr = treble crochet, sp = space, sk = skip, rep = repeat, RS = right side and WS = wrong side.
Open mesh foundation repeat
Use a multiple of 4 chains plus turning chains. Row 1: dc in the required foundation chain, then repeat ch 1, skip 1 chain, dc in next chain. Row 2: ch 4 to count as dc plus ch 1, turn, then work dc in each dc and ch 1 over each ch-1 space. Repeat Row 2 for a stable mesh.
Decorative lace row
Every fourth or sixth row, replace selected mesh blocks with a small fan: work (2 dc, ch 2, 2 dc) in one ch-1 space, skip the next space and anchor with dc in the following dc. On the return row, place mesh stitches across the fan while maintaining the same overall repeat count. These subtle fans reproduce the richer openwork visible around the shoulders and lower body.
Crochet the Front and Back Panels
Step 1
Plan the finished width
Select bust ease first. Divide the finished circumference by two for each panel. The reference front is about 40 cm wide, but a larger size must use a wider panel rather than tighter stitches.
Step 2
Work the lower body
Chain for the chosen width and work the lace repeat upward. To create a gentle A-line, remove one mesh block at each side every 6–8 rows until the upper body is 4–8 cm narrower than the hem. Maintain mirrored shaping.
Step 3
Begin the armholes
At approximately 56 cm from the lower lace-body edge—or your chosen point—leave 2–4 repeats unworked at each side. Over the next 4 rows, reduce one additional mesh block at each armhole edge. Continue straight until the armhole depth reaches about 20 cm.
Step 4
Shape the front scoop
When 9–11 cm of upper-body depth remains, mark the center 20 cm. Work each shoulder separately. Remove one mesh block at the neck edge on the next 3–5 rows until a smooth scoop forms. Finish with equal 8–10 cm shoulder sections.
Step 5
Shape the deep V back
Mark the center at the start of the armhole section. Work left and right sides separately, decreasing one partial repeat at the V edge every row or every second row. Continue until each shoulder measures approximately 8 cm and matches the front shoulder length.
Make both panels the same total length before adding the lower border. Count rows from the armhole base to each shoulder. The floral crochet tunic pattern depends on balanced shoulders even though the appliqué layout is intentionally asymmetrical.
Seam the Panels and Finish Openings
Step 6
Block before seaming
Wet-block both panels to the paper measurements. Align rows, straighten side edges and confirm the armholes are equal. Let the pieces dry completely.
Step 7
Join shoulders
With RS together, slip stitch through matching shoulder stitches or use mattress stitch. Avoid a tight seam; it must support the flower weight without puckering.
Step 8
Join side seams
Seam from the lower armhole to the chosen side-slit point. The reference leaves movement at the hips, so a 15–25 cm side opening works well. Reinforce the top of each slit.
Step 9
Edge neck and armholes
Work one round of sc evenly around each opening, followed by a round of reverse sc or sl st. At the front scoop and back V, skip stitches only when needed to keep the edge flat. Place three stitches together at the V point for a crisp turn.
Large Three-Dimensional Crochet Flower
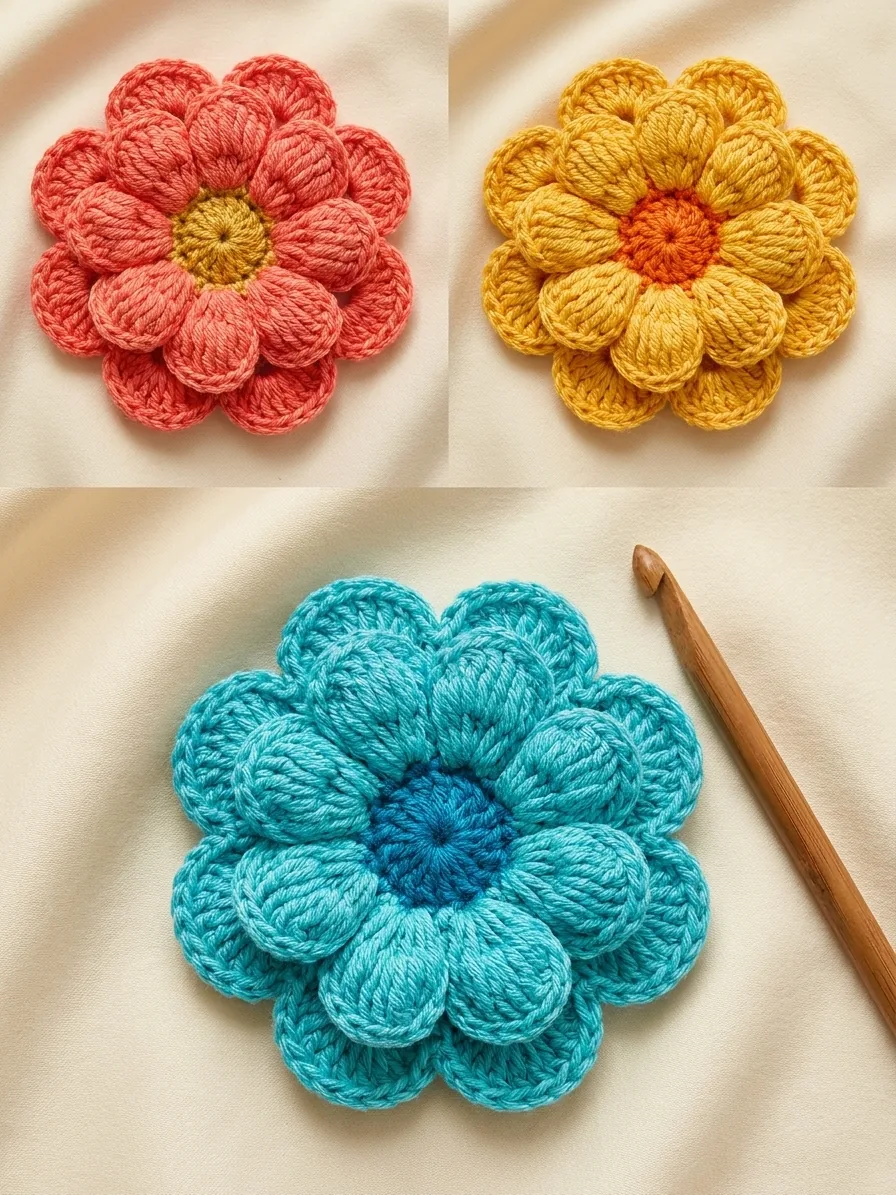
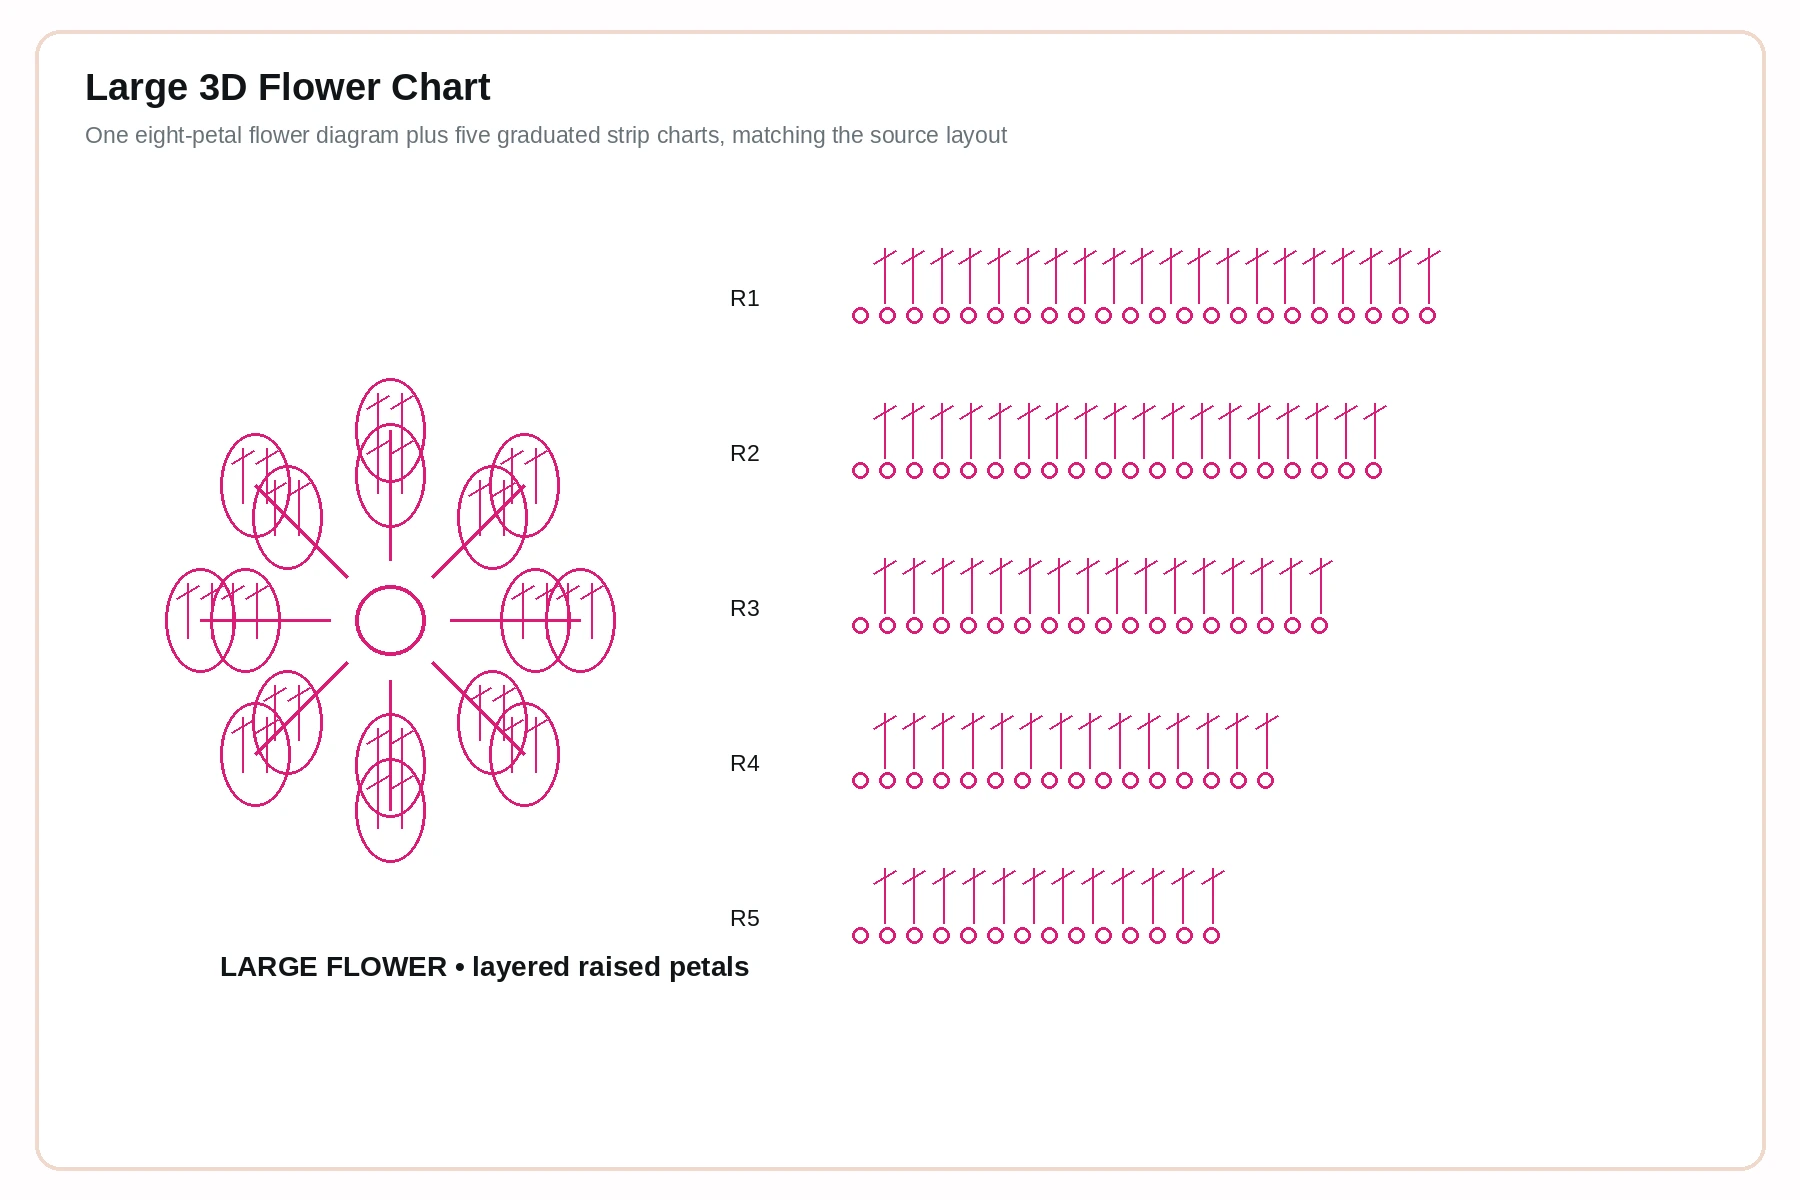
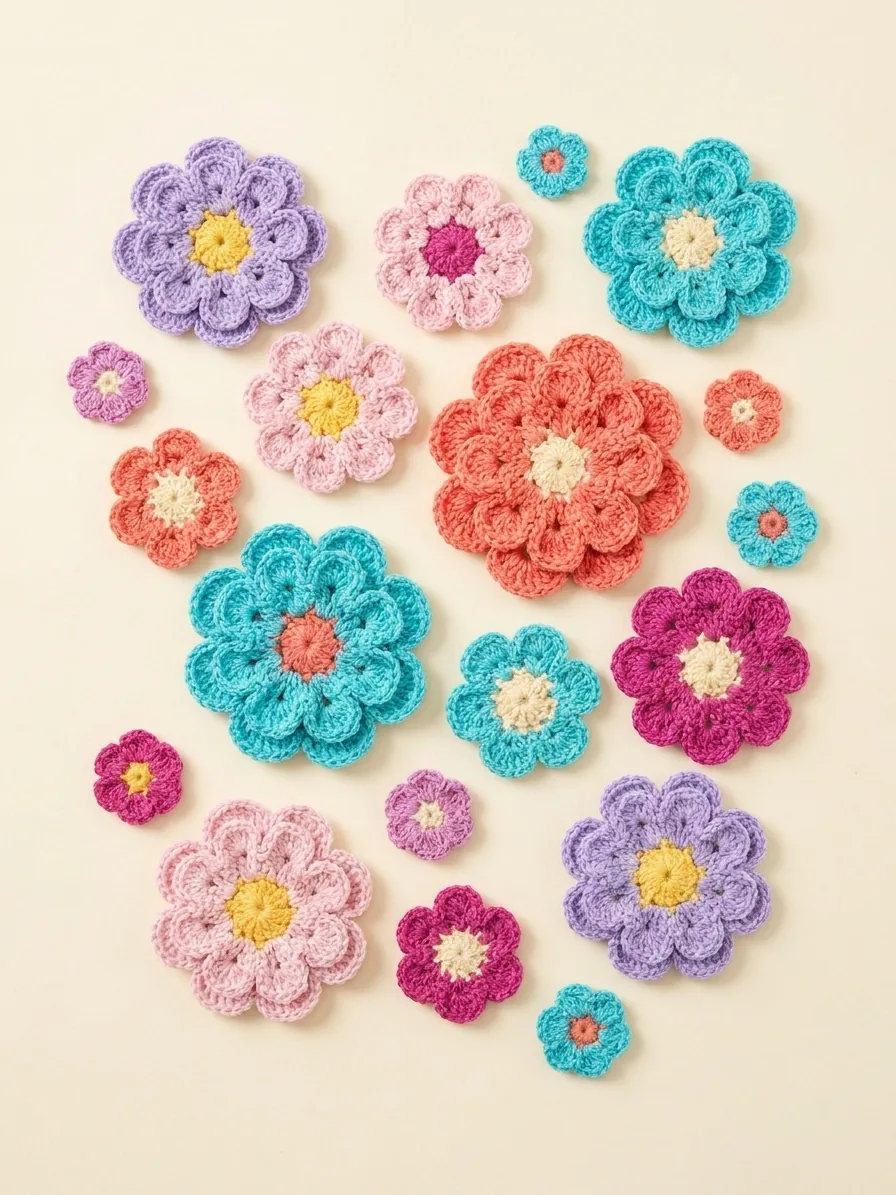
The largest flowers anchor the composition. Make 3–5 blooms in strong contrasting colors. The following raised-petal method gives the substantial layered look seen in the reference.
- Round 1: with center color, make a magic ring, ch 1 and work 12 sc into the ring; join.
- Round 2: change color. Repeat (sl st in next st, ch 7, work 1 sc, 1 hdc, 3 dc, 1 hdc down the chain, sl st in same base stitch) around for 6 inner petals.
- Round 3: working behind the petals, make ch-4 arches anchored around the post area between petals.
- Round 4: in each arch work sc, hdc, 5 dc, hdc, sc for 6 broad petals.
- Round 5: make ch-6 arches behind Round 4.
- Round 6: work sc, hdc, 7 dc, hdc, sc in each arch. Fasten off with a 40 cm sewing tail.
Steam lightly from the reverse without flattening the petals. The finished diameter should be approximately 10–14 cm. A large bloom can become heavy, so sew through the center and inner petal bases while leaving outer petals free.
Medium, Small and Accent Flowers
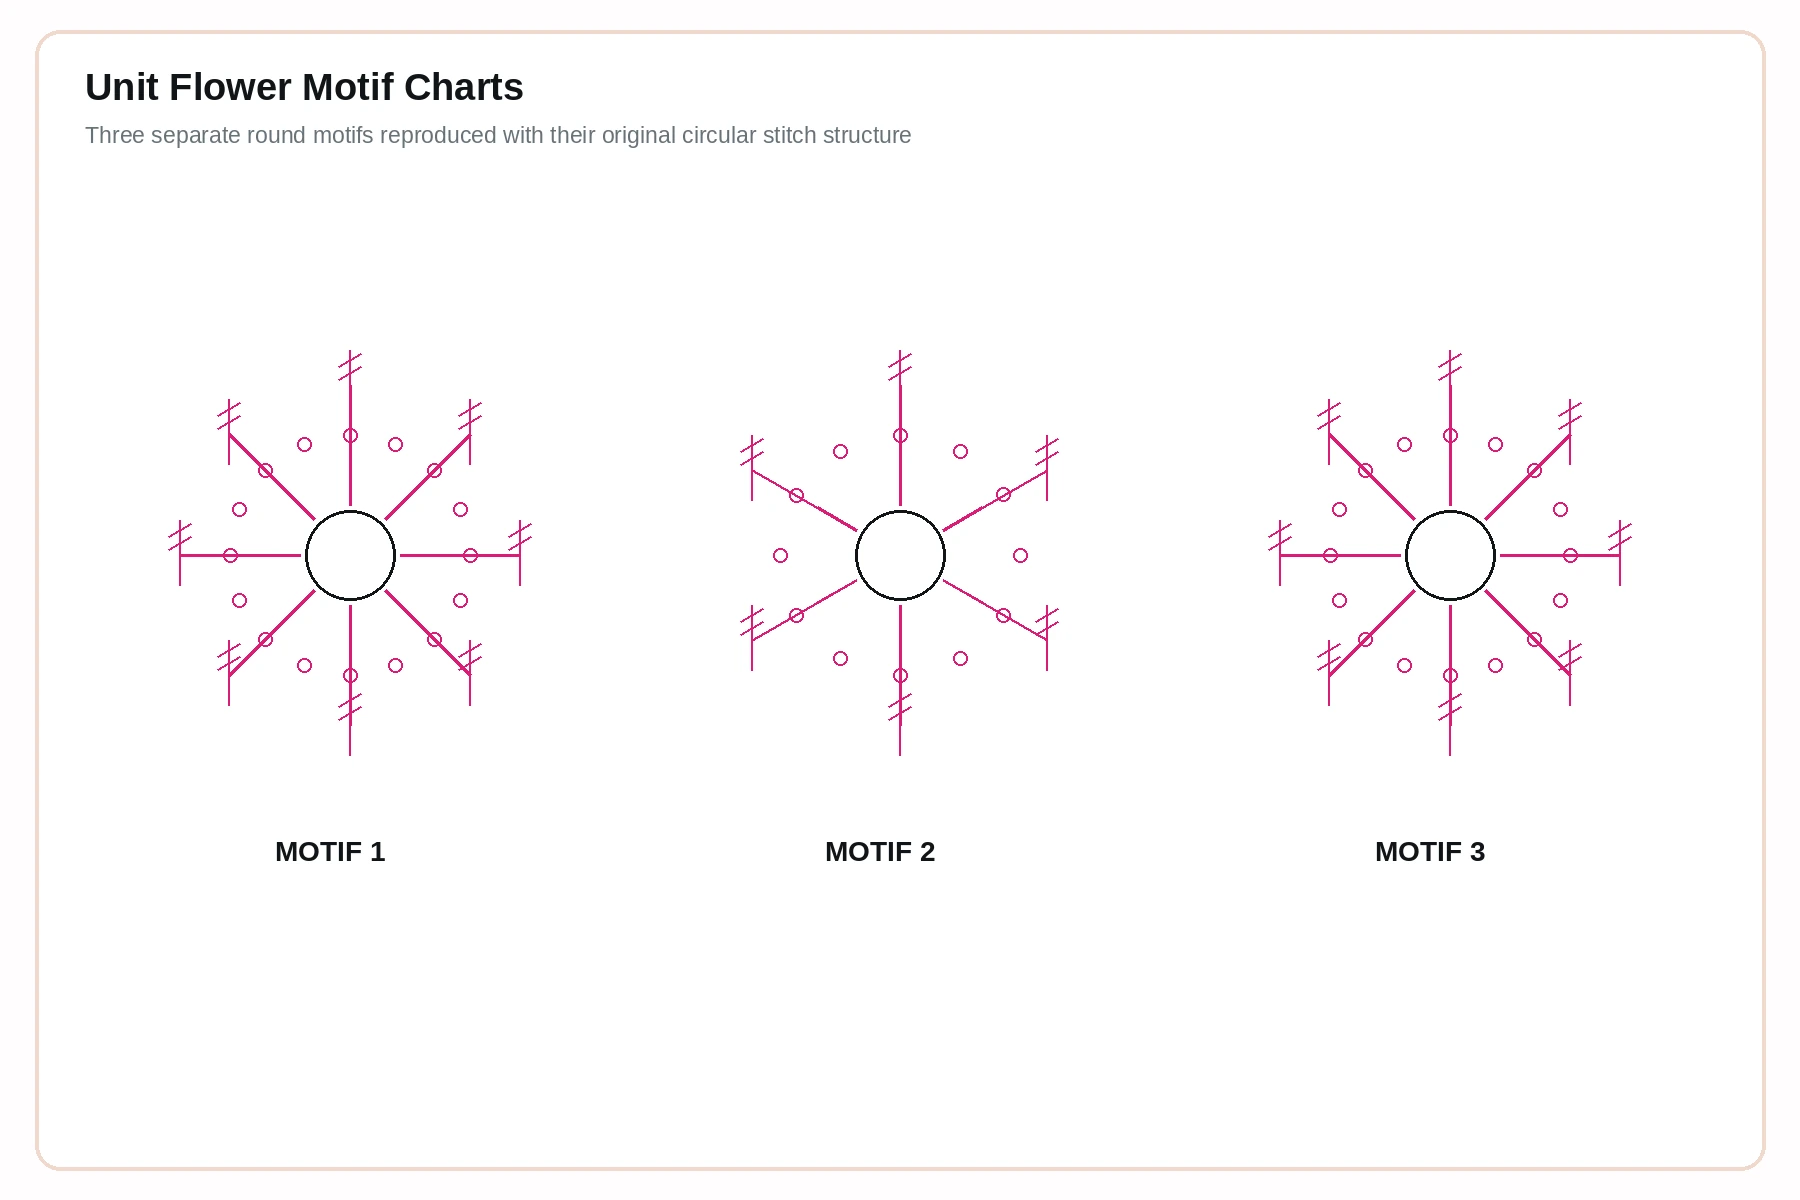
Medium layered flower
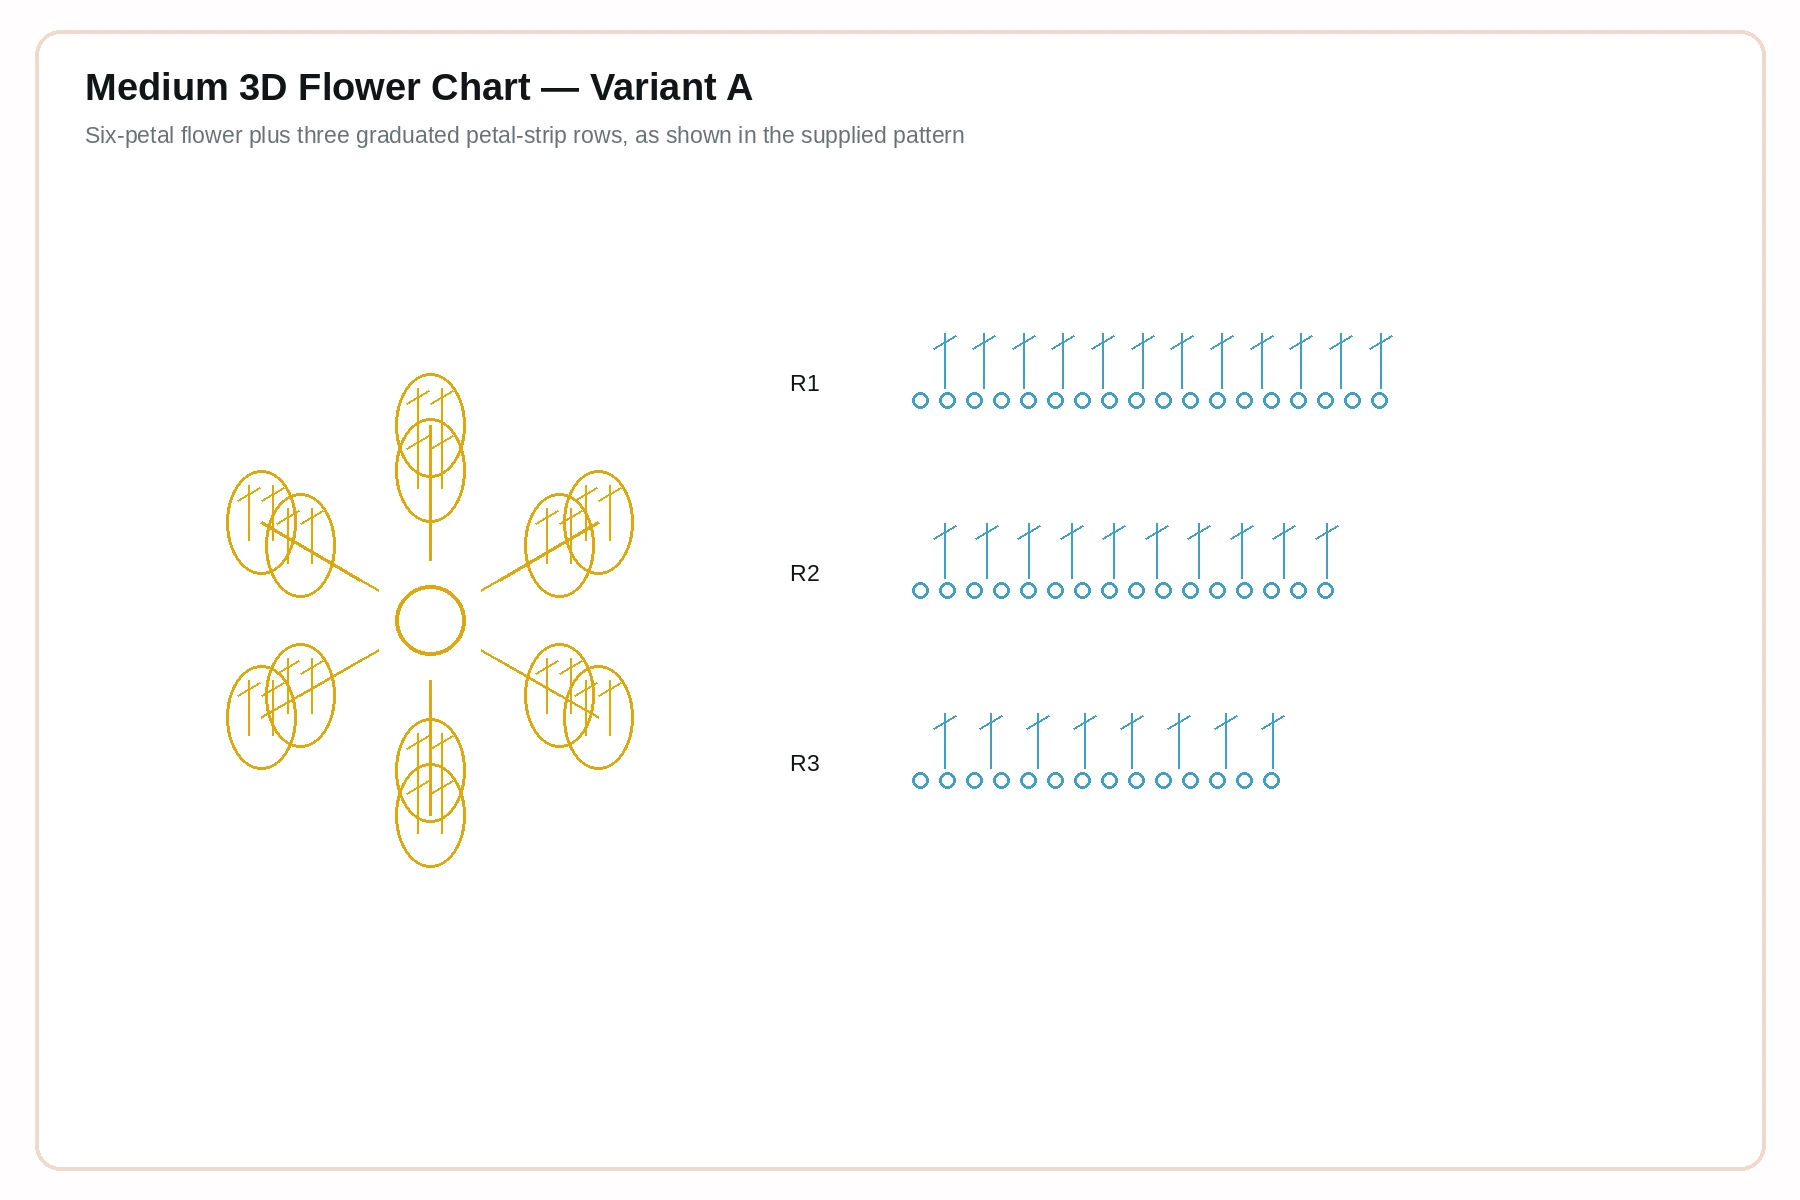
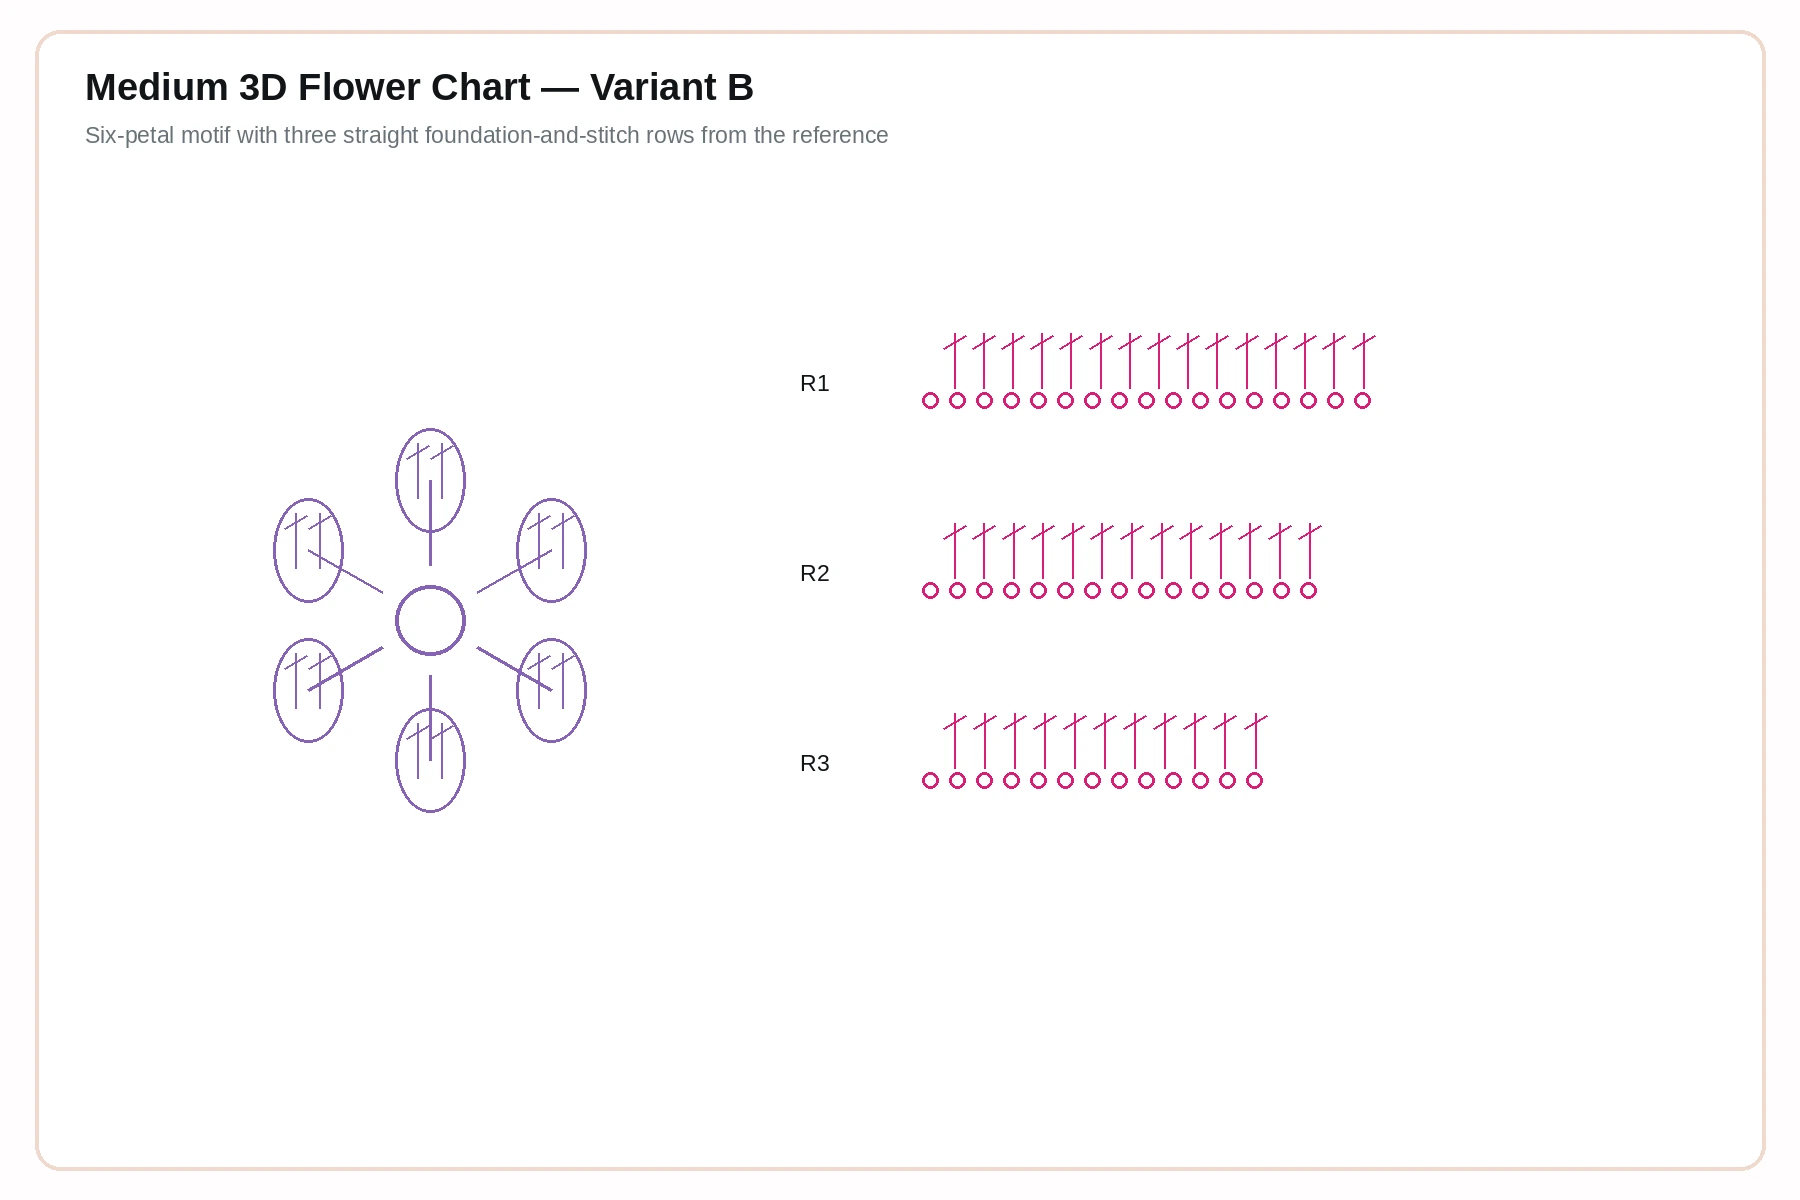
Make a magic ring with 10 sc. For five inner petals, repeat: sl st, ch 5, work sc, hdc, 2 dc, hdc back along the chain, sl st in the next base stitch. Add five ch-4 arches behind the first layer and fill each with sc, hdc, 4 dc, hdc, sc. Target diameter: 6–9 cm.
Small flat flower
Make a magic ring. Repeat five times: ch 3, 2 dc in the ring, ch 3, sl st in the ring. Pull closed and add a contrasting French knot or tiny crocheted center. Target diameter: 3–5 cm.
Tiny round blossom
Work 8–10 hdc into a magic ring, join and fasten off. Add a contrasting center with embroidery. These small circles bridge gaps beside leaves and are useful at the ends of stems.
For a balanced floral crochet tunic pattern, repeat colors in three places instead of using every color only once. Keep the largest blooms apart and connect them visually with medium flowers, leaves and stems.
Crochet Leaves, Stems and Appliqué Map
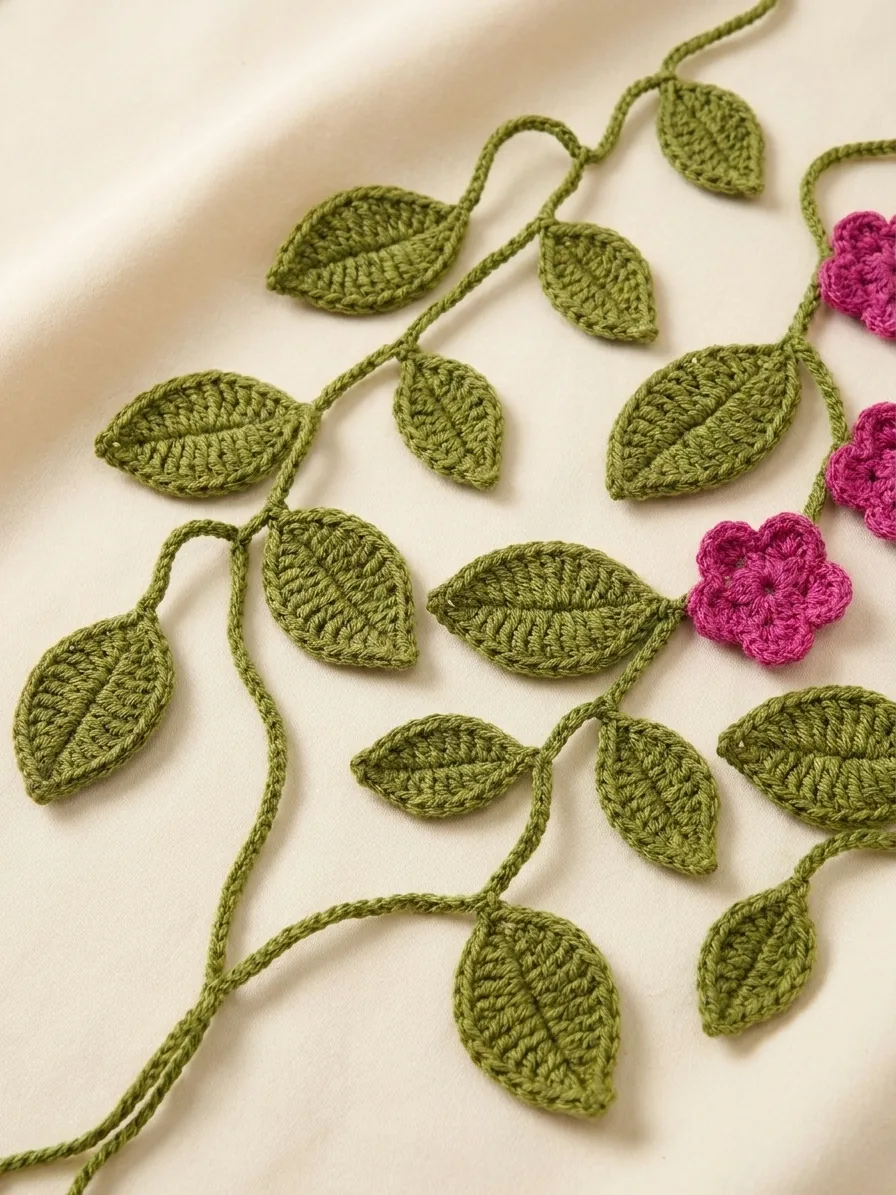
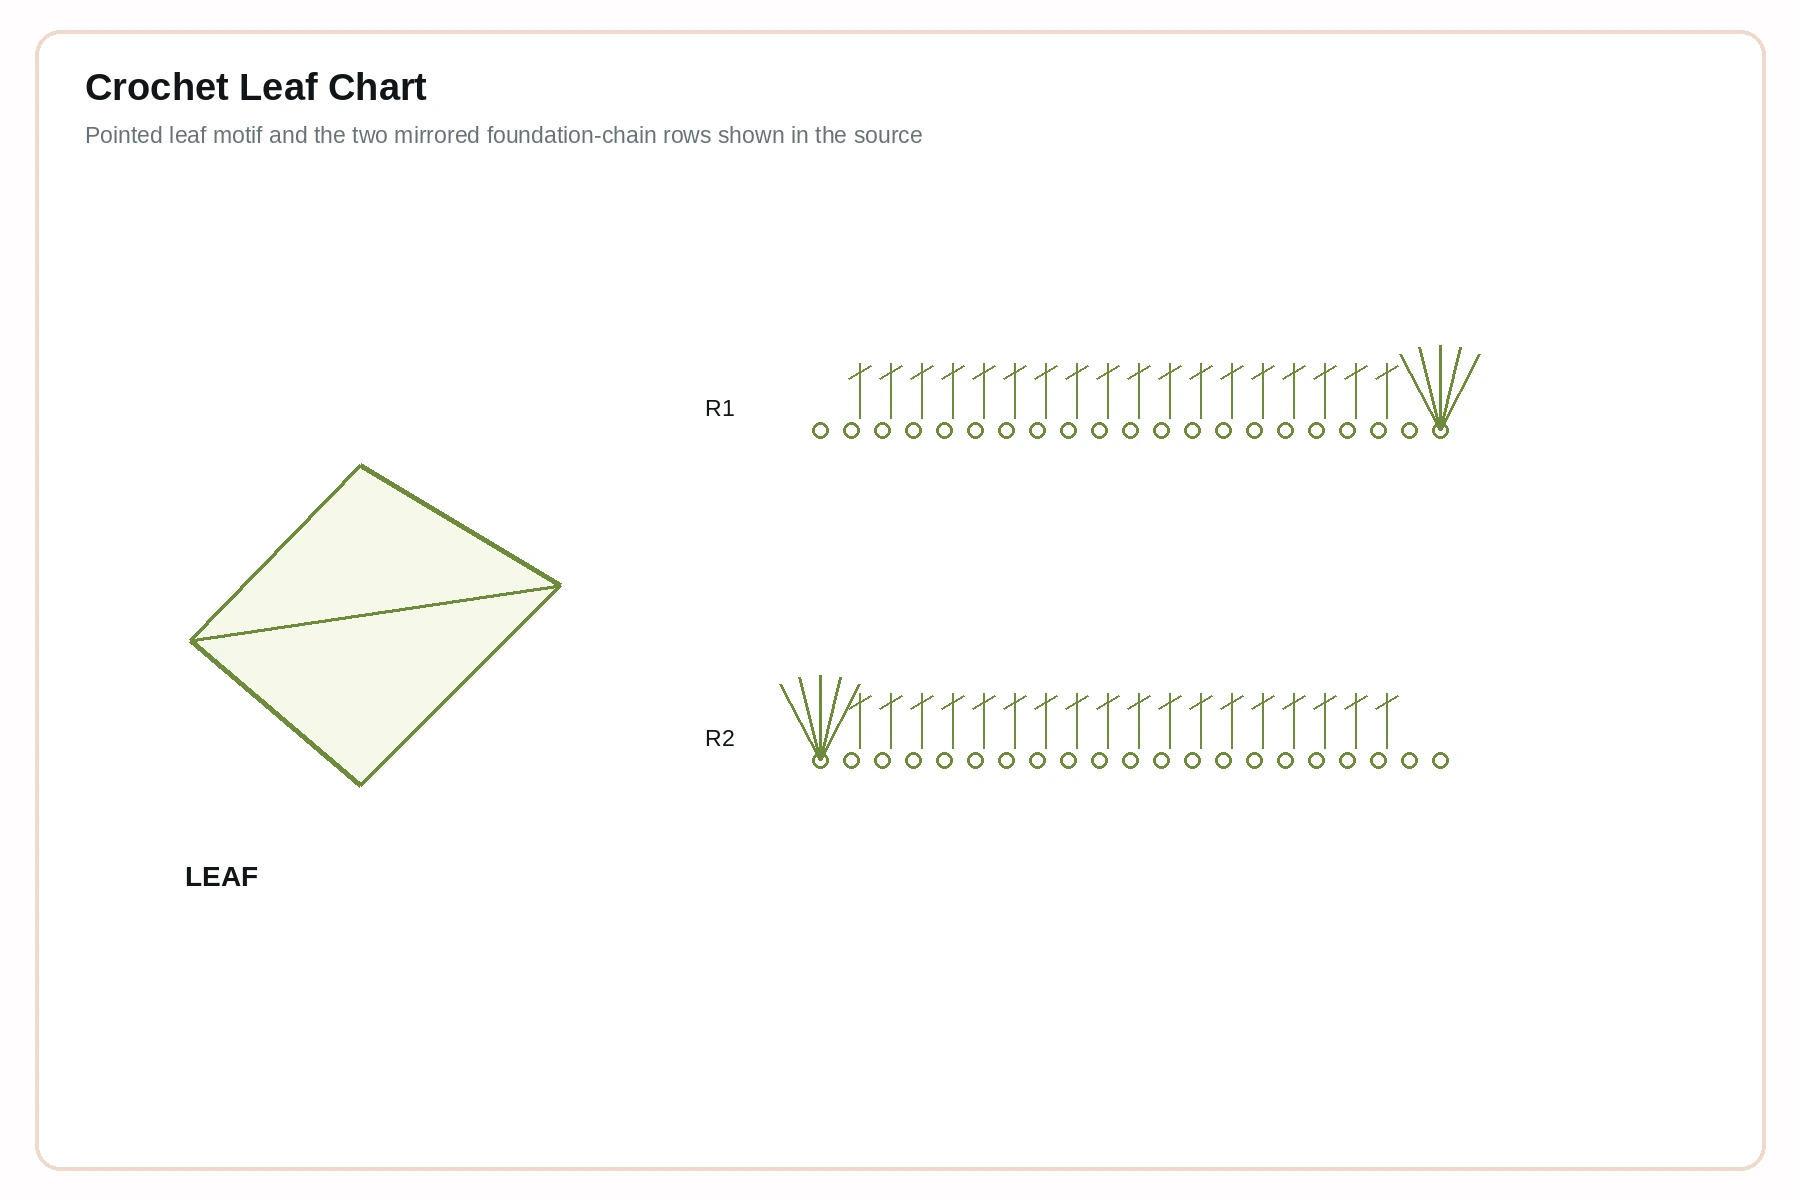
Pointed leaf
Ch 11. Starting in the second chain, work sl st, sc, hdc, 4 dc, hdc, sc, then 3 sc in the last chain. Continue down the opposite side with sc, hdc, 4 dc, hdc, sc and sl st. Ch 1, then surface slip stitch through the center to form a vein. Make some leaves with ch 8 and others with ch 13 for variation.
Vine stems
Chain to the required length and slip stitch back through every chain for a firm cord. Curve stems naturally between blooms. Do not pull them straight; gentle arcs make the composition look botanical rather than geometric.
Placement strategy
- Lay the blocked tunic flat and mark the bust line, side seams and neckline.
- Place the three largest flowers first: one upper, one near the waist and one toward the opposite lower side.
- Add medium flowers to create a diagonal flow. Keep heavy motifs away from both armhole edges.
- Use stems and leaves to connect blooms, turning some leaves in opposite directions.
- Repeat the process on the back but protect the deep V and keep shoulder appliqués lightweight.
- Photograph the final layout before removing pieces for sewing.
Floral Hem Border and Hanging Cords
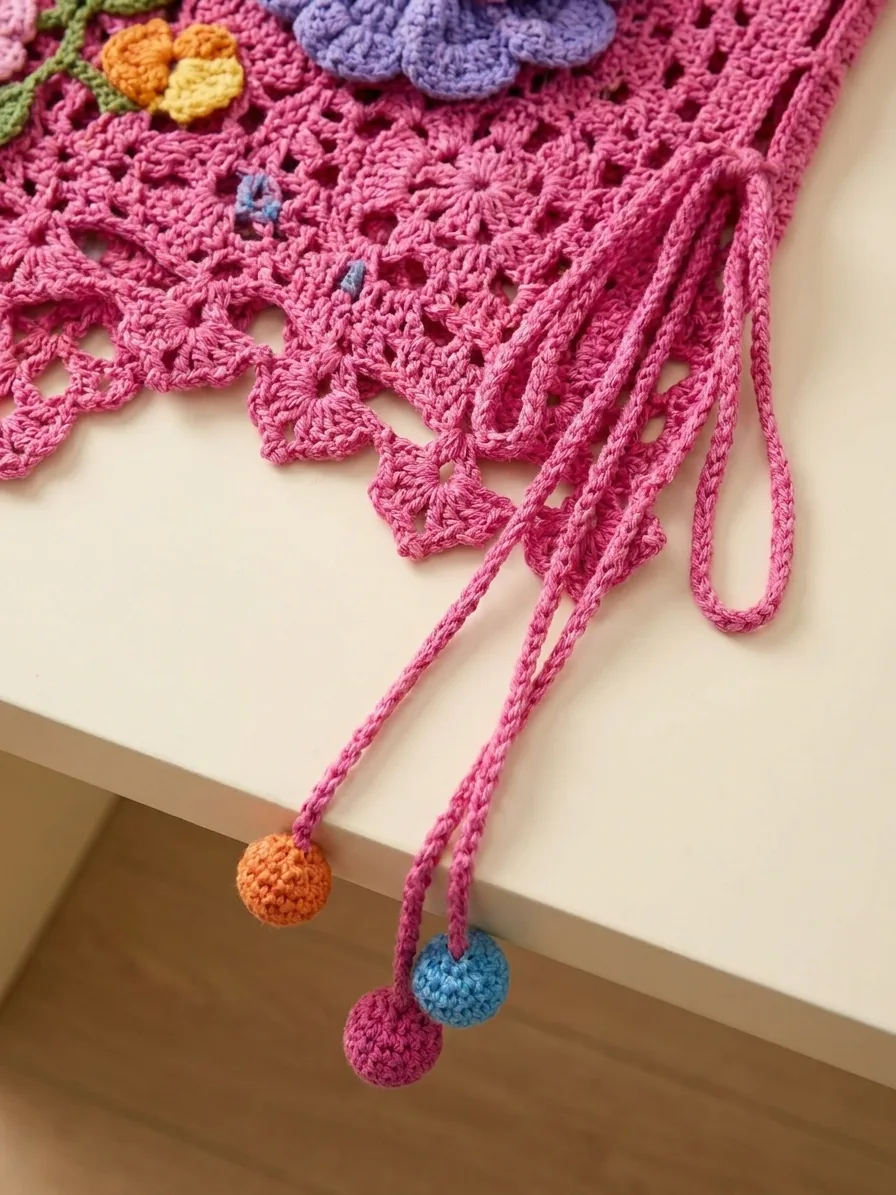
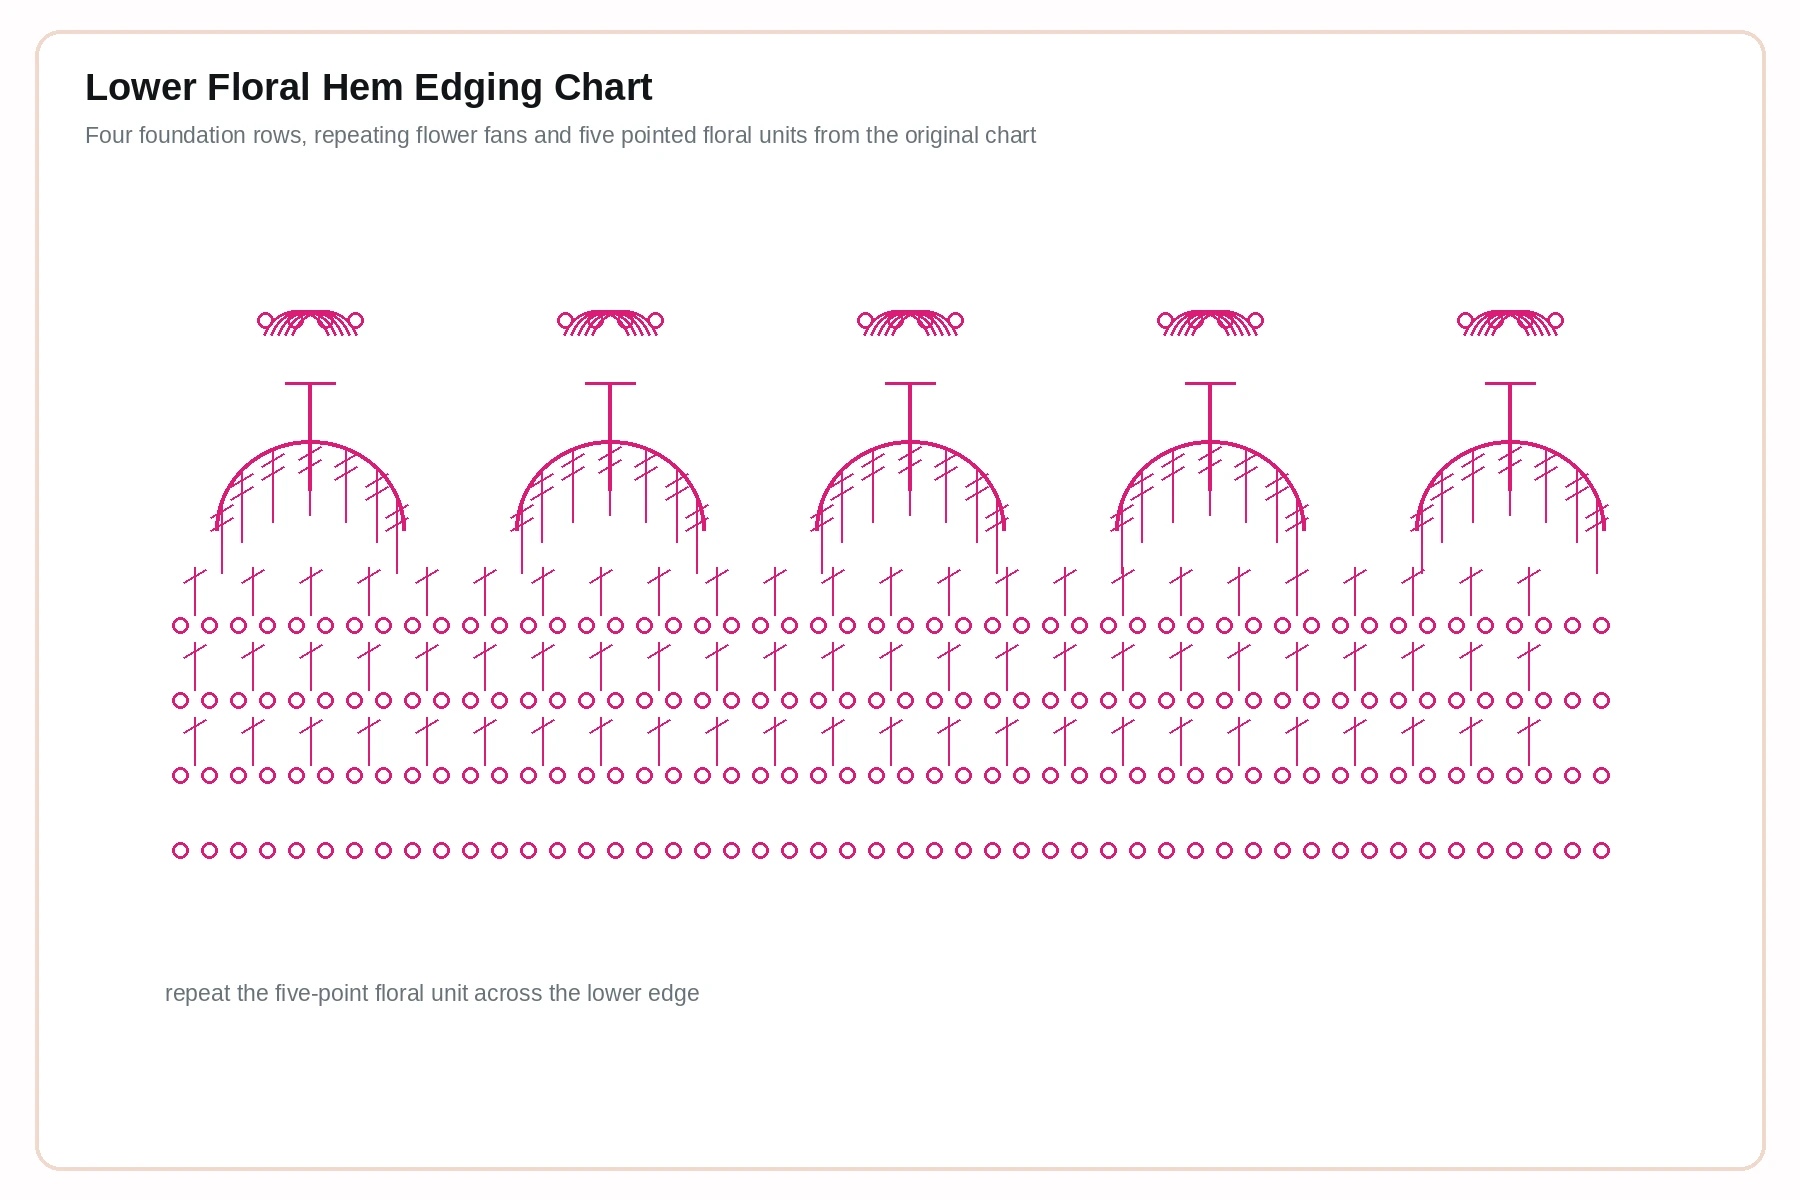
The reference reserves roughly 18 cm for the decorative lower section. Begin with one stabilizing sc round around the hem and side-slit edges. Space stitches evenly so the edge neither cups nor flares.
Pointed floral border
- Foundation round: repeat ch 3, skip approximately one mesh space, sc in the next stable point.
- Fan round: in each ch-3 space work sc, ch 3, 3 tr, ch 3, 3 tr, ch 3, sc.
- Point round: work sl st to the center of each fan, then ch 5, a 5-tr cluster, ch 5 and sl st in the same center. Place smaller ch-3 arches between points.
- Final round: add picots—ch 3 and sl st in the first chain—at the tips. Block every point individually.
Long ties and ball ends
Attach yarn at selected hem points and chain 25–45 cm. Slip stitch back along the chain. For the ball, make 6 sc in a magic ring, increase to 12, work two even rounds, decrease to 6 with a small amount of yarn tail or filling inside, then close. Vary cord lengths for movement while keeping the side cords shorter than the center points.
Appliqué Assembly, Blocking and Final Finish
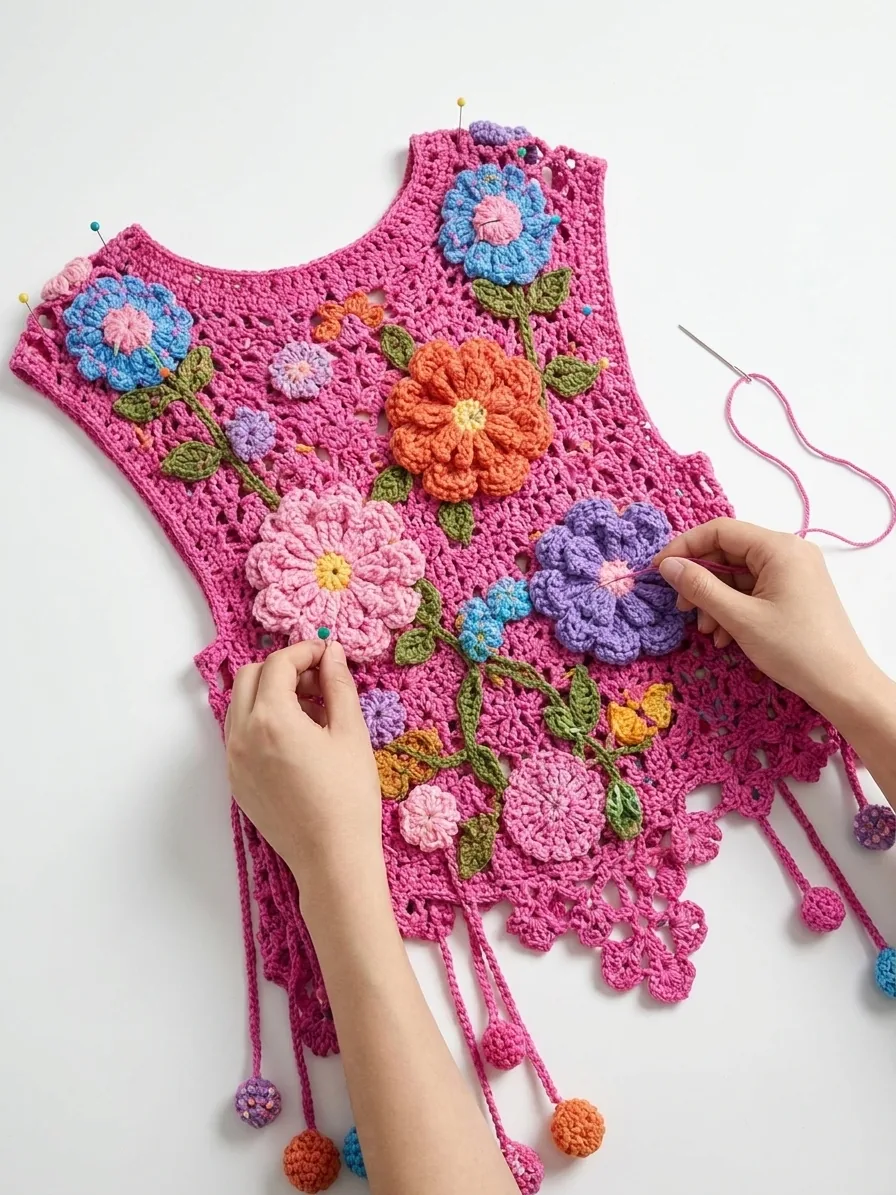
Step 10
Pin on a dress form or flat board
Support the tunic at its final dimensions. Pin flowers, stems and leaves through stable lace intersections rather than chain loops. Check the design from several meters away.
Step 11
Sew stable centers first
Use matching yarn and small stitches. Secure flower centers and inner petal bases, leaf center veins and stem ends. Leave outer petals and some leaf tips free for dimension.
Step 12
Control weight
Distribute large flowers across the body. If one area sags, add discreet support stitches between the motif and several nearby lace intersections. Avoid one long thread spanning open mesh.
Step 13
Final block
Mist the finished tunic, shape it without crushing petals and pin the lace hem. Support raised flowers with rolled towels while drying. Do not press dimensional petals flat.
Try the garment over the intended outfit. Confirm the shoulders stay in place, the back V lies flat, cords do not catch underfoot and the appliqués remain comfortable against the body. Weave in every end twice because wearable motifs receive more movement than flat décor.
Sizing and Custom Adjustments
- Bust sizing: finished circumference = body measurement + preferred ease. Divide by two for panel width.
- Length: add or remove straight body rows before armhole shaping. Preserve the 18 cm border only if you want the same long decorative finish.
- Armhole depth: use 18–22 cm for many adult sizes, but measure a garment that fits well.
- Front neckline: widen the 20 cm opening for a broader scoop or begin shaping earlier for a deeper neckline.
- Back V: begin the V at the armhole line for the dramatic reference look; begin 5–8 cm higher for more coverage.
- Flower scale: use fewer large flowers on smaller sizes and more medium flowers on larger sizes so the design remains proportional.
- Yarn substitution: match blocked fabric drape, not label category alone. A dense acrylic yarn will not behave like smooth cotton.
Floral Crochet Tunic Pattern FAQ
What skill level is this tunic?
Intermediate to advanced. You should be comfortable reading stitch structure, shaping mesh, seaming lace, making motifs and adjusting from blocked gauge.
Can I make it without the flowers?
Yes. The base tunic is wearable on its own, but the flowers and leaves are what reproduce the statement design in the reference.
How much ease should I add?
Use 8–16 cm total positive ease for the relaxed layered look, or 4–8 cm for a closer vest fit.
Why must I block before sewing flowers?
The lace changes dimensions after washing. Sewing motifs to unblocked fabric can cause puckering or an uneven neckline later.
Can I use acrylic yarn?
You can, but choose a smooth lightweight yarn and test drape. Cotton or a cotton blend gives clearer lace and firmer flowers.
How do I wash the finished tunic?
Hand wash gently in cool water, support the garment when lifting, reshape flat and arrange every dimensional flower before drying.
More crochet inspiration
Continue Your Handmade Wardrobe
Visit the store for statement crochet garments, floral motifs and professionally formatted patterns.
Explore more projects
Browse crochet patterns, discover free crochet patterns, or visit the amigurumi collection.




