

Crochet Bee Baby Slippers: Step-by-Step Tutorial
A complete visual-match pattern with sizing, safety guidance, and step-by-step photos
About These Crochet Bee Baby Slippers
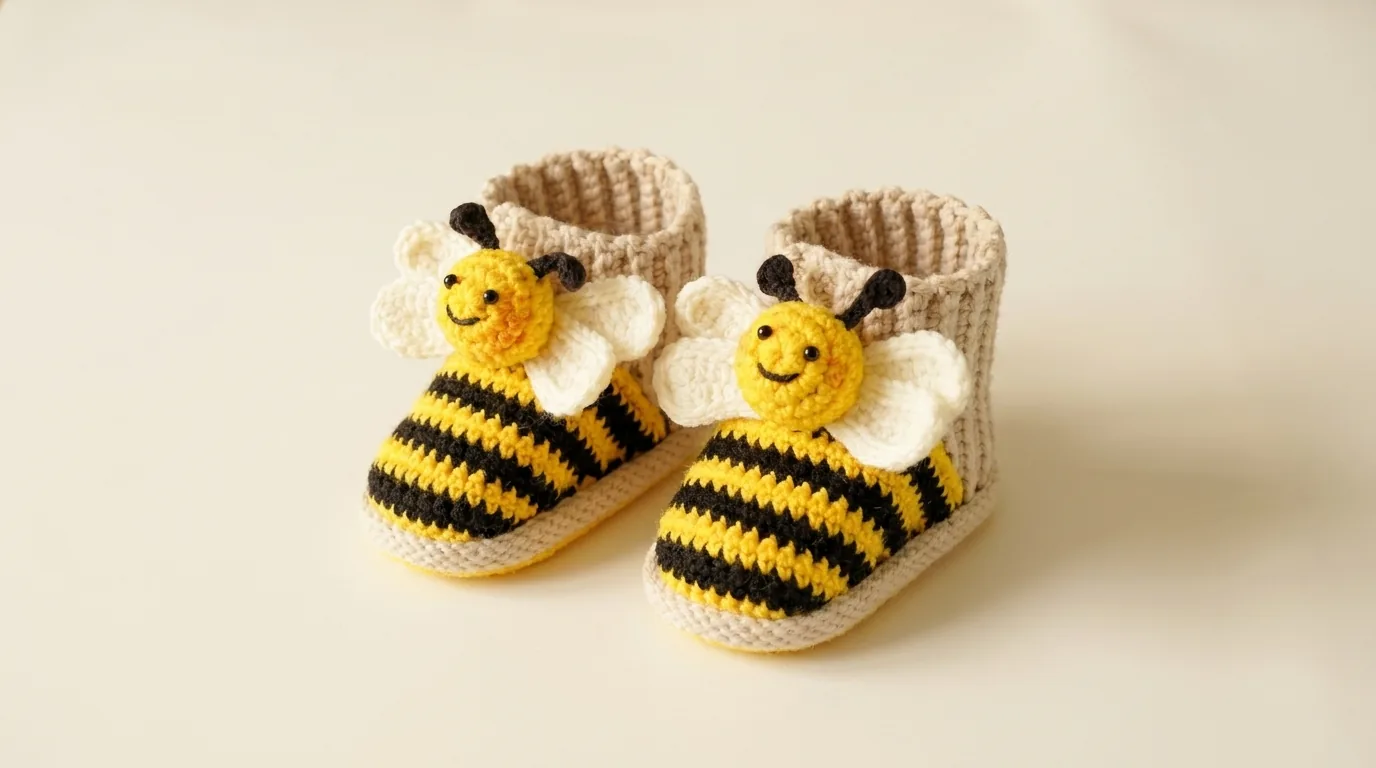
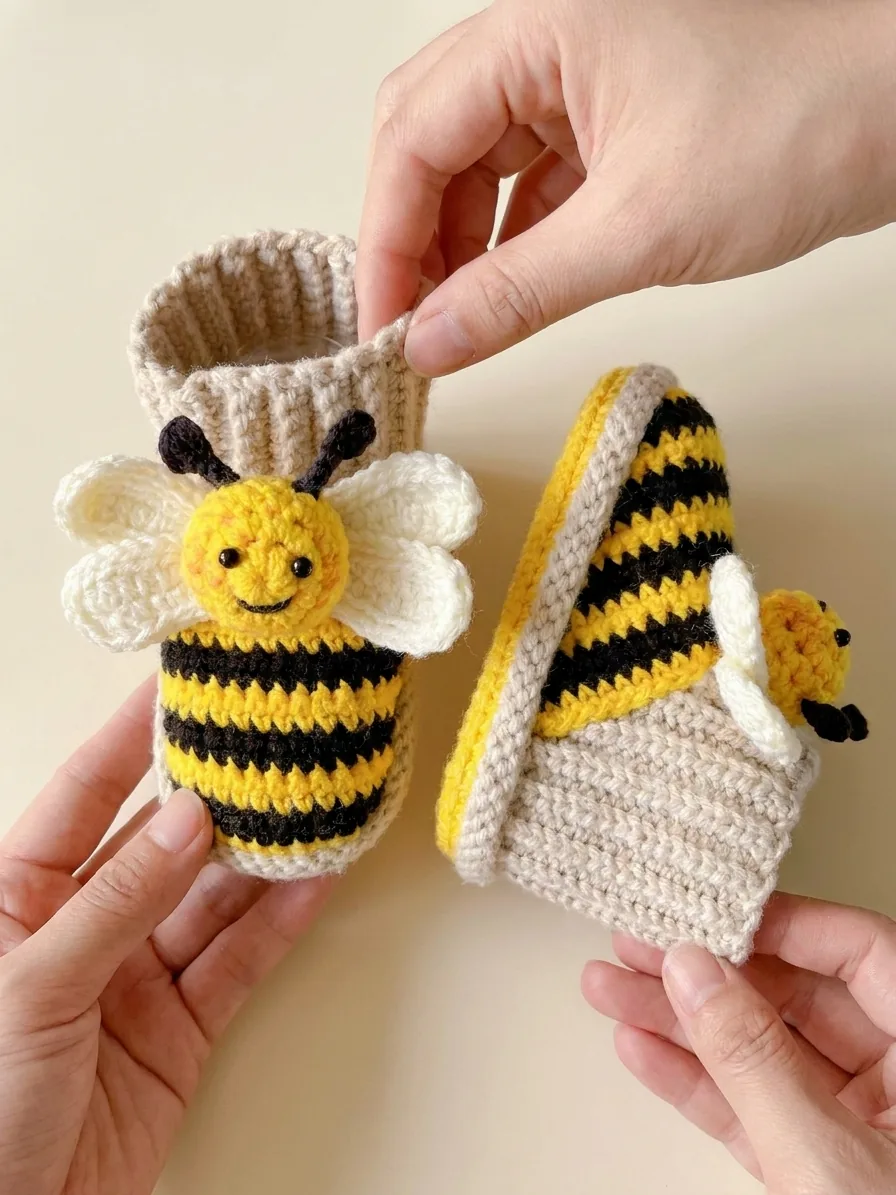
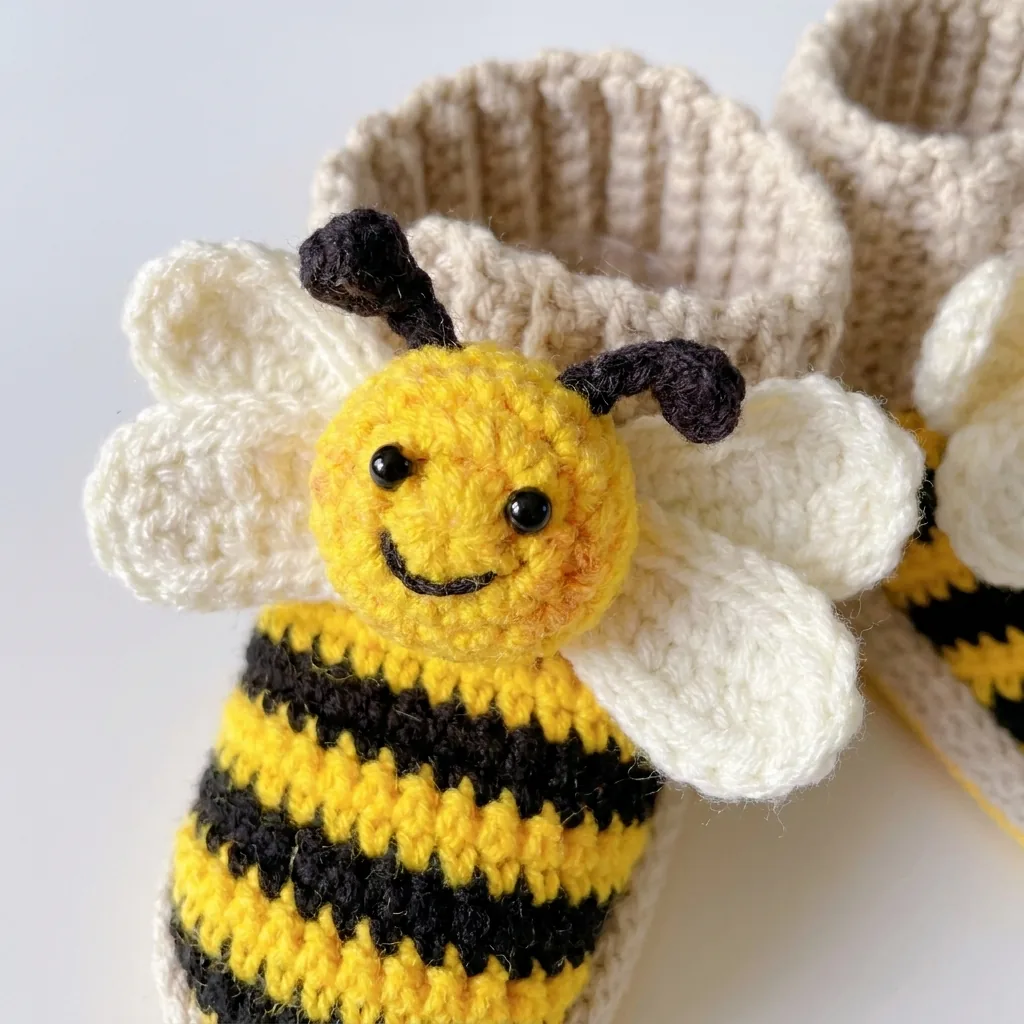
This tutorial creates a coordinated pair of tall crochet bee slippers for a baby or young toddler. Each slipper has a cream oval sole, a rounded yellow-and-black striped foot, a tall cream ribbed cuff, a raised bee face at the toe, four white wings, and two black antennae. The reference image shows a cheerful yellow bee palette with bold black bands and a light neutral background. The written design below preserves those visual anchors while making the construction explicit.
The default size is intended for an approximately 10–11 cm foot length. That is an estimate based on the reference image, not a measurement recovered from the source. Measure the recipient’s foot before beginning and adjust the sole length if necessary.
Crochet Bee Baby Slippers Size and Skill Level
| Feature | Target |
|---|---|
| Intended foot length | 10–11 cm |
| Approximate sole width | 5–5.5 cm |
| Upper height at heel | 8–10 cm, including cuff |
| Skill level | Advanced beginner |
| Construction | Cream oval sole, striped foot, separate ribbed cuff, sewn face, four wings, and antennae |
The project uses single crochet, increases, decreases, color changes, crocheting through the back loop, sewing, and basic embroidery. The time requirement is approximately 3–5 hours for a pair, depending on experience and the amount of facial detail added.
Materials for Crochet Bee Baby Slippers
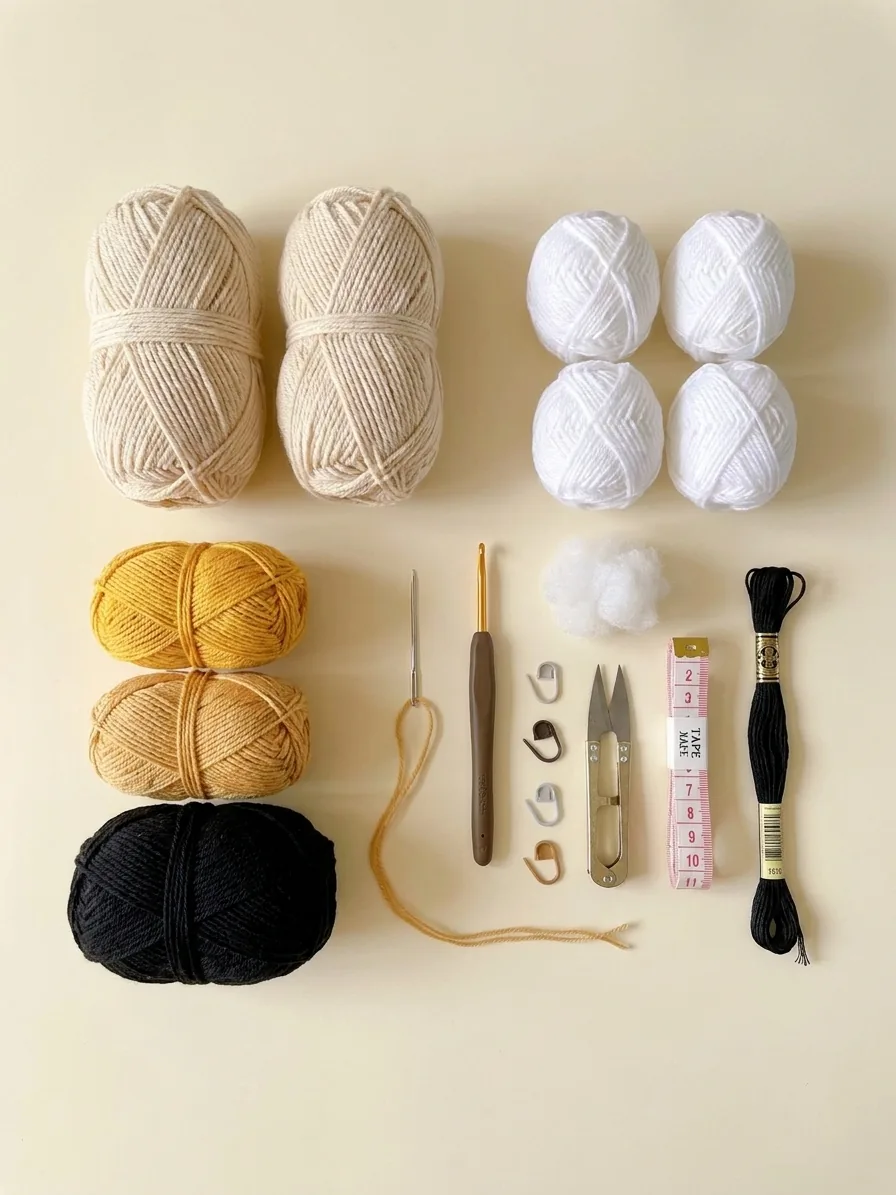
Use worsted-weight or aran yarn in the following colors:
| Color | Use |
|---|---|
| Honey yellow | Foot stripes and bee face |
| Deep black | Stripe bands, antennae, pupils, mouth, optional eye outlines |
| Warm cream | Oval sole and tall ribbed cuff |
| Soft white | Four wings per slipper and optional eye highlights |
| Blush pink | Optional cheeks |
You will also need a 3.0–3.5 mm crochet hook, a yarn needle, scissors, stitch markers, polyester fiberfill for the small face appliqué if a raised face is desired, and a flexible tape measure. Optional 6–8 mm safety eyes may be used only for items not intended for young children; embroidered eyes are the safer choice for baby footwear.
Crochet Bee Baby Slippers Gauge and Sizing
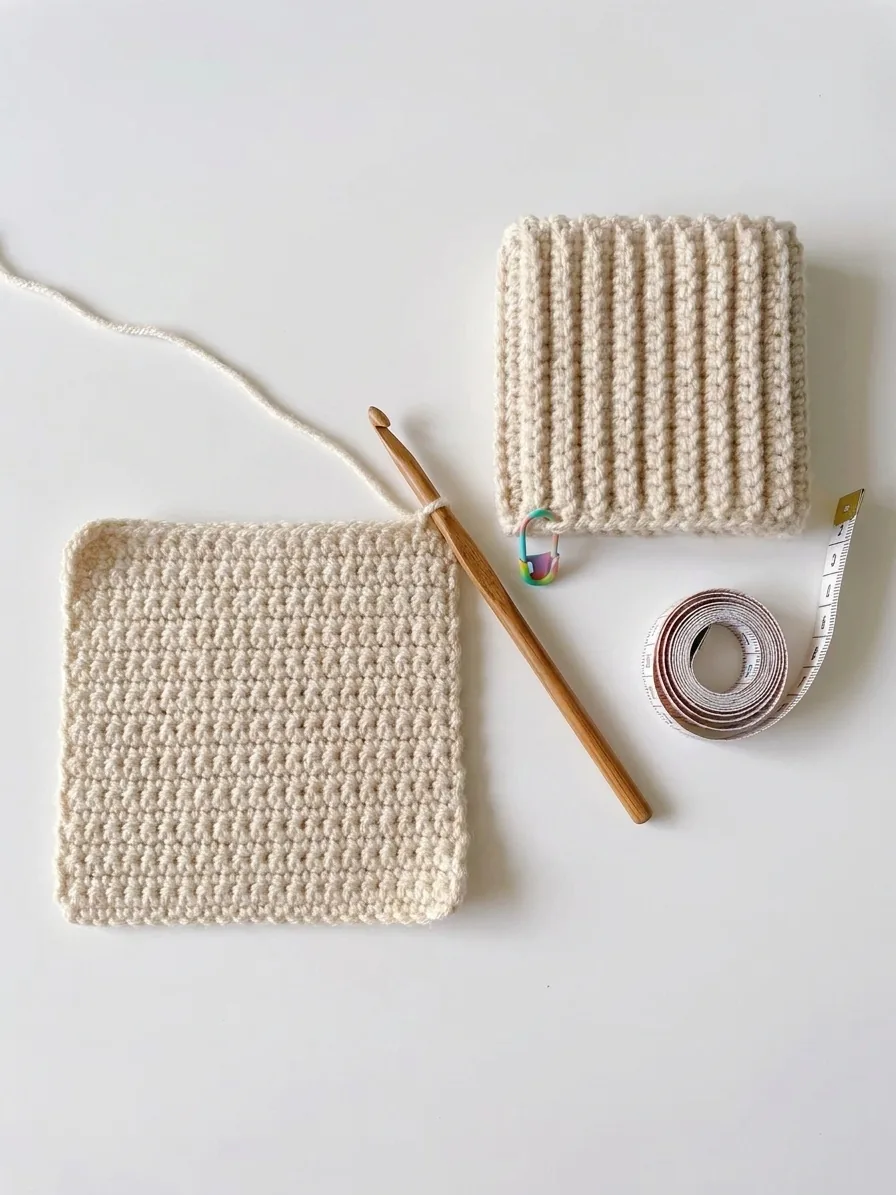
Work a small single-crochet swatch in cream yarn for the sole and a BLO ribbing swatch for the cuff. A useful starting gauge is approximately 18–20 single crochet stitches and 20–22 rounds per 10 cm with a 3.0–3.5 mm hook. The exact gauge is less important than matching the recipient’s foot length and producing a firm sole that does not stretch excessively.
Measure the sole after Round 8. It should be approximately 9–10 cm long before the upper is added. The finished slipper should have about 0.5–1 cm of ease beyond the foot length. If the sole is too short, add one increase round at each rounded end. If it is too long, remove one straight round before beginning the upper.
Abbreviations and stitch glossary
This tutorial uses US crochet terminology.
- ch: chain.
- sc: single crochet.
- inc: work 2 sc in the same stitch.
- dec: work an invisible single-crochet decrease over the next 2 stitches.
- sl st: slip stitch.
- BLO: back loop only.
- MR: magic ring.
- FO: fasten off.
- st/sts: stitch/stitches.
- rep: repeat.
Work the sole and upper in a continuous spiral unless a round says to join. Place a marker in the first stitch and move it after every round.
Color and component map
The main slipper body alternates honey yellow and deep black in broad horizontal bands. Keep the color boundaries level by changing color at the final yarn-over of the last stitch in the previous round. The bee face is yellow, the four wings are soft white, the sole and tall ribbed cuff are warm cream, and the antennae and facial embroidery are black. Optional blush cheeks are pink.
The two slippers should be mirror images only in their placement of the face and wings. The color order remains the same on both slippers.
Crochet Bee Baby Slippers Safety and Use Notes
These slippers are intended as a soft visual-match craft design, not as protective footwear. Crochet soles can be slippery on smooth floors. Add a tested non-slip treatment or use the slippers only on surfaces where traction is not required.
Do not use loose safety eyes, buttons, beads, or other detachable pieces for babies or children who may mouth the slippers. Embroider the eyes, mouth, and highlights securely instead. Bury every tail inside the piece and inspect the wings, antennae, and face before use. Do not leave a child unattended while wearing handmade footwear.
Preparing the Crochet Bee Baby Slippers
Make two identical soles and uppers. Before sewing, lay the pieces side by side with the toe ends pointing in the same direction. Check that the stripes align and that the bee faces sit at the toe rather than on the outer ankle.
For a more structured slipper, crochet tightly and use a smaller hook. For a softer indoor slipper, use a slightly larger hook but recheck the sole length. Avoid stuffing the slipper itself; only the optional bee-face appliqué receives a small amount of filling.
Crochet Bee Baby Slippers Step 1: Make the Oval Sole
Use warm cream yarn. The sole begins with a foundation chain and is worked around both sides to create a rounded oval.
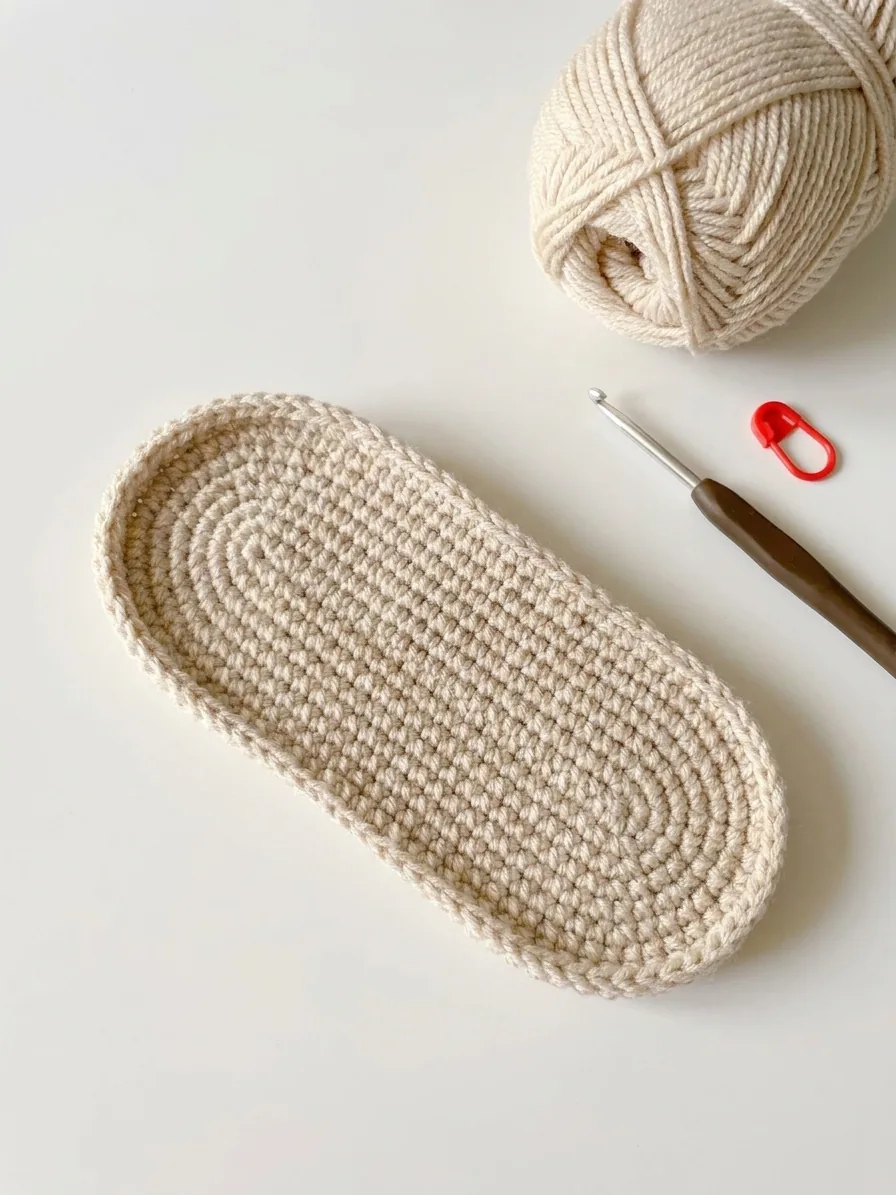
- Foundation: Ch 11. Sc in the 2nd ch from the hook and in the next 8 chains. Work 3 sc in the final chain. Turn the chain and work 8 sc along the unused loops on the underside. Work 2 sc in the first chain. Do not join unless you prefer joined rounds. Total: 22 sc.
- Round 2: Sc in the next 9 sts, inc in each of the next 3 sts, sc in the next 9 sts, inc in each of the next 2 sts. Total: 27 sc.
- Round 3: Sc in the next 9 sts, [sc, inc] 3 times, sc in the next 9 sts, [sc, inc] 2 times. Total: 32 sc.
- Round 4: Sc in the next 9 sts, [sc in the next 2 sts, inc] 3 times, sc in the next 9 sts, [sc in the next 2 sts, inc] 2 times. Total: 37 sc.
- Round 5: Sc in the next 9 sts, [sc in the next 3 sts, inc] 3 times, sc in the next 9 sts, [sc in the next 3 sts, inc] 2 times. Total: 42 sc.
- Round 6: Sc around in BLO. Total: 42 sc. This creates a visible ridge where the upper will begin.
- Rounds 7–9: Sc around in both loops. Total: 42 sc per round. The sole should lie flat with a gently rounded toe and heel.
- Round 10: Sc in the next 10 sts, dec 3 times, sc in the next 10 sts, dec 2 times. Total: 37 sc. This slight reduction helps the upper turn upward.
FO and weave in the cream tail. Repeat for the second sole. If the sole cups strongly, loosen tension or add one plain round. If it ruffles, check the increase placement before continuing.
Crochet Bee Baby Slippers Step 2: Build the Striped Upper
Join honey yellow at the center back of the sole. Work upward in a continuous spiral. The first upper round is worked into the ridge created by Round 6.
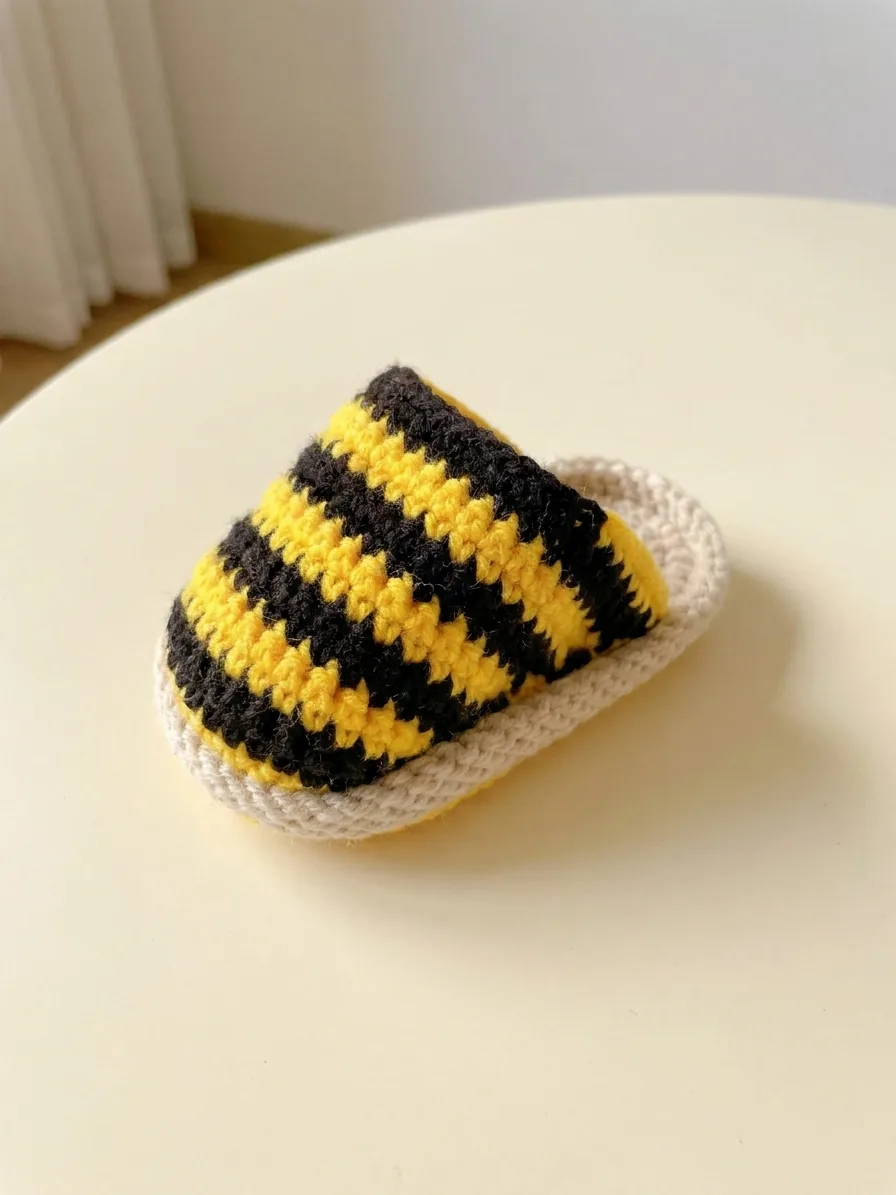
- Upper Round 1, yellow: Sc in each of the 42 ridge stitches. Total: 42 sc.
- Upper Round 2, yellow: Sc around. Total: 42 sc.
- Upper Round 3, black: Change to black and sc around. Total: 42 sc.
- Upper Round 4, black: Sc around. Total: 42 sc.
- Upper Round 5, yellow: Change to yellow and sc around. Total: 42 sc.
- Upper Round 6, yellow: Sc around. Total: 42 sc.
- Upper Round 7, black: Change to black and sc around. Total: 42 sc.
- Upper Round 8, black: Sc around. Total: 42 sc.
- Upper Round 9, yellow: Change to yellow and sc around. Total: 42 sc.
- Upper Round 10, yellow: Sc around. Total: 42 sc.
- Upper Round 11, black: Change to black and sc around. Total: 42 sc.
- Upper Round 12, black: Sc around. Total: 42 sc.
- Upper Round 13, yellow: Change to yellow and sc around. Total: 42 sc.
- Upper Round 14, yellow: Sc around. Total: 42 sc.
- Upper Round 15, black: Change to black and sc around. Total: 42 sc.
- Upper Round 16, black: Sc around. Total: 42 sc.
- Upper Round 17, yellow: Change to yellow and sc around. Total: 42 sc.
- Upper Round 18, yellow: Sc around. Total: 42 sc.
- Upper Round 19, yellow: Sc around. Total: 42 sc. Fasten off and weave in the tail.
Stop after Round 19 and keep the top edge level. The separate cream ribbed cuff is added next to create the tall boot silhouette shown in the original pattern photo.
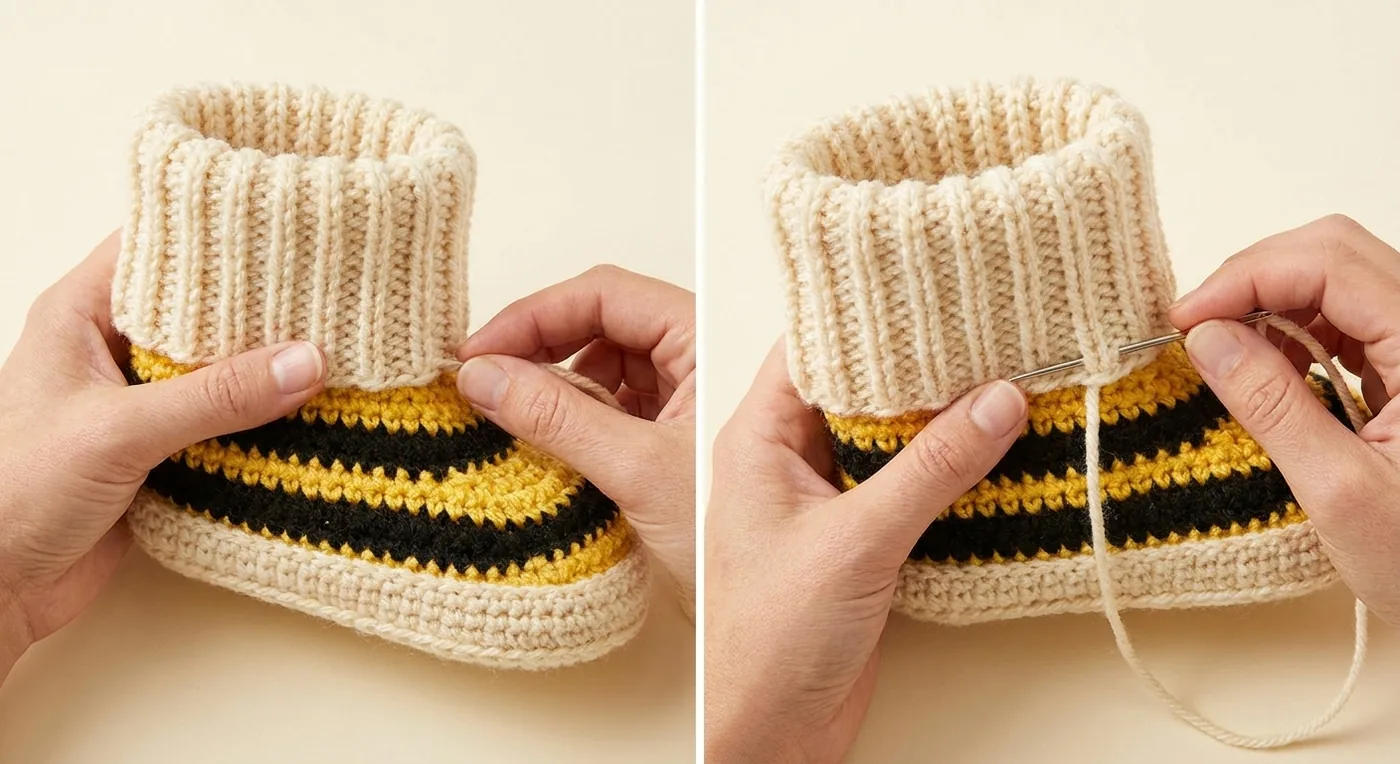
Step 3: Add the tall cream ribbed cuff
With cream yarn, ch 13. Starting in the second chain from the hook, sc across for 12 sts. Ch 1, turn, and work 12 sc in BLO. Repeat the BLO row until the ribbed strip wraps comfortably around the 42-stitch opening without stretching hard. Join the short ends to form a tube, then sew or slip-stitch the lower edge evenly around the top of the striped foot. Keep the vertical ribs straight and the opening comfortable.
Step 4: Make the bee face
The face is a small raised yellow circle sewn to the toe area. Make one face for each slipper.
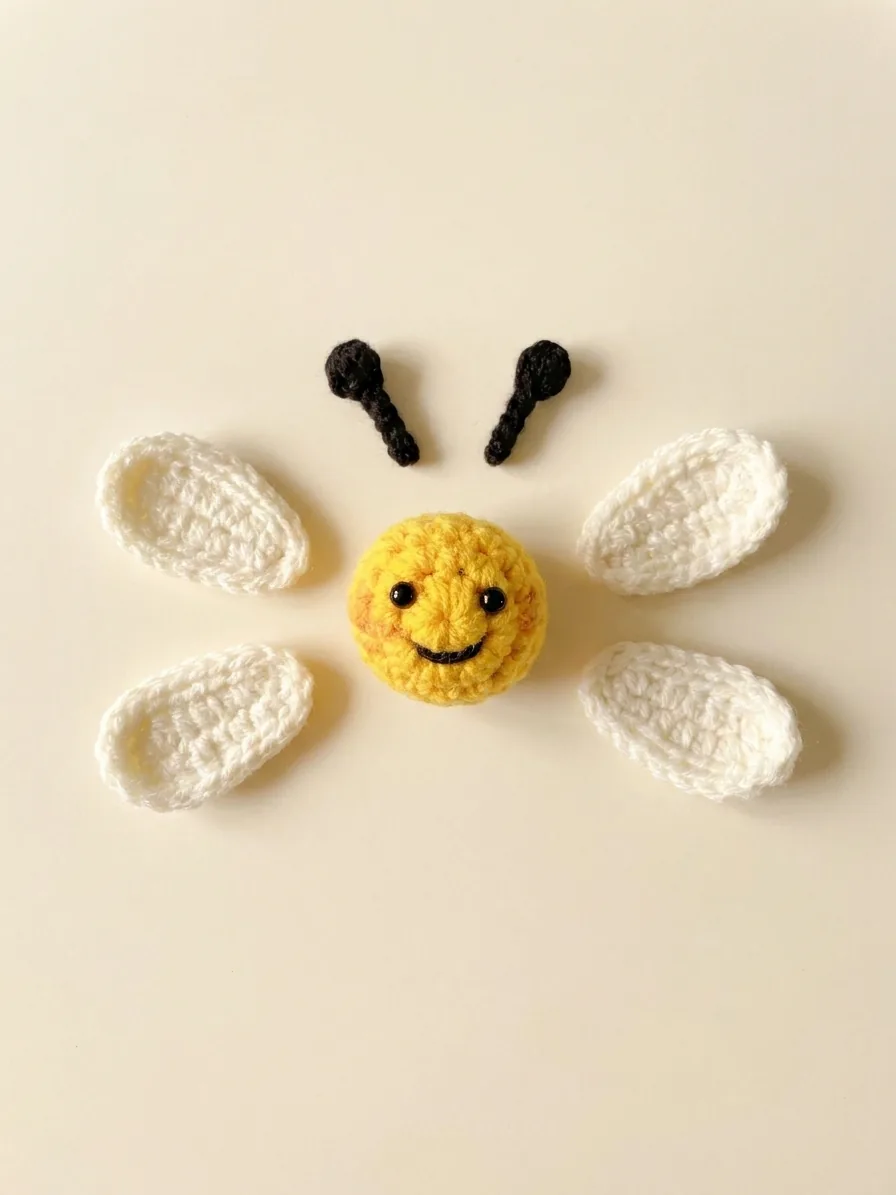
- With yellow yarn, make an MR and work 6 sc into the ring.
- Round 2: Inc around. Total: 12 sc.
- Round 3: [Sc, inc] 6 times. Total: 18 sc.
- Round 4: [Sc in the next 2 sts, inc] 6 times. Total: 24 sc.
- Round 5: [Sc in the next 3 sts, inc] 6 times. Total: 30 sc.
- Round 6: Sc around. Total: 30 sc.
- Round 7: [Sc in the next 3 sts, dec] 6 times. Total: 24 sc.
- Round 8: [Sc in the next 2 sts, dec] 6 times. Total: 18 sc.
Add a very small amount of fiberfill so the face is gently domed. FO, leaving a sewing tail, and close the opening by weaving through the remaining front loops. Sew the face to the toe of the slipper, centered above the black stripe.
Add the face
Embroider two black oval eyes or sew on safety eyes only if the item will not be used by a child who may mouth it. Place the eyes symmetrically in the upper half of the face. Add a small curved black smile below the eyes. Add two small pink cheek circles if desired. Keep the facial details firmly attached and avoid long loose floats on the inside.
Step 5: Crochet the wings
Make eight soft-white wings, four for each slipper. Each wing is a flat oval with a softly pointed outer edge.
- Ch 7.
- Sc in the 2nd ch from the hook and across. Total: 6 sc.
- Ch 1, turn. Inc in the first st, sc in the next 4 sts, inc in the last st. Total: 8 sc.
- Ch 1, turn. Sc across. Total: 8 sc.
- Ch 1, turn. Inc in the first st, sc in the next 6 sts, inc in the last st. Total: 10 sc.
- Ch 1, turn. Sc across. Total: 10 sc.
- Ch 1, turn. Dec, sc in the next 6 sts, dec. Total: 8 sc.
- Ch 1, turn. Dec, sc in the next 4 sts, dec. Total: 6 sc.
- Ch 1, turn. Dec across. Total: 3 sc.
- FO and weave in the tail.
Flatten each wing and arrange four wings on each slipper, two on each side of the face and slightly behind it. Angle the upper pair upward and the lower pair outward. The wings should remain flat rather than stuffed.
Step 6: Make the antennae
Make four short black antennae, two for each slipper.
- With black yarn, make an MR and work 6 sc into the ring.
- Work 3 rounds of sc around. Total: 6 sc per round.
- FO and leave a sewing tail. Add a tiny black ball at the tip by making an MR with 5 sc, working one round of sc, adding a pinch of fiberfill, and closing the opening.
- Sew one antenna to each side of the top of the bee face. Angle them slightly outward and keep the paired antennae similar in height.
Step 7: Final assembly and finishing
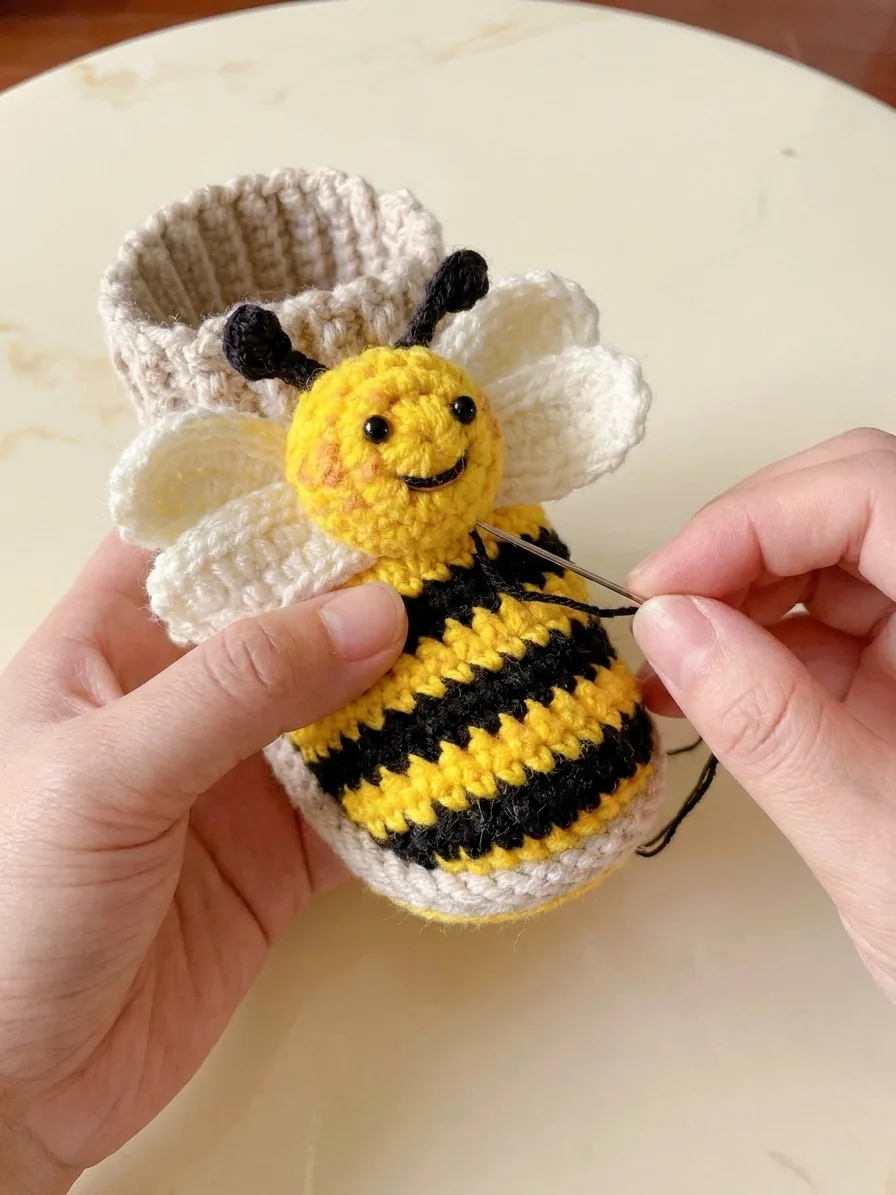
- Place each face on the toe and pin it before sewing. Check that the face is centered over the black stripe.
- Sew around the face with small even stitches. Do not pull so tightly that the yellow circle puckers.
- Pin all four wings behind the face, two on each side. Sew along the inner edges only so the outer wing edges remain visibly raised.
- Sew the antennae to the upper edge of the face. Add a second pass through the base if the slippers will be handled often.
- Secure the facial embroidery on the inside of the upper. Bury all yarn tails through several stitches before trimming.
- Lightly block the slippers over a small rounded form or a rolled towel. Do not stretch the sole longer than the measured target.
- Check the pair together. Confirm matching stripe heights, equal face placement, secure wings, firm antennae, and comfortable ankle openings.
Troubleshooting Crochet Bee Baby Slippers
The sole is too small. Add one plain round before the upper or work a longer foundation chain. Recalculate the rounded ends so the sole remains oval rather than circular.
The sole curls. Check the increase rounds and loosen tension. The sole should lie mostly flat before the upper is added.
The upper flares outward. Use a smaller hook for the upper or add one decrease round near the heel. Do not over-tighten the opening.
The stripes are slanted. Change color at the same point in every round and keep the first stitch marker at the center back.
The face looks too large. Stop after Round 6 of the face instead of Round 8, or use a smaller hook. The face should sit within the toe area without covering the side wings.
The wings droop. Use a firmer yarn, add a second identical wing layer, or sew the inner edge more securely. Do not stuff the wings.
The slippers slip. Add a tested non-slip sole treatment and allow it to cure fully before use. Crochet alone is not a reliable non-slip surface.
Crochet Bee Baby Slippers Final Checklist
- □ Both soles match in length and width.
- □ Yellow and black stripes are level and in the same order.
- □ Each toe has one centered yellow bee face.
- □ Each slipper has four soft-white wings.
- □ Each slipper has two black antennae.
- □ Eyes, smile, cheeks, wings, and antennae are securely attached.
- □ All tails are buried and trimmed.
- □ The ankle openings are comfortable and not stretched.
- □ The soles have been checked for traction before use.
Quick answers
Crochet Bee Baby Slippers FAQ
What size are these crochet bee baby slippers?
The default design targets an approximately 10–11 cm foot length, with about 0.5–1 cm of ease. Measure the recipient’s foot and compare it with the finished sole before building the upper.
Are these slippers suitable for a complete beginner?
They are best for an advanced beginner who can crochet in the round, count increases and decreases, change colors, sew pieces securely, and make simple embroidery.
Can I use safety eyes on baby slippers?
Embroidered eyes are the safer choice for babies and children who may mouth the slippers. Avoid loose safety eyes, buttons, beads, or any detachable decoration.
How can I make the crochet sole larger?
Add one plain round before the upper or begin with a longer foundation chain, then redistribute the increases so the sole remains oval rather than becoming circular.
How do I make crochet slippers less slippery?
Crochet alone is not a reliable non-slip surface. Apply a tested non-slip sole treatment according to its instructions and let it cure fully before use.
More patterns
Find Your Next Crochet Project
Visit the store for more professionally formatted crochet patterns, handmade gift ideas, and step-by-step projects.
Keep exploring crochet
Browse crochet patterns, visit the amigurumi collection, or find another project in free crochet patterns.




