

My Crochet Universe · Halloween Keychain Collection
10 Easy Crochet Halloween Keychain Patterns
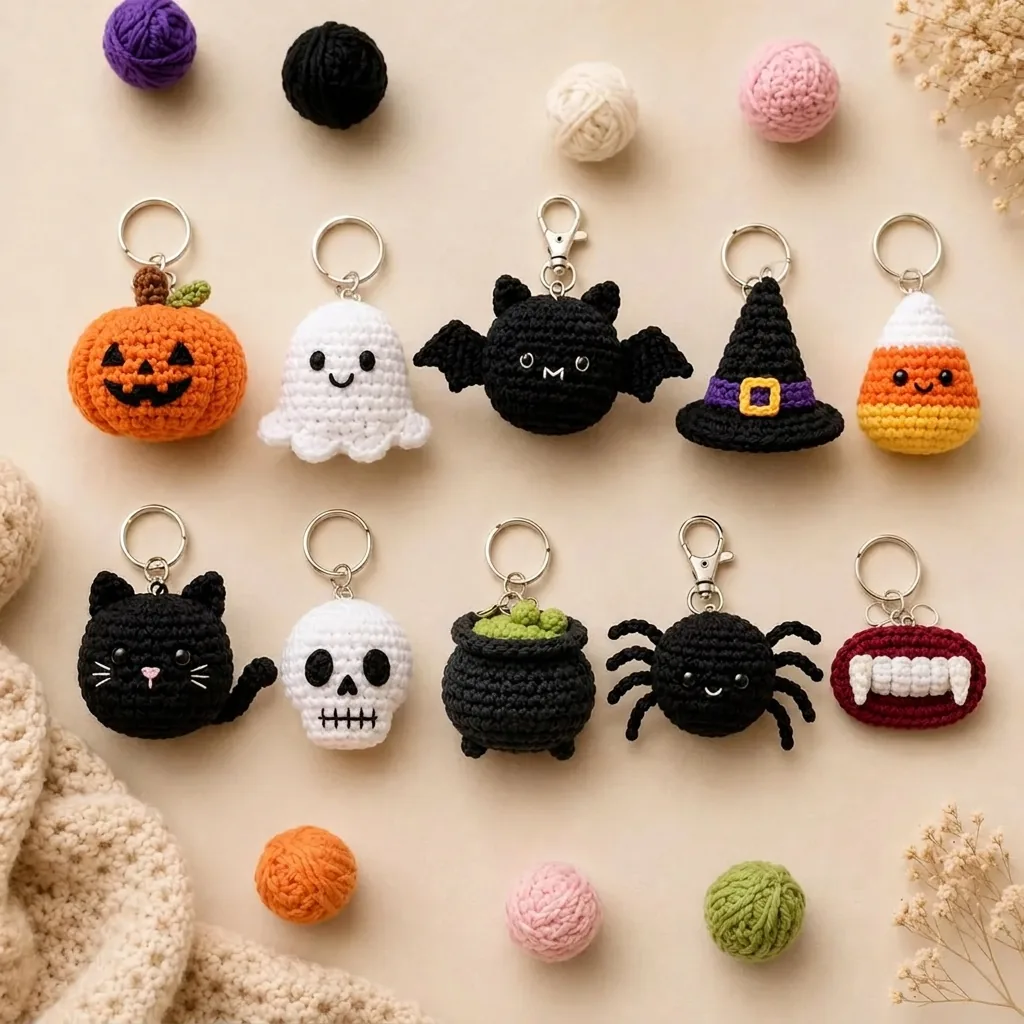
Need a small project after a long WIP? These crochet Halloween keychain patterns turn scrap yarn into ten pocket-size characters: a pumpkin, ghost, bat, witch hat, candy corn, black cat, skull, cauldron, spider, and vampire mouth.
Every design below includes exact stitch counts, construction notes, assembly guidance, and a dedicated visual. The patterns use US crochet terms and are sized for key rings, bag charms, party favors, and quick handmade gifts.
Materials, Gauge, and Abbreviations
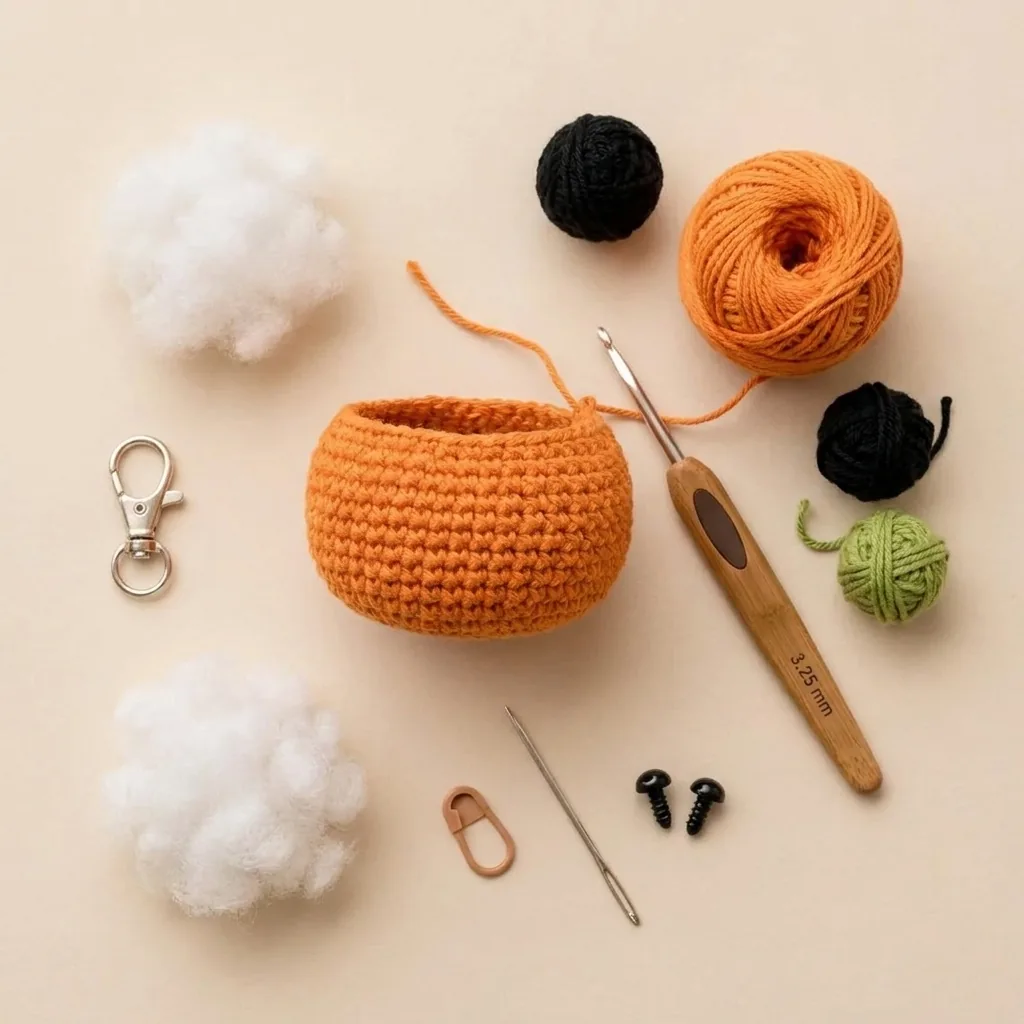
Use DK or light worsted cotton yarn with a 2.5 mm crochet hook. Tight, even stitches keep the filling hidden and help the pieces survive daily use. Each charm uses roughly 10–25 yards (9–23 m) of the main color plus small scraps for faces and details.
Supply checklist
- Orange, black, white, purple, yellow, green, brown, burgundy, and pink yarn scraps
- 2.5 mm crochet hook, locking stitch marker, scissors, and yarn needle
- Polyester fiberfill and black/white embroidery thread
- Metal key rings, lobster clasps, closed or sturdy jump rings, and optional pliers
US abbreviations: MR = magic ring; ch = chain; sc = single crochet; hdc = half double crochet; dc = double crochet; inc = two sc in one stitch; dec = invisible decrease; sl st = slip stitch; FO = fasten off.
Work body pieces in continuous rounds unless a row is stated. Place the marker in the first stitch and move it after every round. Finished size is approximately 6–9 cm, depending on yarn, hook, and tension.
Pumpkins & Friends
Begin with three round-bodied designs. Once you can increase to 24 or 30 stitches and decrease cleanly, the same shaping skills carry through most of the collection.
1. Jack-o’-Lantern Pumpkin
Skill level: Beginner · Finished size: approximately 6–9 cm · Hook: 2.5 mm
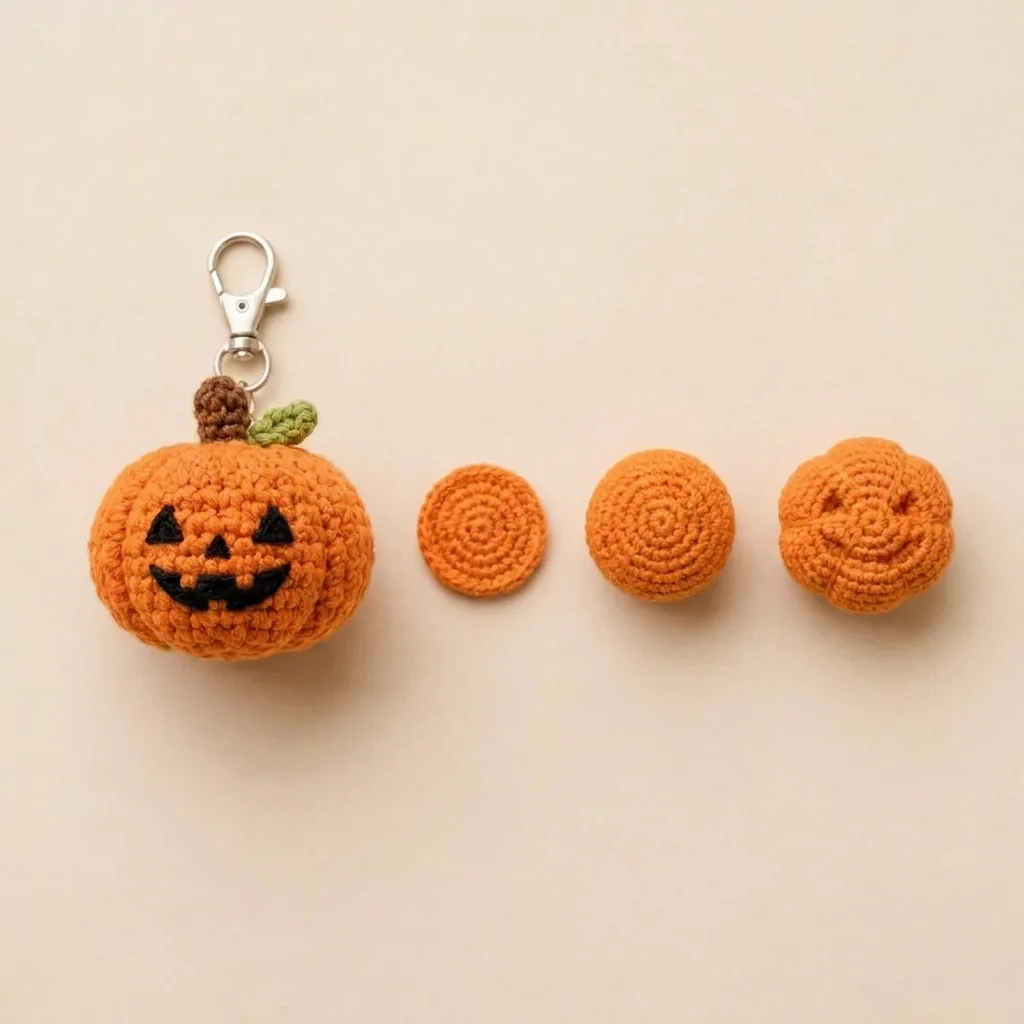
This plump pumpkin uses a 30-stitch sphere, then a long yarn tail creates the familiar grooves. Keep the face embroidery simple so it stays readable at keychain scale.
| Round / row | Instructions | Stitches |
|---|---|---|
| R1 | MR, 6 sc | 6 |
| R2 | inc × 6 | 12 |
| R3 | (sc, inc) × 6 | 18 |
| R4 | (2 sc, inc) × 6 | 24 |
| R5 | (3 sc, inc) × 6 | 30 |
| R6–R10 | sc around | 30 each |
| R11 | (3 sc, dec) × 6 | 24 |
| R12 | (2 sc, dec) × 6 | 18 |
| R13 | (sc, dec) × 6 | 12 |
| Stuff | Fill firmly without overpacking | — |
| R14 | dec × 6; FO and close | 6 |
Assembly and details: Make the stem with brown yarn: MR, 6 sc for 3 rounds. For the leaf, ch 5 and work sl st, sc, and hdc around both sides. Sew both pieces to the top. Embroider triangular eyes, a small nose, and a wide smile. To form the grooves, pass a long orange tail from bottom to top six times and pull each strand with even, gentle tension.
2. Cute Ghost
Skill level: Beginner · Finished size: approximately 6–9 cm · Hook: 2.5 mm
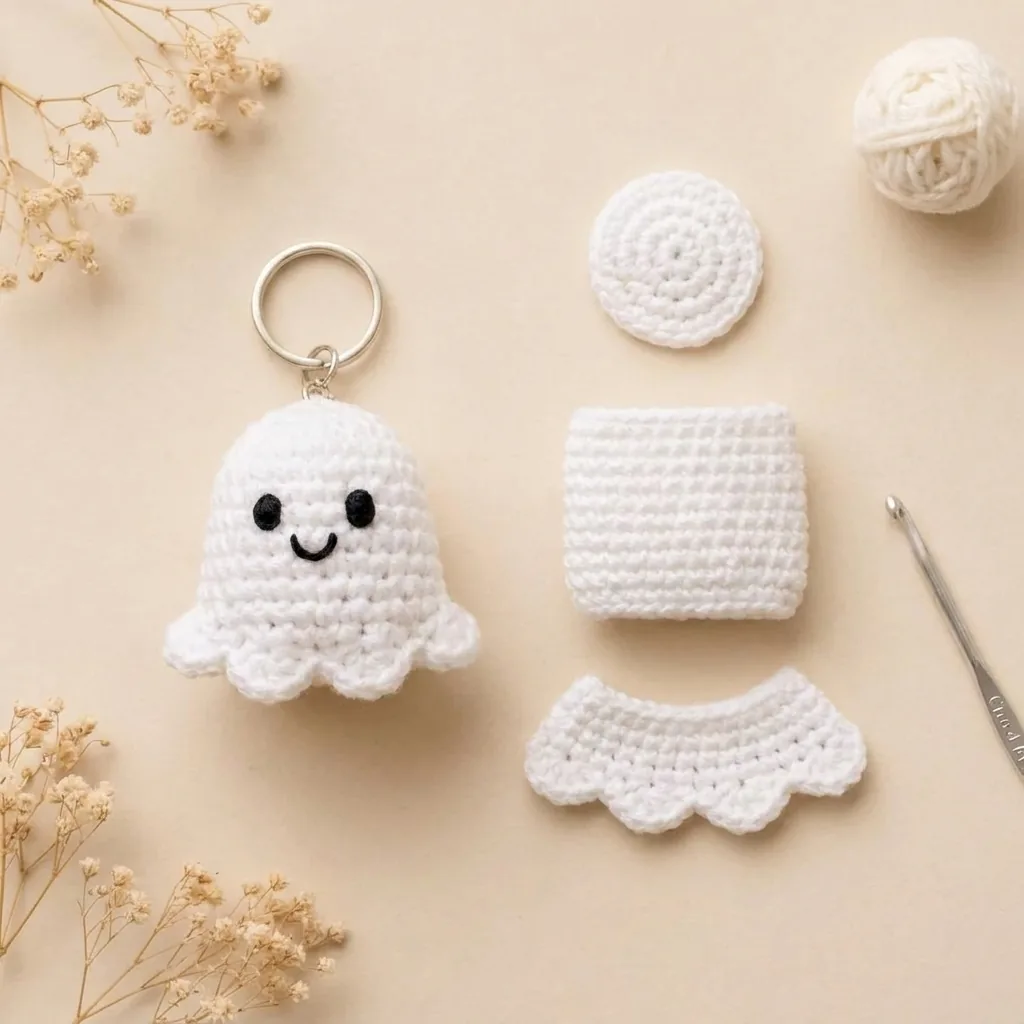
The ghost is one of the quickest crochet Halloween keychain patterns in this set. A rounded body and an applied scalloped edge create the floating shape without complicated sewing.
| Round / row | Instructions | Stitches |
|---|---|---|
| R1 | MR, 6 sc | 6 |
| R2 | inc × 6 | 12 |
| R3 | (sc, inc) × 6 | 18 |
| R4 | (2 sc, inc) × 6 | 24 |
| R5–R8 | sc around | 24 each |
| R9 | (2 sc, dec) × 6 | 18 |
| R10 | (sc, dec) × 6 | 12 |
| Stuff | Fill the upper body | — |
| R11 | dec × 6; FO and close | 6 |
Assembly and details: Join white yarn around the lower visible edge. Add evenly spaced scallops with a repeating combination of sl st, ch 2, and 3 dc worked into selected edge stitches. Embroider two small eyes and a curved smile in black. Keep the stuffing lighter near the bottom so the hem does not flare awkwardly.
3. Bat
Skill level: Beginner · Finished size: approximately 6–9 cm · Hook: 2.5 mm
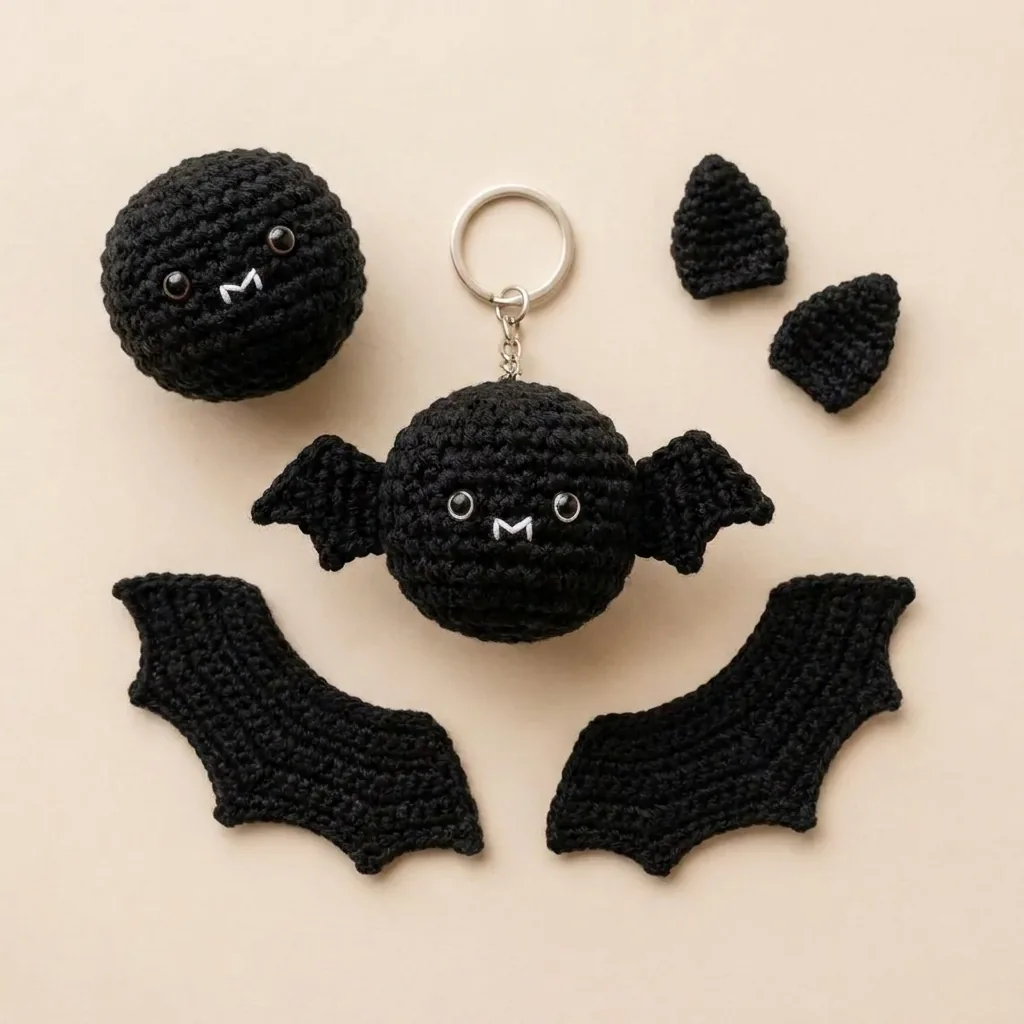
Use bright task lighting for black yarn and keep a light-colored stitch marker in the first stitch. The body is a simple 24-stitch ball; the character comes from the ears, wings, and tiny fangs.
| Round / row | Instructions | Stitches |
|---|---|---|
| R1 | MR, 6 sc | 6 |
| R2 | inc × 6 | 12 |
| R3 | (sc, inc) × 6 | 18 |
| R4 | (2 sc, inc) × 6 | 24 |
| R5–R8 | sc around | 24 each |
| R9 | (2 sc, dec) × 6 | 18 |
| R10 | (sc, dec) × 6 | 12 |
| Stuff | Fill evenly | — |
| R11 | dec × 6; FO and close | 6 |
Assembly and details: Make two ears: MR 4 sc; R2 (sc, inc) × 2 = 6; R3 sc around = 6. Flatten and sew them to the top. For each wing, ch 6; work 5 sc across, then decrease the width over the next rows to 4, 3, 2, and 1 stitch. Sew one wing to each side. Embroider the eyes, mouth, and two small white fangs.
Witchy Vibes
These two tapered projects teach controlled increases and crisp color changes. Keep the cone tips lightly stuffed so they stay defined.
4. Witch Hat
Skill level: Beginner · Finished size: approximately 6–9 cm · Hook: 2.5 mm
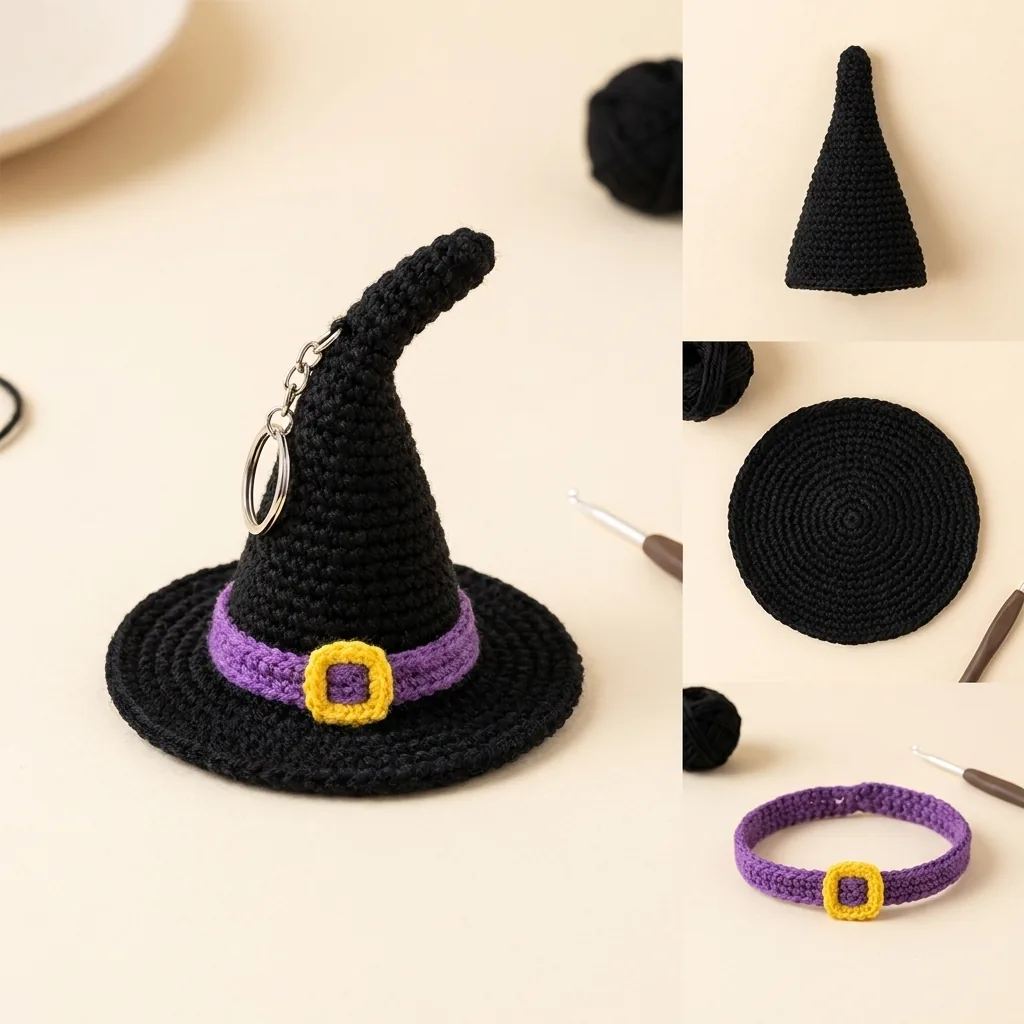
This witch hat grows from a four-stitch tip into a gently tapered cone. Light stuffing keeps the shape while still allowing you to bend the point.
| Round / row | Instructions | Stitches |
|---|---|---|
| R1 | MR, 4 sc | 4 |
| R2 | sc around | 4 |
| R3 | (sc, inc) × 2 | 6 |
| R4 | sc around | 6 |
| R5 | (2 sc, inc) × 2 | 8 |
| R6 | sc around | 8 |
| R7 | (3 sc, inc) × 2 | 10 |
| R8 | sc around | 10 |
| R9 | (4 sc, inc) × 2 | 12 |
| R10 | sc around | 12 |
| R11 | (5 sc, inc) × 2 | 14 |
| R12 | sc around; stuff lightly | 14 |
| R13 | (sc, inc) × 7 | 21 |
| R14 | (2 sc, inc) × 7; FO | 28 |
Assembly and details: Surface-slip-stitch a purple band around the base of the cone, then embroider a small yellow square buckle. Shape the brim with your fingers and bend the tip slightly before attaching the key ring through several sturdy stitches.
5. Candy Corn
Skill level: Beginner · Finished size: approximately 6–9 cm · Hook: 2.5 mm
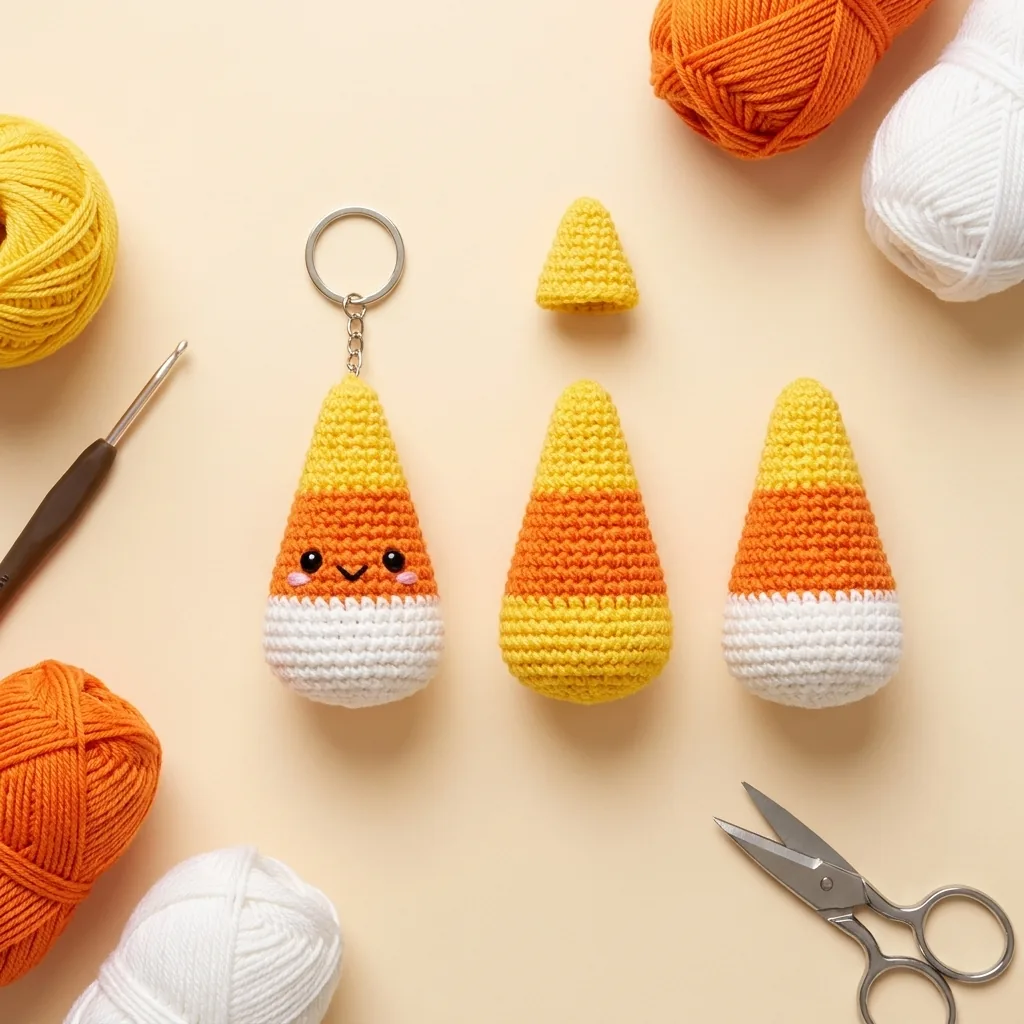
Work this tapered charm from the point downward. Complete each color change on the final yarn-over of the previous stitch so the new stripe begins cleanly.
| Round / row | Instructions | Stitches |
|---|---|---|
| R1, yellow | MR, 4 sc | 4 |
| R2 | sc around | 4 |
| R3 | (sc, inc) × 2 | 6 |
| R4 | sc around | 6 |
| R5, orange | (2 sc, inc) × 2 | 8 |
| R6 | sc around | 8 |
| R7 | (3 sc, inc) × 2 | 10 |
| R8 | sc around | 10 |
| R9, white | (4 sc, inc) × 2 | 12 |
| R10 | (5 sc, inc) × 2 | 14 |
| R11 | sc around | 14 |
| R12 | (5 sc, dec) × 2 | 12 |
| R13 | (sc, dec) × 4 | 8 |
| Stuff | Fill the cone evenly | — |
| R14 | dec × 4; FO and close | 4 |
Assembly and details: Embroider two black eyes and a small smile on the orange band. Bury each color tail inside the piece instead of carrying yarn through several rounds; too many floats can make this small cone lumpy.
Black Cats & Bones
Both designs rely on careful facial placement. Use pins to map the features before committing with the yarn needle.
6. Black Cat
Skill level: Beginner · Finished size: approximately 6–9 cm · Hook: 2.5 mm
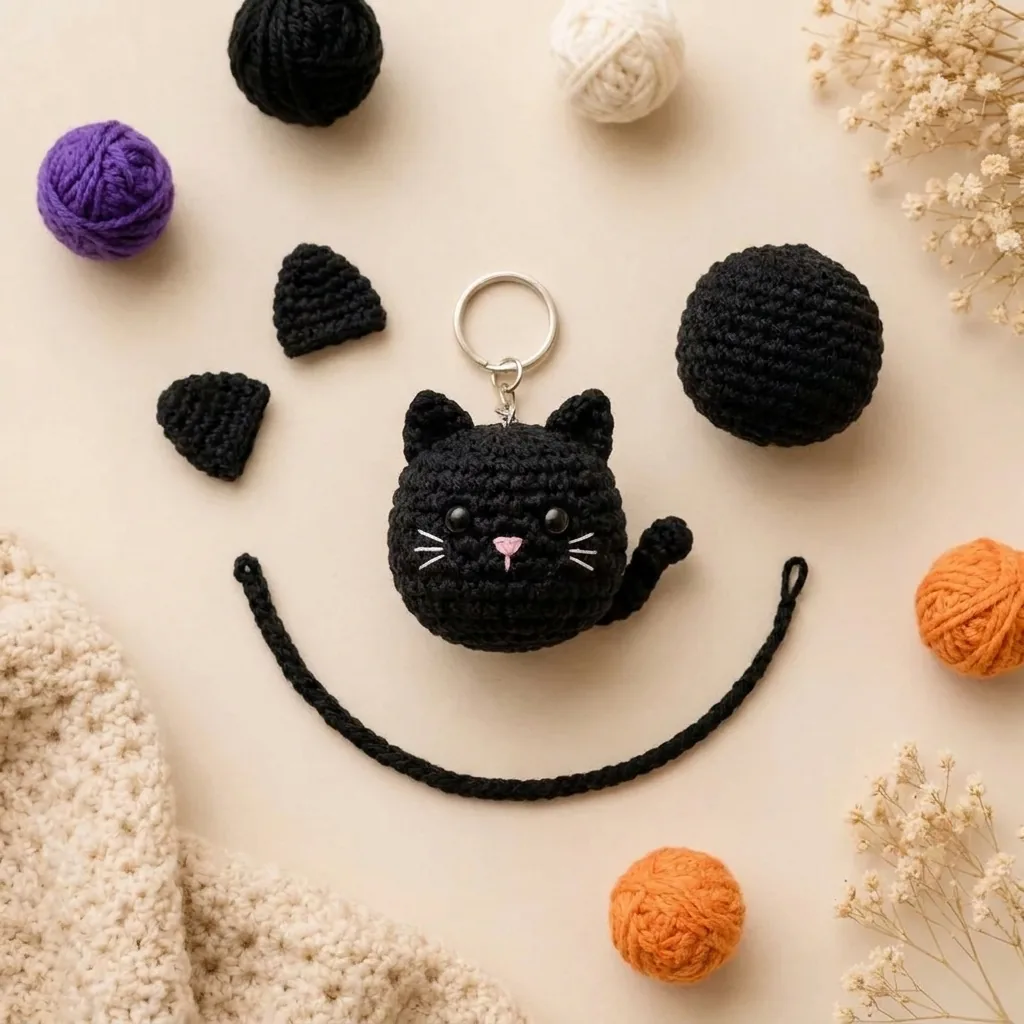
The cat shares the bat’s reliable 24-stitch base. Pin the ears, face, and tail before sewing; a few millimeters can change the expression completely.
| Round / row | Instructions | Stitches |
|---|---|---|
| R1 | MR, 6 sc | 6 |
| R2 | inc × 6 | 12 |
| R3 | (sc, inc) × 6 | 18 |
| R4 | (2 sc, inc) × 6 | 24 |
| R5–R8 | sc around | 24 each |
| R9 | (2 sc, dec) × 6 | 18 |
| R10 | (sc, dec) × 6 | 12 |
| Stuff | Fill evenly | — |
| R11 | dec × 6; FO and close | 6 |
Assembly and details: Make two ears: MR 4 sc; R2 (sc, inc) × 2 = 6; R3 (sc, inc) × 3 = 9. Flatten and sew them on top. For the tail, ch 13 and sl st back across 12 chains; curve and sew it to the lower side. Embroider the eyes, pink triangular nose, mouth, and three white whiskers per side.
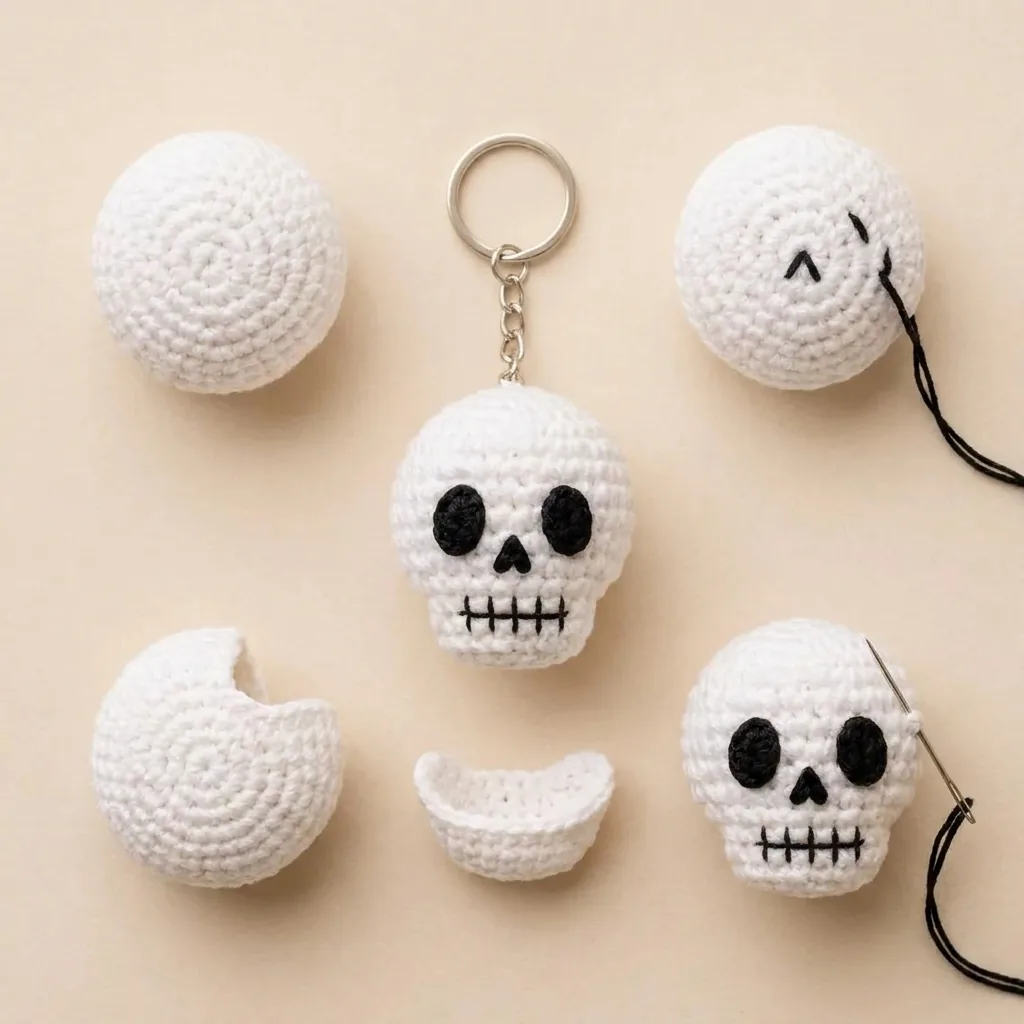
7. Skull
Skill level: Beginner · Finished size: approximately 6–9 cm · Hook: 2.5 mm
A carefully placed face turns a plain white sphere into a pocket-size skull. Mark the center line before embroidering so the eye sockets and teeth remain balanced.
| Round / row | Instructions | Stitches |
|---|---|---|
| R1 | MR, 6 sc | 6 |
| R2 | inc × 6 | 12 |
| R3 | (sc, inc) × 6 | 18 |
| R4 | (2 sc, inc) × 6 | 24 |
| R5–R8 | sc around | 24 each |
| R9 | (2 sc, dec) × 6 | 18 |
| R10 | (sc, dec) × 6 | 12 |
| Stuff | Fill firmly but keep the face flat enough to embroider | — |
| R11 | dec × 6; FO and close | 6 |
Assembly and details: Embroider two large black oval eye sockets, a small upside-down triangular nose, and one horizontal mouth line. Add short vertical stitches across the mouth for teeth. Work all facial stitches through shallow surface loops so the black yarn does not pull the head out of shape.
Creepy Crawlies
Finish the collection with a textured cauldron, an eight-legged spider, and a flat-built vampire mouth. These patterns add bobbles, chain appendages, and shaped rows to your small-project toolkit.
8. Cauldron
Skill level: Beginner · Finished size: approximately 6–9 cm · Hook: 2.5 mm
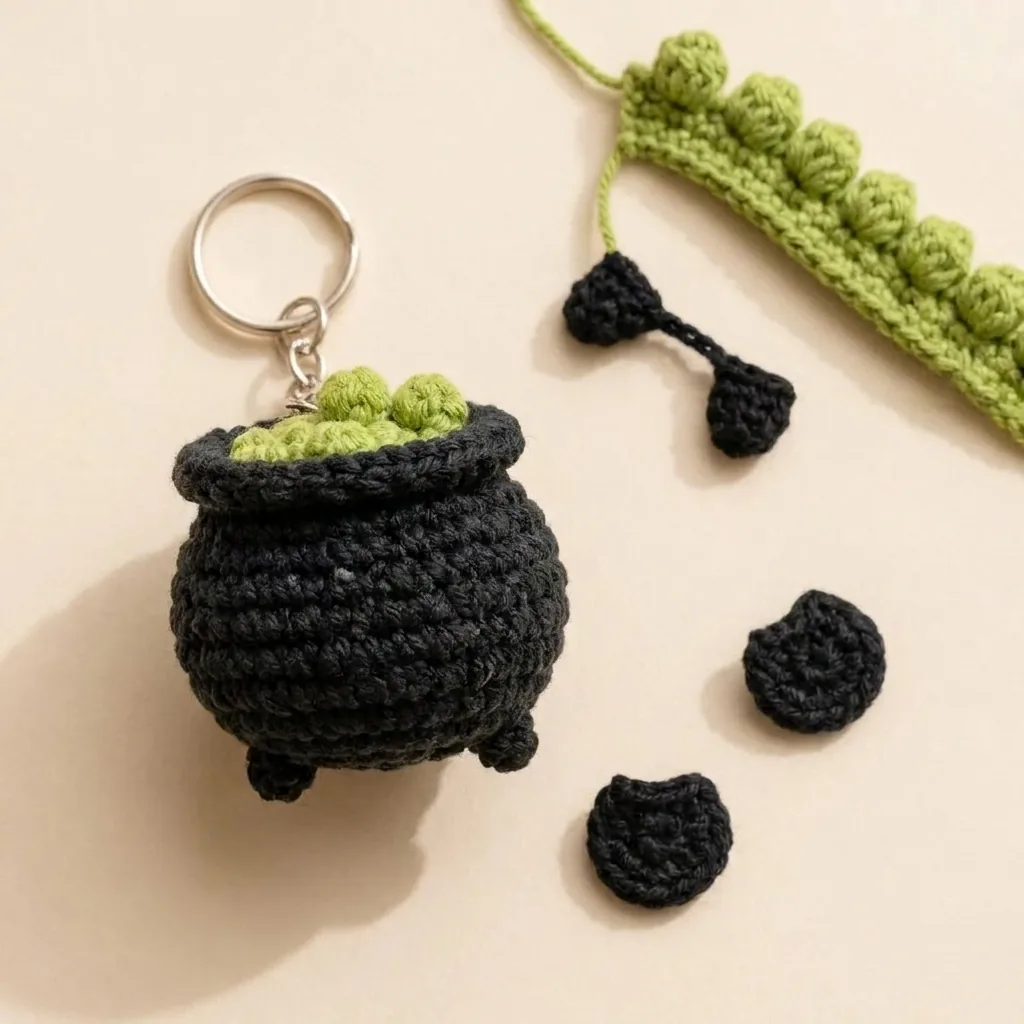
The cauldron combines a lightly stuffed pot with a larger applied rim and green bobble bubbles. Concentrate the texture at the top so the pot silhouette stays easy to read.
| Round / row | Instructions | Stitches |
|---|---|---|
| R1 | MR, 6 sc | 6 |
| R2 | inc × 6 | 12 |
| R3 | (sc, inc) × 6 | 18 |
| R4 | (2 sc, inc) × 6 | 24 |
| R5–R8 | sc around | 24 each |
| R9 | (2 sc, dec) × 6 | 18 |
| R10 | sc around | 18 |
| R11 | (sc, dec) × 6 | 12 |
| Stuff | Fill lightly | — |
| R12 | dec × 6; FO and close | 6 |
Assembly and details: Join black yarn around the upper edge and work (sc, inc) × 9 for a 27-stitch brim. Make three feet with MR 4 sc and one plain round, then sew them underneath. Add spaced green bobble stitches along the upper edge as potion bubbles. Keep the feet evenly distributed so the charm hangs straight.
9. Spider
Skill level: Beginner · Finished size: approximately 6–9 cm · Hook: 2.5 mm
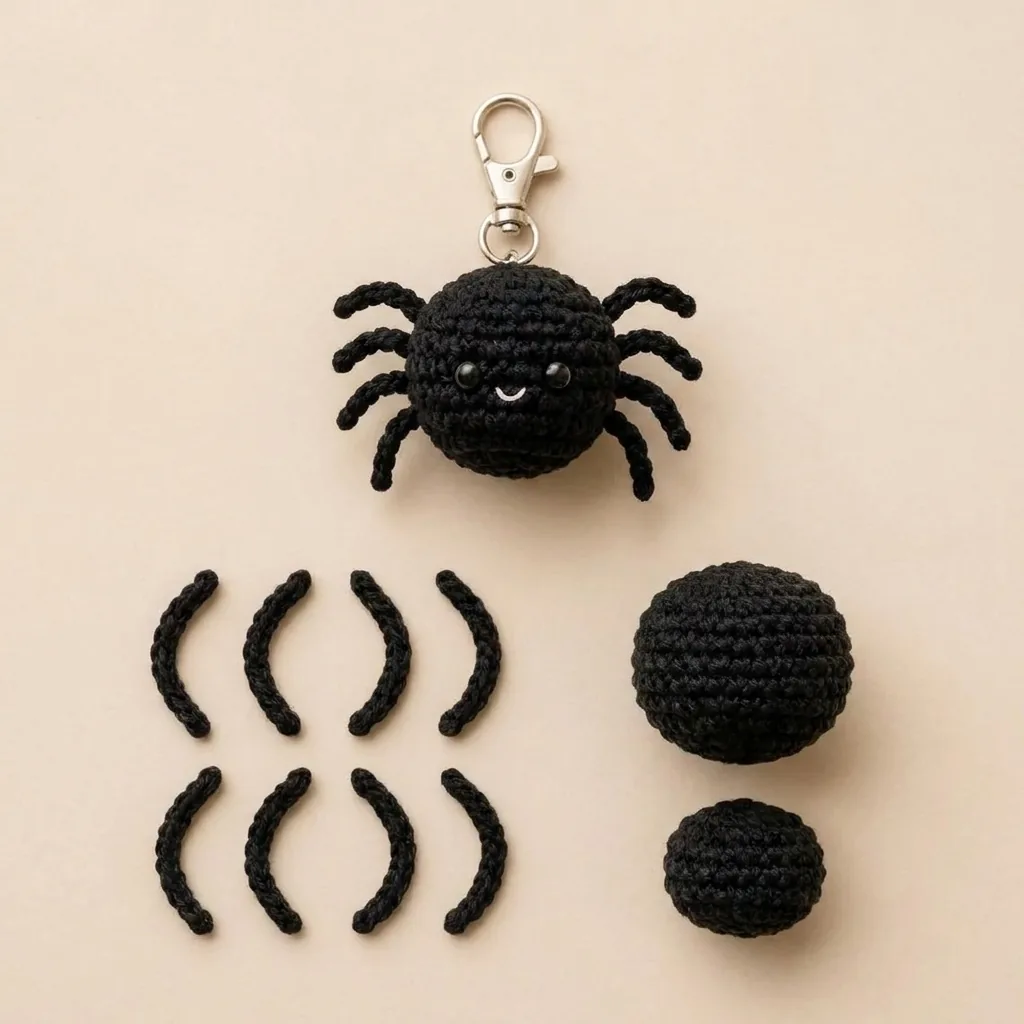
Count the legs before you sew—then count them again. Making all eight chains in one sitting helps keep their length and tension consistent.
| Round / row | Instructions | Stitches |
|---|---|---|
| R1 | MR, 6 sc | 6 |
| R2 | inc × 6 | 12 |
| R3 | (sc, inc) × 6 | 18 |
| R4 | (2 sc, inc) × 6 | 24 |
| R5–R8 | sc around | 24 each |
| R9 | (2 sc, dec) × 6 | 18 |
| R10 | (sc, dec) × 6 | 12 |
| Stuff | Fill the body | — |
| R11 | dec × 6; FO and close | 6 |
Assembly and details: For the head, MR 6 sc; R2 inc × 6 = 12; R3 sc around = 12. Stuff lightly and sew to the front/top. Make eight legs: ch 8, then sl st back across 7 chains. Curve and sew four to each side in two even rows. Embroider tiny eyes and a smile.
10. Vampire Lips
Skill level: Beginner · Finished size: approximately 6–9 cm · Hook: 2.5 mm
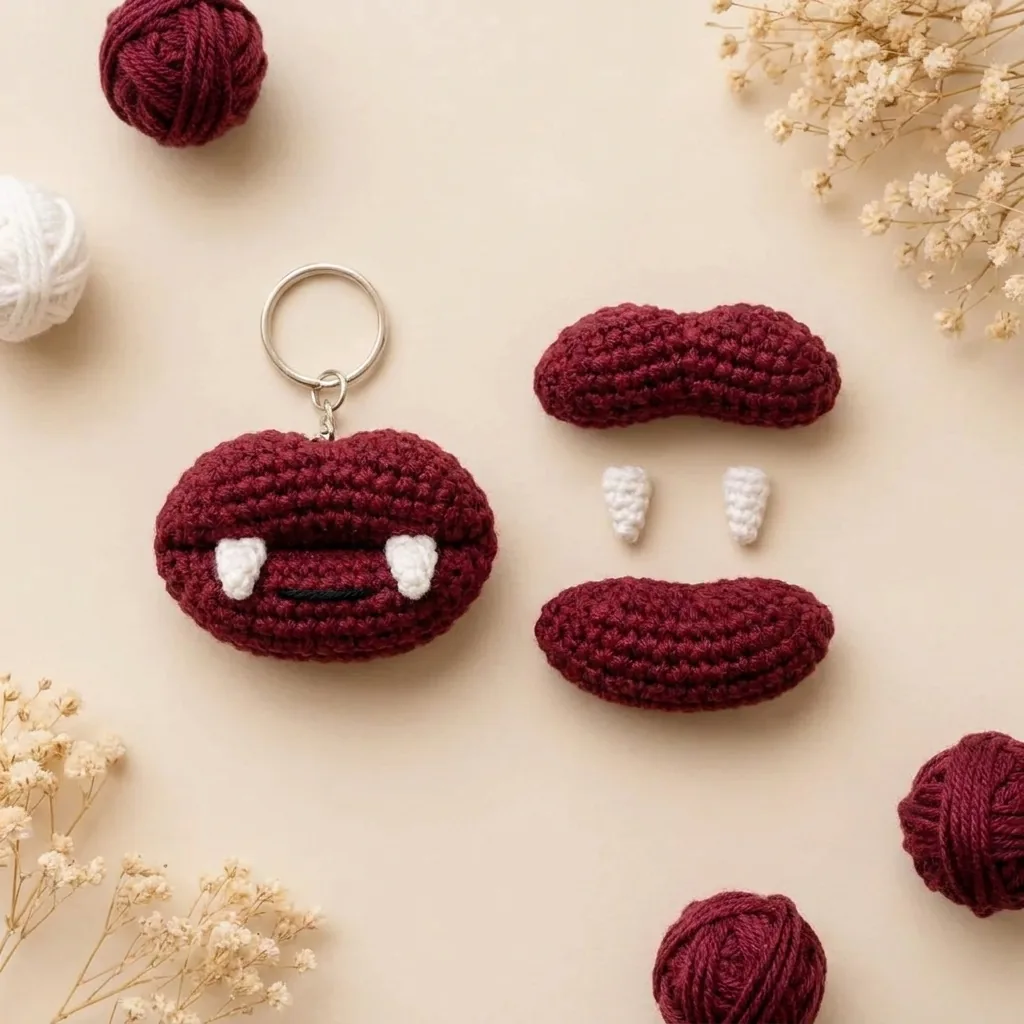
Unlike the round amigurumi pieces, the vampire mouth is built in rows. Keep the stuffing minimal so the two burgundy shapes remain recognizably lip-like.
| Round / row | Instructions | Stitches |
|---|---|---|
| Upper lip R1 | ch 7; sc from second ch across | 6 |
| R2 | ch 1, turn; inc, sc 4, inc | 8 |
| R3 | sc across | 8 |
| R4 | inc, sc 6, inc | 10 |
| R5 | sc across | 10 |
| R6 | dec, sc 6, dec | 8 |
| R7 | dec, sc 4, dec; FO | 6 |
| Lower lip R1 | ch 6; sc from second ch across | 5 |
| R2 | inc, sc 3, inc | 7 |
| R3 | sc across | 7 |
| R4 | dec, sc 3, dec; FO | 5 |
Assembly and details: Sew the two lip pieces into an oval, adding only a pinch of stuffing if you want a padded look. Make two fangs: ch 4, sl st in the second chain, sc in the next, and sl st in the final chain. Sew the fangs symmetrically beneath the upper lip and embroider a short black smile line.
Finishing, Care, and Quality Check
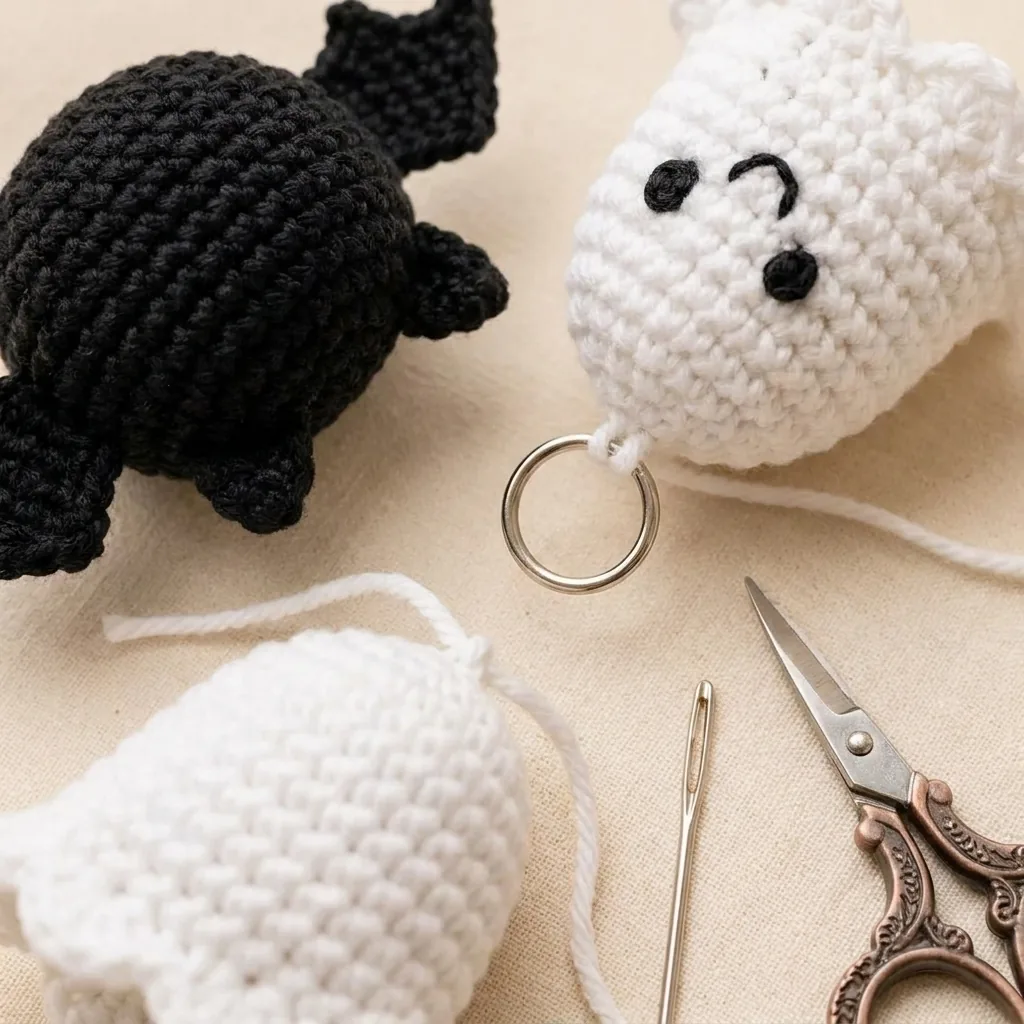
Weave each end through the body in two directions, then trim only after a gentle tug test. Attach the hardware through several top stitches or a reinforced loop rather than one exposed crochet loop.
Before selling or gifting
- Confirm the stitch count and check that no stuffing shows.
- Pull firmly on ears, wings, tails, feet, and hardware.
- Use embroidered facial features for young children and avoid wire.
- State that small charms and hardware are not toys for children under three.
- Spot-clean gently, reshape, and air-dry completely.
Trusted crochet references
Check the Craft Yarn Council standards for abbreviations and sizing, use Lion Brand’s beginner crochet guide for technique refreshers, and consult the Yarnspirations learning library for illustrated stitch help.
Frequently asked questions
Are these crochet Halloween keychain patterns beginner-friendly?
Yes. Start with the ghost, pumpkin, or skull. Practice a magic ring, single crochet, increases, invisible decreases, and working in continuous rounds first.
Can I use a larger hook?
You can, but the finished charm will be larger and the fabric may show gaps. Match the hook to your yarn while aiming for dense, flexible stitches.
How much yarn does one keychain need?
Most use 10–25 yards (9–23 m) of the main color plus tiny amounts for facial details, making them ideal scrap yarn projects.
Can I sell the finished keychains?
You can sell your handmade finished pieces using your own photos and product descriptions. Replace the Etsy placeholder above with your live listing URL when the printable pattern is ready.
Your Tiny Halloween Crew Is Ready
These crochet Halloween keychain patterns cover round amigurumi, tapered shapes, color changes, small appendages, surface texture, embroidery, and secure hardware. Pick one character tonight—or turn the full set into a coordinated seasonal collection.
Which spooky-cute charm is going on your hook first? Save the guide, share it with a crochet friend, and come back to My Crochet Universe crochet patterns for your next project.




