

Complete beginner reference • US terms
Crochet Essentials: A Best Complete 20 Skills and Abbreviations Guide
This complete crochet guide follows a visual-first structure: study each original image, then read the matching skill and instructions immediately underneath. It covers hook selection, yarn control, slip knots, chains, fundamental stitches, rows, rings, conversions, and the full abbreviation list shown in the supplied reference.
Crochet hook and yarn reference
Hook labels vary between the UK, metric, and US systems. Use the metric measurement as the main reference when two labels appear to conflict, and compare it with the recommendation printed on the yarn label or specified in your pattern.
| UK | Metric | US |
|---|---|---|
| 14 | 2 mm | — |
| 13 | 2.25 mm | B/1 |
| 12 | 2.5 mm | — |
| — | 2.75 mm | C/2 |
| 11 | 3 mm | — |
| 10 | 3.25 mm | D/3 |
| 9 | 3.5 mm | E/4 |
| — | 3.75 mm | F/5 |
| 8 | 4 mm | G/6 |
| 7 | 4.5 mm | 7 |
| 6 | 5 mm | H/8 |
| 5 | 5.5 mm | I/9 |
| 4 | 6 mm | J/10 |
| 3 | 6.5 mm | K/10½ |
| 2 | 7 mm | — |
| 0 | 8 mm | L/11 |
| 00 | 9 mm | M/13 |
| 000 | 10 mm | N/15 |
Which hook should I use?
| Hook size | Typical UK yarn weight |
|---|---|
| 2.5–3.5 mm | 4-ply / fine yarn |
| 3.5–4.5 mm | DK / light worsted yarn |
| 5–6 mm | Aran / worsted yarn |
| 7 mm and larger | Chunky / bulky yarn |
These are starting ranges rather than strict rules. Use a smaller hook for dense amigurumi fabric, or a larger hook when a project needs more drape. Make a gauge swatch for garments, fitted accessories, and any project where finished dimensions matter.
Holding the hook and yarn
Each photograph is separate. Read the complete method directly below it before trying the next position.
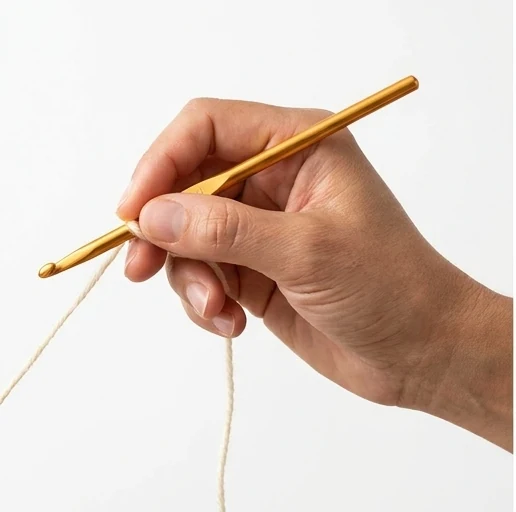
Skill 1A
Pencil method
Hold the crochet hook as if writing with a pencil. Rest the grip between the thumb and index finger, about 3–5 cm from the hooked end. Keep the remaining fingers relaxed. This position supports small, precise movements and can give excellent control for delicate stitches.
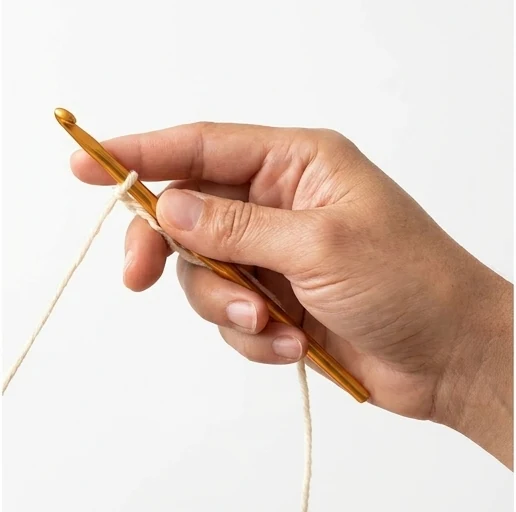
Skill 1B
Knife method
Hold the hook from above like a table knife, with the handle resting lightly against the palm. Place the thumb and index finger near the grip and allow the wrist to guide the movement. Do not squeeze. The pencil and knife grips are equally valid; use the one that feels natural and pain-free.
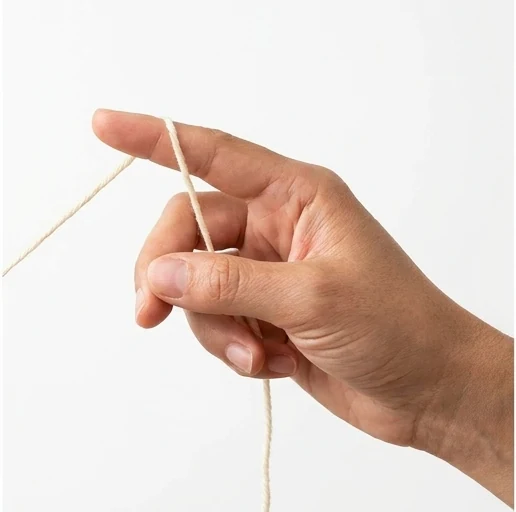
Skill 2A
Yarn tension: method one
Pass the yarn between the little finger and ring finger of the non-hook hand. Carry it behind the middle fingers, then over the index finger. Pinch the work between the thumb and middle finger. The index finger guides the yarn while the lower fingers create gentle resistance.
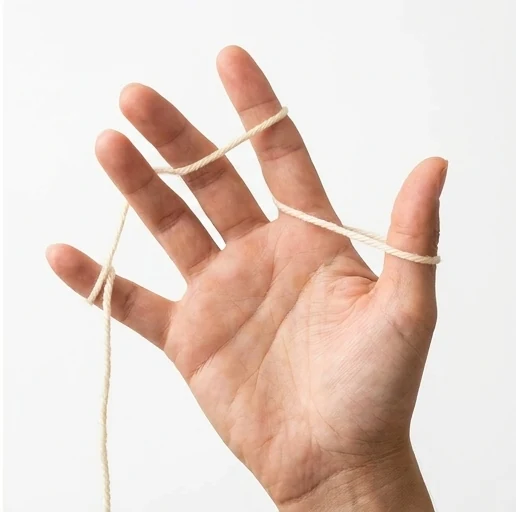
Skill 2B
Yarn tension: method two
Loop the yarn loosely around the little finger, pass it behind the middle and ring fingers, and bring it over the index finger. This adds more resistance than method one. Adjust or remove a wrap if the yarn stops feeding smoothly. Even tension comes from repeatable movement, not tight pulling.
Making a slip knot and foundation chain
Follow the photographs from left to right. Every photograph has its own instruction immediately underneath.
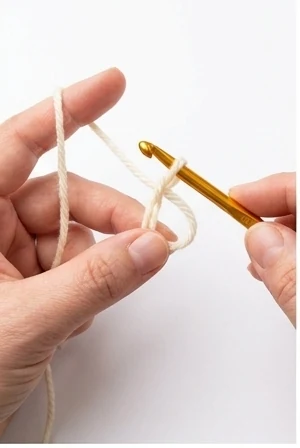
Slip knot · Step 1
Hold the yarn tail
Hold the tail in the non-hook hand. Cross the working yarn over it to form a loose circular loop. Keep the crossing point visible between the thumb and index finger.
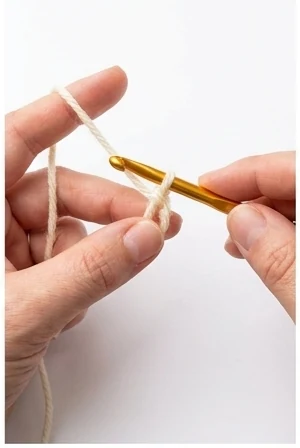
Slip knot · Step 2
Insert the hook
Hold the loop securely and insert the crochet hook through the center from front to back. Keep the loop open so the hook does not catch the wrong strand.
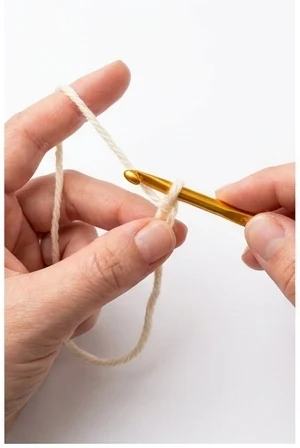
Slip knot · Step 3
Catch the working yarn
Use the hook to catch the working yarn and pull it back through the center of the loop. The new loop on the hook becomes the adjustable working loop.
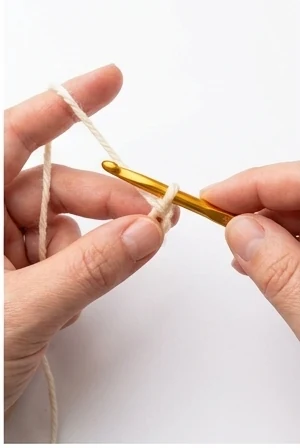
Slip knot · Step 4
Tighten the slip knot
Pull the yarn tail and working strand to close the knot. Then pull only the working yarn until the loop sits close to the hook without touching it tightly. The loop must still slide.
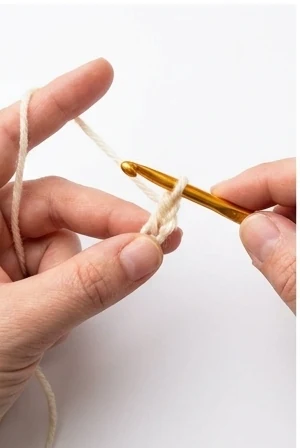
Chain stitch · Step 1
Position the yarn
Hold the hook in the dominant hand and the yarn in the other hand. Pinch the slip knot below the hook. Move the hook under and over the working yarn so the yarn rests in the hook groove.
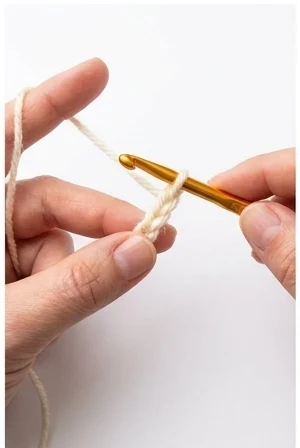
Chain stitch · Step 2
Pull through the loop
Rotate the hook slightly downward and draw the yarn through the slip-knot loop. This completes the first chain stitch and leaves one working loop on the hook.
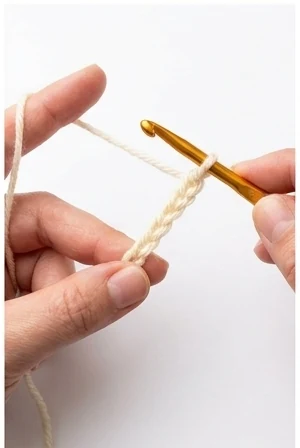
Chain stitch · Step 3
Repeat the chain motion
Yarn over and pull through the working loop again. Repeat the same smooth movement without tightening after every stitch. Similar movements create even V-shaped links.
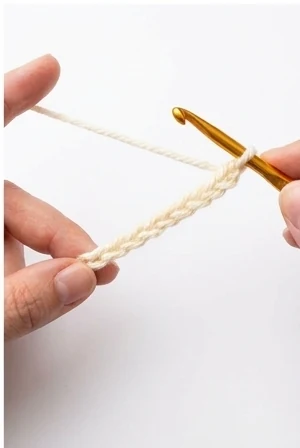
Chain stitch · Step 4
Check the chain length
Continue until the chain contains the number required by the pattern. Count the visible V shapes only. Do not count the slip knot or the active loop on the hook, and keep the chain untwisted.
Slip stitch, single crochet, and half double crochet
Complete one four-image sequence before moving to the next stitch.
Slip stitch (sl st)
Single crochet (sc)
Half double crochet (hdc)
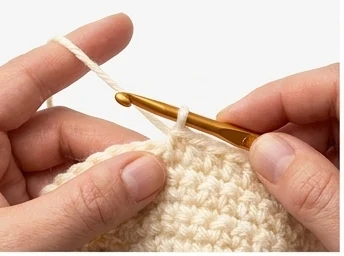
Slip stitch · Step 1
Insert the hook
Insert the hook into the indicated chain, stitch, or space from front to back.

Slip stitch · Step 2
Yarn over
Catch the working yarn with the hook so it wraps over the hook from back to front.
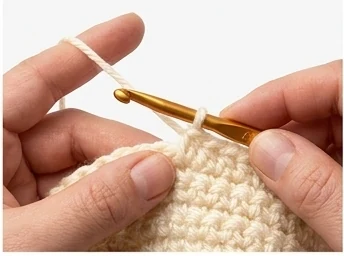
Slip stitch · Step 3
Begin the pull-through
Draw the yarn back through the stitch. Keep the hook facing downward so it does not split the yarn.
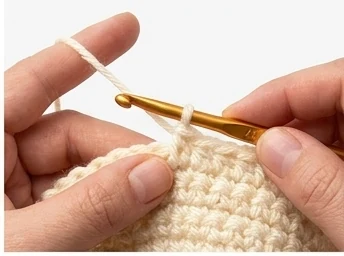
Slip stitch · Step 4
Complete the stitch
Continue pulling through the loop already on the hook in the same movement. One loop remains. Slip stitch has almost no height and is useful for joining rounds or edging.
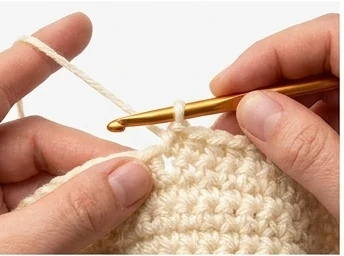
Single crochet · Step 1
Insert into the next stitch
Insert the hook under the top two loops of the next stitch unless the pattern specifies a different loop.
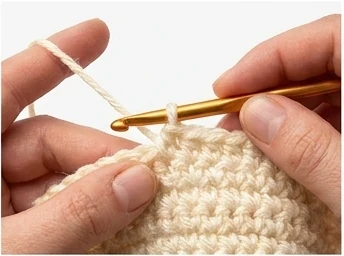
Single crochet · Step 2
Pull up a loop
Yarn over and draw the yarn through the stitch. Two loops should now be visible on the hook.
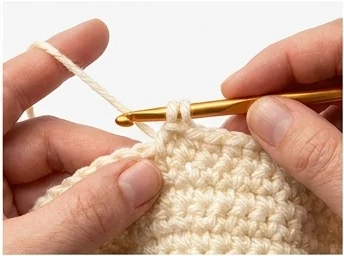
Single crochet · Step 3
Yarn over again
Catch the working yarn once more while keeping both loops open and even.
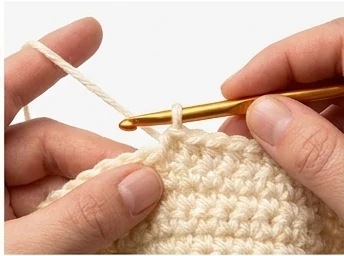
Single crochet · Step 4
Pull through both loops
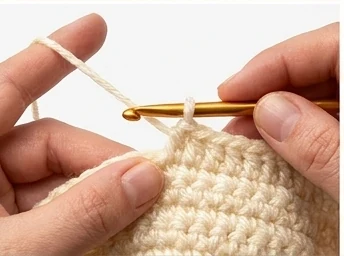
Draw the yarn through both loops together. One loop remains and the US single crochet is complete. In UK terms, this is double crochet.
Half double crochet · Step 1
Yarn over first
Wrap the yarn over the hook before inserting it into the next stitch.
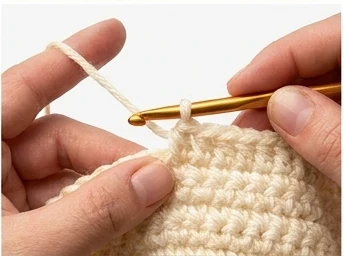
Half double crochet · Step 2
Insert and pull up a loop
Insert under the top two loops, yarn over, and pull through the stitch. Three loops are now on the hook.
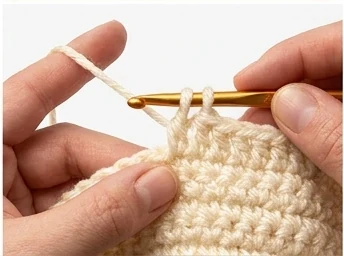
Half double crochet · Step 3
Yarn over again
Catch the working yarn while maintaining the three loops at an even height.
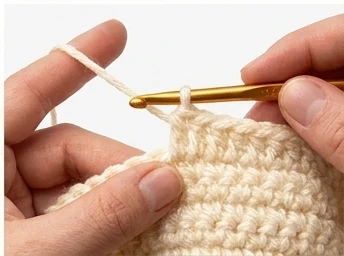
Half double crochet · Step 4
Pull through all three loops
Draw the yarn through all three loops at once. One loop remains. The US half double crochet, called half treble in UK terms, is complete.
Double crochet, rows, and stitches in a ring
Use each photograph independently and read the full action underneath it.
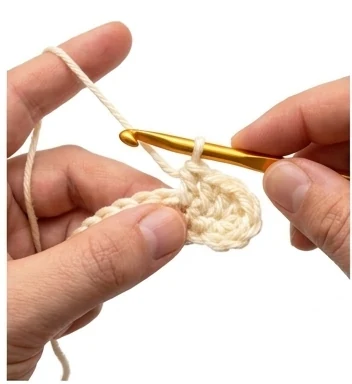
Double crochet · Step 1
Yarn over and insert
Yarn over once, then insert the hook under the top two loops of the next stitch.
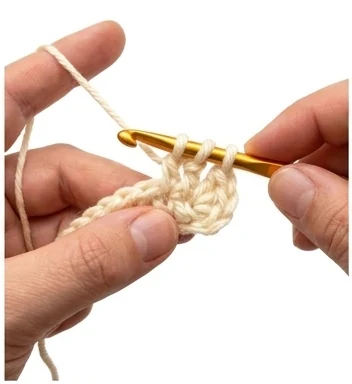
Double crochet · Step 2
Pull up a loop
Yarn over and draw the yarn through the stitch. Three loops should be on the hook.
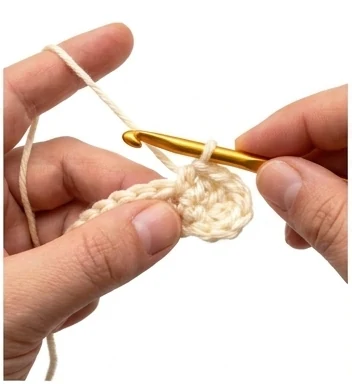
Double crochet · Step 3
Pull through two loops
Yarn over and draw through the first two loops only. Two loops remain.
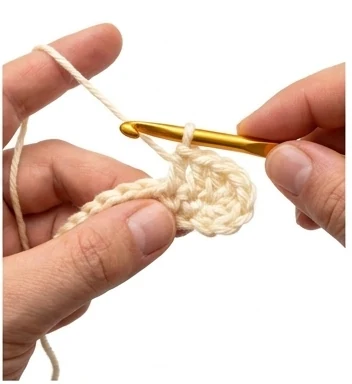
Double crochet · Step 4
Finish the double crochet
Yarn over again and pull through the final two loops. The US double crochet is complete; the UK name is treble crochet.
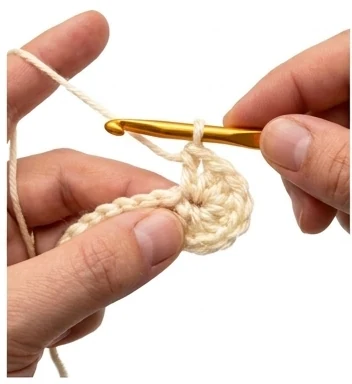
Working in rows · Step 1
Finish the first row
Work across the foundation chain in the direction specified by the pattern. At the end, check the stitch count before turning.

Working in rows · Step 2
Turn and begin the next row
Make the turning chain required for the stitch height, turn the fabric, and identify the first stitch. Follow the pattern rule for whether the turning chain counts as a stitch. Count each completed row to keep edges straight.
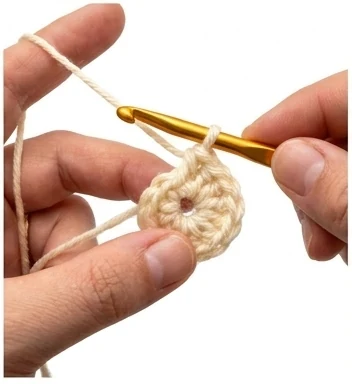
Working into a ring · Step 1
Work into the center
Create a foundation ring or adjustable magic ring. Make any required starting chain, then insert the hook into the center of the ring rather than an individual chain loop.
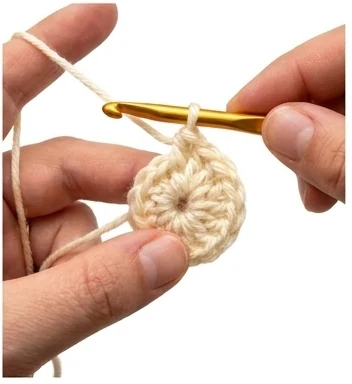
Working into a ring · Step 2
Complete and close the round
Work the required stitches into the ring. Pull the tail to close an adjustable center. Use a stitch marker for continuous rounds, or join with a slip stitch when the pattern calls for joined rounds.
Treble and taller crochet stitches
The four photographs below show US treble crochet. Double treble and triple treble are explained completely afterward.
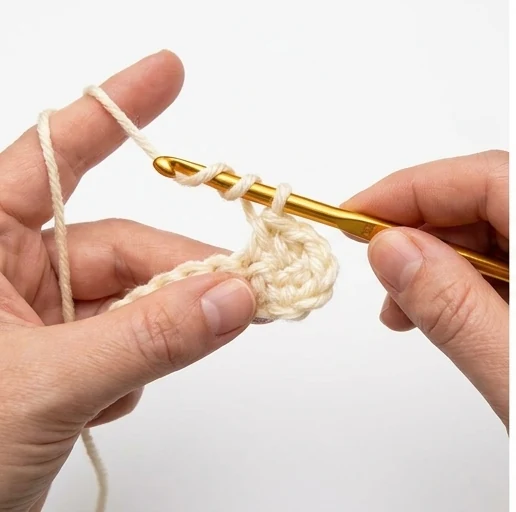
Treble crochet · Step 1
Yarn over twice and insert
Wrap the working yarn over the hook two times, then insert the hook under the top two loops of the next stitch.
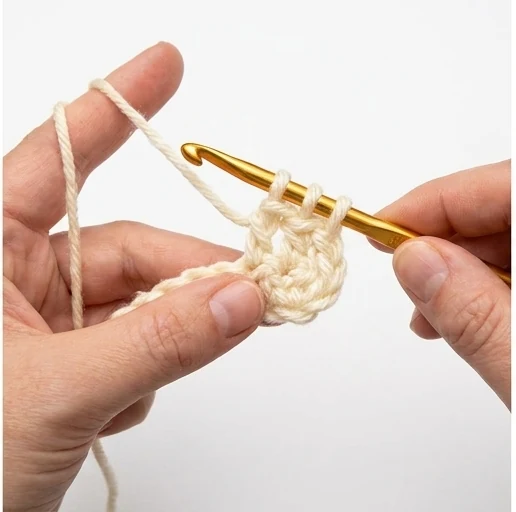
Treble crochet · Step 2
Pull up a loop
Yarn over and draw through the stitch. Four loops should now be visible on the hook.
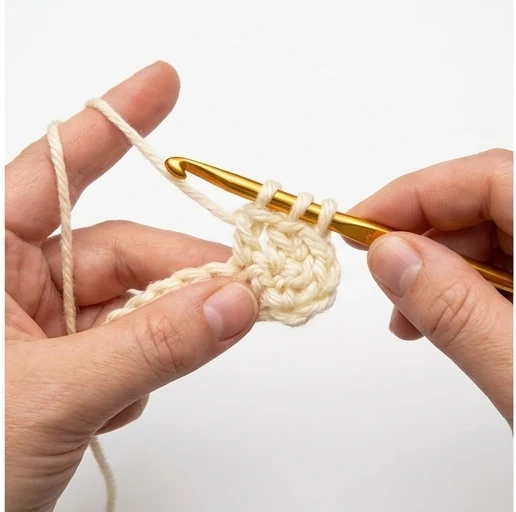
Treble crochet · Step 3
Reduce the loops in pairs
Yarn over and pull through two loops. Repeat once more, leaving two loops on the hook.
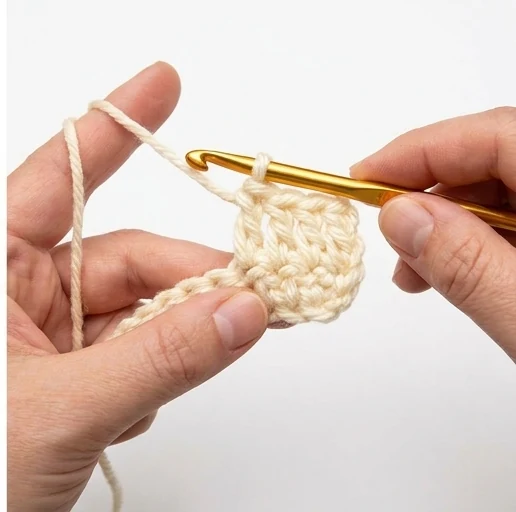
Treble crochet · Step 4
Complete the treble
Yarn over and pull through the final two loops. The US treble crochet is finished. The equivalent UK name is double treble.
Complete technique
US double treble crochet — dtr
- Yarn over three times.
- Insert the hook into the next stitch, yarn over, and pull up a loop; five loops are on the hook.
- Yarn over and pull through two loops four times until one loop remains.
- For the next row, follow the pattern’s turning-chain instruction and work into the correct first stitch.
Complete technique
US triple treble crochet — trtr
- Yarn over four times.
- Insert the hook into the next stitch, yarn over, and pull up a loop; six loops are on the hook.
- Yarn over and pull through two loops five times until one loop remains.
- Use the turning-chain height stated in the pattern and confirm whether it counts as the first stitch.
Complete crochet abbreviations
This expanded table preserves every abbreviation visible in the supplied guide. Always check the pattern’s own legend because designers occasionally use different shorthand.
| Abbreviation | Meaning |
|---|---|
| across | work across the row or round |
| approx | approximately |
| beg | beginning |
| bl / blo | insert hook under back loop only |
| BP | back post: insert hook around the post from back to front and back again |
| ch(s) | chain / chain stitches |
| ch- | refers to a chain already made, such as ch-3 |
| ch-sp(s) | chain space or spaces |
| cl(s) | cluster or clusters |
| cont | continue |
| dc | double crochet; confirm whether the pattern uses UK or US terms |
| dc2tog | work two double crochet stitches together as a decrease |
| dec | decrease |
| dtr | double treble crochet |
| dtr2tog | work two double treble stitches together |
| fdc | foundation double crochet |
| fl / flo | insert hook under front loop only |
| foll / folls | following / follows |
| FP | front post: insert hook around the post from front to back to front |
| ftr | foundation treble crochet |
| htr | half treble crochet in UK terms; US half double crochet |
| htr2tog | work two half treble stitches together |
| inc | increase |
| LH | left hand |
| lp(s) | loop or loops |
| meas | measures |
| patt(s) | pattern or patterns |
| pm | place marker |
| prev | previous |
| qtr | quadruple treble |
| rem | remain, remains, or remaining |
| rep | repeat |
| RH | right hand |
| rnd(s) | round or rounds |
| RS | right side |
| sk | skip |
| sp(s) | space or spaces |
| ss / sl st | slip stitch |
| st(s) | stitch or stitches |
| t-ch(s) | turning chain or turning chains |
| tog | together |
| tr | treble crochet in UK terms; US double crochet |
| tr cl | treble cluster: make partial trebles in the stated space, then draw through the remaining loops together |
| tr2tog | work two treble stitches together as a decrease |
| ttr | triple treble crochet |
| WS | wrong side |
| yrh / yo | yarn round hook / yarn over |
| * | repeat instructions from the asterisk as directed |
| ( ) | repeat all instructions inside parentheses as directed |
UK and US stitch-name conversion
| UK term | UK abbr. | US equivalent | US abbr. |
|---|---|---|---|
| chain | ch | chain | ch |
| slip stitch | ss | slip stitch | sl st |
| double crochet | dc | single crochet | sc |
| half treble | htr | half double crochet | hdc |
| treble | tr | double crochet | dc |
| double treble | dtr | treble crochet | tr |
| triple treble | ttr | double treble crochet | dtr |
How to use this guide while crocheting
Keep the page open beside the pattern. Begin with the image that matches the technique, then read the skill card immediately underneath before attempting the movement. Count stitches at the end of every row or round, place markers early, and stop to correct an error before it changes the project shape.
For related learning, replace these placeholders with your beginner patterns, and amigurumi essentials.
Frequently asked questions
Skill FAQ 1
Which hook grip is best?
The pencil and knife grips are both valid. Use the one that keeps the hand and wrist relaxed.
Skill FAQ 2
Why is my chain too tight?
Relax the yarn hand, avoid tightening after every chain, or try a slightly larger hook for the foundation only.
Skill FAQ 3
Does a turning chain count as a stitch?
Sometimes. Follow the rule stated in the individual pattern.
Skill FAQ 4
Are UK and US terms interchangeable?
No. The same stitch name can describe different techniques, so confirm the terminology first.
Skill FAQ 5
When should I use a stitch marker?
Use one for the first stitch of spiral rounds, pattern repeats, shaping points, or any place that is easy to lose.




