

MY CROCHET UNIVERSE · CHILDREN’S CROCHET
Crochet Baby Dress Pattern: Ruffled Pinafore in 6 Sizes
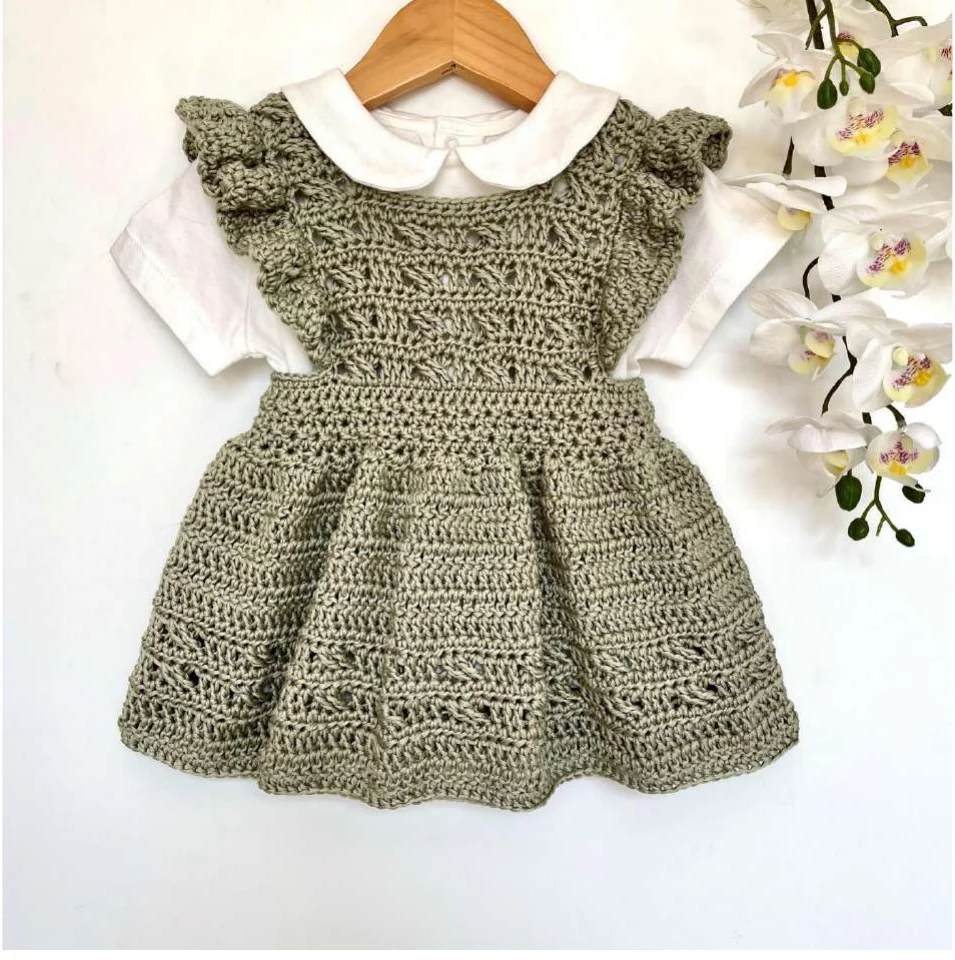
This crochet baby dress pattern creates a timeless pinafore-style dress with a textured bodice, buttoned back, ruffled straps, and a generous skirt. Instructions are included for six sizes from 0–3 months through 7–8 years, with color-coded stitch counts converted here into clear size-by-size tables.
The crochet baby dress pattern uses standard US crochet terms and DK-weight yarn. You can make the skirt mainly in double crochet for a faster finish, repeat the crossed-treble detail throughout, or combine both options to control the texture and final length. Keep this crochet baby dress pattern open while working so every size-specific count stays easy to check.
Finished sizes and skill level
This intermediate crochet baby dress pattern includes six sizes: 0–3 months, 3–6 months, 6–12 months, 2–3 years, 4–6 years, and 7–8 years. Skills include foundation chains, turned rows, working in rounds, crossed trebles, garment shaping, button loops, edging, frills, and hand sewing. Always compare the garment measurements with the child’s actual measurements before beginning.
Crochet Baby Dress Pattern Sizes, Gauge, and Materials
| Size | Finished waist | Approx. length | Approx. yarn |
|---|---|---|---|
| 0–3 months | 45 cm / 17.7 in | 30 cm / 11.8 in | 400 m |
| 3–6 months | 48 cm / 18.9 in | 35 cm / 13.8 in | 430 m |
| 6–12 months | 50 cm / 19.7 in | 40 cm / 15.7 in | 500 m |
| 2–3 years | 54 cm / 21.3 in | 50 cm / 19.7 in | 560 m |
| 4–6 years | 58 cm / 22.8 in | 56 cm / 22 in | 620 m |
| 7–8 years | 64 cm / 25.2 in | 60 cm / 23.6 in | 700 m |
Sizing note
Length is measured from the top of the shoulder and may be adjusted. Yarn amounts are approximate and depend on the final skirt length. For the best fit, wash and dry a gauge swatch in the same way you plan to care for the finished dress.
Materials
- DK-weight / category 3 yarn. The samples use Paintbox Cotton DK and Drops Muskat Cotton.
- Approximately 225 m / 246 yd per 100 g.
- 3.5 mm and 4 mm crochet hooks.
- Yarn needle, scissors, stitch markers, pins, and buttons.
- Gauge: 17 double crochets and 10 rows = 10 × 10 cm / 4 × 4 in.
Gauge is essential in this crochet baby dress pattern because the waistband determines the fit and the bib must remain centered. Change hook size if your washed swatch does not match the stated gauge.
Crochet Baby Dress Pattern Abbreviations
| Abbreviation | Meaning |
|---|---|
| ch | chain |
| st(s) | stitch(es) |
| sk | skip |
| sl st | slip stitch |
| SC | single crochet — UK double crochet |
| HDC | half double crochet — UK half treble |
| DC | double crochet — UK treble |
| TR | treble crochet — UK double treble |
| RS / WS | right side / wrong side |
| CRTR | crossed treble worked across 4 stitches |
How to work CRTR
Skip 2 stitches, work 1 TR in each of the next 2 stitches, then return to the first skipped stitch and work 1 TR into it. Work 1 TR into the second skipped stitch. The third and fourth trebles cross in front of the first pair.
Waistband and Button Loops
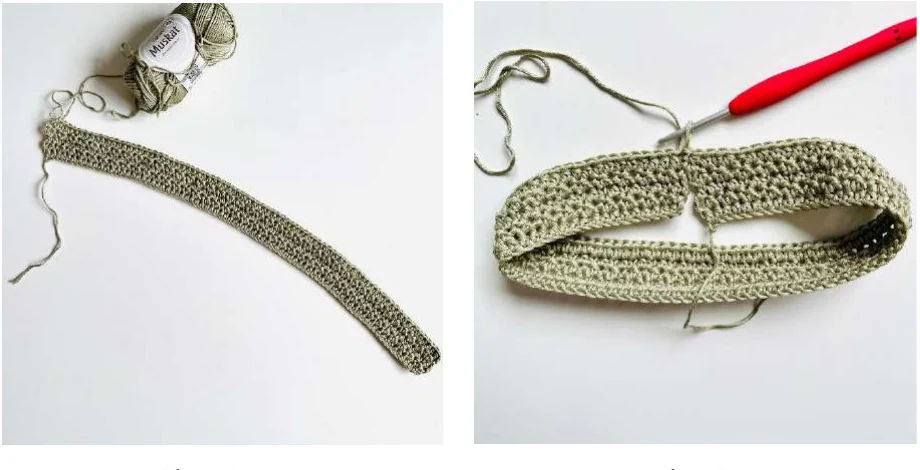
The upper waistband of the crochet baby dress pattern is worked back and forth with a 3.5 mm hook. The turning chains on selected rows become button loops and do not count as stitches. Follow only the stitch count for your chosen size.
| Row instructions | Stitch count |
|---|---|
| Foundation: Ch 81 (85, 89, 97, 105, 113). | All sizes |
| Row 1 — RS: HDC in the second chain from the hook and in every chain. Ch 3 and turn. The ch-3 creates the first button loop and does not count as a stitch. | 80 (84, 88, 96, 104, 112) |
| Row 2 — WS: Repeat *HDC, SC* to the end. Ch 1 and turn. | 80 (84, 88, 96, 104, 112) |
| Row 3: Repeat *HDC, SC* to the end, avoiding the ch-3 button loop. Ch 3 and turn to create the second loop. | 80 (84, 88, 96, 104, 112) |
| Row 4: Repeat *HDC, SC* to the end. Ch 1 and turn. | 80 (84, 88, 96, 104, 112) |
| Row 5 — sizes 0–3, 3–6, and 6–12 months: HDC in every stitch. Join with sl st to the first HDC, ch 1, and turn. Continue to Skirt Round 1. | 80 (84, 88) |
| Row 5 — sizes 2–3, 4–6, and 7–8 years: Repeat *HDC, SC* to the end, avoiding the button loop. Ch 3 and turn to create the third loop. | 96 (104, 112) |
| Row 6 — larger sizes: Repeat *HDC, SC* to the end. Ch 1 and turn. | 96 (104, 112) |
| Row 7 — larger sizes: HDC in every stitch. Join with sl st to the first HDC, ch 1, and turn. Continue to Skirt Round 1. | 96 (104, 112) |
Crochet Baby Dress Pattern Skirt
Switch to the 4 mm hook for the remainder of the crochet baby dress pattern. Skirt Round 1 increases dramatically to produce the full, gathered shape shown in the finished dress. Count carefully before continuing.
Skirt Round 1
| Size | Instructions | Count |
|---|---|---|
| 0–3 months | 4 HDC in first stitch; repeat *skip 1 stitch, 4 HDC in next stitch* until 3 stitches remain. Skip 1, work 5 HDC in next, skip last, join, ch 1 loosely, and turn. | 161 |
| 3–6 months | Work as above, but work 4 HDC in the final increase stitch. | 168 |
| 6–12 months | Work as above, but work 3 HDC in the final increase stitch. | 175 |
| 2–3 years | Work as above, but work 1 HDC in the final increase stitch. | 189 |
| 4–6 years | 5 HDC in first stitch; repeat *skip 1, 4 HDC in next* until 3 remain. Skip 1, work 5 HDC in next, skip last, join, ch 1 loosely, and turn. | 210 |
| 7–8 years | 4 HDC in first stitch; repeat *skip 1, 4 HDC in next* until 3 remain. Skip 1, work 4 HDC in next, skip last, join, ch 1 loosely, and turn. | 224 |
Choose a plain or detailed skirt
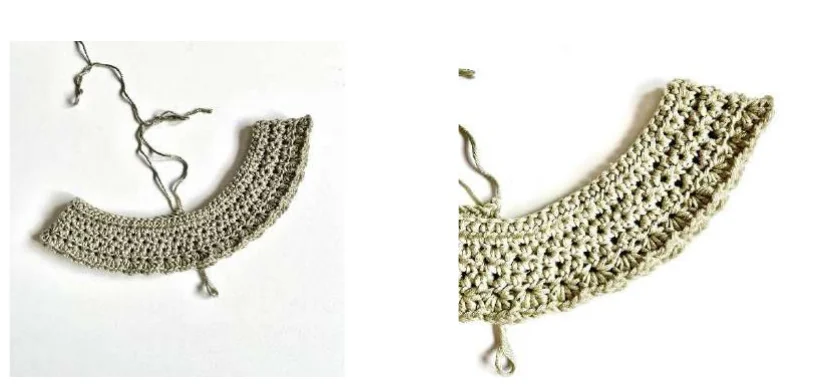
The rest of the crochet baby dress pattern skirt may be made in plain DC rounds, entirely in the two-round textured repeat, or with plain rounds followed by a textured border. The two detail rounds add approximately 2 cm / 0.8 in each time they are worked.
Plain DC Round: DC in every stitch, join with sl st to the first DC, ch 1 loosely, and turn. Counts: 161 (168, 175, 189, 210, 224).
Detail Round 1: DC in the first stitch. Skip 2 stitches; work TR in each of the next 2 stitches, then return to the 2 skipped stitches and work TR in each to form CRTR. Repeat *DC 3, CRTR* until 2 stitches remain. DC in each remaining stitch, join, ch 1, and turn.
Detail Round 2: HDC in every stitch, ch 1 loosely, and turn. Counts remain 161 (168, 175, 189, 210, 224).
Repeat: Alternate Detail Rounds 1 and 2 until the skirt approaches the required length.
Final Round: On the right side, HDC around to neaten the hem. Fasten off.
Plan the length before the yarn runs out
When the first ball is nearly finished, pause the skirt and make the bib and straps. Measuring from the top of a finished strap makes it easier to decide the final skirt length and estimate the remaining yarn.
Crochet Baby Dress Pattern
Keep Every Size and Stitch Count Together
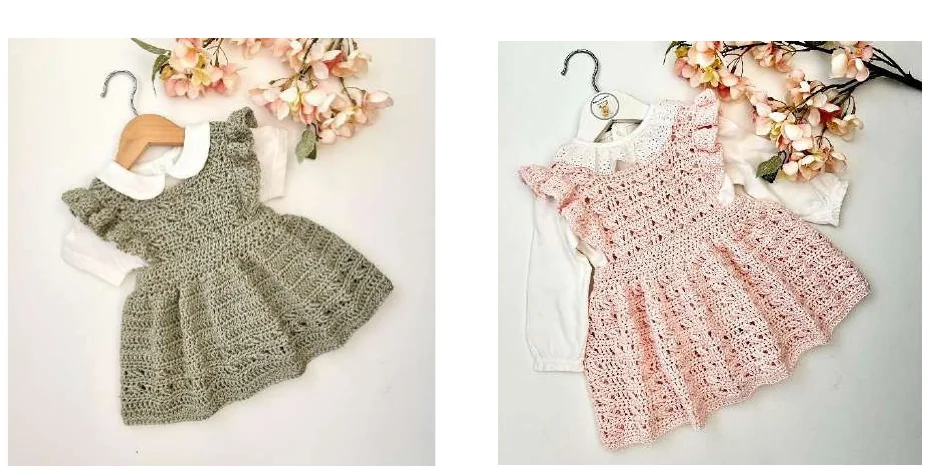
Save the complete crochet baby dress pattern so the waistband, six skirt counts, bib, straps, edging, and frill instructions remain together while you work.
Front Bib for the Crochet Baby Dress Pattern
Lay the dress flat with the front facing. Center and mark 26 (26, 30, 34, 38, 42) stitches across the top of the waistband. There will be 27 (29, 29, 31, 33, 35) unused stitches on each side between the marked bib section and the waistband end.
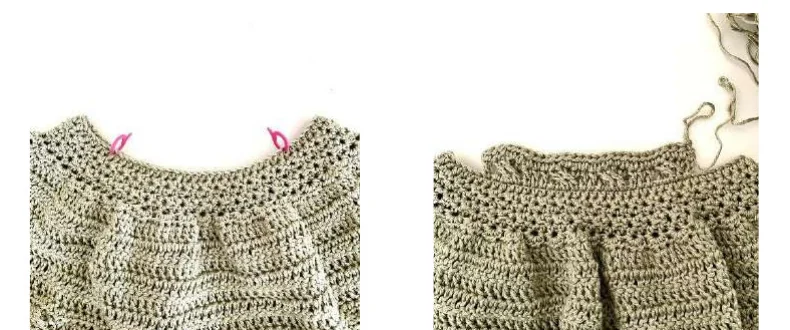
Bib Row 1 by size
| Size | Bib Row 1 | Count |
|---|---|---|
| 0–3 and 3–6 months | Attach yarn to the marked stitch on the right. Ch 1, DC in that stitch; work *CRTR, DC 3, CRTR, DC 2, CRTR, DC 3, CRTR*; DC in the last stitch. Ch 1 and turn. | 26 |
| 6–12 months | Ch 1, DC; work *CRTR, DC 2, CRTR, DC 2, CRTR, DC 2, CRTR, DC 2, CRTR*; DC in the last stitch. Ch 1 and turn. | 30 |
| 2–3 years | Ch 1, DC; work *CRTR, DC 3* four times, CRTR; DC in the last stitch. Ch 1 and turn. | 34 |
| 4–6 years | Ch 1, DC; work CRTR, DC 2, CRTR, DC 3, CRTR, DC 2, CRTR, DC 3, CRTR, DC 2, CRTR; DC in the last stitch. Ch 1 and turn. | 38 |
| 7–8 years | Follow the size-specific sequence across all 42 marked stitches, maintaining the CRTR and DC spacing shown for the larger bib. Ch 1 and turn. | 42 |
Row 2 — all sizes: HDC in every stitch. Ch 1 loosely and turn. Counts: 26 (26, 30, 34, 38, 42).
Row 3: DC in the first stitch, then repeat the Row 1 CRTR sequence for your size. Ch 1 and turn.
Row 4: HDC in every stitch. Ch 1 loosely and turn.
Repeat Rows 3–4: Repeat 2 (3, 3, 4, 5, 6) times. Keep the first and last stitch marked so the bib edges remain straight.
The alternating textured and HDC rows match the skirt detail and give this crochet baby dress pattern a structured front without making it stiff.
Shoulder Straps
The straps continue directly from the front bib. Complete the first strap, then count six stitches inward from the opposite side and repeat the same number of rows for the second strap.
Strap Row 1: DC in the first stitch, CRTR across the next 4 stitches, then DC in the final stitch. Ch 1 and turn. — 6 stitches.
Strap Row 2: HDC in all 6 stitches. Ch 1 loosely and turn.
Continue: Repeat Rows 1 and 2 until the strap rises approximately 5 (6, 6, 6, 7, 7) cm above the bib and meets the back waistband.
Back overlap: Work 4 additional HDC rows. These rows will sit behind the waistband. Fasten off, leaving a long sewing tail.
Second strap: With the RS facing, count 6 stitches inward from the left edge, attach yarn, and repeat the first strap exactly. Do not sew the straps down yet.
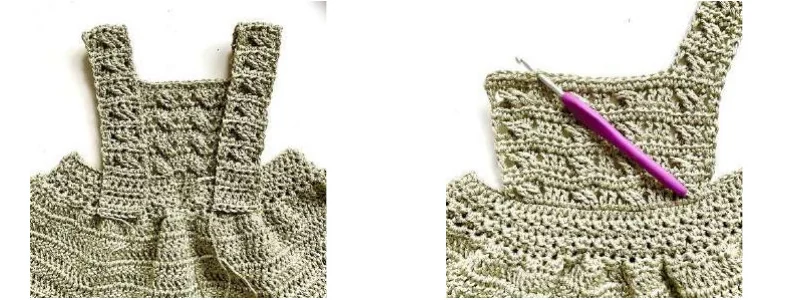
Top Edging and Final Button Loop
The edging creates a tidy finish around the open top of the crochet baby dress pattern before the frills are added. Leave the straps unattached while completing this round.
Begin: Leave a long tail and ch 4. This chain creates the final button loop.
Join: With the RS facing, sl st into the first stitch along the top of the waistband. Ch 1 and SC in the same stitch.
Continue: SC in every stitch around the top section. Along bib and strap sides, work 2 SC into the end of each DC row and 1 SC into the end of each HDC row.
Corners: Work 3 SC in each strap-end corner so the straps lie flat.
Finish: End the edging at the opposite end of the waistband and fasten off.
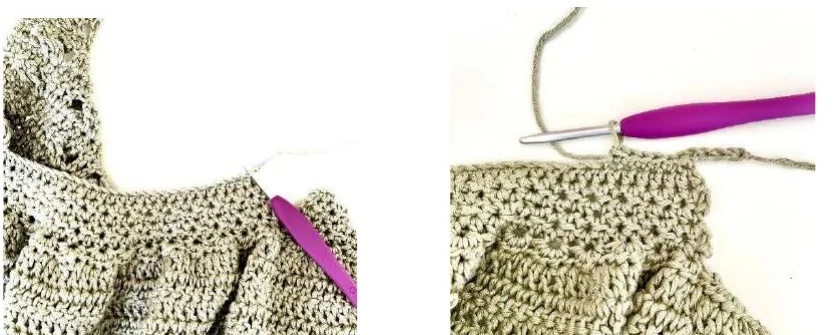
Ruffled Strap Frills
The shoulder frills are a signature feature of this crochet baby dress pattern. Pin the straps temporarily, then place markers before crocheting so both frills begin and end at matching positions.
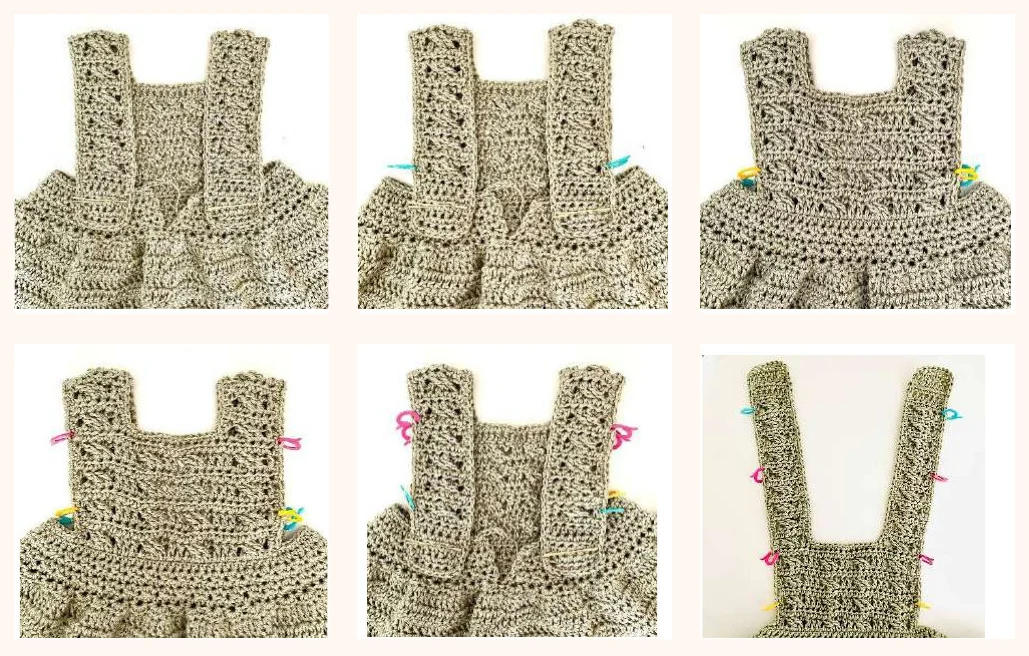
- Pin the straps close to the back opening, leaving enough overlap to sew them inside the waistband.
- Place a marker in the side of the fourth stitch above the waistband.
- Turn the dress over and mark the matching stitch on the other side.
- Place a marker in the row just below the top of the bib.
- Turn again and mark the same position on the back side.
- Unpin the straps. Each strap now has four matching markers.
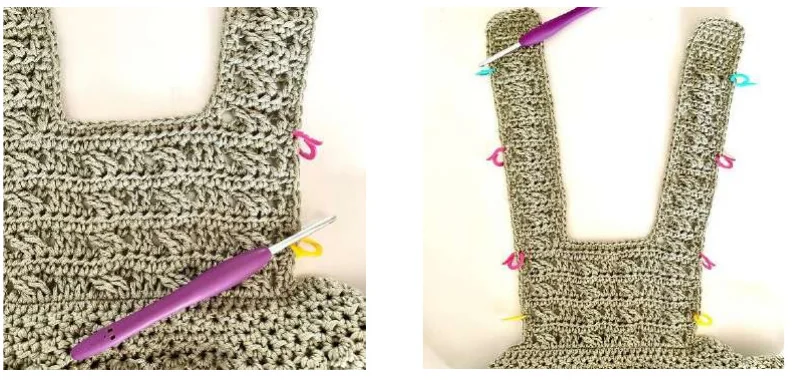
Frill rows — make 2
Row 1: Leave a long sewing tail. Attach yarn at the first marked stitch, ch 1, and SC in that stitch. Working in FLO, make 2 HDC in each stitch to the first marker. Remove it and work 3 HDC in that stitch and every stitch until the next marker. Remove the second marker and work 3 HDC in that stitch. Then work 2 HDC in each stitch until the last marker; remove it and SC in the final stitch. Ch 1 and turn. Work through both loops from this point onward.
Row 2: DC in the first stitch, SC in the next, and continue alternating DC and SC across. Ch 1 and turn.
Row 3: SC in the first 3 stitches, HDC in the next 3, DC in every stitch until 6 remain, HDC in the next 3, and SC in the final 3. Ch 1 and turn.
Row 4: SC in the first stitch, DC in the next, and continue alternating SC and DC across. Fasten off.
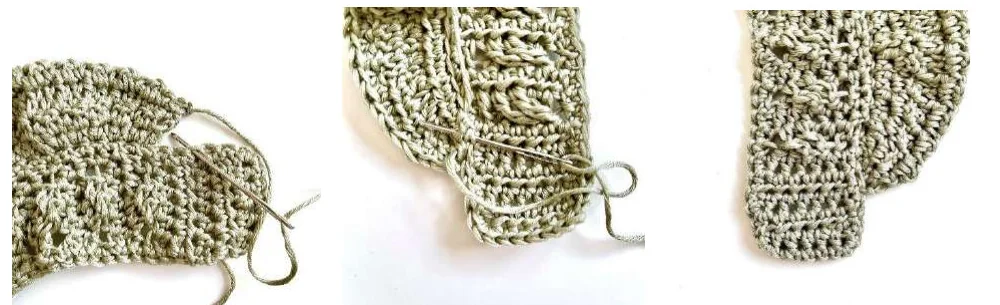
Attaching the frill ends
Use the long tails to secure each frill end through the side of three strap stitches. The front frill ends should finish just above the waistband. Keep the stitches firm but not tight enough to pull the straps out of shape.
Crochet Baby Dress Pattern Assembly and Finishing
Complete the final assembly only after both frills sit evenly and the straps have been tried against the back waistband. This keeps the crochet baby dress pattern balanced and prevents one strap from finishing longer than the other.
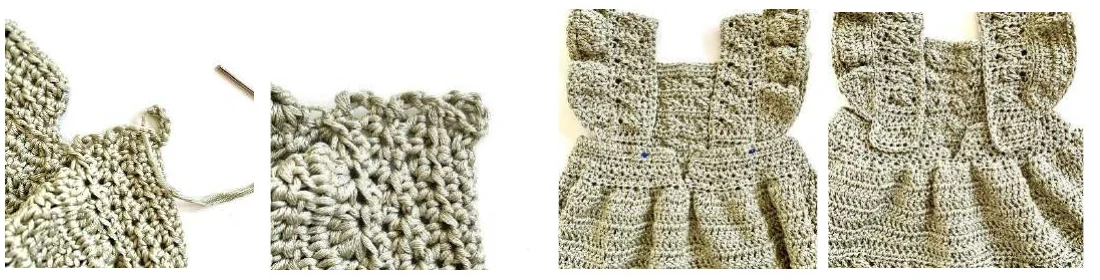
- Use the long chain-4 tail to secure the final button loop to the waistband edge.
- Pin the straps carefully and confirm that both are the same length.
- Turn the dress inside out. Sew down one side of each strap, across the bottom, up the opposite side, and along the top.
- Weave in every yarn end securely.
- Sew on buttons that fit the loops without forcing them.
- Wash and block according to the yarn label, reshaping the frills and skirt while damp.
Your crochet baby dress pattern is complete. The dress can be worn over a bodysuit, blouse, or lightweight top, and the skirt length can be adjusted before the final hem round. Save the crochet baby dress pattern with your yarn notes in case you want to make a second size later.
Crochet Baby Dress Pattern
Make the Dress Without Losing Your Place
Keep the six sizes, stitch counts, photo checkpoints, crossed-treble instructions, frill placement, and final assembly in one printable crochet baby dress pattern.
Crochet Baby Dress Pattern FAQ
Can I use acrylic yarn?
Yes. Smooth DK acrylic can work, but cotton gives the crochet baby dress pattern crisp stitch definition and a breathable finish. Always swatch because fiber choice changes drape.
How do I adjust the skirt length?
Work more or fewer plain DC or two-round detail repeats before the final HDC hem. Measure from the top of the finished strap, not from the waistband.
Why is the waistband too wide or too narrow?
The most common cause is incorrect gauge. Recheck 17 DC and 10 rows over 10 cm / 4 in after washing the swatch, then change hook size.
Can I omit the shoulder frills?
Yes. The crochet baby dress pattern remains wearable without them. Finish the top edging, sew the plain straps to the back, and continue with the buttons.
How should I choose a size?
Use the child’s waist measurement and desired finished length rather than age alone. If between sizes, choose the waist size that allows comfortable ease and adjust the skirt length separately.
Are the turning chains counted as stitches?
No. The pattern specifically states that the button-loop chains and ch-1 turning chains do not count as stitches.
Final checklist
Confirm the stitch count at every size change, keep the bib centered, make both straps identical, place the frill markers symmetrically, test the buttons, weave in all tails, and block the finished crochet baby dress pattern gently before wearing.




