

MY CROCHET UNIVERSE · FREE CROCHET PATTERN
Multi-Coloured Granny Square Pattern: Easy 4-Round Tutorial
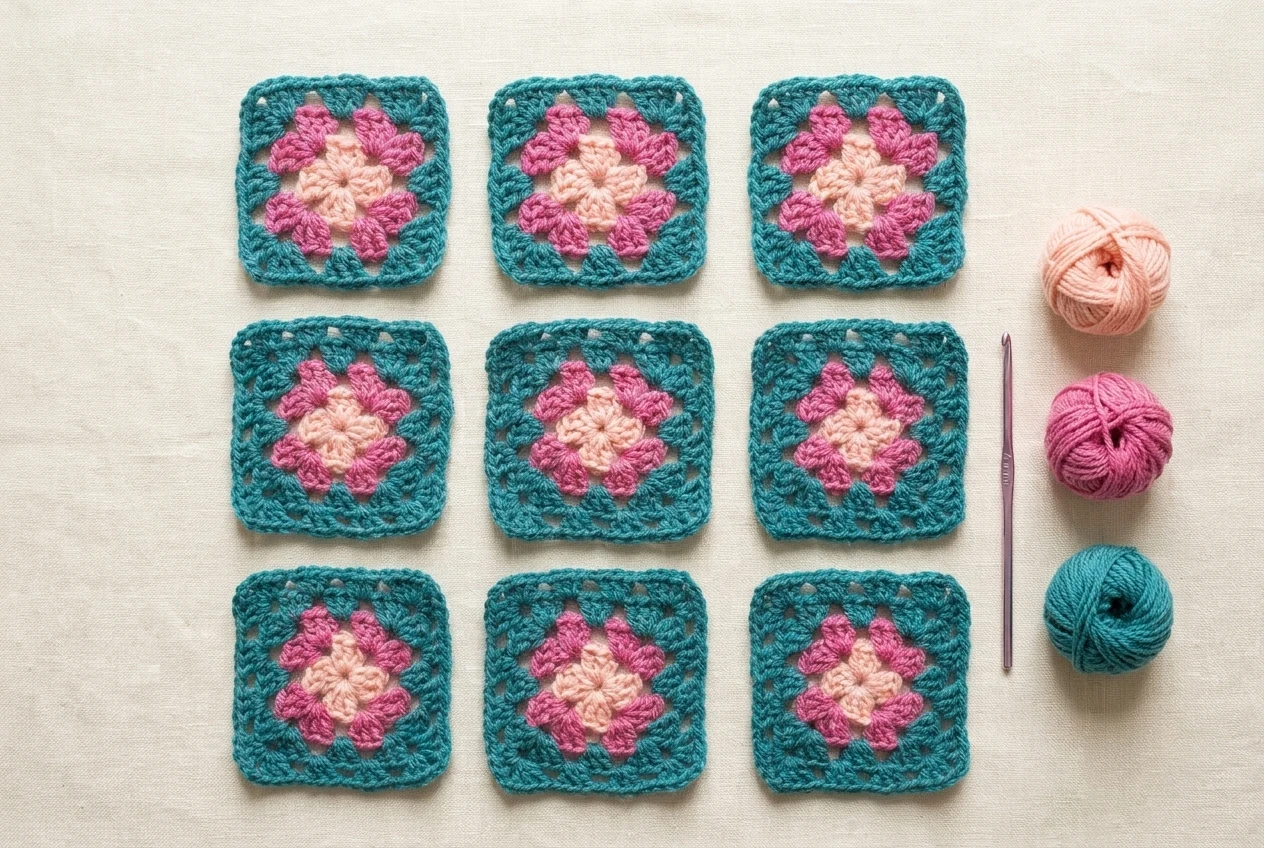
This multi-coloured granny square pattern uses only four rounds to create a bright 9 cm motif with a salmon center, flamingo-pink middle, and teal border. The square begins with four classic three-treble clusters, expands into four pink corners, then gains two teal rounds that define the sides and sharpen the corners.
The colour changes are part of the design rather than an afterthought. By crocheting over the old and new tails as you work, the multi-coloured granny square pattern stays tidy and avoids a large pile of ends at the end. Once you understand the corner and side logic, you can keep the same palette, reverse the colours, or continue adding rounds for a larger square.
Table of Contents
- Project overview
- Before you begin
- Materials and tension
- Abbreviations
- How the square grows
- Written pattern
- Step-by-step tutorial
- Colour planning
- Project ideas
- Troubleshooting
- FAQ
Project Overview
| Detail | Pattern information |
|---|---|
| Project | Three-colour granny square |
| Skill level | Beginner / confident beginner |
| Finished size | Approximately 9 cm |
| Hook | 4 mm crochet hook |
| Yarn | Washable worsted-weight wool in salmon, flamingo pink, and teal |
| Rounds | Four |
| Main stitches | Chain, slip stitch, UK treble crochet |
| Construction | Center ring, four corners, side clusters, two-round outer border |
| Colour order | Salmon R1, Flamingo Pink R2, Teal R3–R4 |
Every corner in the multi-coloured granny square pattern contains (3 tr, ch 2, 3 tr). Side groups are separated by one chain. Round 2 has no side clusters because the motif is still small. Round 3 adds one side cluster between each pair of corners, and Round 4 adds two side clusters.
Before You Begin
Read all four rounds of the multi-coloured granny square pattern before making the starting chain. The instructions use UK crochet terminology: a UK treble crochet is the same stitch as a US double crochet. Keep one terminology system throughout the motif so the clusters reach the correct height.
- Wind small balls of all three colours before starting.
- Choose yarns with the same thickness and similar fiber content.
- Keep the 4 mm hook with the project so later squares match.
- Count four corner spaces after every round.
- Work over the yarn tails for several clusters, then trim only after checking security.
- Keep one chain between side clusters and two chains in each corner.
- Measure the square only after blocking.
- Make one complete sample before beginning a blanket-size batch.
Materials and Tension
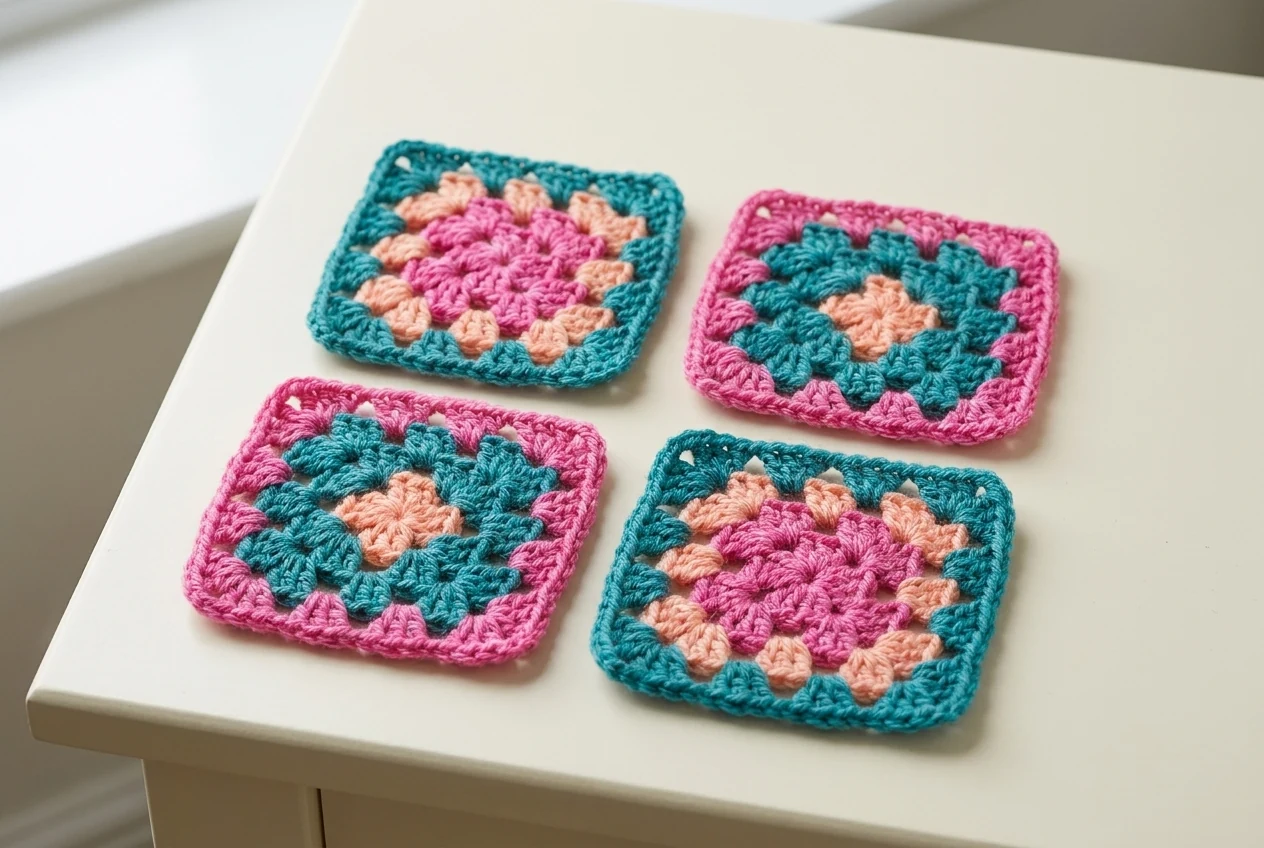
You need relatively small amounts of each colour for one multi-coloured granny square pattern. The original tutorial uses a washable worsted-weight wool. Smooth yarn makes the clusters easy to see and helps the square block cleanly.
| Material | Specification |
|---|---|
| Salmon yarn | Center colour for Round 1 |
| Flamingo-pink yarn | Flower or middle colour for Round 2 |
| Teal yarn | Outer colour for Rounds 3 and 4 |
| Crochet hook | 4 mm |
| Tapestry needle | Weaves and secures any remaining tails |
| Scissors | Cuts colour changes cleanly |
| Blocking mat and pins | Shapes every motif to the same measurement |
| Ruler | Confirms the 9 cm finished size |
The source gives a motif measurement instead of a conventional stitch-and-row swatch: one blocked square measures approximately 9 cm. If your square is much larger, tighten your tension or try a smaller hook. If it is smaller and stiff, relax the yarn or try a slightly larger hook.
Use the same yarn line for every colour when possible. If substituting, compare yarn thickness with the Craft Yarn Council yarn-weight system. Fiber, twist, and elasticity can change both the size and the way the motif blocks.
Crochet Abbreviations
| Abbreviation | UK meaning in this tutorial | US equivalent |
|---|---|---|
| ch | Chain | Chain |
| ch-sp | Chain space | Chain space |
| rep | Repeat | Repeat |
| rnd | Round | Round |
| ss | Slip stitch | Slip stitch |
| tr | Treble crochet | Double crochet |
For one UK treble, yarn over, insert the hook into the space, yarn over and pull up a loop, yarn over and pull through two loops, then yarn over and pull through the final two loops. Compare any unfamiliar term with the Craft Yarn Council crochet abbreviations.
How the Square Grows
The multi-coloured granny square pattern follows classic granny-square geometry. The four Round 1 chain-2 spaces become permanent corners. You never work a corner into an ordinary side chain space. Keeping that distinction clear prevents extra corners and keeps the motif flat.
Round structure
- Round 1: Four salmon clusters with four chain-2 corners.
- Round 2: Four flamingo-pink corner units; no side cluster yet.
- Round 3: Four teal corners plus one teal side cluster on every side.
- Round 4: Four teal corners plus two teal side clusters on every side.
Each new round adds one additional side cluster per side. The corner unit stays unchanged, so the square can be enlarged after Round 4 by repeating the same logic.
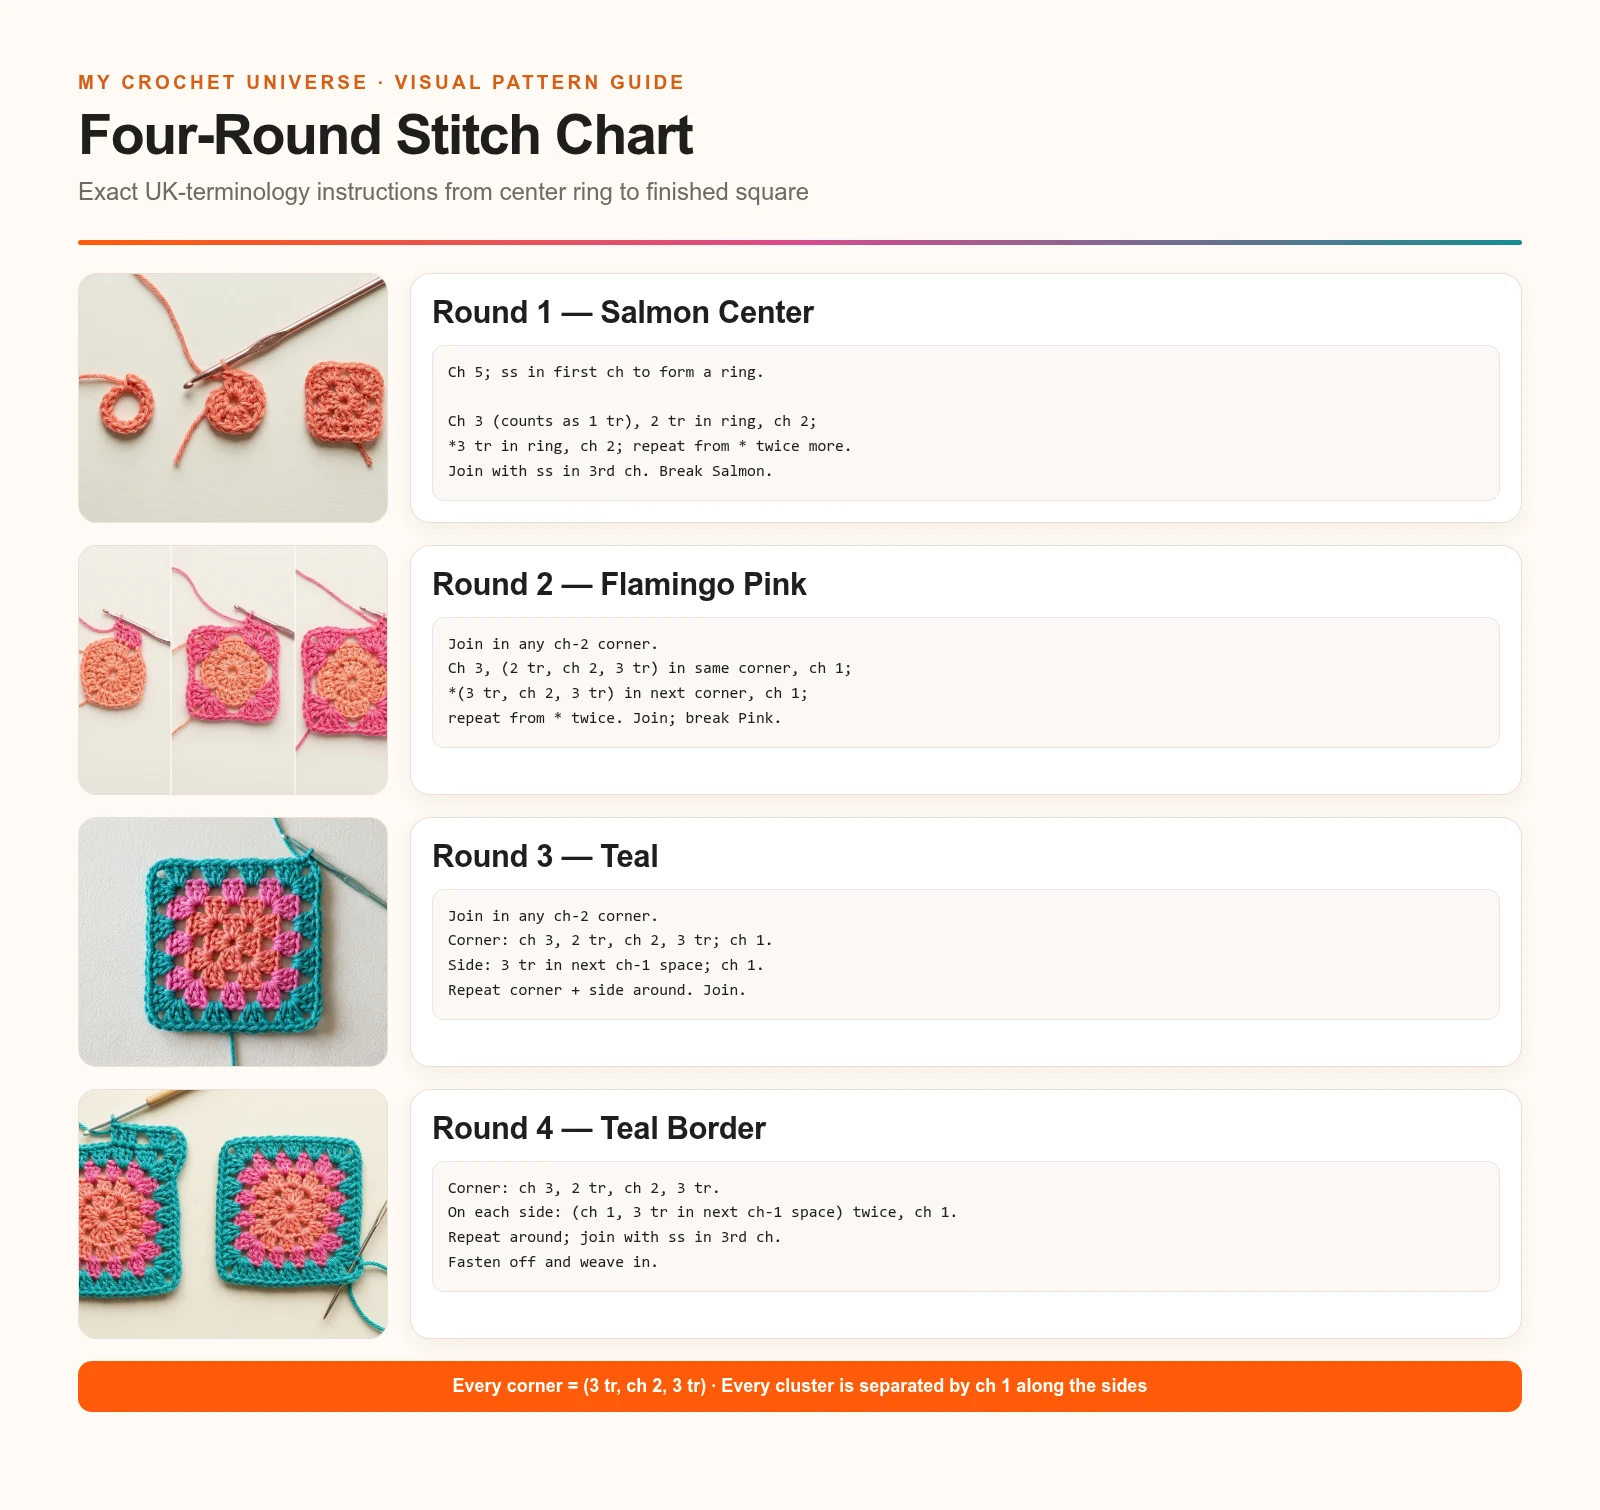
Multi-Coloured Granny Square Pattern Written Instructions
The multi-coloured granny square pattern is written in UK terms. Replace every tr with a US double crochet if you prefer US terminology.
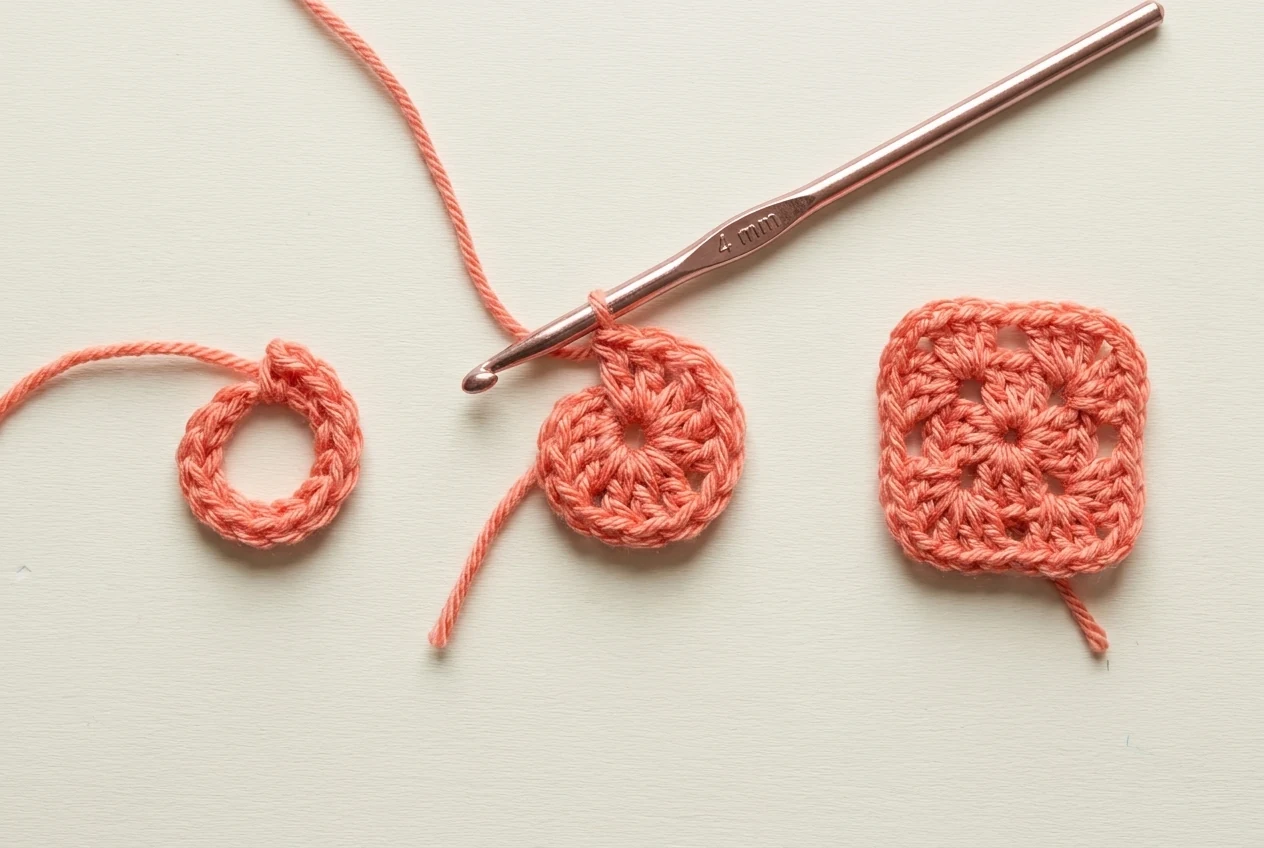
Foundation Ring — Salmon
Using a 4 mm hook and salmon yarn, ch 5. Join with a slip stitch in the first chain to form a ring. Keep the ring open enough to insert all four clusters comfortably.
Round 1 — Salmon center
- Ch 3; this counts as the first tr.
- Work 2 tr into the center ring.
- Ch 2.
- Repeat (3 tr in the ring, ch 2) three more times.
- Join with a slip stitch in the third chain of the beginning ch-3.
You should have four groups of 3 tr and four chain-2 corner spaces. Cut the salmon yarn. Pull the end through the final loop and leave a tail long enough to secure under the next round.
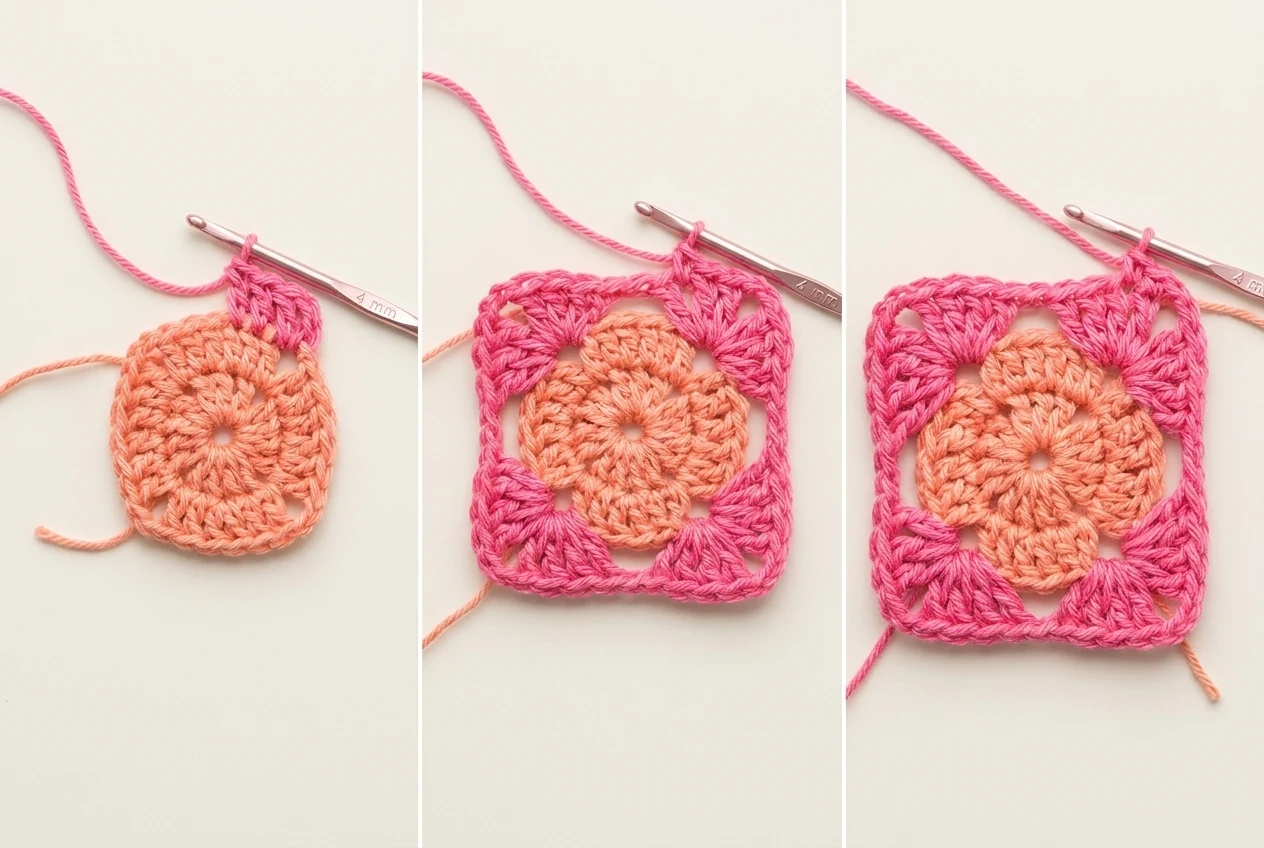
Round 2 — Flamingo Pink
Join flamingo-pink yarn in any Round 1 chain-2 corner space. Lay the salmon tail and the new pink tail along the top of the stitches so the first clusters can enclose them.
- Ch 3; this counts as the first tr.
- In the same corner space work 2 tr, ch 2, 3 tr.
- Ch 1.
- In the next chain-2 corner space work (3 tr, ch 2, 3 tr).
- Ch 1.
- Repeat the corner unit and ch 1 in each remaining corner.
- Join with a slip stitch in the third chain of the beginning ch-3.
Round 2 contains four corners, each made from two 3-tr groups separated by ch 2. There is one chain between corners. Cut the flamingo-pink yarn and secure the final loop.
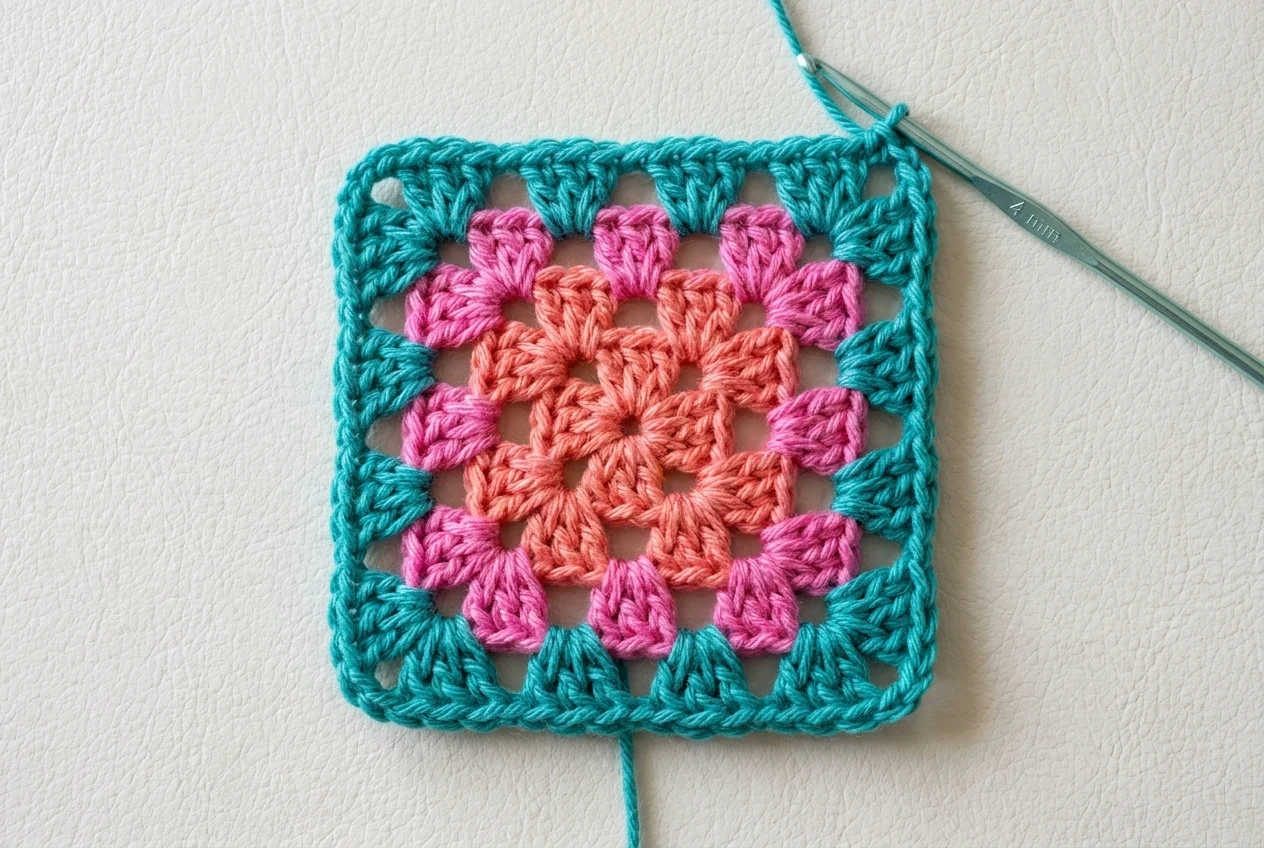
Round 3 — Teal
Join teal yarn in any chain-2 corner space. Work over the teal tail and the nearest pink tail where practical.
- Ch 3; this counts as the first tr.
- In the same corner space work 2 tr, ch 2, 3 tr.
- Ch 1.
- Work 3 tr in the next chain-1 side space.
- Ch 1.
- In the next chain-2 corner space work (3 tr, ch 2, 3 tr).
- Ch 1, work 3 tr in the next chain-1 side space, ch 1.
- Repeat the corner and side sequence around.
- Join with a slip stitch in the third chain of the beginning ch-3.
Do not cut the teal yarn. Check that each side contains one 3-tr group and that all four corners still contain a chain-2 space.
Round 4 — Teal border
Continue with teal. Slip stitch into the next chain-2 corner space if necessary so the new round begins in a corner.
- Ch 3; this counts as the first tr.
- In the same corner space work 2 tr, ch 2, 3 tr.
- Work (ch 1, 3 tr in the next chain-1 space) twice.
- Ch 1.
- In the next chain-2 corner space work (3 tr, ch 2, 3 tr).
- Work (ch 1, 3 tr in the next chain-1 space) twice.
- Ch 1.
- Repeat the corner-and-side sequence around.
- Join with a slip stitch in the third chain of the beginning ch-3.
Fasten off. The completed multi-coloured granny square pattern has four corners and two side clusters between each pair of corners. Secure any tails that were not completely enclosed.
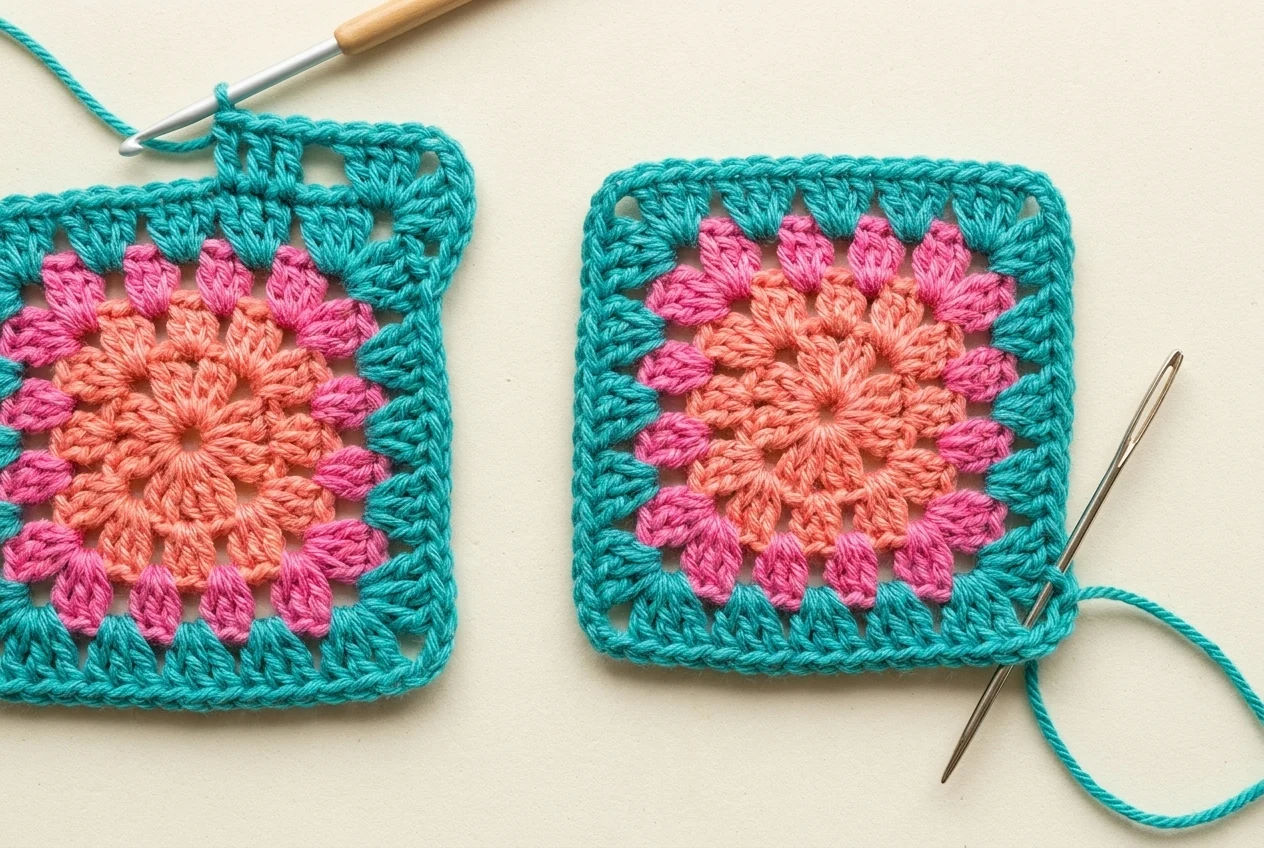
Multi-Coloured Granny Square Pattern Step-by-Step Tutorial
The round list above is complete. These checkpoints explain the hand movements, counting habits, and finishing decisions that make the multi-coloured granny square pattern consistent across a large batch.
Step 1 — Form a stable five-chain ring
Make five chains with even tension. Insert the hook into the first chain without twisting the chain strand and complete a slip stitch. Tug the working yarn gently to confirm the ring is closed but still flexible.
Avoid tightening the ring until it becomes a knot. Round 1 needs room for twelve treble crochets. If the center opening looks too large after Round 1, use the starting tail to close it slightly before weaving the tail.
Step 2 — Build four equal salmon corners
The starting ch 3 plus 2 tr forms the first cluster. Ch 2, then make each remaining 3-tr cluster into the center ring. Spread the groups around the ring as you go rather than stacking them in one area.
Before joining, count four clusters and four chain-2 spaces. The multi-coloured granny square pattern cannot become a square later if Round 1 contains three or five corners.
Step 3 — Add the pink corner round
Join flamingo pink in any corner because the motif has no fixed top. Complete two 3-tr groups in the same corner, separated by ch 2. Ch 1 before moving to the next corner.
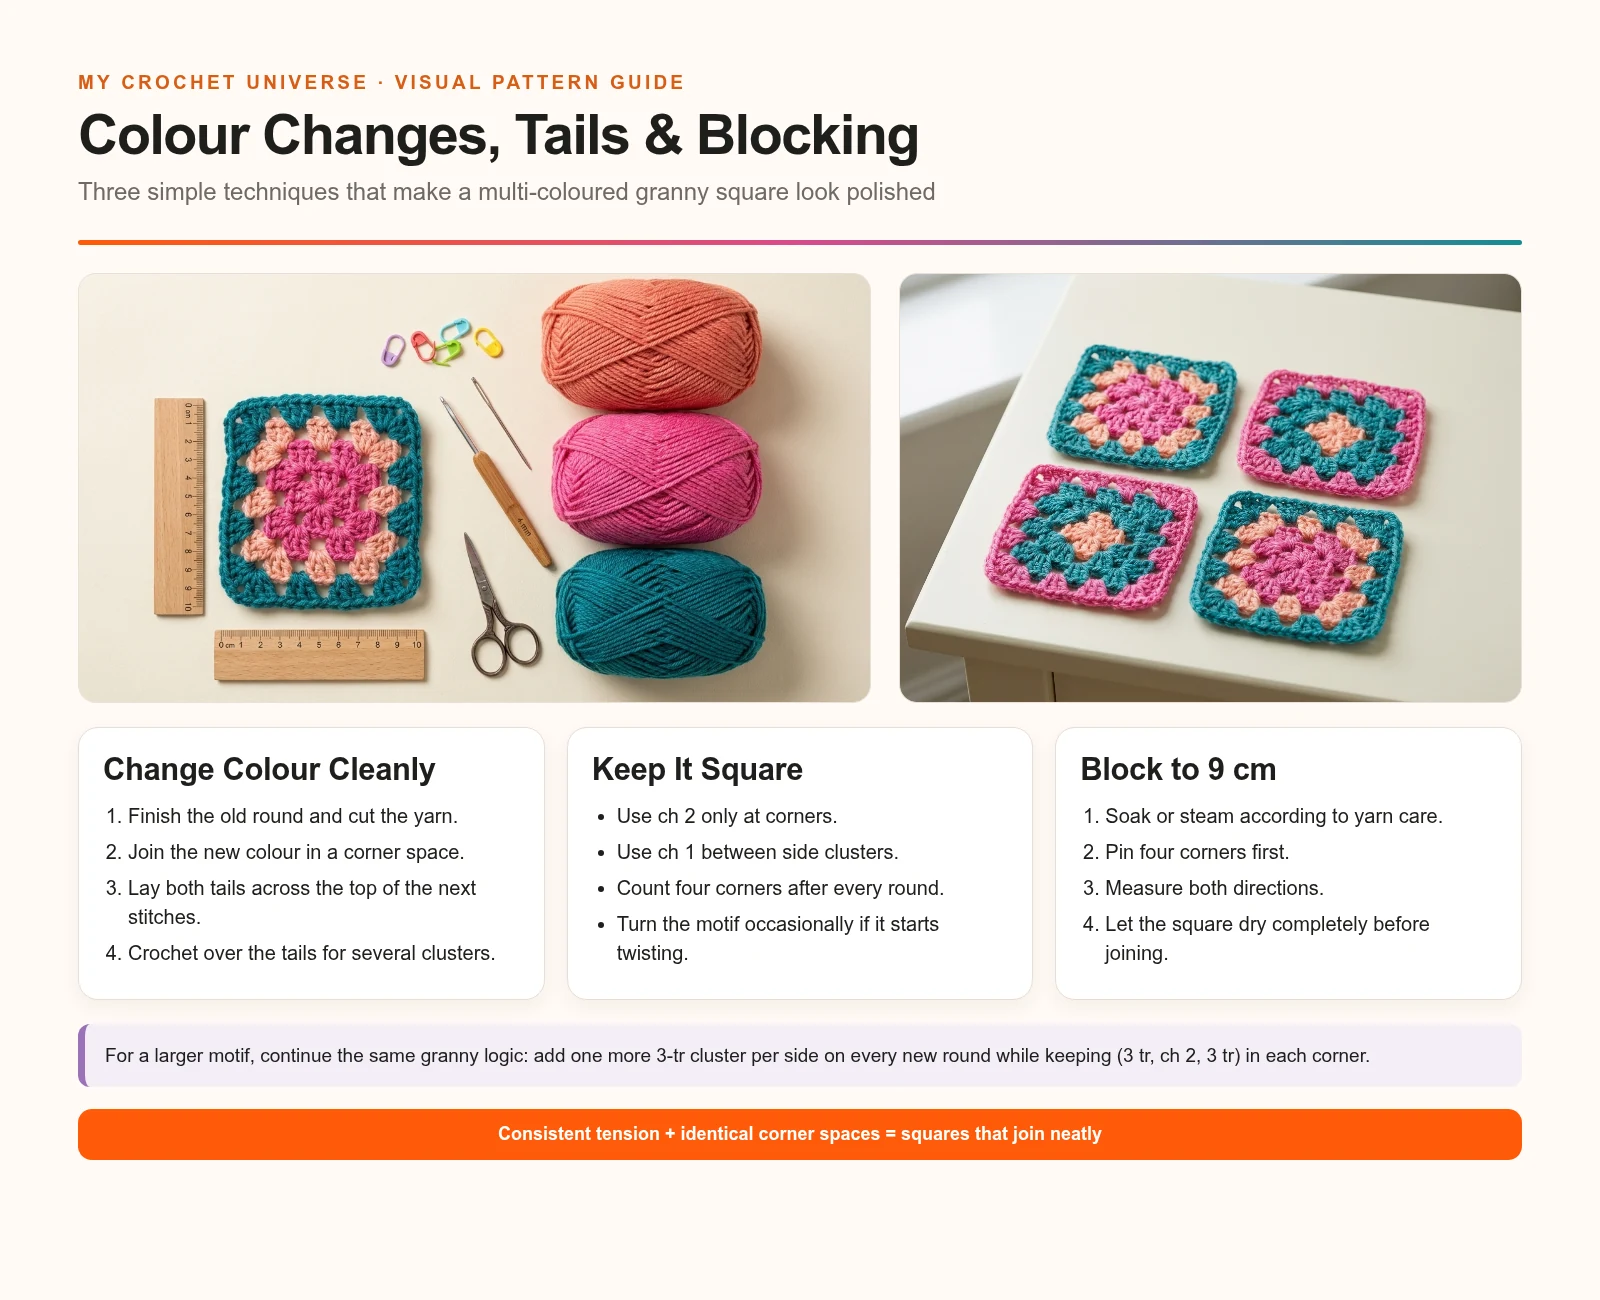
Round 2 should look like a small flower with four openings at the corners. Keep the chain-1 links relaxed; very tight chains can pull the motif into a cup.
Step 4 — Introduce the teal side clusters
Join teal in a corner and make the standard corner unit. After ch 1, place one 3-tr group into the pink chain-1 side space. Repeat around.
This is the first round that clearly separates corners from sides. If a teal cluster lands in the wrong space, undo it immediately. The finished Round 3 should show one side cluster between every two corner units.
Step 5 — Complete the second teal round
Begin in a corner and repeat the standard corner unit. Each side now has two chain-1 spaces, so work one 3-tr cluster in each space with ch 1 between them.
Lay the motif flat after every side. If the teal border ruffles, your chains or treble stitches may be too loose. If the edges pull inward, the chains may be too tight.
Step 6 — Secure, block, and measure
Fasten off the teal yarn and inspect every colour change. Thread loose tails through the backs of nearby clusters, reverse direction once, and trim. Do not rely only on crocheting over a very short tail.
Wet-block or steam-block according to the yarn care instructions. Pin four corners first, then adjust each side until the square measures approximately 9 cm in both directions. Let it dry completely before removing the pins.
Colour Planning and Working Over Ends
The original multi-coloured granny square pattern uses a pale warm center, a vivid middle colour, and a darker outside colour. This light-to-dark structure keeps the flower effect visible and gives every motif a strong joining edge.
A simple three-colour formula
- Color A — center: light or warm colour.
- Color B — middle: brightest or most saturated colour.
- Color C — border: darkest colour or the colour used for joining.
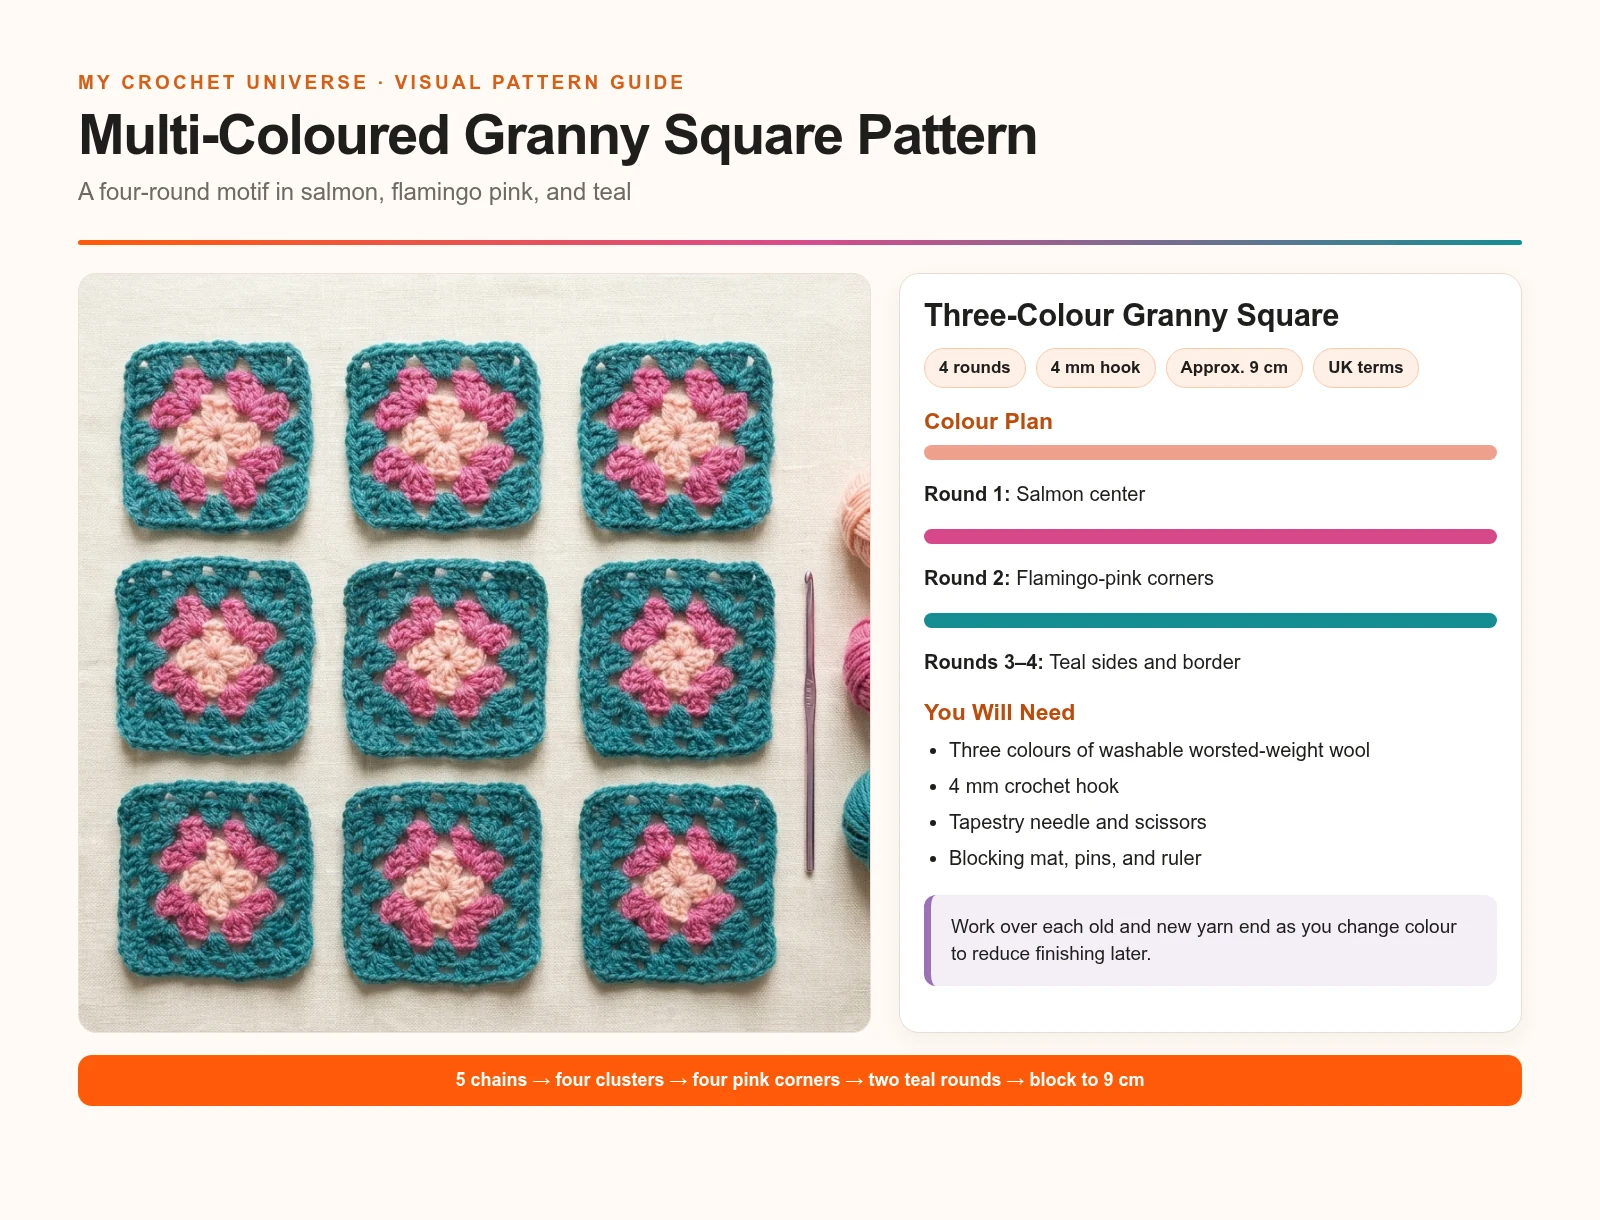
If making many squares, keep Color C consistent. A repeated border makes different center combinations look intentional once the motifs are joined.
Working over the ends saves time but should not replace secure finishing. Lay the old tail and new tail across the next chain space, crochet several clusters around them, then leave a small untrimmed end until the motif is complete. After blocking, test the tail gently and weave it farther if it slips.
Making the Square Larger
To enlarge the multi-coloured granny square pattern beyond four rounds, keep the corner unit exactly the same: (3 tr, ch 2, 3 tr). On every side, work 3 tr in each chain-1 space and place ch 1 between clusters.
Round 5 will contain three side clusters per side, Round 6 will contain four, and so on. Continue in teal for a bold frame or introduce another colour at the beginning of a corner. Measure after blocking rather than assuming every extra round adds the same exact width.
Project Ideas and Joining Options
One multi-coloured granny square pattern can become a coaster, pocket, applique, or test swatch. Repeating the motif creates larger projects:
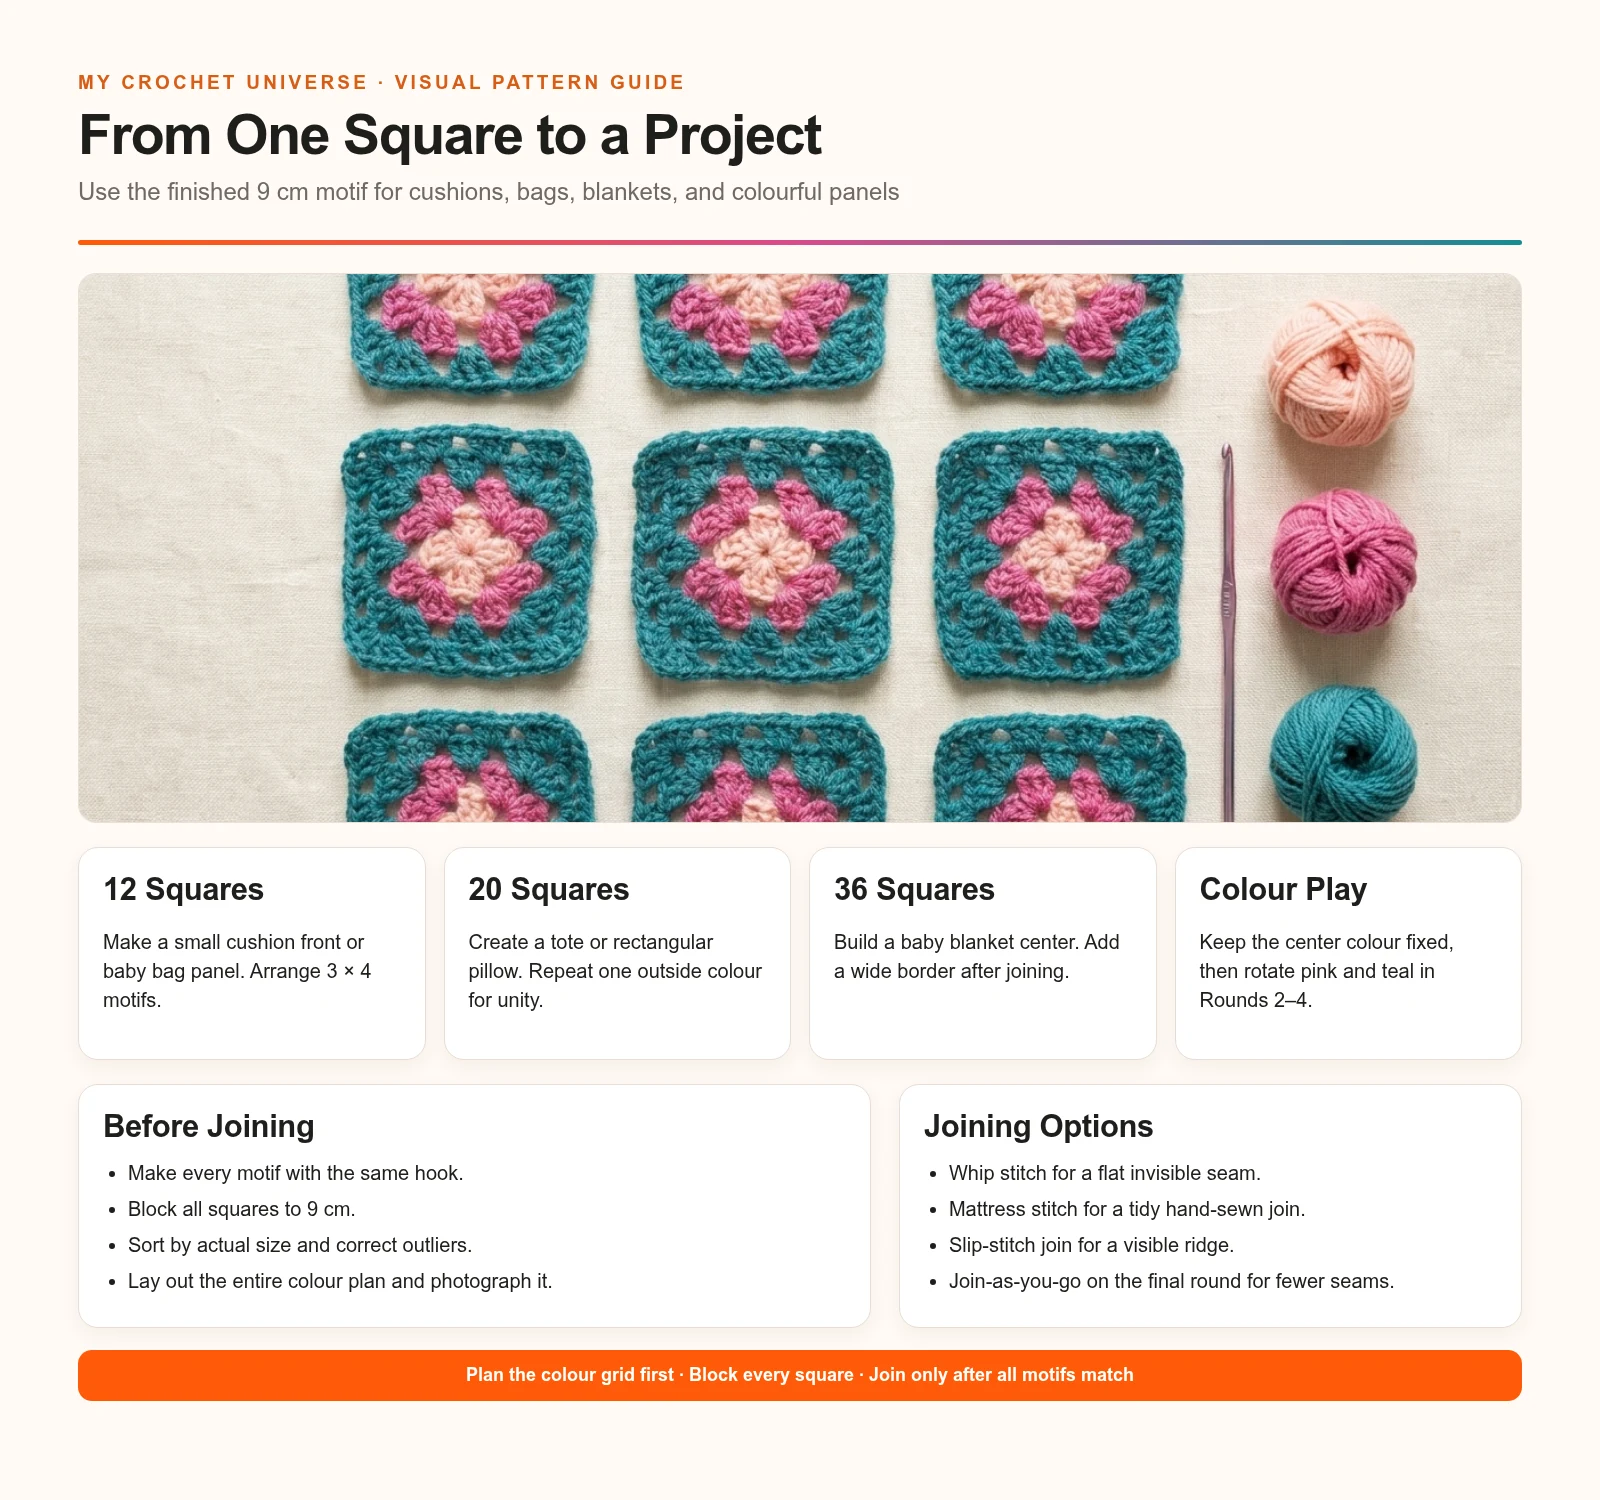
- 12 squares: a small cushion front or bag panel in a 3 × 4 layout.
- 20 squares: a tote, rectangular pillow, or stroller organizer panel.
- 36 squares: the center of a baby blanket with an added border.
- More squares: a lap blanket, cardigan panel, scarf, or patchwork throw.
Block every motif to the same size before joining. Lay the full arrangement on a clean floor or table and photograph it. The photo becomes a map when stacks of loose squares begin to look similar.
Whip-stitch join
Place two squares with wrong sides together and sew through corresponding outer loops. This method creates a flat seam and allows you to use teal for an almost invisible join.
Mattress-stitch join
Work through the edge bars and pull the seam closed gradually. Mattress stitch gives a tidy hand-sewn join with little visible ridge.
Slip-stitch join
Hold the squares together and slip stitch through matched edge loops. The seam creates a decorative ridge and is easy to undo if the layout changes.
Join as you go
Connect motifs during the final round by replacing selected chain stitches with slip stitches into the neighboring square. Join-as-you-go reduces sewing but requires the full layout to be planned in advance.
Why This Pattern Works
The multi-coloured granny square pattern teaches the complete granny-square structure in only four rounds. The multi-coloured granny square pattern uses the same corner formula throughout, so the maker can focus on colour placement rather than memorizing new shaping.
Working over tails keeps the multi-coloured granny square pattern practical for large projects with many colour changes. Blocking the multi-coloured granny square pattern to one measurement makes joining more predictable, and the repeated teal border gives the multi-coloured granny square pattern a unified frame.
The multi-coloured granny square pattern is also easy to personalize: keep the stitch plan, rotate the three colours, or add more rounds. Once the first multi-coloured granny square pattern is accurate, later motifs become quick and repeatable.
Batch Workflow and Yarn Planning
When a project requires dozens of motifs, make one complete sample and weigh it on a small digital scale. Multiply that weight by the number of squares, then add at least ten percent for joining, borders, gauge variation, and swatching. Weighing a finished sample is more reliable than guessing from a yarn label because every crocheter’s tension uses a slightly different amount.
Batching the work can make a large project feel faster. Crochet Round 1 on every square, then complete Round 2 across the batch, and continue with the teal rounds. This method reduces repeated color switching and helps the motifs look consistent. Store each batch in a labelled cloth bag so the salmon centers, pink middle rounds, and completed motifs do not become mixed with loose scraps.
Count and inspect each square before moving it into the finished stack. Check four corners, the correct number of side clusters, secure tails, and a flat shape. Place a small removable marker on any motif that needs repair. Blocking several squares together saves time, but every piece still needs enough space to dry without overlapping.
Keep leftover lengths of each colour until the final joining and border are complete. Matching dye lots matter most along the repeated teal outside edge, where a shade change will be more noticeable than in an occasional center. If a second dye lot is unavoidable, distribute it deliberately across the layout instead of switching halfway through one row of the finished project.
Troubleshooting
The center has the wrong number of corners
Round 1 must contain four 3-tr clusters and four chain-2 spaces. If you have the wrong count, undo the round rather than trying to repair it later. Each later corner depends on those four original spaces.
The square turns into a circle
You may be placing all groups into ordinary side spaces or forgetting the chain-2 corner gaps. Mark each corner with a removable marker until the structure becomes familiar.
The motif cups upward
Your chain spaces may be too tight, or the hook may be too small for the yarn. Stretch the chains slightly as you work and confirm that every side has the correct number of clusters.
The outer round ruffles
Loose chains, extra side clusters, or accidentally treating a side space as a corner can add excess fabric. Count four corners and two side clusters per side after Round 4.
The corners look rounded
The completed motif still needs blocking. Pin each chain-2 corner to a true right angle, then adjust the sides. If the corner remains blunt, make the chain-2 stitches slightly looser on the next square.
The colour change is bulky
Trim only one tail after it has been crocheted over securely, then weave the second tail in a different direction. Avoid knotting several tails in the same corner because the knot creates a hard lump.
My squares are different sizes
Use the same hook, yarn line, and tension for every multi-coloured granny square pattern. Count stitches, then block all motifs to 9 cm. Sort any outlier before joining and remake it if the difference cannot be corrected gently.
The joining seam waves
Match every cluster and corner before sewing. Do not place two stitches into one edge loop to force alignment. If neighboring squares have different counts or sizes, correct them before joining.
FAQ
Open a question for a concise answer about terminology, size, yarn, extra rounds, and finishing.
Final Checklist
- Starting ring contains four salmon clusters and four chain-2 corners.
- Round 2 has four flamingo-pink corner units and one chain between them.
- Round 3 has one teal side cluster on every side.
- Round 4 has two teal side clusters on every side.
- Every corner uses (3 tr, ch 2, 3 tr).
- Side clusters are separated by ch 1.
- Colour-change tails are enclosed and securely woven.
- The motif lies flat without cupping or ruffling.
- The blocked square measures approximately 9 cm in both directions.
- All squares for the project use the same yarn, hook, tension, and blocking size.
The finished multi-coloured granny square pattern is small enough to learn quickly and flexible enough for bags, cushions, blankets, and garments. Make one accurate sample, record its blocked measurement, and use it as the quality reference for the rest of the project.




