

My Crochet Universe · Technical Tutorial
Crochet Beret Pattern: Easy Step-by-Step Lace Beret Tutorial

This detailed crochet beret pattern explains how to turn sport-weight yarn into a lightweight, slouchy lace beret with a 55 cm head opening and an approximate depth of 21.5 cm. The design is worked from the top down: first a growing circular crown, then the side shaping, followed by a separate single-crochet band sewn around the opening.
The tutorial uses the complete supplied chart as the technical reference and translates its count map into a practical top-down sequence. Because the reference combines a circular diagram, a side schematic and a compact count table, this crochet beret pattern also explains how those elements relate to one another instead of asking you to guess.
Finished size and construction
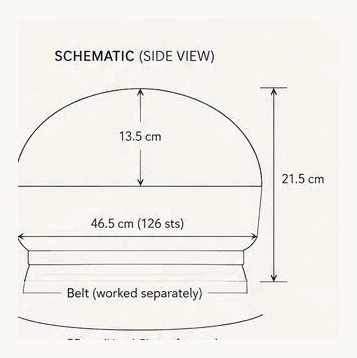
The sample crochet beret pattern is designed for a 55 cm head circumference. The side schematic shows an overall depth of approximately 21.5 cm, with about 13.5 cm from the centre of the crown to the transition line. The chart labels a 46.5 cm relaxed opening with 126 stitches before the separate belt is attached; the final band stretches to fit the 55 cm head.
| Measurement | Reference size |
|---|---|
| Head circumference | 55 cm / 21.7 in |
| Finished depth | 21.5 cm / 8.5 in |
| Crown depth to transition | 13.5 cm / 5.3 in |
| Opening before band | 46.5 cm relaxed / 126 sts |
Expect an airy fabric with noticeable drape rather than a stiff hat. The full crown expands to 216 chart stitches before the shaping returns the opening to 126 stitches. This relationship is central to the crochet beret pattern: the extra crown width produces the characteristic slouch, while the final decrease zone controls fit.
Materials and Amazon supply links
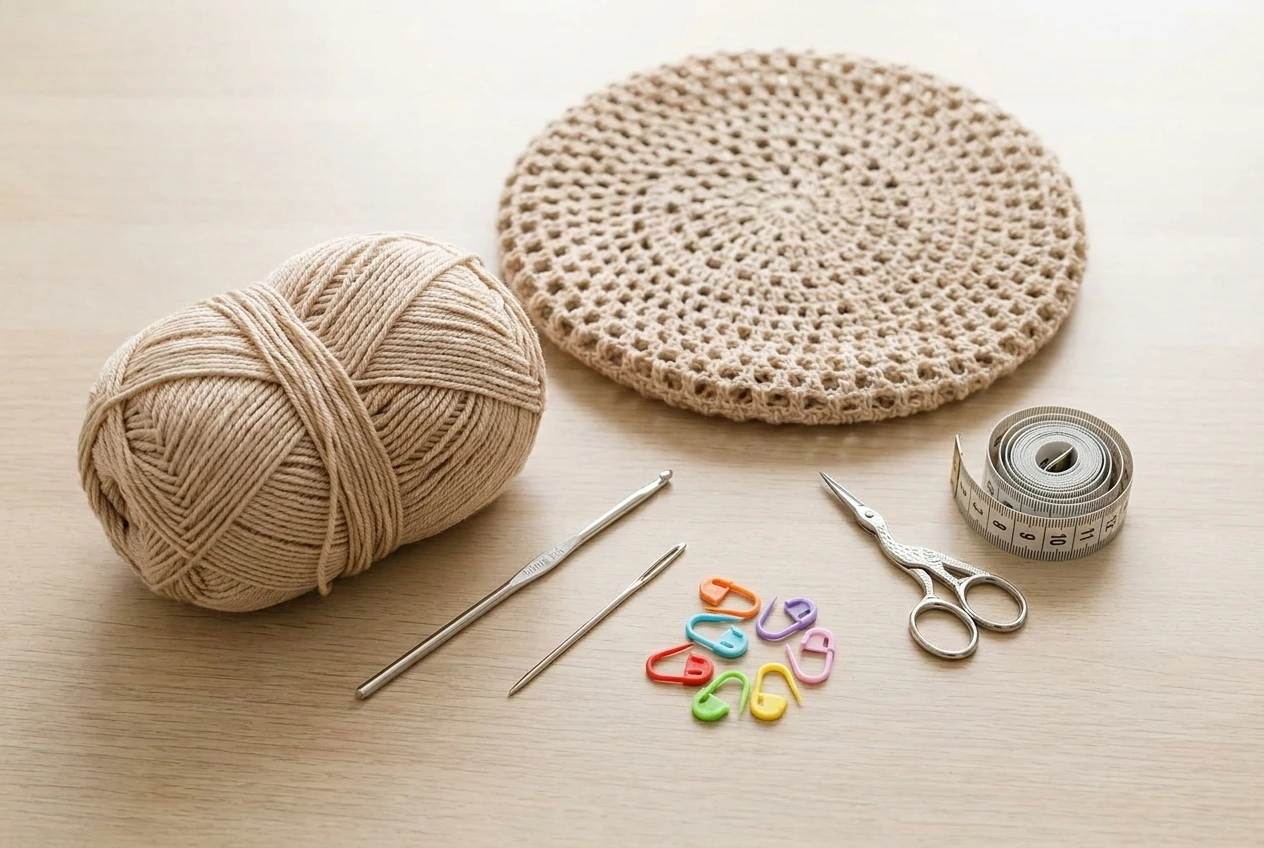
Gather approximately 100–120 g of sport-weight yarn, a US 4/0 or 2.5 mm crochet hook, a yarn needle and at least one locking stitch marker. Scissors, a flexible measuring tape and rustproof blocking pins are also useful. A smooth cotton, cotton blend or tightly spun acrylic will display the lace more clearly than a fuzzy yarn.
The crochet beret pattern depends more on measured fabric than on a particular brand. Choose a yarn that can form crisp tall stitches without feeling rigid. If substituting fibre, make a blocked swatch first because cotton may relax, wool may bloom, and acrylic may retain more spring. These fibre differences can change both the diameter and drape of the crochet beret pattern.
Gauge and sizing math
The supplied sheet does not state a conventional stitches-per-10-cm gauge, so measure the project itself. After the crown is complete and lightly relaxed, its flat diameter should support the 55 cm sample size without forcing the stitches. For a beret, the flat crown is intentionally wider than a close-fitting beanie.
Check the crochet beret pattern after Rounds 4, 8 and 12. The circle should lie flat. Rippling usually means the increases are too frequent or the chain spaces are too loose; cupping before the side section usually means the increases are insufficient or the yarn is tighter than the reference.
Practical gauge rule
Work the first six rounds, mist and relax the sample, then compare its growth with the schematic. Change hook size before continuing if the fabric is stiff, floppy or strongly distorted.
Stitch guide in US terms
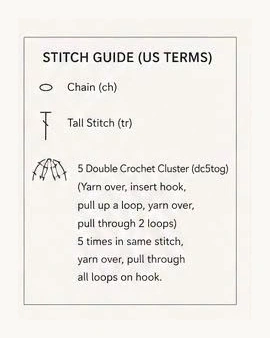
Abbreviations
- ch: chain
- sl st: slip stitch
- sc: single crochet
- tr: tall stitch as marked in the supplied chart
- dc5tog-cl: five-double-crochet cluster worked into one stitch or space
- st(s): stitch(es)
- rnd: round
How to make the five-double-crochet cluster
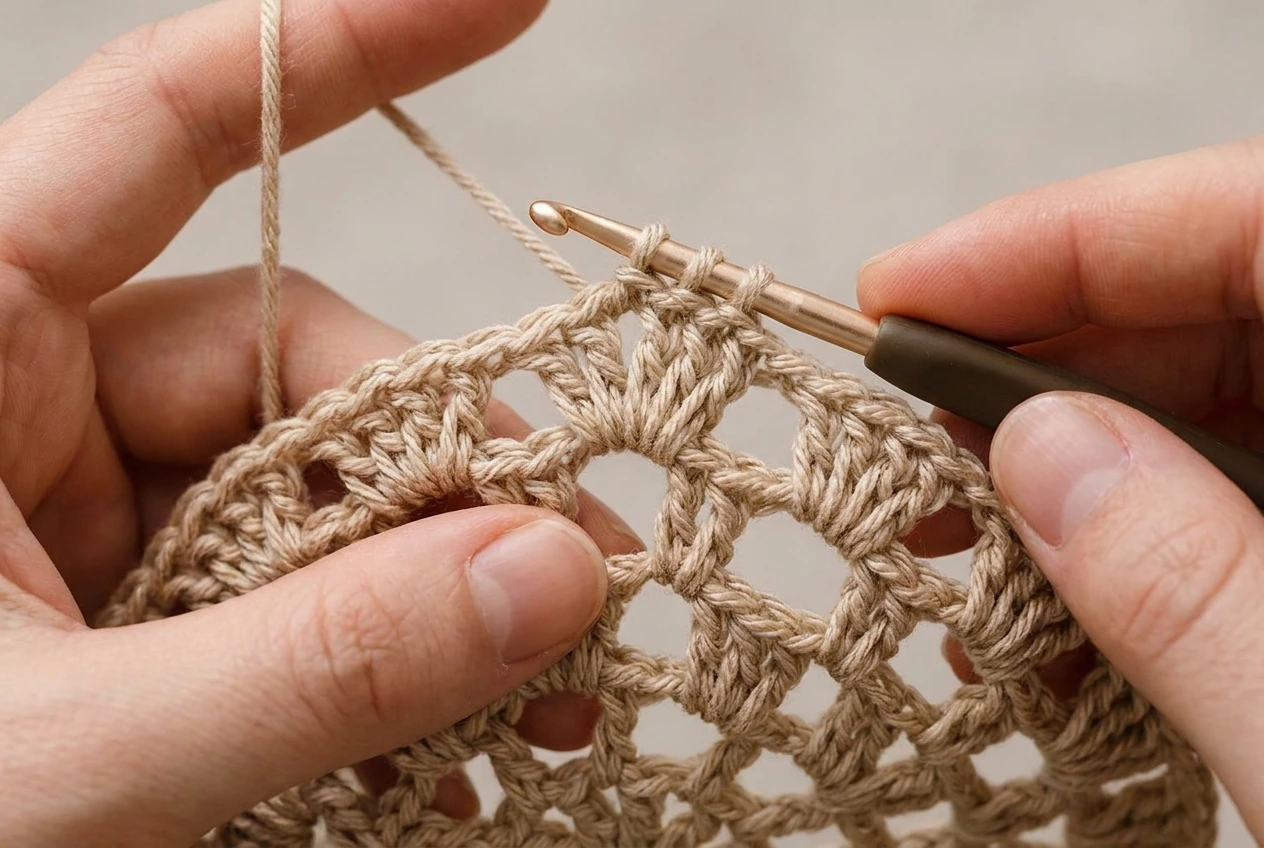
Yarn over, insert the hook into the indicated stitch or chain space, pull up a loop, yarn over and pull through two loops. Repeat that partial double crochet four more times in the same place. Yarn over once more and pull through every remaining loop on the hook. The cluster closes five partial stitches into one decorative unit.
Do not tighten the final pull-through aggressively. The cluster motif in this crochet beret pattern needs enough height to keep the surrounding chain spaces open. If the clusters become compact knots, move up one hook size or consciously lengthen each pulled-up loop.
How to read all the supplied schemas
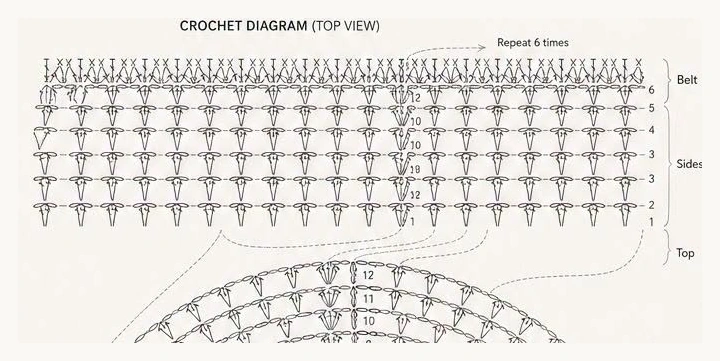
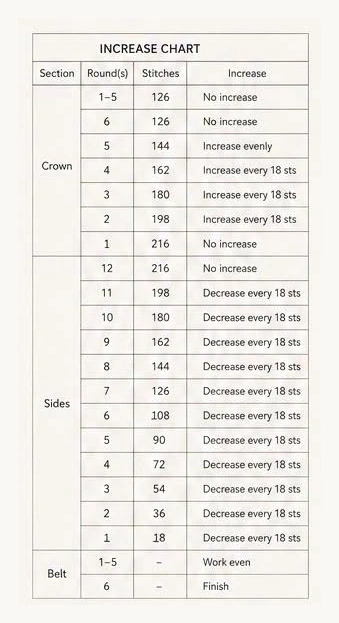
The full source image above is included uncropped so every supplied schema remains available in the post. Read the circular diagram from the centre outward. The side-view schematic explains the silhouette and finished measurements. The count table tracks the expansion from 18 to 216 stitches and the return to 126 stitches. The straight chart shows the repeating side and belt motifs.
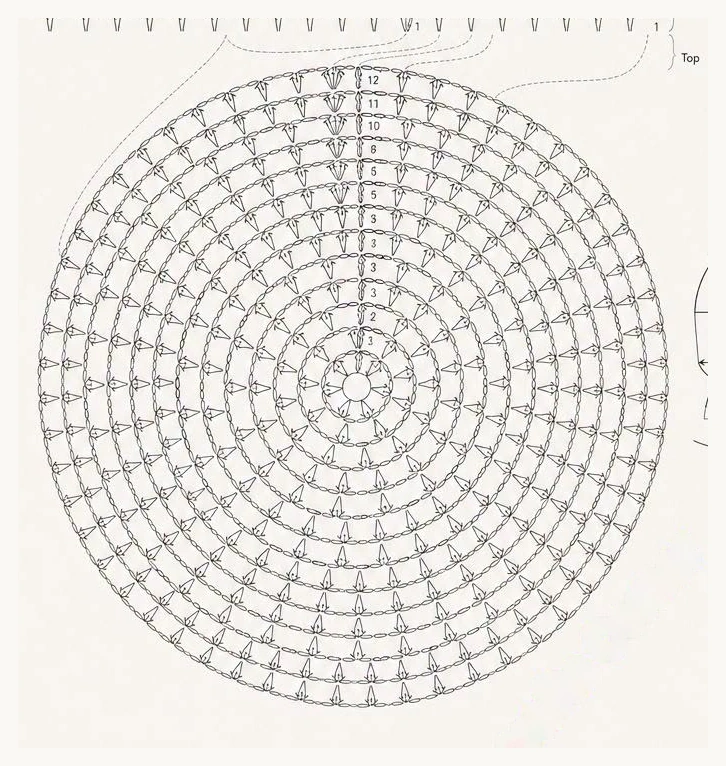
For a top-down crochet beret pattern, the count table is easiest to understand when reorganized into working order: increase from 18 stitches at the centre to 216 at the outer crown, establish the side, then decrease evenly until 126 stitches remain. After the shaping, work even rounds before attaching the separately made band.
Important chart-reading note
The supplied table is visually arranged in sections rather than written as a conventional line-by-line pattern. The instructions below translate the visible target counts into a logical top-down sequence. Always compare your fabric with the full chart, particularly for placement of clusters and chain spaces. The three schemas work together as one crochet beret pattern, not as separate alternatives.
Step 1: Crochet the crown from the centre
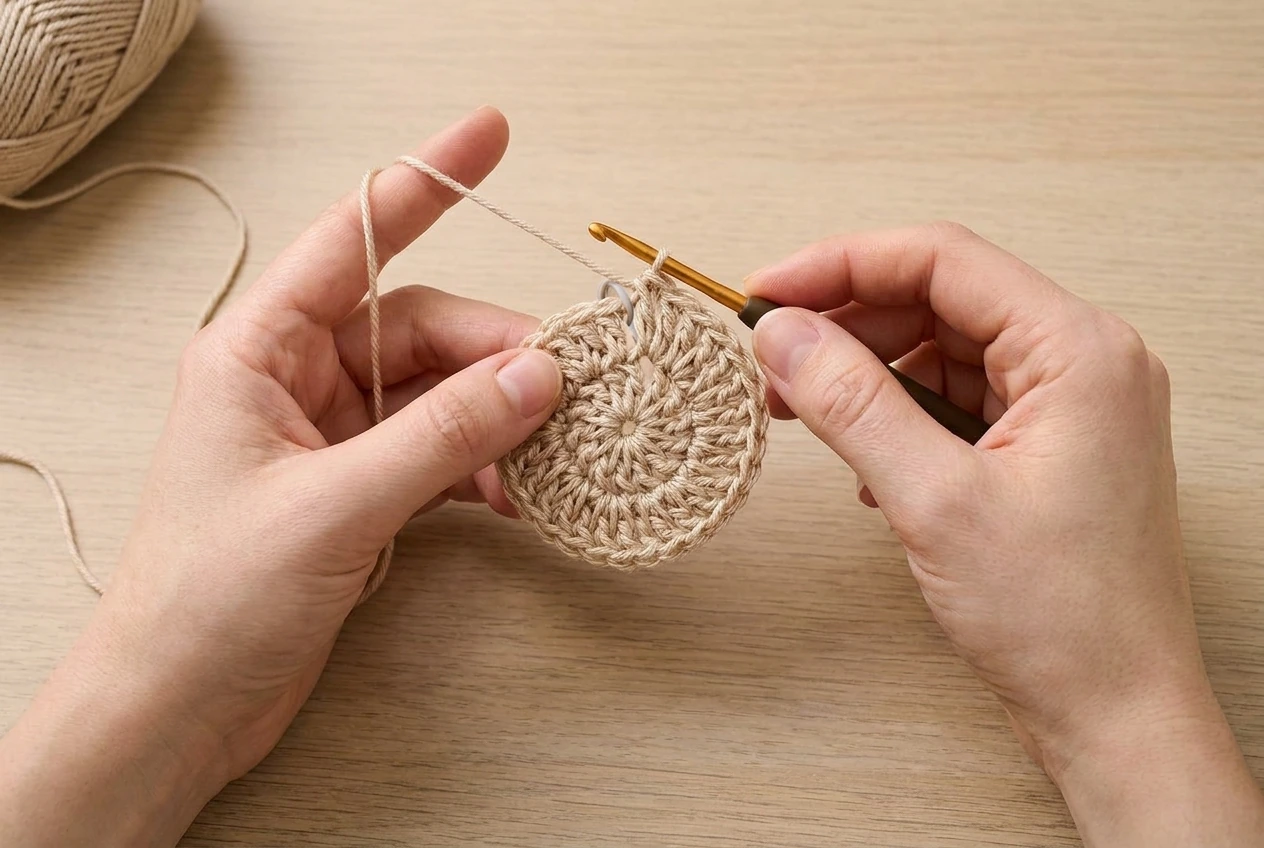
Create a magic ring or chain 4 and join to form a ring. Work the first 18 chart stitches or stitch units into the centre, distributing them evenly. Join without twisting and place a marker at the beginning of the round. The centre must remain flat and secure because every later increase radiates from it.
The top-down count sequence for this crochet beret pattern adds 18 stitches per crown round. Follow the symbols and chain spaces shown on the circular chart while using the totals below as checkpoints. If your lace repeat consumes several chart stitches, count the total chart positions rather than treating each cluster as a single ordinary stitch.
| Crown round | Target total | Increase distribution |
|---|---|---|
| 1 | 18 | Add 18 evenly |
| 2 | 36 | Add 18 evenly |
| 3 | 54 | Add 18 evenly |
| 4 | 72 | Add 18 evenly |
| 5 | 90 | Add 18 evenly |
| 6 | 108 | Add 18 evenly |
| 7 | 126 | Add 18 evenly |
| 8 | 144 | Add 18 evenly |
| 9 | 162 | Add 18 evenly |
| 10 | 180 | Add 18 evenly |
| 11 | 198 | Add 18 evenly |
| 12 | 216 | Add 18 evenly |
A simple mathematical equivalent is to place one additional stitch in each of 18 sectors every round. For example, the ordinary-stitch version progresses from increasing in every stitch to working one stitch between increases, then two, three and so on. The actual lace placement must still follow the diagram so the decorative spokes line up.
Step 2: Build the repeating lace pattern
The visual identity of the crochet beret pattern comes from alternating tall stitches, chain spaces and closed clusters. Keep each chain the same height and insert the hook into the exact space indicated. Count repeats at the end of every round instead of relying on the shape alone.
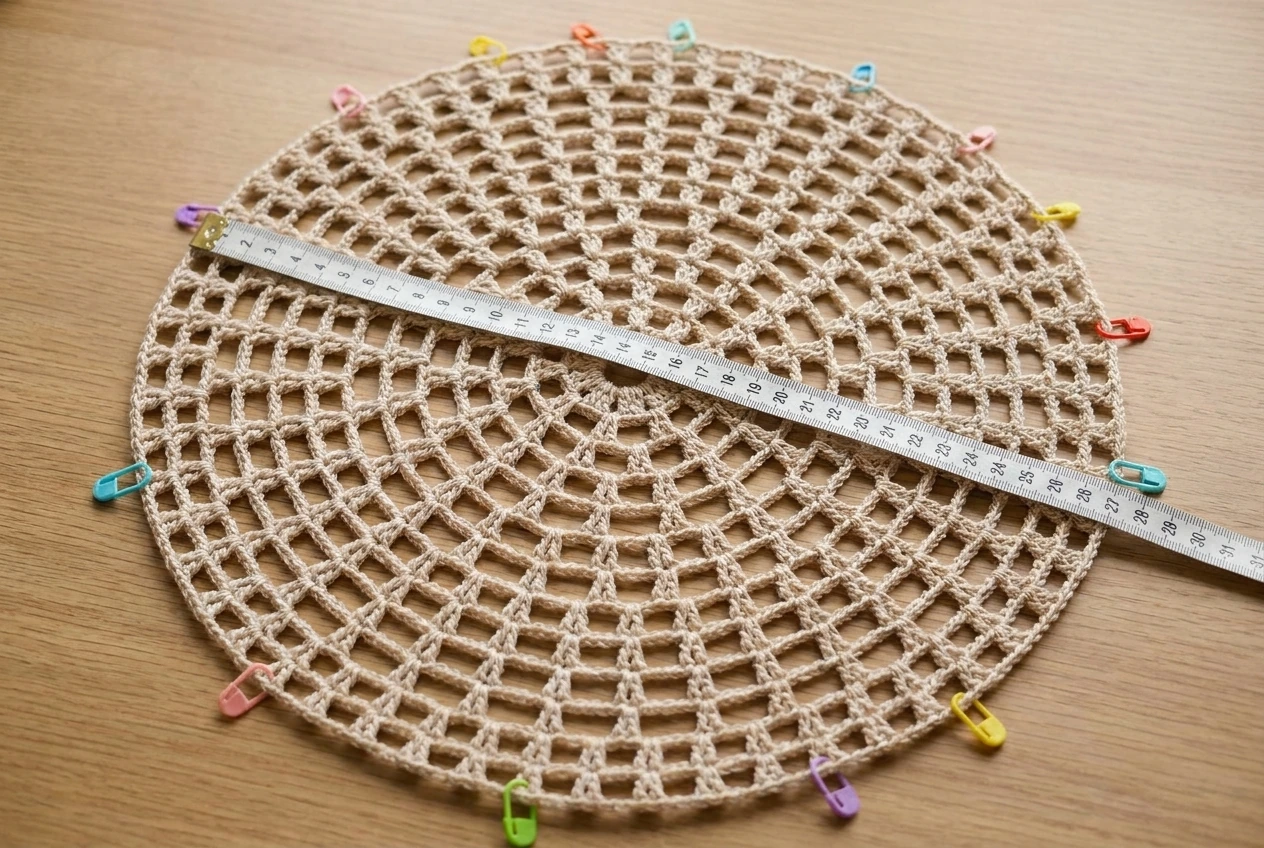
Use stitch markers to divide the circle into six equal wedges. The source diagram marks a repeat that is worked six times, so wedge markers make errors easier to isolate. If one wedge has a missing cluster, you can repair that section before the mistake shifts every following repeat.
Lay the crown flat every two rounds. Openwork can appear even while held but distort when released. The crochet beret pattern should form a symmetrical disc with evenly radiating lace columns, not a spiral with one compressed sector.
Step 3: Shape the sides and opening
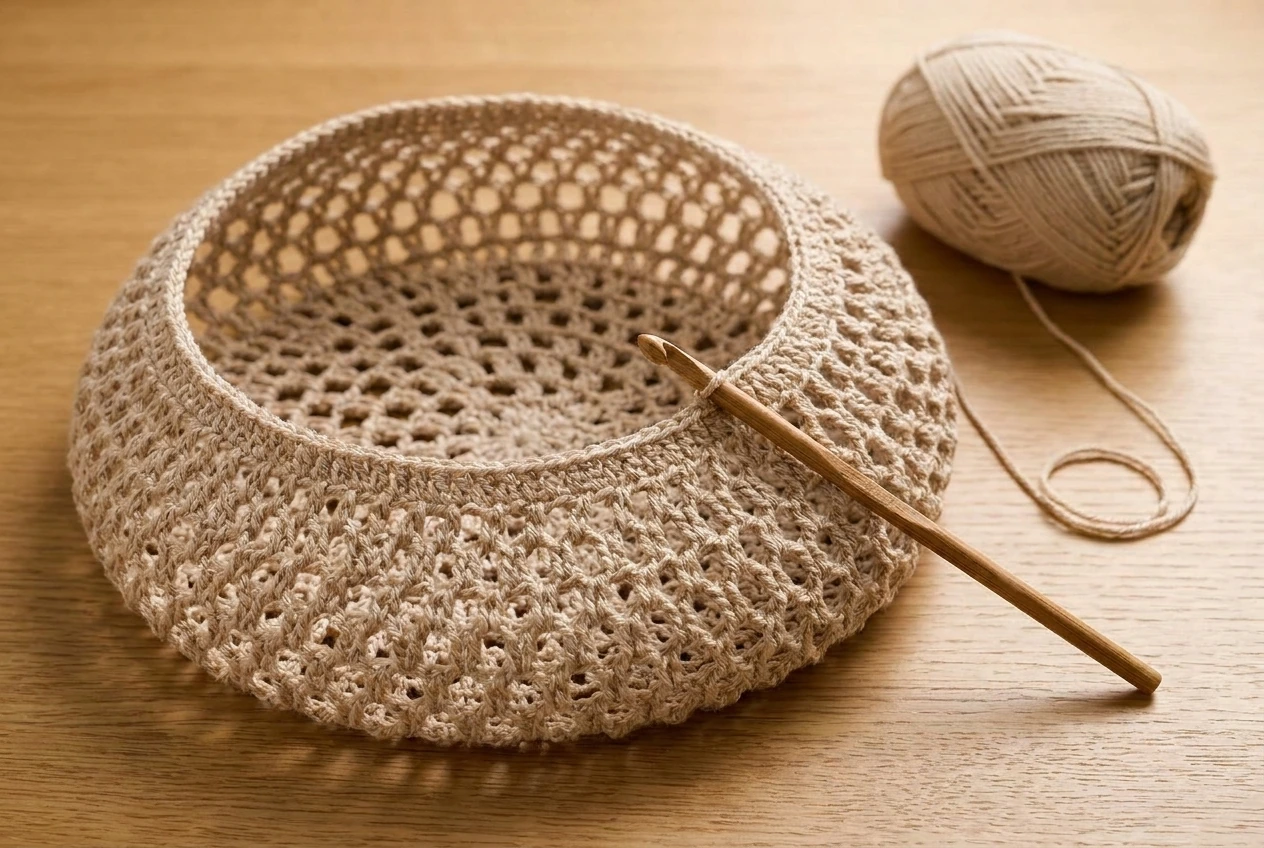
Once the crown reaches 216 chart stitches, work one establishing round without increasing. Then begin the decrease sequence, removing 18 stitches evenly per shaping round until 126 remain. Maintain the decorative alignment by placing decreases at consistent points within the 18 sectors.
| Side stage | Target stitches |
|---|---|
| Establish side | 216 |
| Decrease round 1 | 198 |
| Decrease round 2 | 180 |
| Decrease round 3 | 162 |
| Decrease round 4 | 144 |
| Decrease round 5 | 126 |
| Work even | 126 for 5 rounds |
Try the unfinished piece over a flexible head form after reaching 126 stitches. The opening should be smaller than the final head circumference because the band and yarn will stretch. This fitting stage keeps the crochet beret pattern secure without flattening the crown. It also shows whether the crochet beret pattern needs another even round before the band is attached.
Step 4: Make and attach the separate band
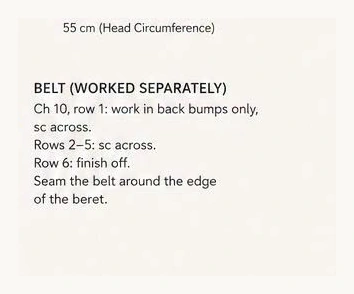
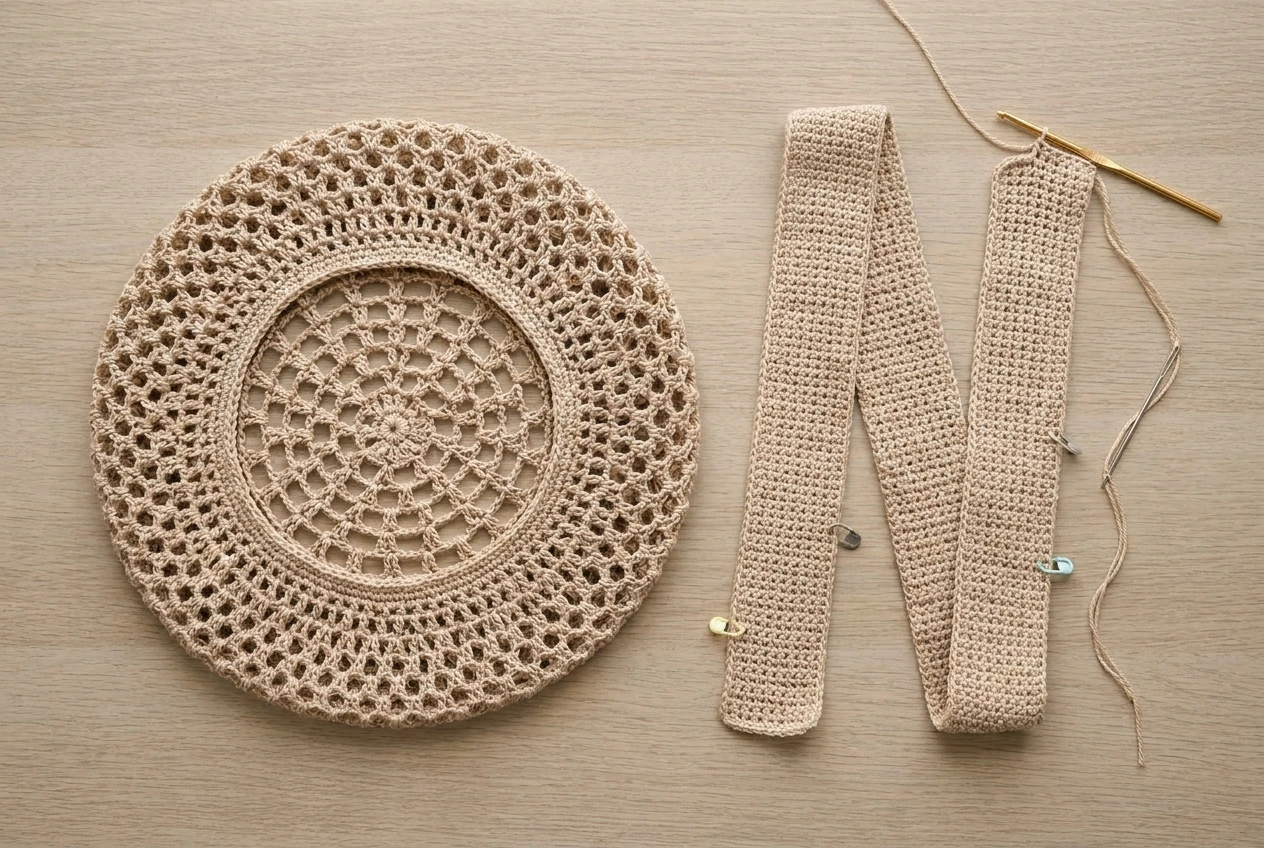
The source band note begins with chain 10, which establishes the width. Work one single crochet in the back bump of the second chain and in each remaining chain for 9 stitches. Turn and continue single crochet rows until the strip reaches the required circumference with approximately 5–10% negative ease.
Although the small schema mentions Rows 2–5 and finishing on Row 6, six short rows cannot encircle a 55 cm head when the strip is worked across a chain of 10. For a functional crochet beret pattern, treat those rows as the stitch setup and continue repeating the single-crochet row until the band fits. This resolves the scale conflict while preserving the illustrated construction. In this crochet beret pattern, the wearer’s measured band length takes priority over a fixed number of short rows.
Join the short ends of the band to form a ring. Quarter the ring and the 126-stitch opening with markers, then pin corresponding points. Sew the band around the edge with a yarn needle, distributing any small difference evenly. Avoid stretching one quarter more than another.
Fit check before seaming
Wrap the band around the head at the intended wearing position. It should feel secure but should not leave a deep mark. Adjust its length now; changing it after attachment is much harder.
Step 5: Finish, block and shape
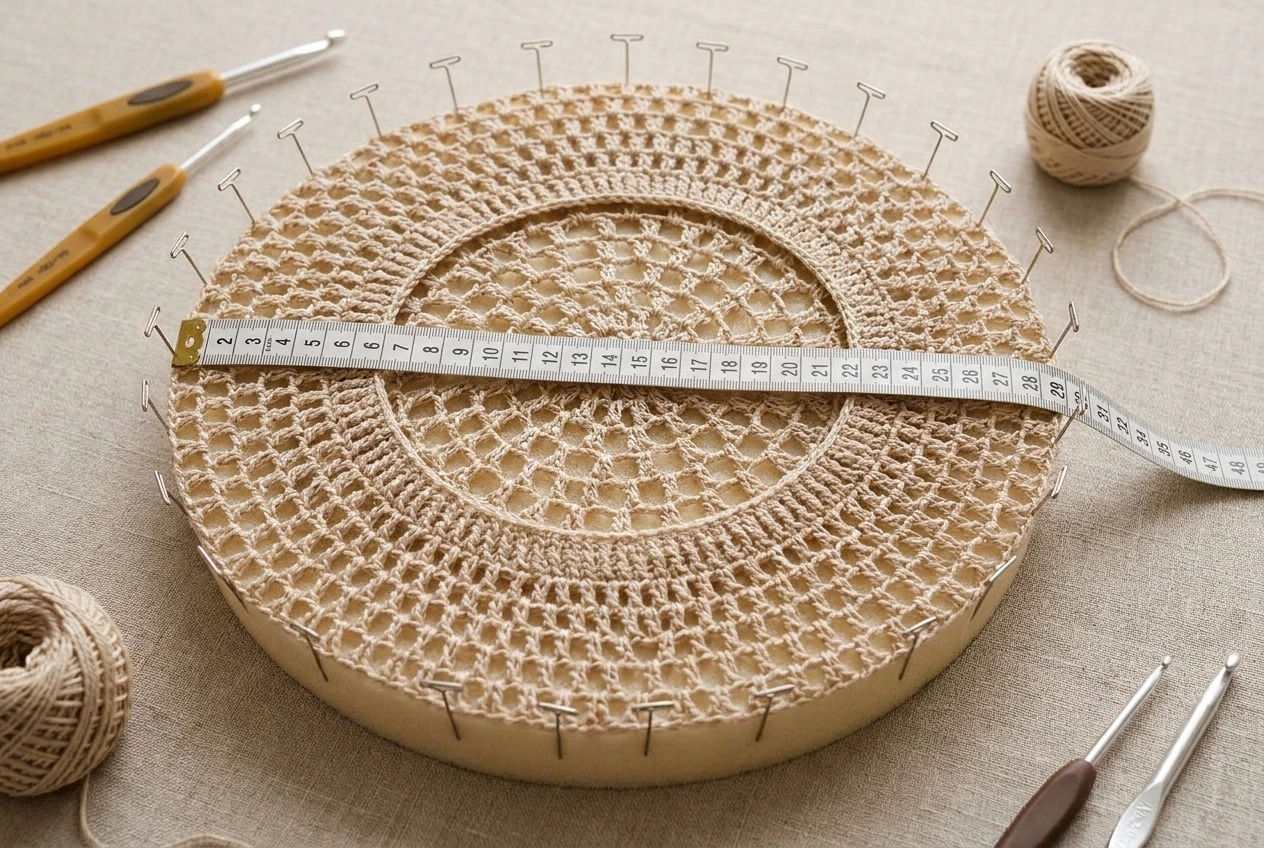
Weave each yarn tail through stitches of the same structure, reverse direction and weave again. Wash according to the yarn label, gently remove excess water in a towel and arrange the crown over a flat round form. Pin the lace without pulling the band wider than its intended measurement.
Blocking opens the clusters and gives the crochet beret pattern a round, deliberate silhouette. Let the beret dry fully before unpinning. Steam can be used cautiously for suitable fibres, but never press a hot iron directly onto the raised crochet stitches.
To style the finished beret, place the band approximately 1–2 cm behind the hairline, angle the crown slightly to one side and smooth the extra fabric toward the back. The beret should feel softly slouched rather than stretched tightly like a beanie.

How to resize the crochet beret
For a different head size, first measure around the intended wearing line. Multiply that measurement by 0.90–0.95 to estimate the relaxed band circumference, depending on yarn elasticity. Make the band to that length and use it as the final fit control.
To keep the same proportions, adjust the maximum crown diameter before beginning the side shaping. A larger crochet beret pattern may need another increase round; a smaller size may stop one round earlier. Keep increases divisible by the 18-sector structure whenever possible so the lace repeat remains balanced.
- Smaller adult: shorten the band and consider stopping the crown before 216 stitches.
- Larger adult: extend the band and add a balanced increase round if more slouch is needed.
- Less slouch: begin decreases earlier.
- More slouch: add an even crown round before shaping.
- Different yarn: prioritize centimetres and fit over the original stitch totals.
Any resized crochet beret pattern should still transition smoothly from flat crown to curved sides. Make one change at a time, record it, and check symmetry before beginning the separate band. Written measurements make a resized crochet beret pattern much easier to reproduce.
Care and troubleshooting
The crown ripples
Reduce the frequency of increases, tighten overly long chain spaces or use a smaller hook. Light blocking can calm minor ripples, but strong waves indicate excess circumference.
The crown cups too early
Check that all 18 increases were completed in the last round. A tight hand or missing chain space can also reduce circumference. Correct the count before continuing this crochet beret pattern. Restoring a flat crown at this stage protects the proportions of the entire crochet beret pattern.
The opening is loose
Shorten the separate band and redistribute it around the opening. Do not solve a loose fit by pulling the sewing yarn extremely tight, because that creates a rigid seam.
The clusters look uneven
Pull every partial double crochet to the same height before closing the cluster. Keep the hook angle consistent and avoid splitting the sport-weight yarn.
The beret feels too stiff
Move up a hook size, choose a softer yarn or reduce tension. The lace should support its shape while still draping toward the back.
Hand wash the completed crochet beret pattern in cool water and reshape it flat. Store it flat or loosely folded rather than hanging it from the band, which may stretch the opening.
Frequently asked questions
Is this crochet beret suitable for a beginner?
It is best for an adventurous beginner or intermediate crocheter who can read chart symbols, work in rounds and make cluster stitches.
What yarn works best?
Smooth sport-weight cotton, cotton blend, wool blend or acrylic will work. Choose a yarn with enough definition to display the openwork.
Why is the band worked separately?
A separate single-crochet band gives more control over fit and creates a stable edge beneath the flexible lace crown.
Can I use a 3 mm hook?
Yes, if your yarn and tension produce the required measurements. A larger hook generally creates more drape and a larger crown.
How do I keep the centre flat?
Distribute the 18 increases evenly, mark the repeat sectors and lay the crown flat after every two rounds to detect rippling or cupping early.
This crochet beret pattern is most successful when the chart, measurements and fabric are checked together. Keep the crown flat during the increase stage, preserve the open cluster texture, shape gradually to 126 stitches and make the separate band to the wearer’s actual measurement.




