

MY CROCHET UNIVERSE · AMIGURUMI MASTERCLASS
Crochet Deer Couple
Amigurumi Pattern: Full Guide
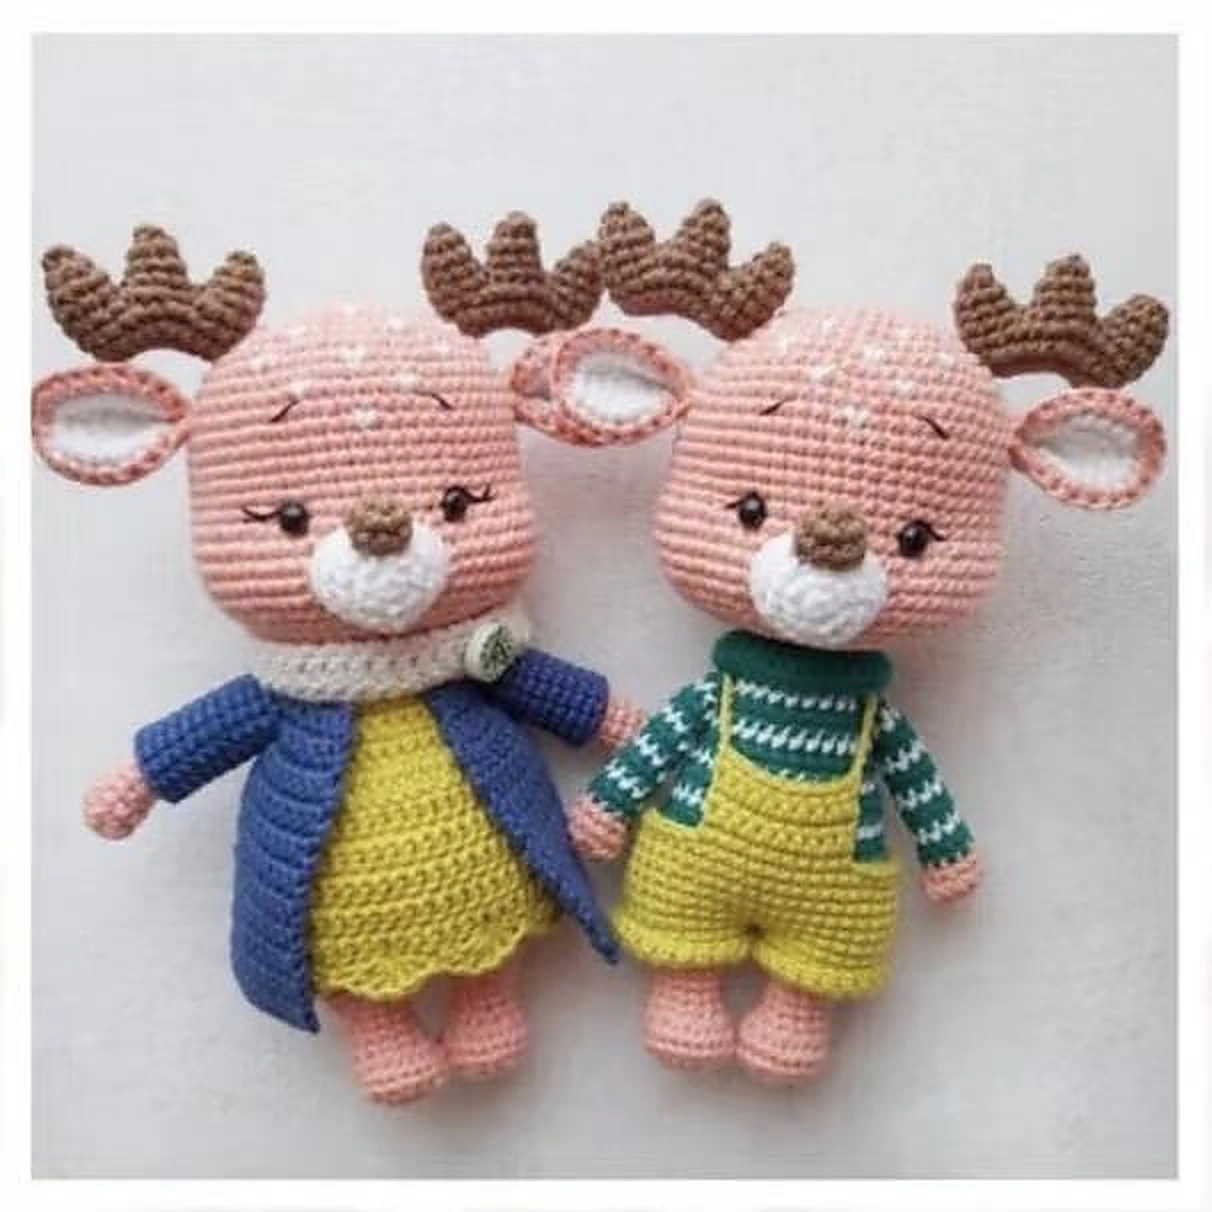
This crochet deer couple amigurumi pattern is a professional English adaptation of the complete illustrated pattern supplied with the project. It includes both deer, every shared body part, the female skirt and cardigan, the male striped body and overalls, facial pieces, antlers, ears, eye placement, joining, collar shaping, and final assembly.
All round counts and color changes are written as editable post text. The new step images are full professional diagrams—not cropped instruction screenshots—and follow the same construction order and technical details shown in the supplied pages.
Pattern level and terminology
Intermediate. The instructions use US crochet terms and continuous rounds unless a section specifically says to turn or join. Keep a stitch marker in the first stitch, count every round, and stuff gradually. Finished size depends on yarn and tension; use the same yarn weight and hook throughout both dolls.
Crochet Deer Couple Amigurumi Pattern Materials
- 2 mm crochet hook.
- 7 mm safety eyes: two eyes per doll.
- Cotton or cotton-blend yarn in skin pink, light pink, white/cream, brown, yellow, blue, green, and optional black embroidery thread.
- Polyester fiberfill.
- Yarn needle, stitch marker, scissors, pins, and small buttons for the scarf/cardigan or overalls.
| Source symbol | English meaning | US abbreviation |
|---|---|---|
| X | single crochet | sc |
| V | 2 sc in one stitch | inc |
| A | single-crochet decrease | dec |
| W | 3 sc in one stitch | 3-sc increase |
| M | single crochet 3 together | sc3tog |
| F | double crochet | dc |
| SL | slip stitch | sl st |
| K | skip | sk |
| BLO / FLO | back/front loop only | BLO / FLO |
Reading the instructions
A formula such as (3 sc, inc) ×6 means repeat the sequence six times. “MR” means magic ring. For sections worked in joined rounds, slip stitch to the first stitch and make the stated turning chain. Color letters in the source have been replaced with full English color names.
Crochet Deer Couple Amigurumi Pattern Flared Skirt
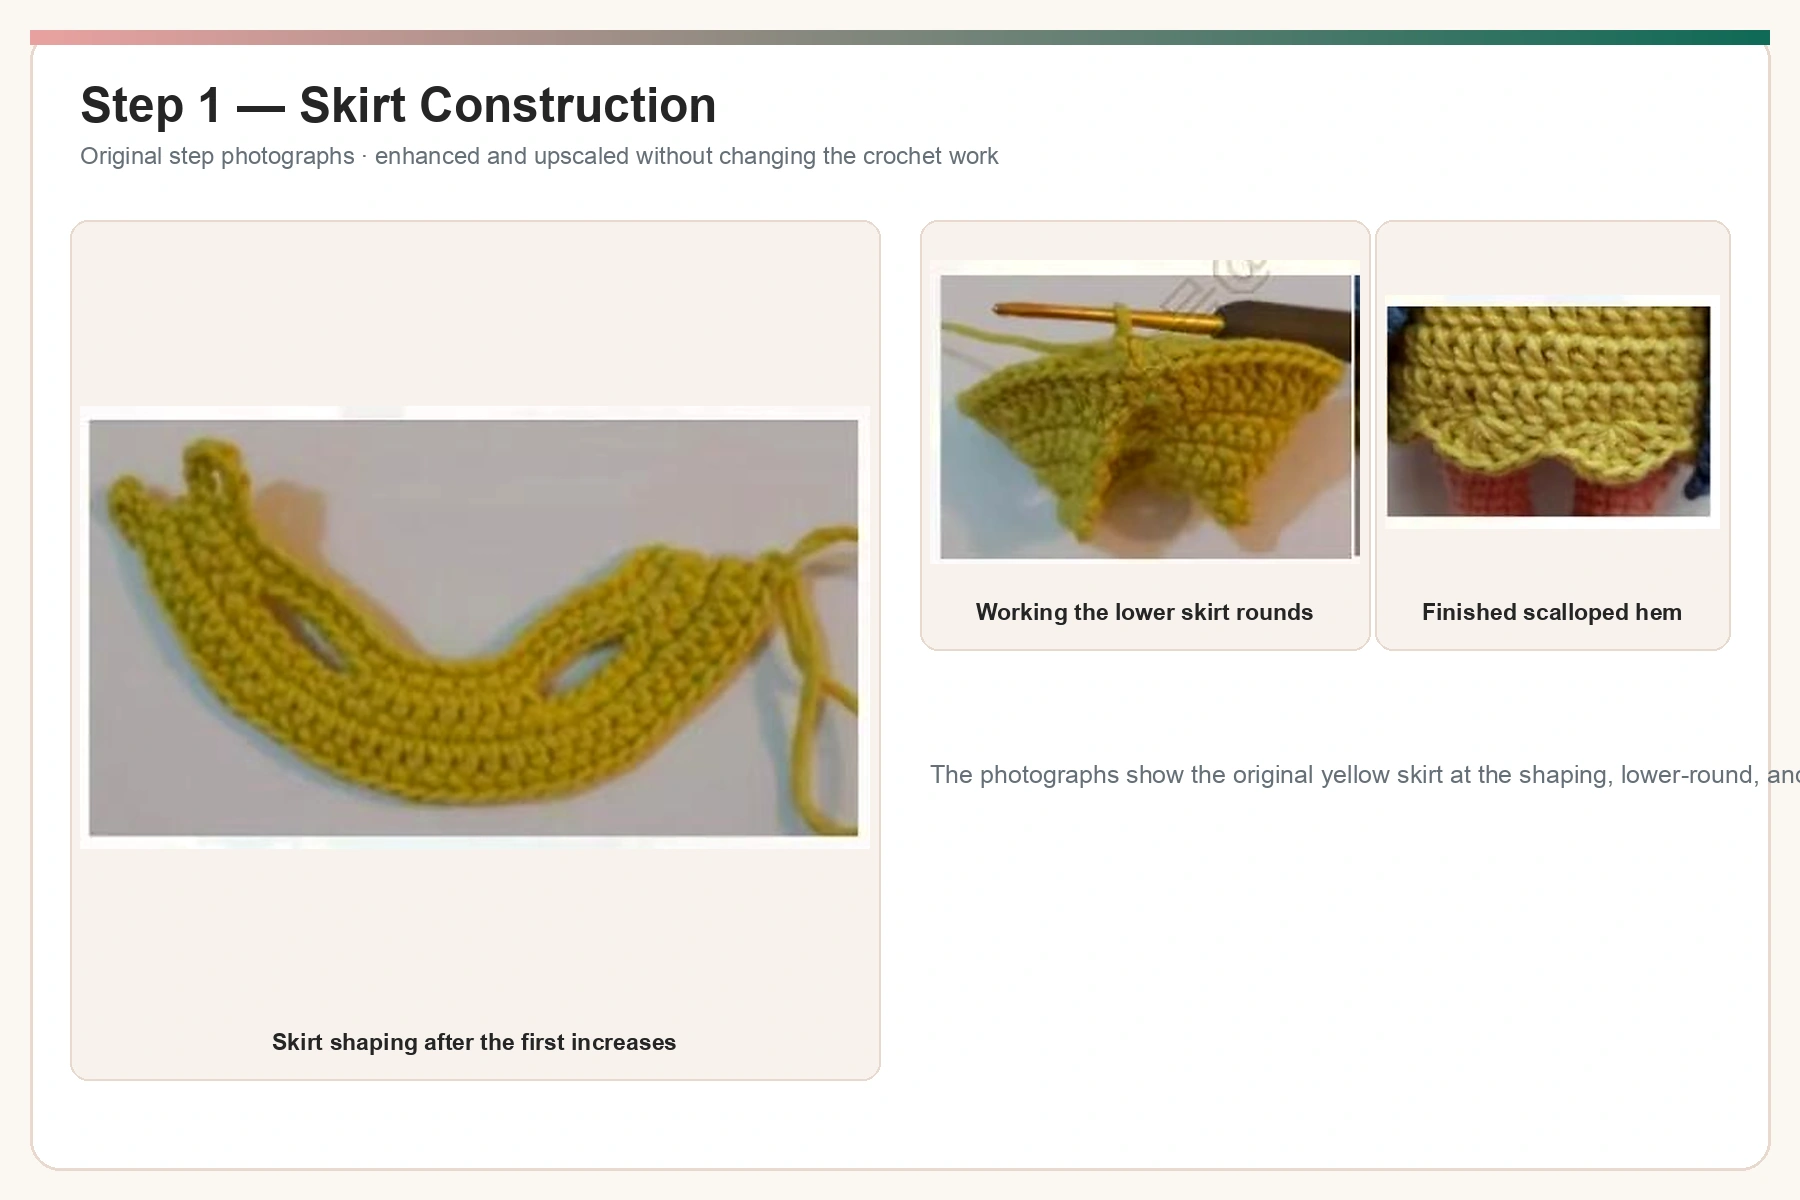
Use yellow yarn. At the end of each row, ch 1 and turn unless the row specifies a taller turning chain.
Female Skirt — Complete Rows
| Round / Row | Instructions | Count |
|---|---|---|
| R1 | Ch 30. Starting in the 7th ch from the hook, work 24 sc. The unused beginning chains form the first fastening loop. | 24 sc |
| R2 | 2 sc, inc, ch 6 and skip 6, inc, 4 sc, inc, ch 6 and skip 6, inc, 2 sc. | Two ch-6 spaces |
| R3 | 3 sc, inc, 6 sc, inc, 6 sc, inc, 6 sc, inc, 3 sc. | 32 |
| R4 | Sc across. | 32 |
| R5 | Ch 6 and turn; repeat (7 sc, inc) ×4. | 36 |
| R6 | Sc across. | 36 |
| R7 | Repeat (inc, 8 sc) ×4. | 40 |
| R8 | In dc: repeat (dc inc, 9 dc) ×4. | 44 |
| R9 | Ch 4 and turn; repeat (dc inc, 10 dc) ×4. | 48 |
| R10 | Dc across; sl st to the first stitch to close the skirt. | 48 |
| R11–14 | Ch 2; work 48 dc around. | 48 |
| R15 | Repeat (2 sc, 5 dc in the same stitch, skip 2 stitches, 1 sc) ×8 to make the scalloped edge. | 8 scallops |
Blue Cardigan, Armholes, and Sleeves
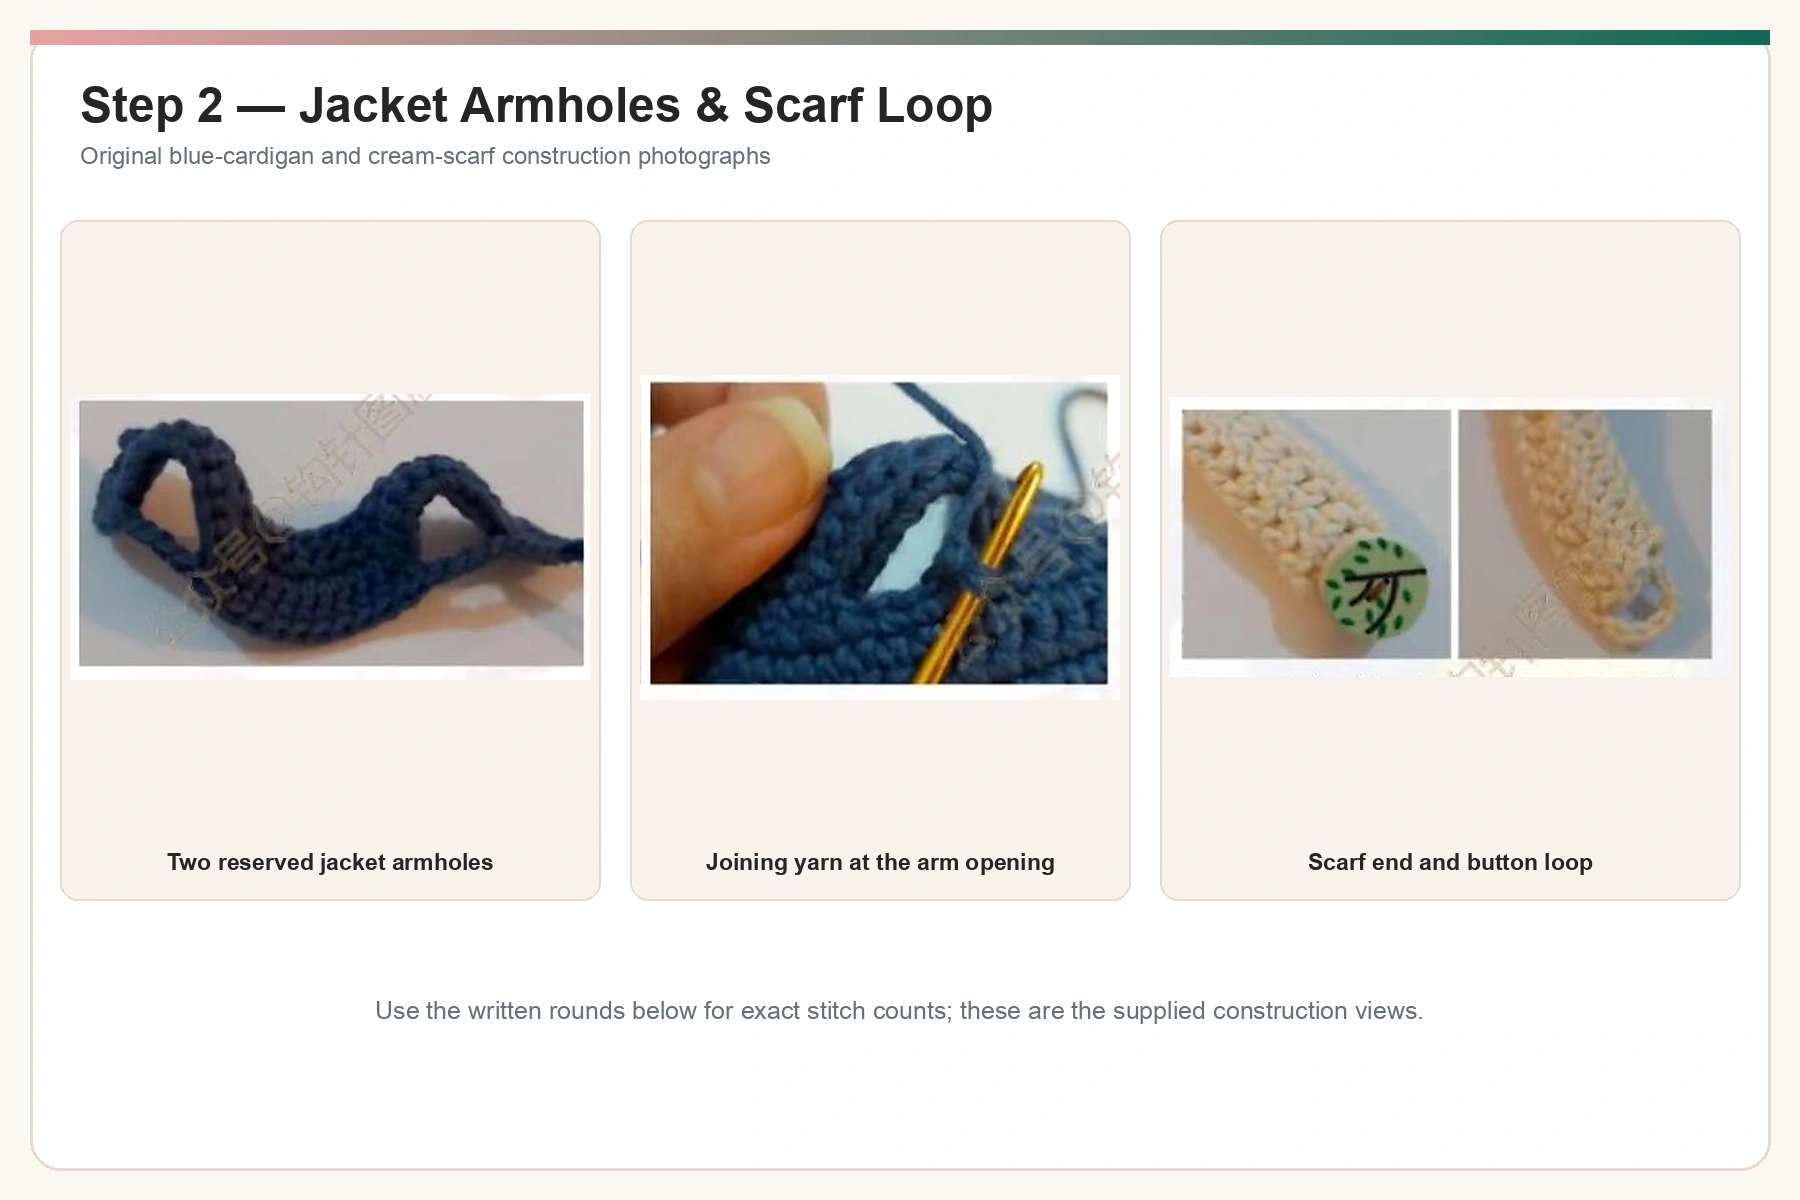
Cardigan Body
| Round / Row | Instructions | Count |
|---|---|---|
| R1 | With blue yarn, ch 25. Starting in the second ch, work 24 sc. Ch 1 and turn. | 24 |
| R2 | Repeat (2 sc, inc) ×8. | 32 |
| R3 | Repeat (3 sc, inc) ×8. | 40 |
| R4 | 1 sc, 2 inc, 2 sc, ch 4 and skip 9, repeat (sc, inc) ×6, ch 4 and skip 9, 2 sc, 2 inc, 1 sc. | Two armholes |
| R5 | 13 sc, inc, 10 sc, inc, 13 sc. | 42 |
| R6–22 | Sc across; ch 1 and turn after each row. | 42 |
Cardigan Sleeves
| Round / Row | Instructions | Count |
|---|---|---|
| R1–10 | Return to one reserved R4 opening with blue yarn. Join with a sl st, ch 1, and work 13 sc around the opening. Continue for 10 rounds. Repeat for the second armhole. | 13 per round |
Printable Step-by-Step Pattern
Keep every round, color change, and assembly step together
The printable edition organizes both deer, all outfit pieces, the complete stitch key, eye placement, shaping tables, and every professional step image.
Scarf, Muzzle, and Nose
Cream Scarf
| Round / Row | Instructions | Count |
|---|---|---|
| R1 | Ch 38. Starting in the third ch from the hook, work 36 dc. Ch 2 and turn. | 36 |
| R2–4 | Dc across; ch 2 and turn. | 36 |
| Button loop | Ch 6 and join to the opposite side to form the button loop. Sew a small button to the other end. | — |
White Muzzle
| Round / Row | Instructions | Count |
|---|---|---|
| R1 | MR, 6 sc. | 6 |
| R2 | Inc in every stitch. | 12 |
| R3 | Repeat (sc, inc) ×6. | 18 |
| R4–5 | Sc around. Fasten off with a long sewing tail. | 18 |
Brown Nose
| Round / Row | Instructions | Count |
|---|---|---|
| R1 | MR, 9 sc. | 9 |
| R2 | Sc around. | 9 |
| R3 | Repeat (sc, dec) ×3. Fasten off with a long tail. | 6 |
Ears, Antlers, and Arms
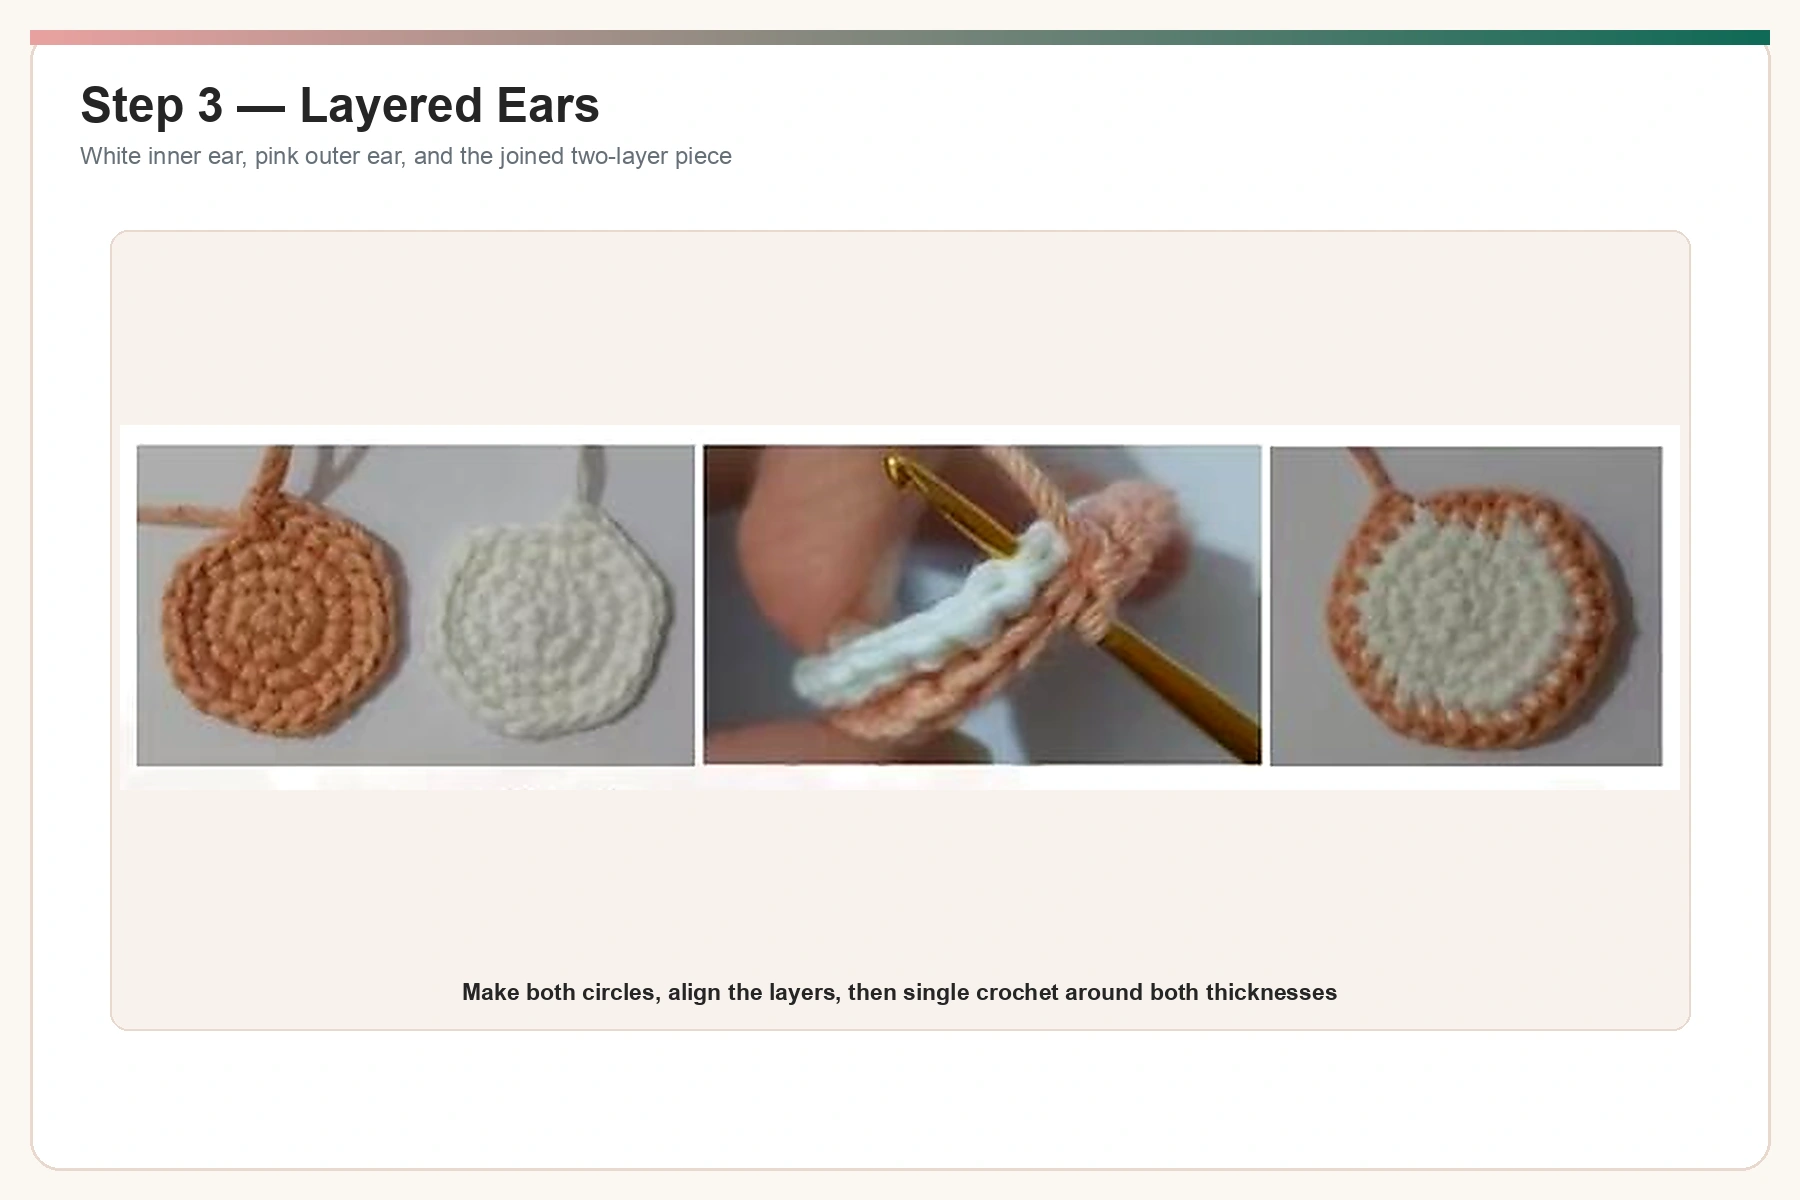
Layered Ears — Make 2
| Round / Row | Instructions | Count |
|---|---|---|
| R1 | With white, MR, 6 sc. | 6 |
| R2 | Inc around. | 12 |
| R3 | Repeat (sc, inc) ×6. | 18 |
| R4 | Repeat (2 sc, inc) ×6. Fasten off. | 24 |
| Pink layer | Repeat R1–4 with light pink, but do not fasten off. Align one pink and one white circle and sc evenly around both layers. Fasten off with a long sewing tail. | 24 edge sts |
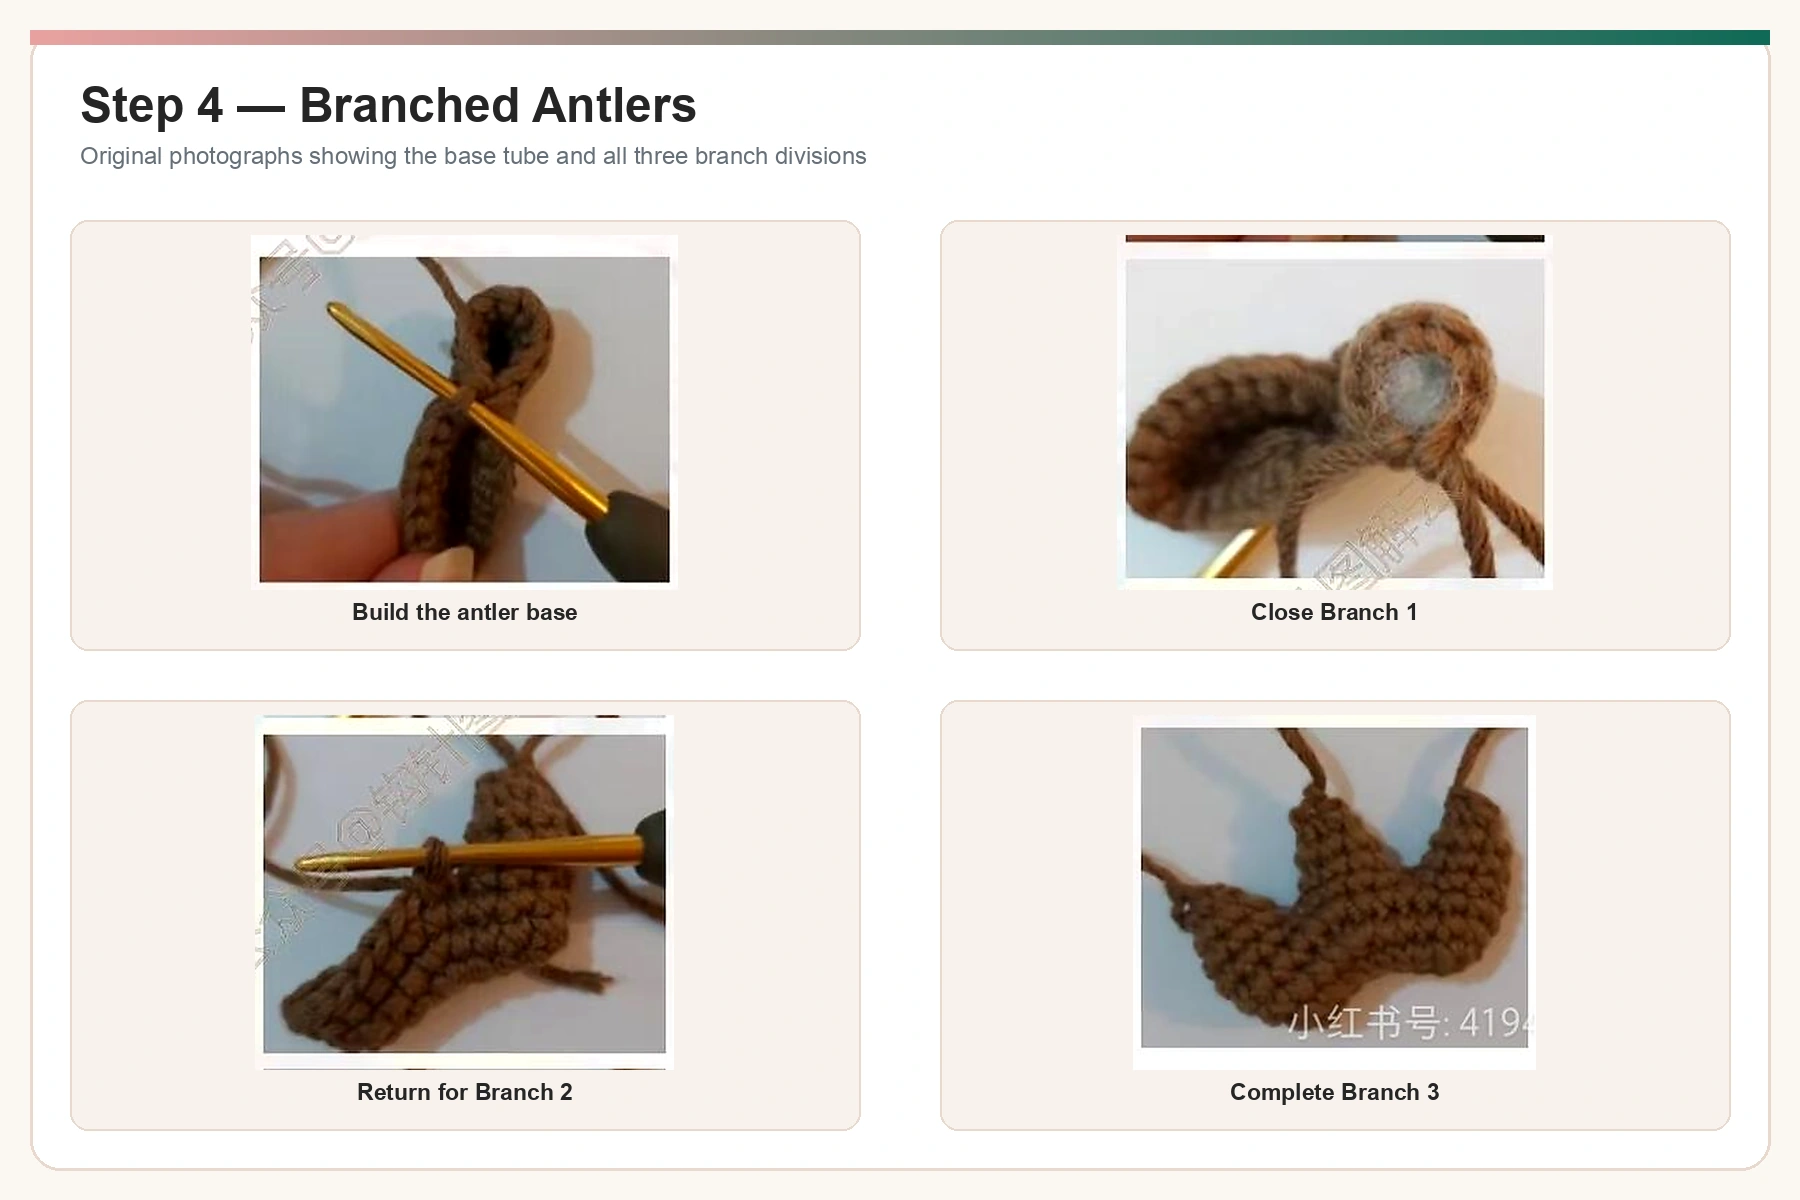
Antlers — Make 2
| Round / Row | Instructions | Count |
|---|---|---|
| R1 | With brown, ch 9. Starting in the second ch: 3 sc, inc, 3 sc, 3 sc in the last ch; continue along the opposite side with 2 sc, inc, 3 sc, inc. | 20 |
| R2 | Repeat (4 sc, inc) ×4. | 24 |
| R3 | Repeat (5 sc, inc) ×4. Do not fasten off; continue with Branch 1. | 28 |
| Branch 1 R1 | 4 sc, skip 18 stitches, 6 sc to close the branch. | 10 |
| Branch 1 R2–3 | Sc around. | 10 |
| Branch 1 R4 | 5 dec. Fasten off the branch. | 5 |
| Branch 2 R1 | Return to the stitches skipped for Branch 1. Ch 1, 4 sc, skip 9 stitches, 5 sc. | 9 |
| Branch 2 R2–3 | Sc around. | 9 |
| Branch 2 R4 | 1 sc, 4 dec. | 5 |
| Branch 3 R1–3 | Return to the stitches skipped for Branch 2 and work 9 sc for three rounds. | 9 |
| Branch 3 R4 | 1 sc, 4 dec. Fasten off. | 5 |
Skin-Color Arms — Make 2
| Round / Row | Instructions | Count |
|---|---|---|
| R1 | MR, 6 sc. | 6 |
| R2 | Inc around. | 12 |
| R3 | Sc around. | 12 |
| R4 | 2 dec, 8 sc. | 10 |
| R5–14 | Sc around. | 10 |
| R15 | 1 sc, dec, 7 sc. | 9 |
| R16 | Sc around. | 9 |
| R17 | Dec, 7 sc. | 8 |
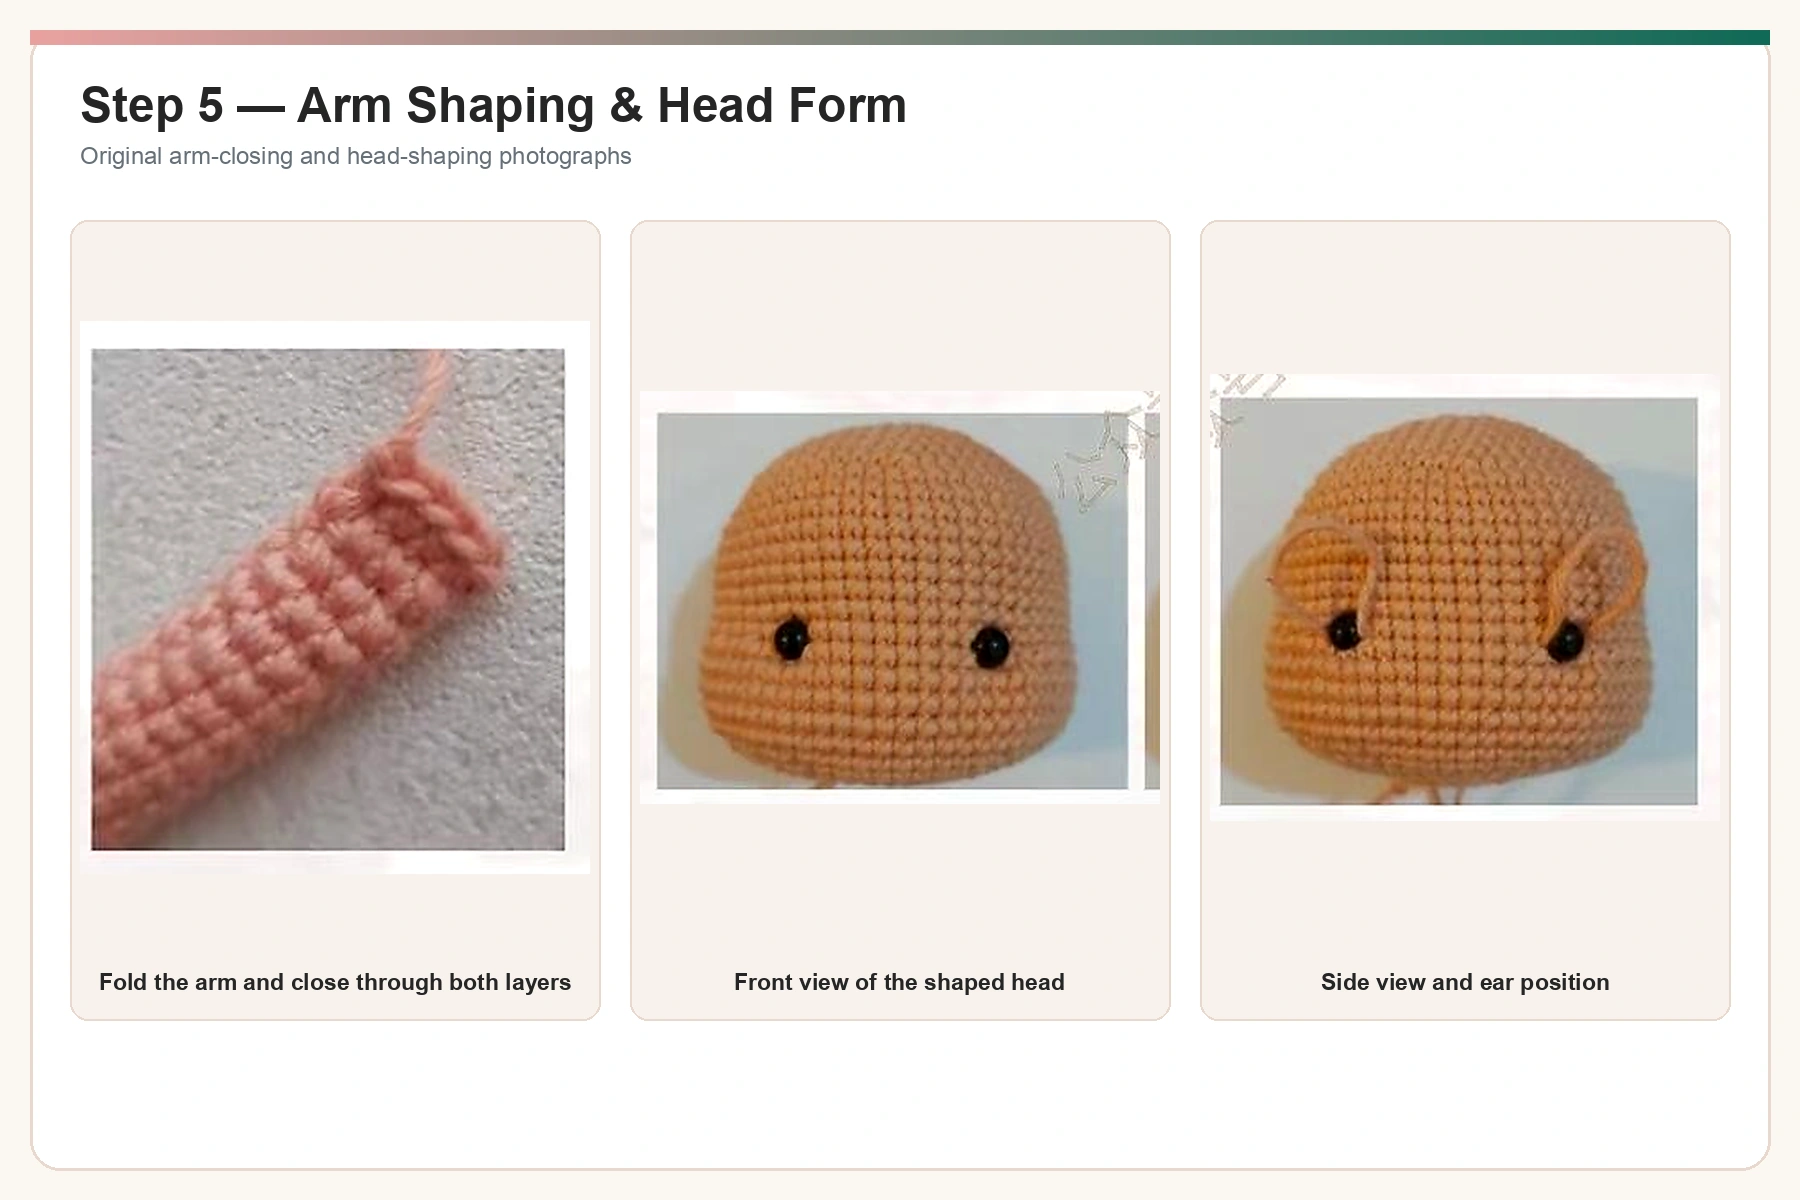
| Close | Fold the arm flat and crochet through both layers with 4 sc. | 4 |
Head and Safety-Eye Placement
Head — Make 2
| Round / Row | Instructions | Count |
|---|---|---|
| R1 | With skin-pink yarn, MR, 8 sc. | 8 |
| R2 | Inc around. | 16 |
| R3 | Repeat (sc, inc) ×8. | 24 |
| R4 | Repeat (3 sc, inc) ×6. | 30 |
| R5 | Repeat (4 sc, inc) ×6. | 36 |
| R6 | Repeat (5 sc, inc) ×6. | 42 |
| R7 | Repeat (6 sc, inc) ×6. | 48 |
| R8 | Repeat (7 sc, inc) ×6. | 54 |
| R9 | Repeat (8 sc, inc) ×6. | 60 |
| R10–18 | Sc around. | 60 |
| R19 | 15 sc, repeat (sc, inc) ×5, 9 sc, repeat (sc, inc) ×5, 16 sc. | 70 |
| R20–23 | Sc around. | 70 |
| R24 | 15 sc, repeat (sc, dec) ×5, 9 sc, repeat (sc, dec) ×5, 16 sc. | 60 |
| R25 | Repeat (8 sc, dec) ×6. | 54 |
| R26 | Repeat (7 sc, dec) ×6. | 48 |
| R27 | Repeat (6 sc, dec) ×6. | 42 |
| R28 | Repeat (5 sc, dec) ×6. | 36 |
| R29 | Repeat (4 sc, dec) ×6. | 30 |
| R30 | Repeat (3 sc, dec) ×6. | 24 |
| R31 | Repeat (2 sc, dec) ×6. Fasten off with a long sewing tail. | 18 |
Eye placement checkpoint
Insert the 7 mm safety eyes between R18 and R19, nine stitches apart. Install the washers before the head opening becomes too small. Add the muzzle and nose only after checking that the eye line is level.
Female Deer Legs, Body, and Attached Arms
Female Left Leg
| Round / Row | Instructions | Count |
|---|---|---|
| R1 | With light pink, MR, 7 sc. | 7 |
| R2 | Inc around. | 14 |
| R3 | Repeat (sc, inc) ×7. | 21 |
| R4 | BLO sc around. | 21 |
| R5 | 3 sc, 7 dec, 4 sc. | 14 |
| R6 | 5 sc, dec, 7 sc. | 13 |
| R7–8 | Sc around. | 13 |
| R9 | 2 inc, 11 sc. | 15 |
| R10 | Sc around. | 15 |
| R11 | Repeat (sc, inc) ×2, 11 sc. | 17 |
| R12 | Sc around. Fasten off the left leg. | 17 |
Female Right Leg and Body
| Round / Row | Instructions | Count |
|---|---|---|
| R1 | With light pink, MR, 7 sc. | 7 |
| R2 | Inc around. | 14 |
| R3 | Repeat (sc, inc) ×7. | 21 |
| R4 | BLO sc around. | 21 |
| R5 | 3 sc, 7 dec, 4 sc. | 14 |
| R6 | 5 sc, dec, 7 sc. | 13 |
| R7–8 | Sc around. | 13 |
| R9 | 8 sc, 2 inc, 3 sc. | 15 |
| R10 | Sc around. | 15 |
| R11 | 8 sc, repeat (sc, inc) ×2, 3 sc. | 17 |
| R12 | Sc around; do not fasten off. | 17 |
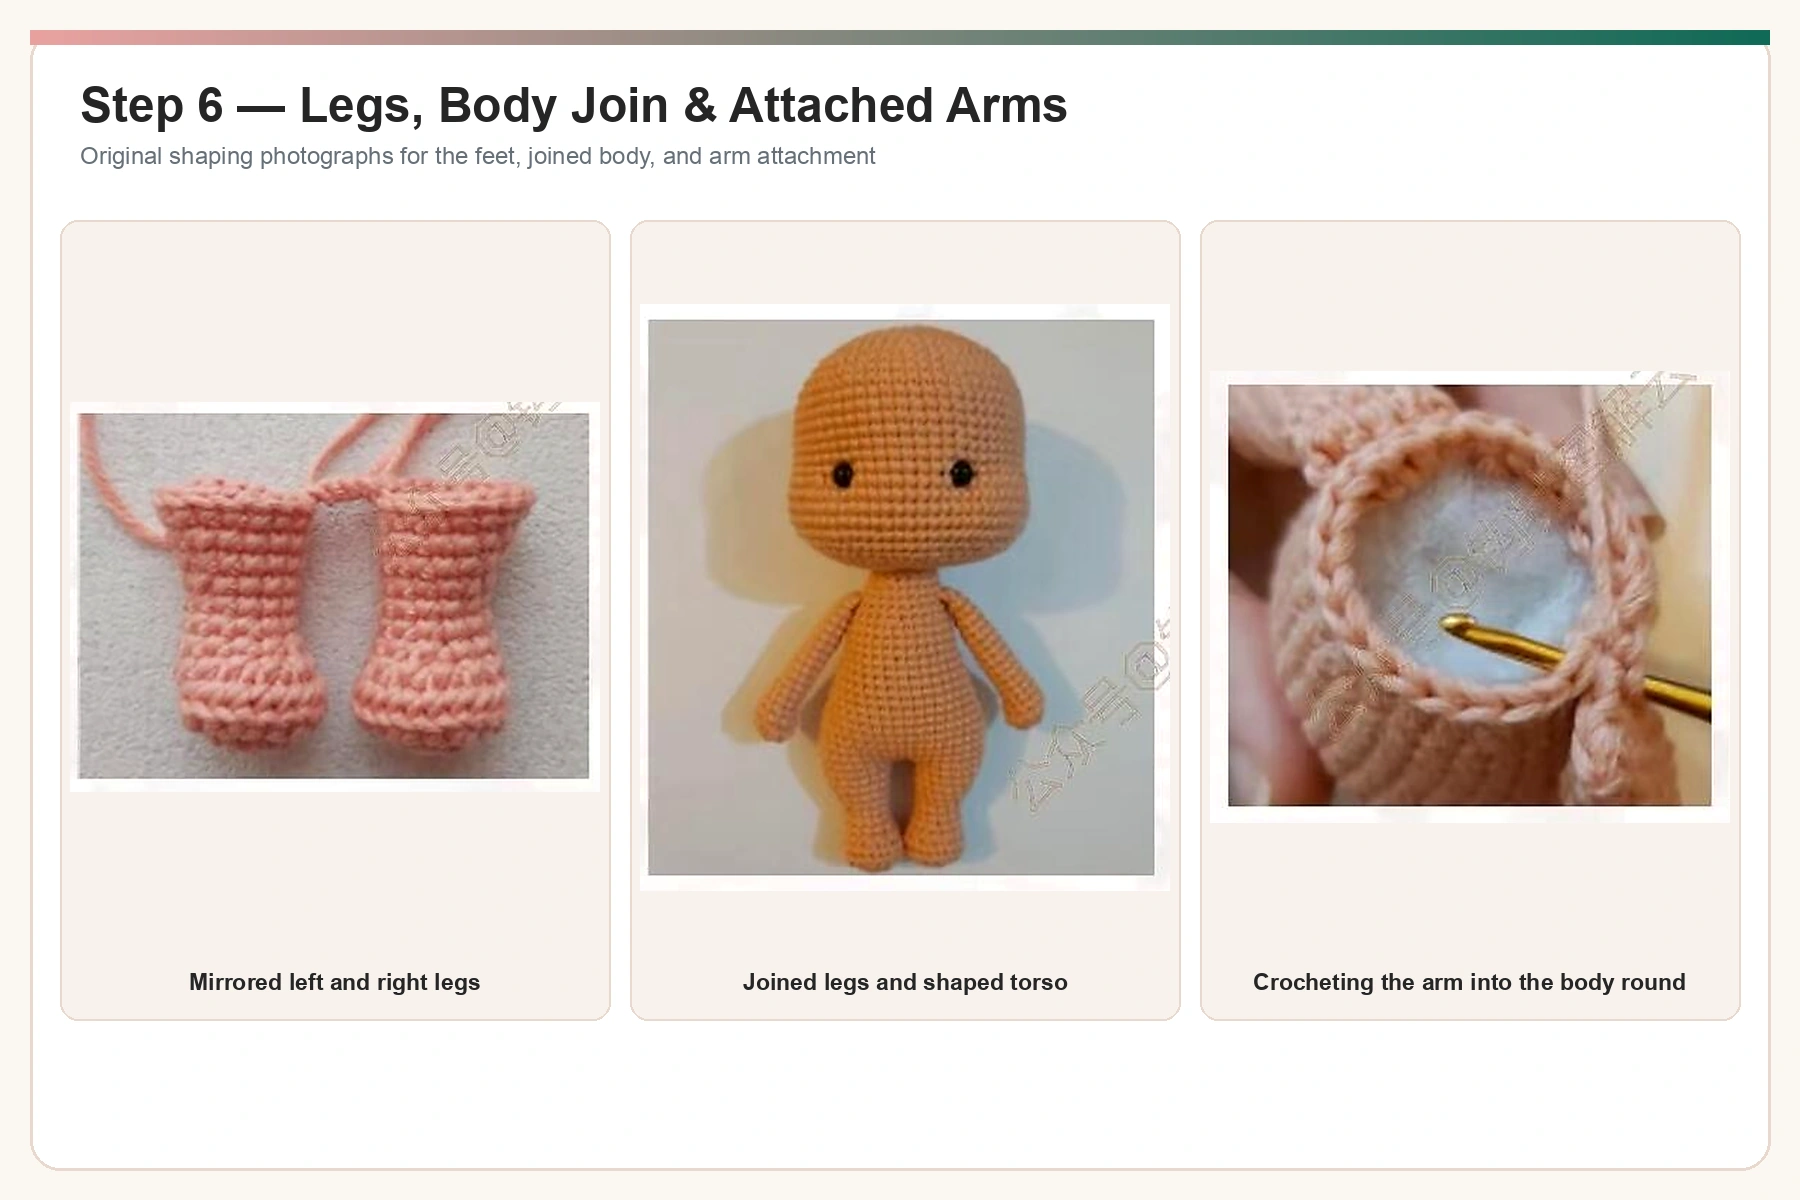
| R13 | Ch 3 and join the left leg. Work 7 sc, inc, 9 sc around the left leg; 3 sc along one side of the chain; 7 sc, inc, 9 sc around the right leg; 3 sc along the other side of the chain. | 42 |
| R14–16 | Sc around. | 42 |
| R17 | 9 sc, dec, 18 sc, dec, 11 sc. | 40 |
| R18 | Sc around. | 40 |
| R19 | 8 sc, dec, 18 sc, dec, 10 sc. | 38 |
| R20 | Sc around. | 38 |
| R21 | 7 sc, sc3tog, 16 sc, sc3tog, 9 sc. | 34 |
| R22–24 | Sc around. | 34 |
| R25 | 6 sc, sc3tog, 14 sc, sc3tog, 8 sc. | 30 |
| R26–29 | Sc around. | 30 |
| R30 | Repeat (3 sc, dec) ×6. | 24 |
| R31 | Sc around. Stuff the body firmly but evenly. | 24 |
| R32 | 4 sc, crochet 4 sc through the first arm and body together, 8 sc, crochet 4 sc through the second arm and body together, 4 sc. | 24 |
| R33 | Sc around. | 24 |
| R34 | Repeat (2 sc, dec) ×6. | 18 |
Yellow Overalls and Straps
Overalls
| Round / Row | Instructions | Count |
|---|---|---|
| Leg 1 R1 | With yellow, ch 23 and join with sl st to form a ring. Ch 1 and work 23 sc. | 23 |
| Leg 1 R2–4 | Sl st to first stitch, ch 1, and sc around. | 23 |
| Leg 2 | Repeat R1–4, but do not fasten off. | 23 |
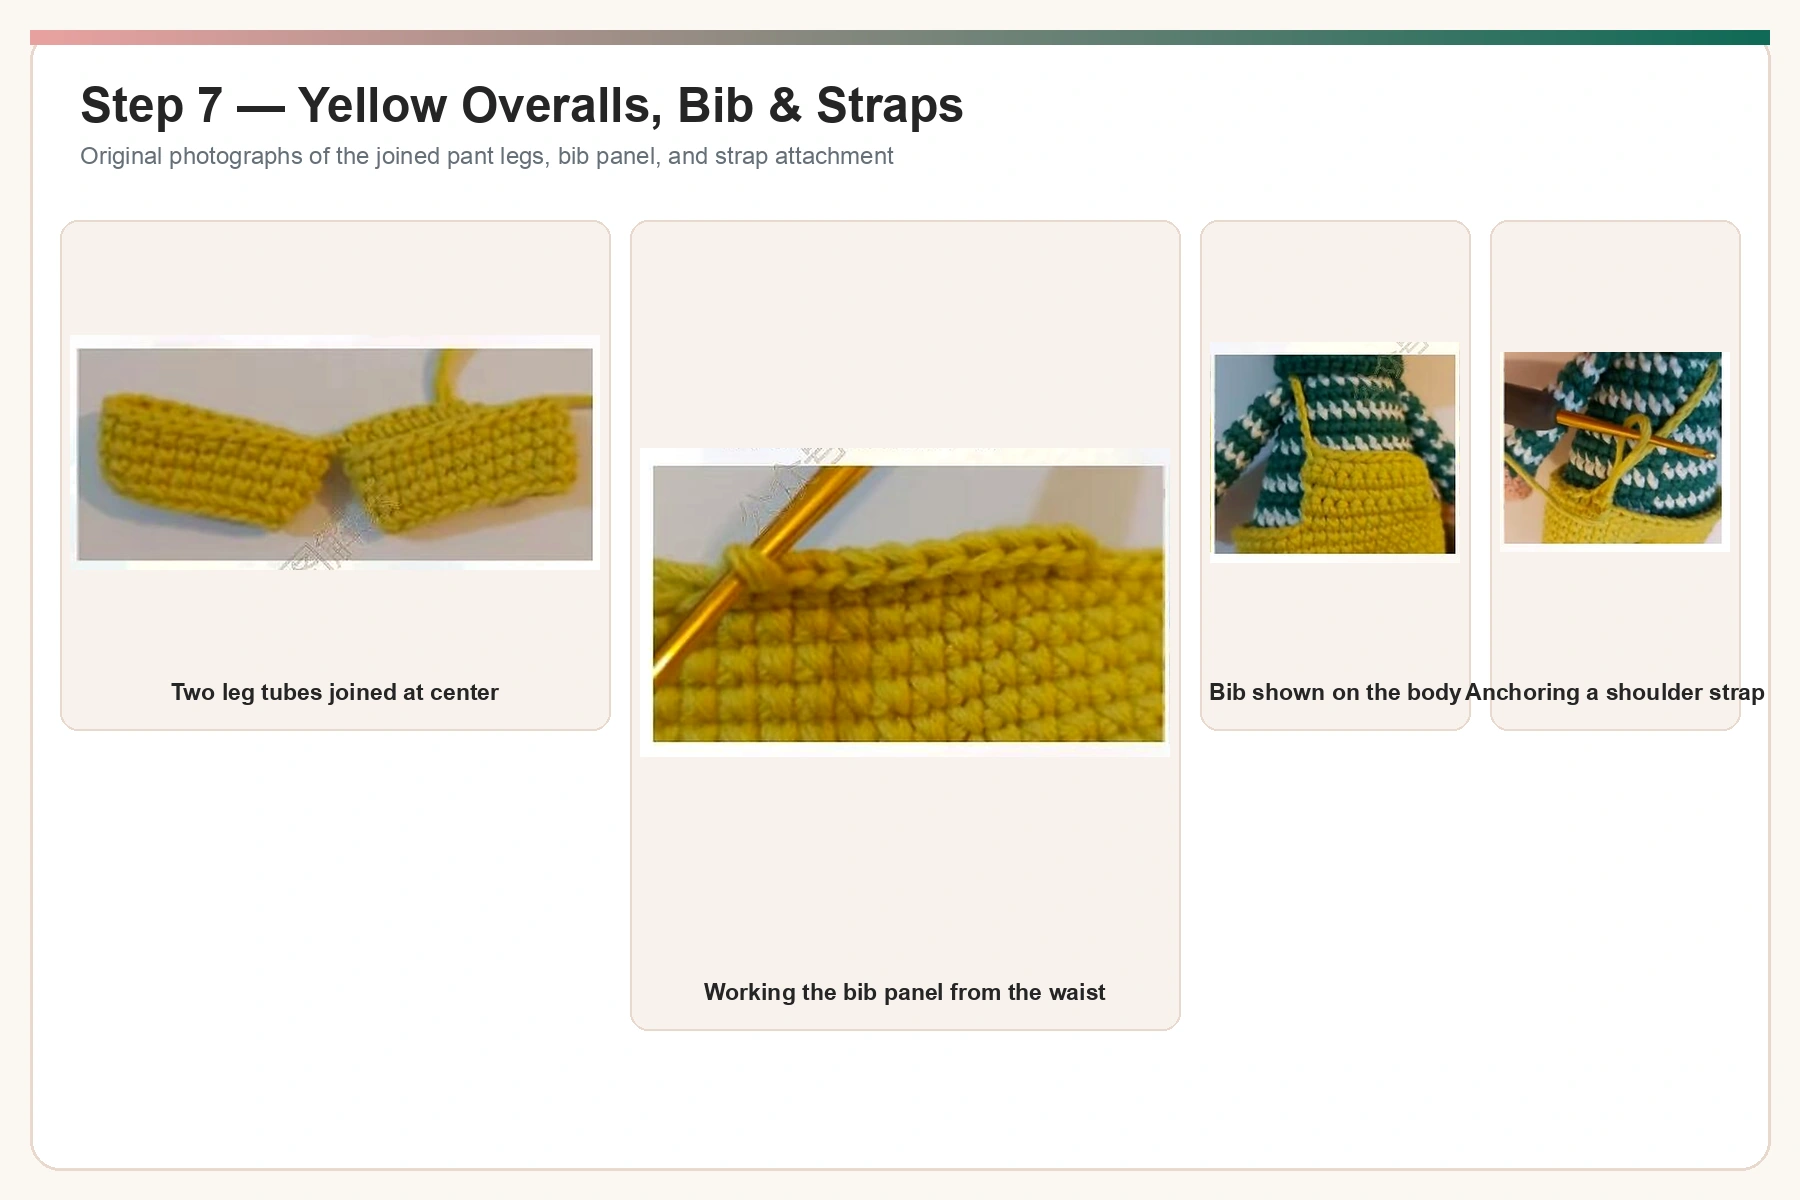
| R5 | Sl st to connect both legs, ch 1, and work 46 sc around both tubes. | 46 |
| R6–11 | Sl st to first stitch, ch 1, and sc around. | 46 |
| Bib Row 1 | From stitch 19 of R11, ch 1, work 10 sc, ch 1 and turn. | 10 |
| Bib Rows 2–5 | Sc across; ch 1 and turn. | 10 |
| Straps | Ch 20, sl st to R11 stitch 8, work 15 sc across the back, ch 20, and sl st to the front edge. Adjust button placement if needed. | Two straps |
Male Deer Striped Arms, Body, and Collar
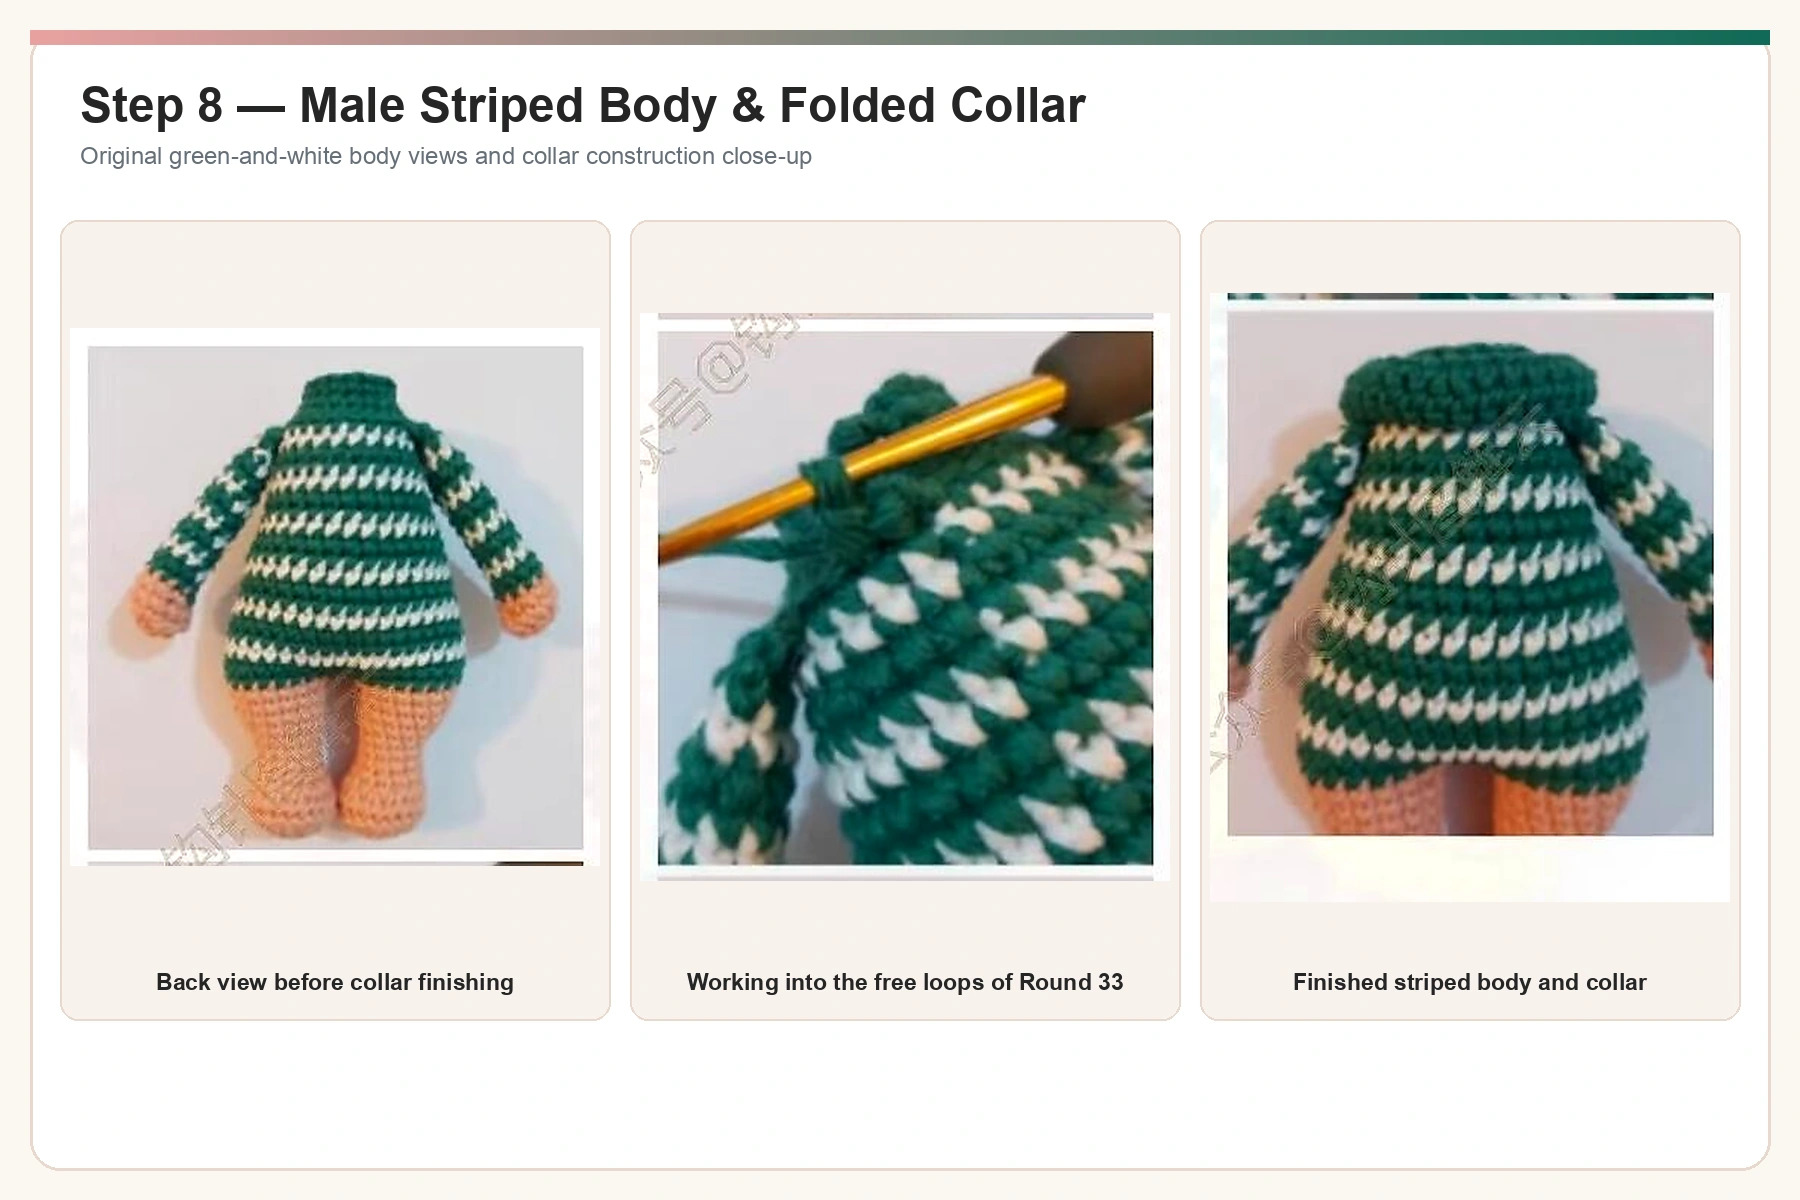
Work the male legs with the same shaping used for the female legs. The left and right shaping remain mirrored. The difference is the green-and-white color sequence in the arms and torso.
Male Striped Arms — Make 2
| Round / Row | Instructions | Count |
|---|---|---|
| R1–4 | Work the same skin-pink hand shaping: 6, 12, 12, then 10 stitches. | 10 |
| R5–6 | Change to green; sc around. | 10 |
| R7 | Change to white; sc around. | 10 |
| R8–9 | Green; sc around. | 10 |
| R10 | White; sc around. | 10 |
| R11–12 | Green; sc around. | 10 |
| R13 | White; sc around. | 10 |
| R14 | Green; sc around. | 10 |
| R15 | Green: 1 sc, dec, 7 sc. | 9 |
| R16 | White: sc around. | 9 |
| R17 | Green: dec, 7 sc. Fold flat and close with 4 sc. | 8 |
Male Torso Color Plan
| Round / Row | Instructions | Count |
|---|---|---|
| R13 | Join the legs exactly as for the female body. | 42 |
| R14–15 | Green; sc around. | 42 |
| R16 | White; sc around. | 42 |
| R17 | Green: 9 sc, dec, 18 sc, dec, 11 sc. | 40 |
| R18 | Green; sc around. | 40 |
| R19 | White: 8 sc, dec, 18 sc, dec, 10 sc. | 38 |
| R20 | Green; sc around. | 38 |
| R21 | Green: 7 sc, sc3tog, 16 sc, sc3tog, 9 sc. | 34 |
| R22 | White; sc around. | 34 |
| R23–24 | Green; sc around. | 34 |
| R25 | White: 6 sc, sc3tog, 14 sc, sc3tog, 8 sc. | 30 |
| R26–27 | Green; sc around. | 30 |
| R28 | White; sc around. | 30 |
| R29 | Green; sc around. | 30 |
| R30 | Green: repeat (3 sc, dec) ×6. | 24 |
| R31 | White; sc around. | 24 |
| R32 | Green: 4 sc, 4 sc through arm and body, 8 sc, 4 sc through second arm and body, 4 sc. | 24 |
| R33 | BLO sc around. | 24 |
| R34 | Repeat (2 sc, dec) ×6. | 18 |
Folded Green Collar — Work in Unused FLO of R33
| Round / Row | Instructions | Count |
|---|---|---|
| R1 | Join green in the free front loops and sc around. | 24 |
| R2 | Repeat (5 sc, inc) ×4. | 28 |
| R3 | Sc around. | 28 |
| R4 | Repeat (6 sc, inc) ×4. | 32 |
| R5 | Sc around. Fasten off and fold the fabric into a collar. | 32 |
Crochet Deer Couple Amigurumi Final Assembly
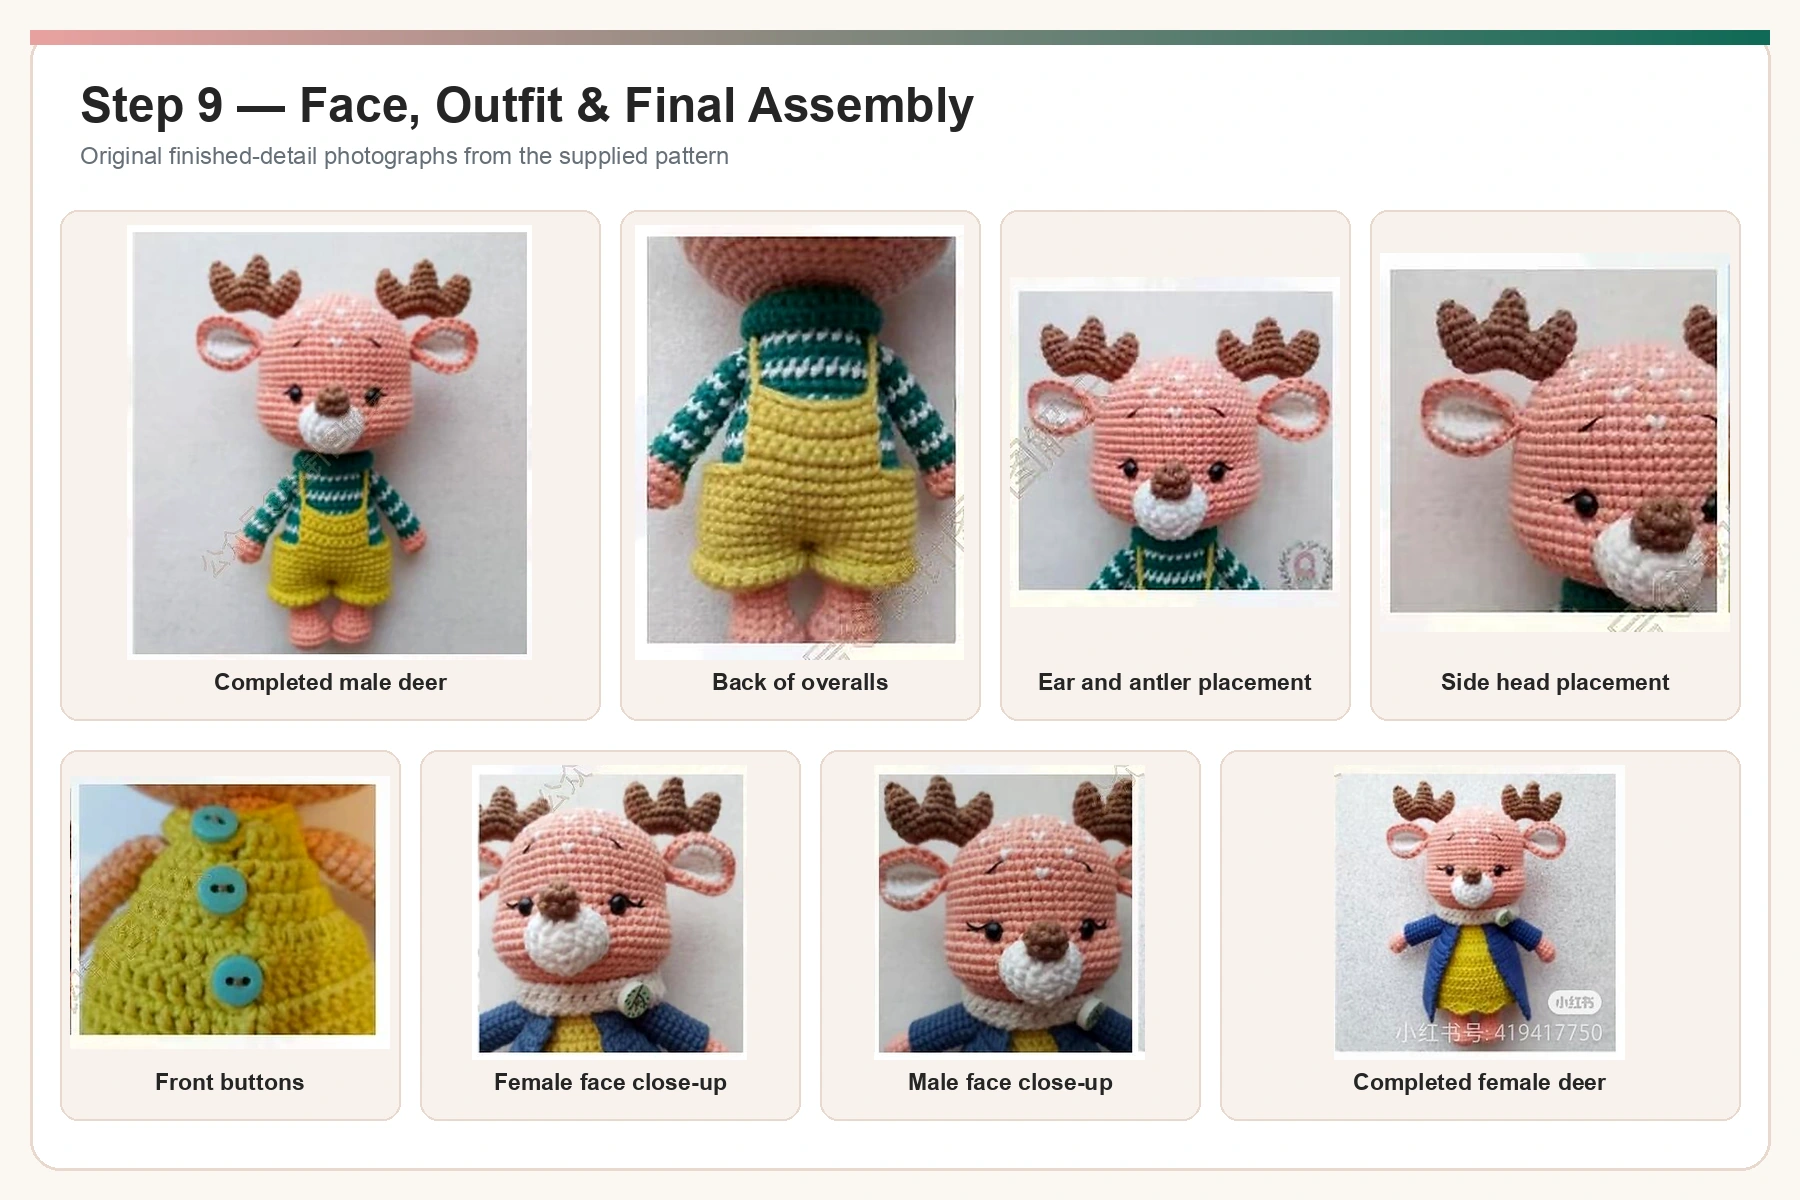
- Face: center the white muzzle below the eyes and sew it down. Place the brown nose over the upper center of the muzzle and sew securely. Embroider a short mouth line if desired.
- Ears: fold or cup each layered ear slightly. Pin them at equal height on the sides of the head, check the front view, then sew.
- Antlers: lightly stuff the bases and branches. Position them behind the ears and sew through several head stitches for stability.
- Head: add more stuffing to the neck area. Align the 18-stitch head opening with the 18-stitch body neck and sew evenly around.
- Female outfit: dress the doll in the yellow skirt, fasten the loops/buttons, add the blue cardigan, and secure the cream scarf.
- Male outfit: pull on the yellow overalls, position the bib at center front, cross or straighten the shoulder straps, and add buttons.
- Finishing: weave in every yarn end, shape the antler branches, align the feet, and add eyelashes or eyebrows only after checking symmetry.
Professional finishing checkpoint
Pin every part before sewing. View the dolls from the front, side, and back. Use small whip stitches in matching yarn, hide knots inside the stuffing, and avoid overstuffing the muzzle, ears, antlers, and hands.
Helpful Amigurumi Technique Guides
For cleaner shaping and assembly, review our amigurumi patterns. The Craft Yarn Council abbreviation list is also useful when comparing US crochet terms.
Frequently Asked Questions
What skill level is this crochet deer couple amigurumi pattern?
Intermediate. The project includes shaping, mirrored legs, joined limbs, color changes, BLO/FLO work, outfit construction, small-parts assembly, and safety-eye placement.
Are the instructions written in US or UK terms?
The English adaptation uses US terminology. “sc” means single crochet and “dc” means double crochet.
Can I use a larger hook and thicker yarn?
Yes, but both dolls and every outfit piece will become larger. Use the same yarn weight and hook throughout, and size the safety eyes and buttons proportionally.
When should I install the safety eyes?
Install 7 mm eyes between Rounds 18 and 19 of the head with nine stitches between them, before the opening becomes too small.
How are the arms attached?
The arms are folded closed and crocheted directly into body Round 32 with four stitches per arm.
Are the step images cropped from the supplied instruction pages?
No. The post uses newly created full-canvas English diagrams for the construction stages. The original project photograph is shown uncropped.
Can I make only one deer?
Yes. The shared head, ears, antlers, muzzle, nose, and basic legs can be used for either doll. Choose the female or male body color plan and outfit.
Printable Step-by-Step Pattern
Keep every round, color change, and assembly step together
The printable edition organizes both deer, all outfit pieces, the complete stitch key, eye placement, shaping tables, and every professional step image.
Finish Your Crochet Deer Couple Amigurumi Pattern
The most reliable way to complete this crochet deer couple amigurumi pattern is to work in batches: prepare both heads, all ears and antlers, both sets of limbs, then the two bodies and outfits. Compare matching pieces before assembly so the dolls look intentionally coordinated.
Record your yarn, hook, finished head circumference, eye spacing, and stuffing level. Those notes make a second pair easier and help you adapt the outfits to new colors without changing the fit.
This English adaptation was prepared from the user-supplied illustrated pattern. Standard US crochet terminology is used. Confirm your rights to publish or sell the underlying pattern and source photograph.




