

CHRISTMAS CROCHET • STEP-BY-STEP PHOTO TUTORIAL
Christmas Snowflakes Crochet Pattern: 4 Step-by-Step Designs
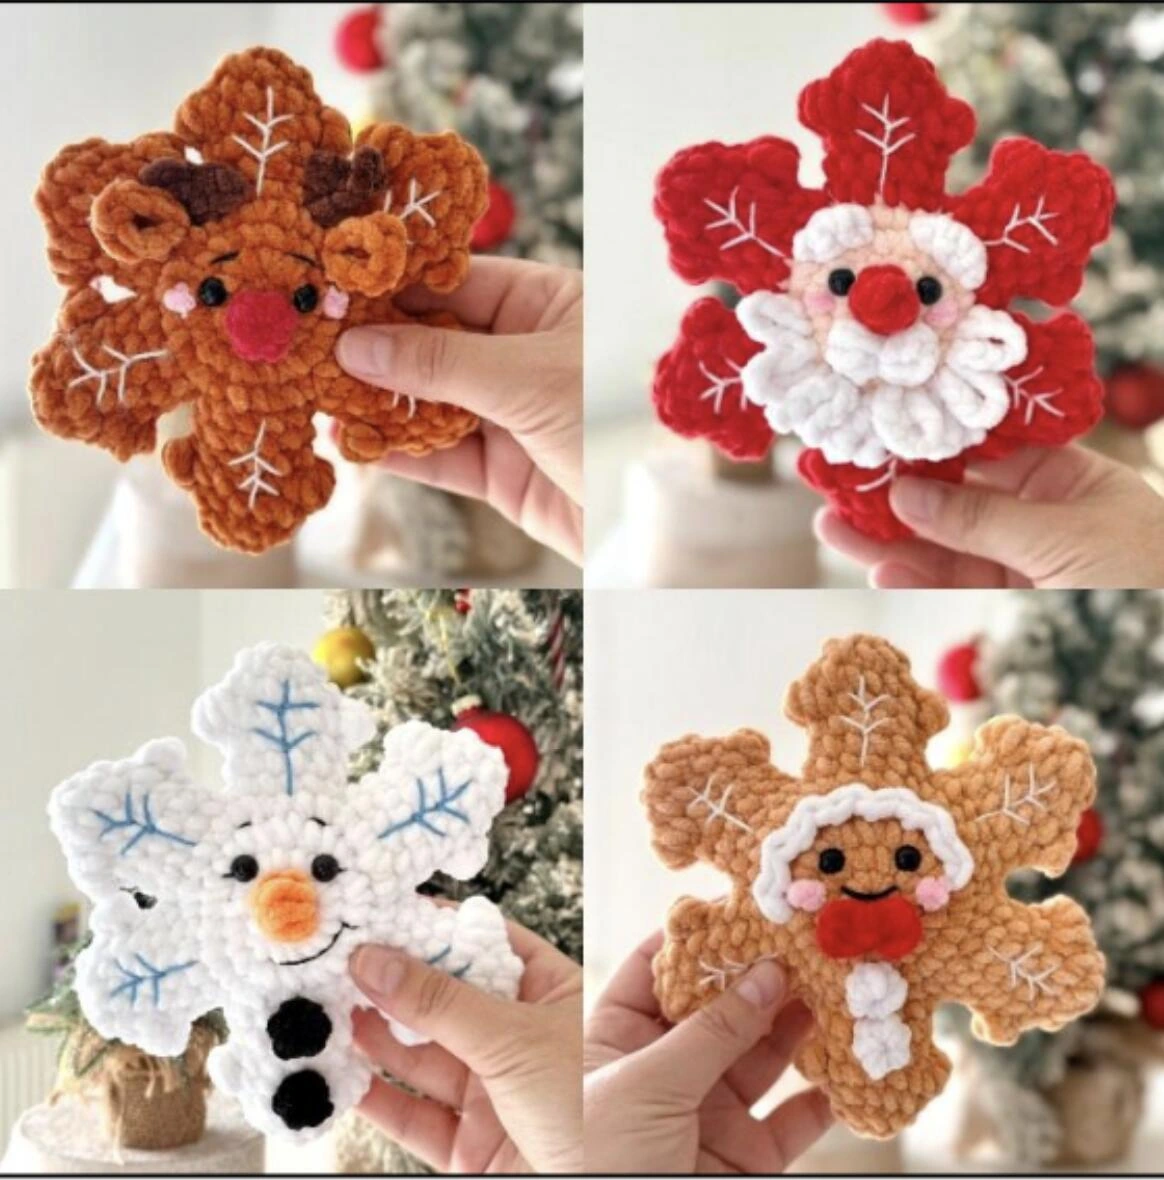
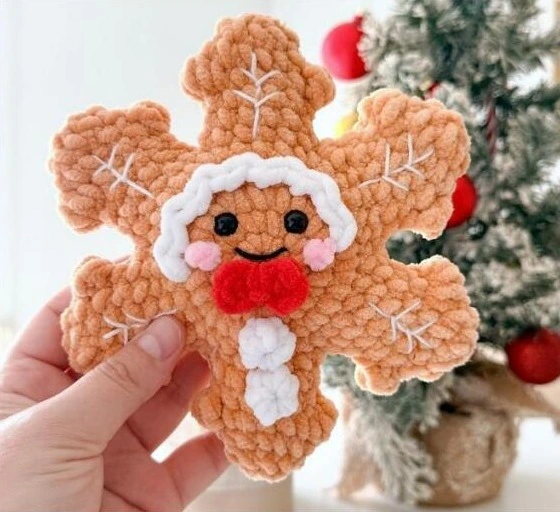
Make four plush Christmas snowflakes: a snowman, reindeer, gingerbread character, and Santa. This Christmas Snowflakes Crochet Pattern walks through the materials, rounds, assembly, and finishing details for each design, with the supplied process photographs beside the relevant steps.
The original designs and pattern are by RNata. The instructions below use US crochet terminology. Work through the snowman first: its central circles and six snowflake arms are also used for the other characters, with the changes explained in their sections.
Materials and Finished Size
- 5 mm crochet hook.
- Plush yarn. The original samples use YarnArt Dolce in white (741), black (742), red (748), orange (852), ginger (854), brown (791), camel (855), and shell (779).
- 9 mm safety eyes.
- Fine yarn for embroidery. The original lists Scheepjes Catona in black (110), white (106), and blue (511); pink yarn is also used for cheeks in the instructions.
- Stuffing, yarn needle, stitch marker, and scissors.
The stated finished height is 16–17 cm. Your result may vary with yarn, hook size, and tension. You can change the colors; no yarn quantity or completion time is specified in the supplied pattern.
Abbreviations and Pattern Notes
- ch — chain
- sc — single crochet
- hdc — half double crochet
- dc — double crochet
- inc — increase
- dec — decrease
- slst — slip stitch
- b / bobble st — 4-dc bobble stitch
- BLO — back loop only
- FLO — front loop only
- st / sts — stitch / stitches
- Rnd — round
A number in square brackets is the stitch count at the end of the round. “× 9” means repeat the preceding group nine times. Leave the yarn tails where instructed; they are used for attaching details or closing openings. For general terminology, see the Craft Yarn Council’s US crochet abbreviation guide.
How to Make the 4-dc Bobble Stitch
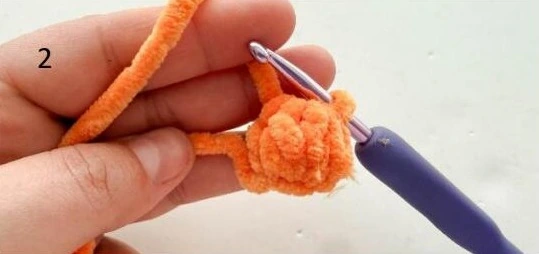
- Yarn over and insert the hook into the indicated stitch.
- Yarn over and pull up a loop: there are 3 loops on the hook.
- Yarn over and pull through 2 loops. Leave the double crochet unfinished: 2 loops remain.
- Repeat the same unfinished-double-crochet process three more times in the same stitch. There are now 5 loops on the hook.
- Yarn over and pull through all 5 loops at once.
1. Snowman Snowflake — Full Step-by-Step Tutorial
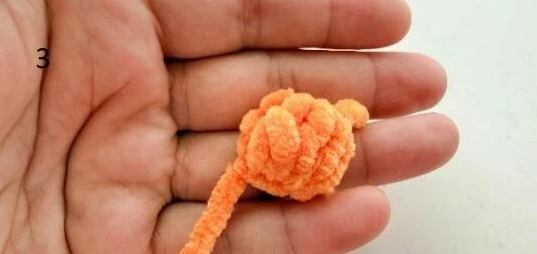
Step 1 — Make the Orange Nose
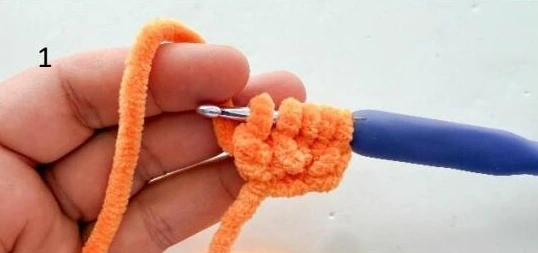
Use orange YarnArt Dolce (852). Leave the starting yarn tail.
Chain 2. Work into the second chain from the hook:
Rnd 1: Make 1 bobble stitch. [1]
Cut the yarn, leaving a tail for attachment.
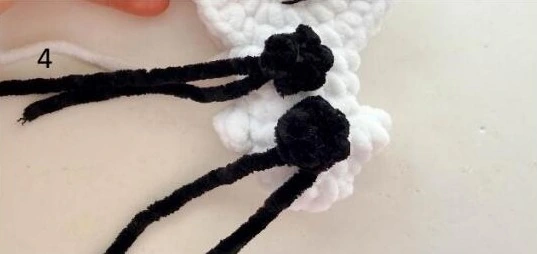
Step 2 — Make Two Black Buttons
Use black YarnArt Dolce (742). Leave the starting tail for each button.
Chain 2. Start in the second chain from the hook:
Rnd 1: 5 sc in the second chain. [5]
Cut the yarn, leaving a tail, and fasten off. Make a second matching button.
Step 3 — Crochet Two White Central Circles
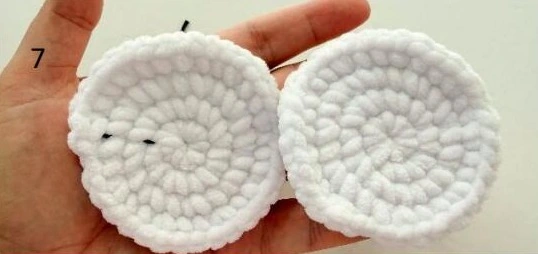
Use white YarnArt Dolce (741). The center is made from two circles that will be connected while you crochet the arms.
For each circle, chain 2 and start in the second chain from the hook.
Rnd 1: 9 sc in the second chain. [9]
Rnd 2: inc × 9. [18]
Rnd 3: (inc, sc) × 9. [27]
Rnd 4: (2 sc, inc) × 9. [36]
Cut the yarn and fasten off. Keep the stitch marker in the second circle: it will guide eye placement.
Step 4 — Position the Eyes and Nose
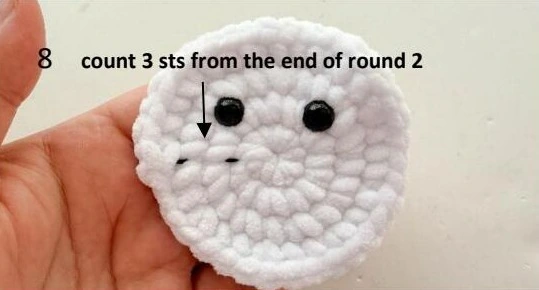
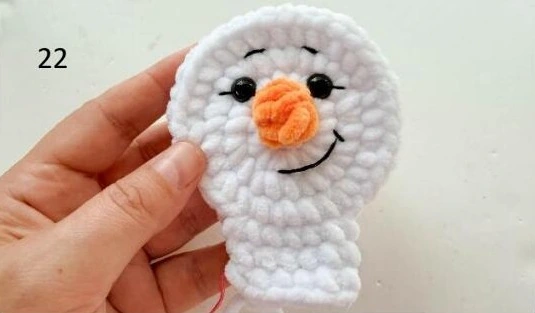
Place the eyes between rounds 2 and 3, with 4 stitches between them. Count 3 stitches from the end of round 2 and attach the first eye. Skip the next 4 stitches, then attach the second eye.
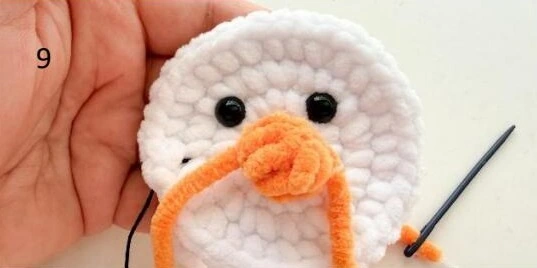
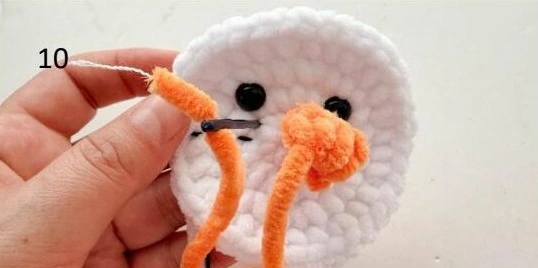
Place the orange nose in the center of round 1. Use a yarn needle to bring both tails to the wrong side. Secure them through the back loops, then tie two knots.
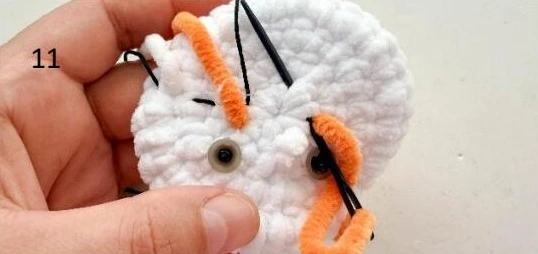
Step 5 — Embroider the Face
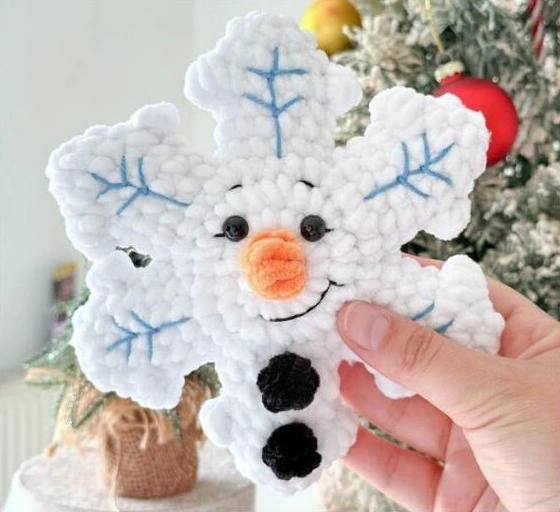
With black embroidery yarn, add a smiling mouth, one eyelash at each eye, and eyebrows about one stitch long. Use the photographs to check the expression and placement.
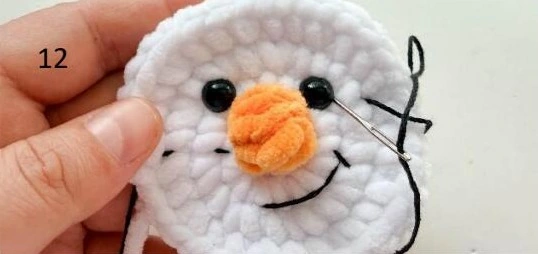
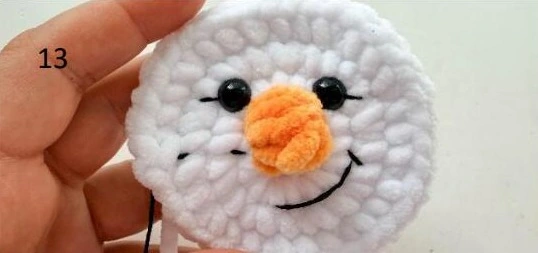
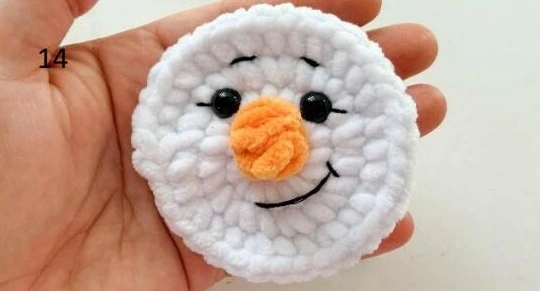
Step 6 — Mark the First Snowflake Arm
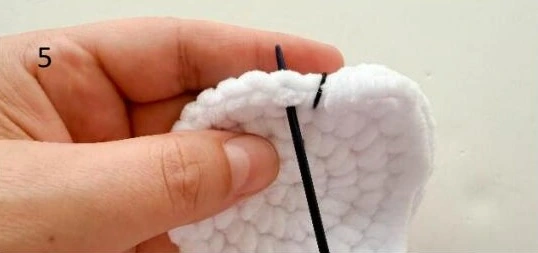
Use white YarnArt Dolce (741). You will divide the work to make six arms. Mark 6 stitches centered along the bottom of the body, using pins or a stitch marker.
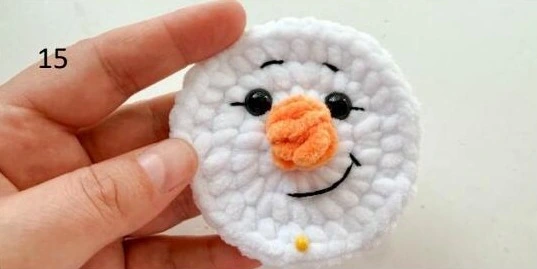
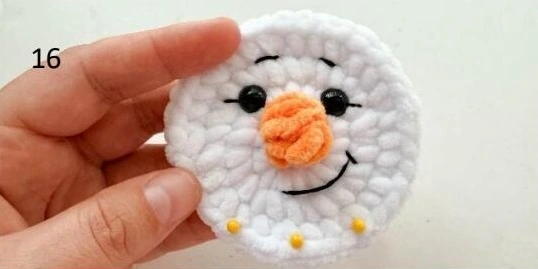
Step 7 — Join the Two Circles and Work the First Arm
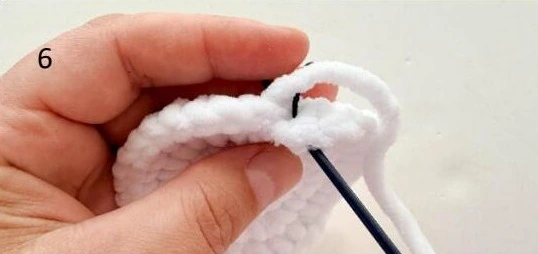
Hold the face upside down, with the front facing you. Insert the hook into the first marked stitch, pick up the white yarn, and pull it through.
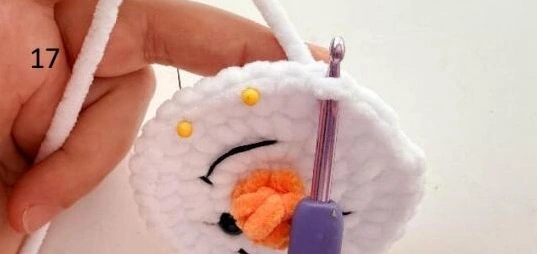
Rnd 1: ch 1, sc in the next 6 sts of the second circle. Turn the work and insert the hook into any stitch of the first circle. Sc in the next 6 sts of that circle. Turn again and insert the hook into the first stitch to join the round. [12]
This arm now consists of 6 sc from each circle, giving 12 stitches in total.
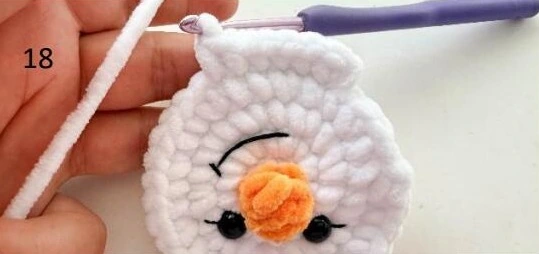
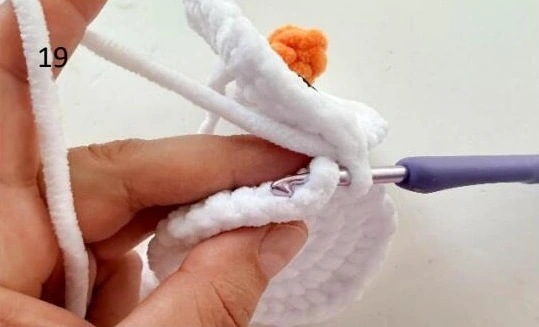
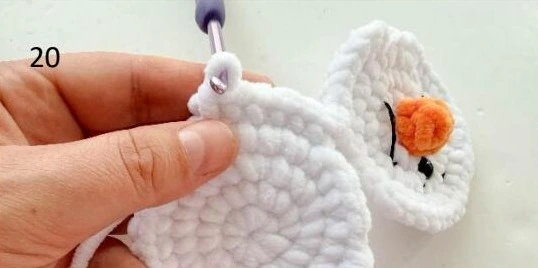
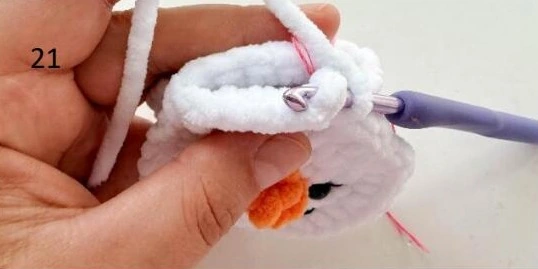
Rnd 2–3: sc around. [12] — 2 rounds
Rnd 4: (bobble st, 5 sc) × 2. [12]
Rnd 5: sc around. [12]
Rnd 6: (dec, sc) × 4. [8]
Stuff the arm lightly. With a yarn needle, weave the yarn tail through the front loops of the remaining stitches and pull tight to close.
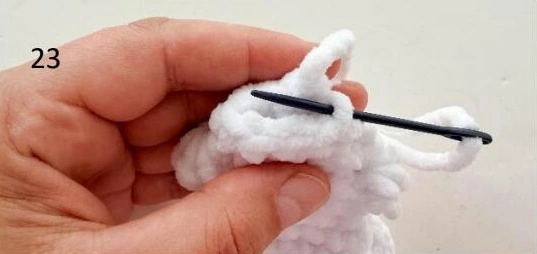
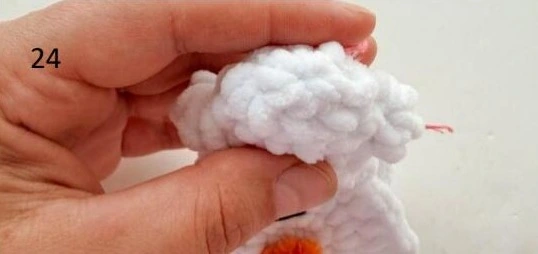
Step 8 — Attach the Buttons
Place both black buttons on the first arm. Pull the tails to the wrong side, secure them through the back loops, and tie two knots.
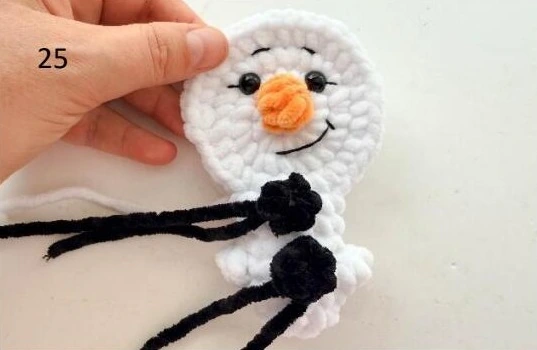
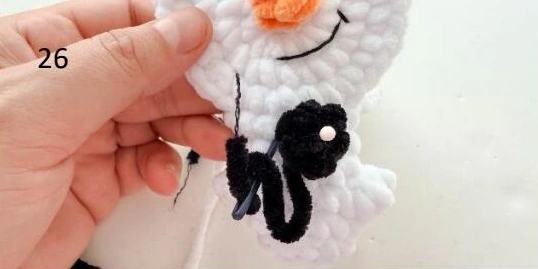
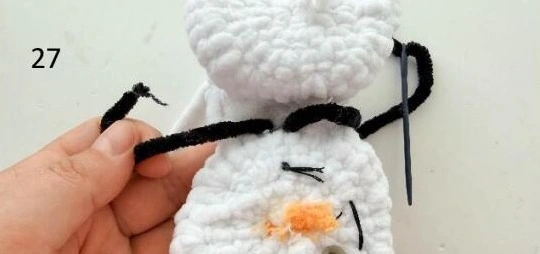
Step 9 — Make the Other Five Arms
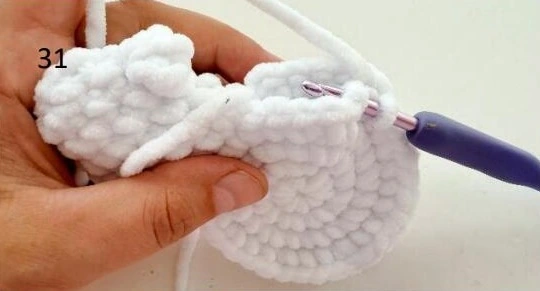
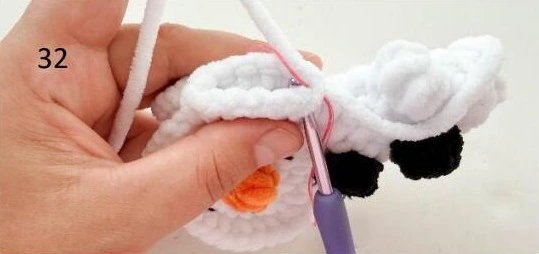
Lay the snowflake with the first arm on the right, away from you, as shown in photo 28. Insert the hook into the very first stitch after that arm, pick up the white yarn, and pull it through.
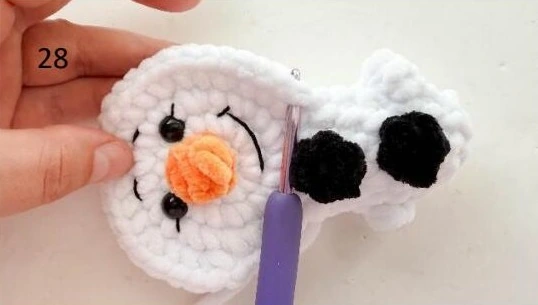
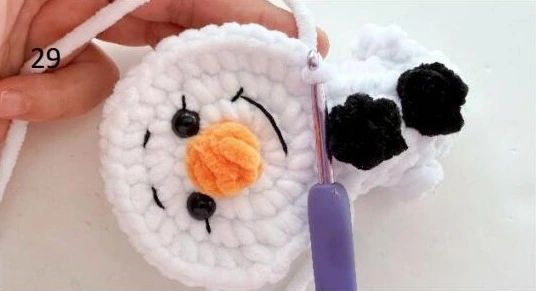
Rnd 1: ch 1, sc in the next 6 sts. Turn the work. Count 6 stitches from the previous arm on the opposite circle, then insert the hook into the sixth stitch. Sc in the next 6 sts. Turn and insert the hook into the first stitch to join the round. [12]
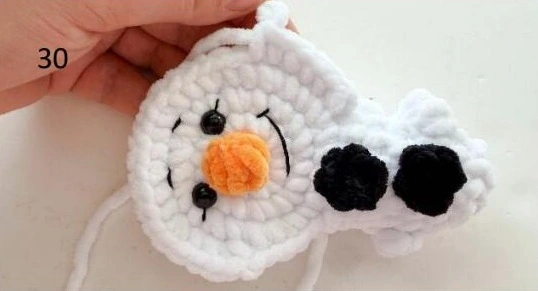
Rnd 2–3: sc around. [12] — 2 rounds
Rnd 4: (bobble st, 5 sc) × 2. [12]
Rnd 5: sc around. [12]
Rnd 6: (dec, sc) × 4. [8]
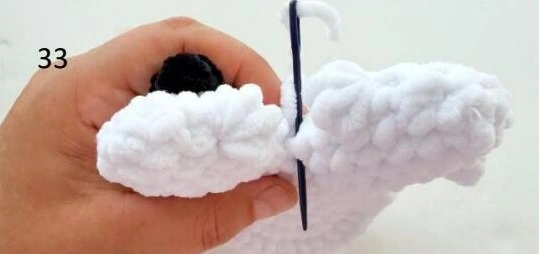
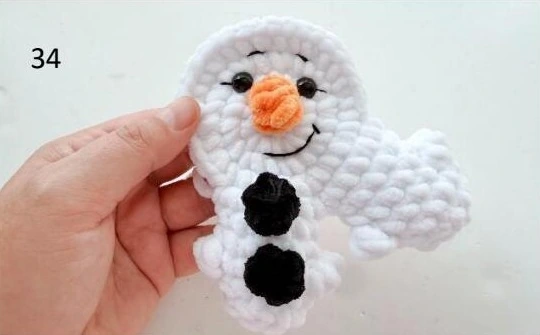
Stuff the arm lightly and close its opening in the same way as the first arm. Use the yarn tail to close the small gap between the arms. Repeat for the third, fourth, fifth, and sixth arms.
Before crocheting the last arm, add a small amount of stuffing to the central body.
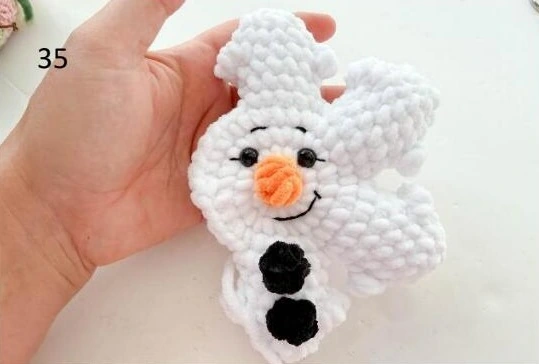
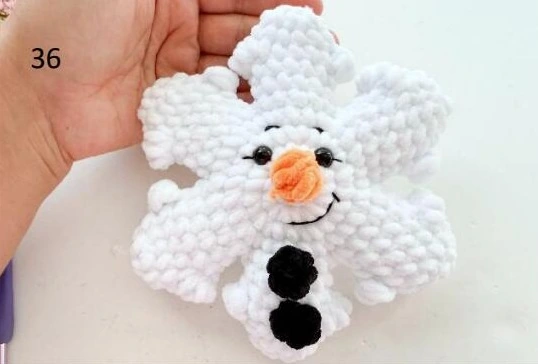
Step 10 — Embroider the Snowflake Details
Use sky-blue embroidery yarn to stitch a tree-shaped, branching motif onto each arm. Start with the main line, then work the short branches as shown in the sequence below. Repeat the motif on all six arms.
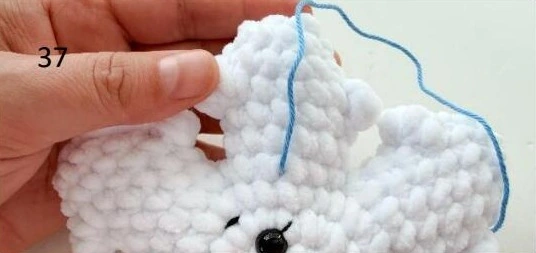
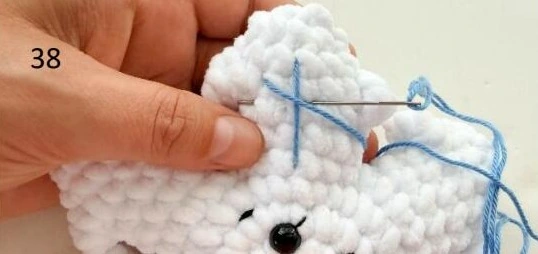
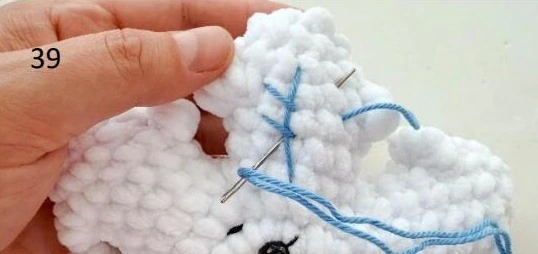
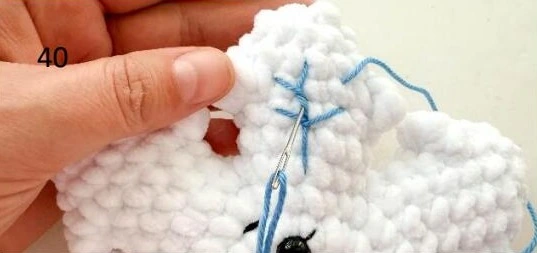
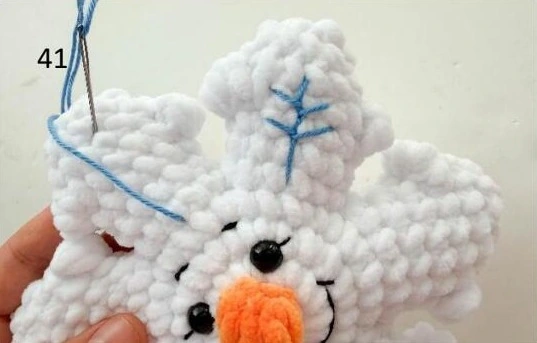
2. Reindeer Snowflake — Step-by-Step Tutorial
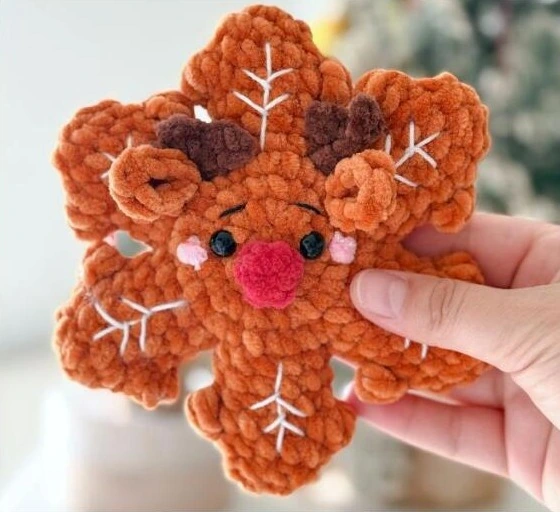
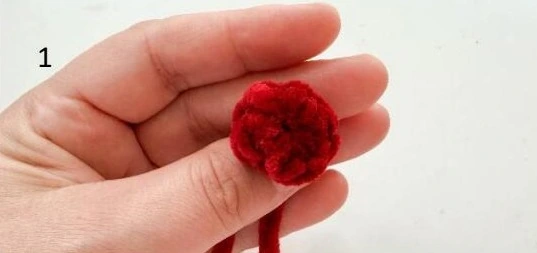
Step 1 — Make the Red Nose
Use red YarnArt Dolce (748). Leave the starting tail. Chain 2 and start in the second chain from the hook.
Rnd 1: 6 sc in the second chain, slst in the first stitch. [6]
Cut the yarn, leaving a tail, and fasten off.
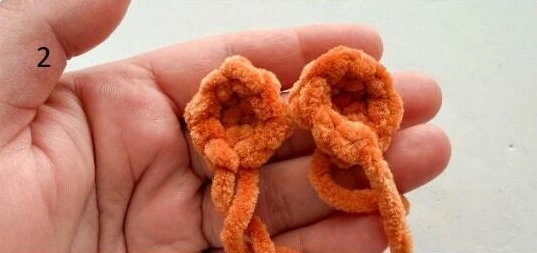
Step 2 — Make Two Ears
Use ginger YarnArt Dolce (854). Leave the starting tail. Chain 3, making sure the chains are not twisted.
Rnd 1: Starting in the second chain from the hook: sc + dc in the next stitch, 3 sc in the last chain. Continue on the other side of the foundation chain: dc + sc in the next stitch, sc in the last stitch, slst in the first stitch. [8]
Cut the yarn, leaving a long tail for sewing. Make a second ear.
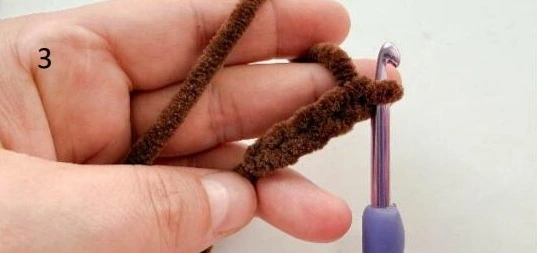
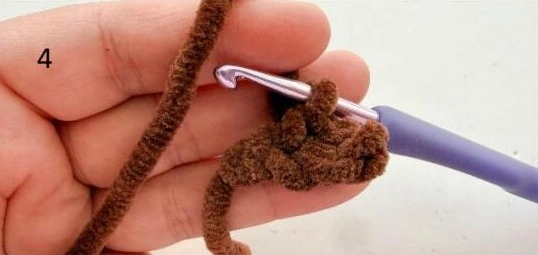
Step 3 — Make Two Antlers
Use brown YarnArt Dolce (791). Leave the starting yarn tail.
- Chain 4.
- Starting in the second chain from the hook, crochet 2 sc along the chain.
- Chain 2. Work 1 sc into the second chain from the hook.
- Crochet 1 sc into the last stitch of the original chain.
- Cut the yarn, leaving a long tail for sewing.
Repeat for the second antler.
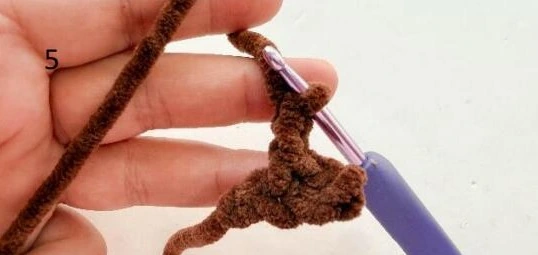
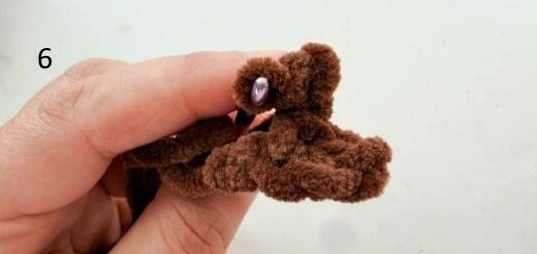
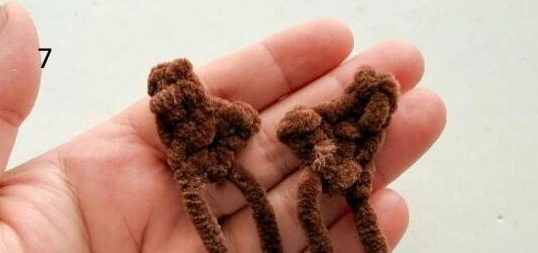
Step 4 — Crochet the Center and Add the Face
Use ginger YarnArt Dolce (854). Make two central circles using the same four-round base as the snowman:
Foundation: ch 2; start in the second chain from the hook.
Rnd 1: 9 sc. [9]
Rnd 2: inc × 9. [18]
Rnd 3: (inc, sc) × 9. [27]
Rnd 4: (2 sc, inc) × 9. [36]
Fasten off and keep the marker in the face circle. Position the eyes between rounds 2 and 3, with 5 stitches between them. Count 2 stitches from the end of round 2 and attach the first eye. Skip the next 5 stitches, then attach the second eye.
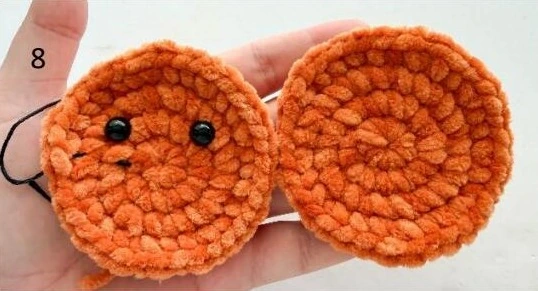
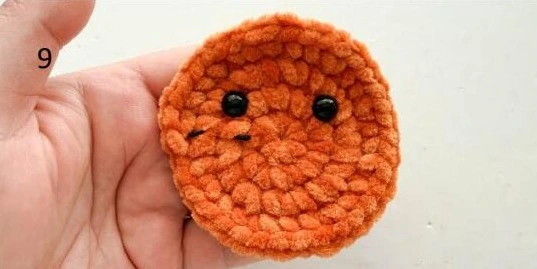
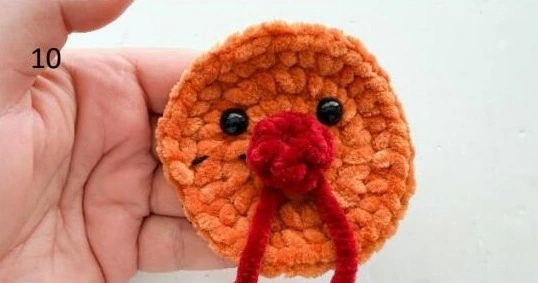
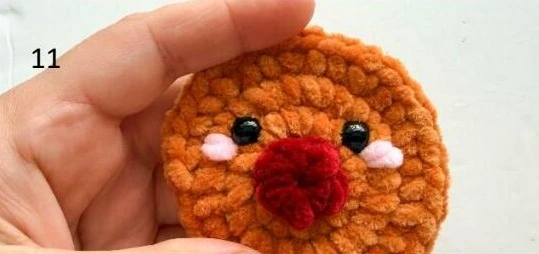
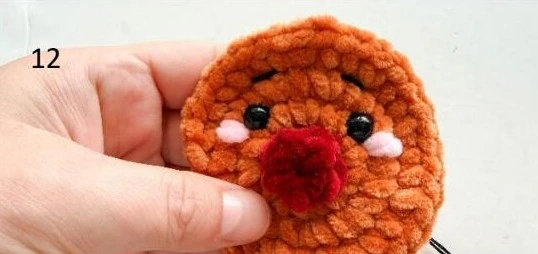
Attach the red nose in the center of round 1. Bring the tails to the wrong side, secure them through the back loops, and tie two knots. Embroider pink cheeks below the eyes and short, one-stitch-long black eyebrows.
Step 5 — Crochet the Arms and Attach the Antlers and Ears
Use ginger YarnArt Dolce (854). Work the six arms exactly as in snowman steps 6–9: join 6 stitches from each circle for each arm.
Rnd 1: ch 1, 6 sc from each circle; turn and join as described in the base tutorial. [12]
Rnd 2–3: sc around. [12] — 2 rounds
Rnd 4: (bobble st, 5 sc) × 2. [12]
Rnd 5: sc around. [12]
Rnd 6: (dec, sc) × 4. [8]
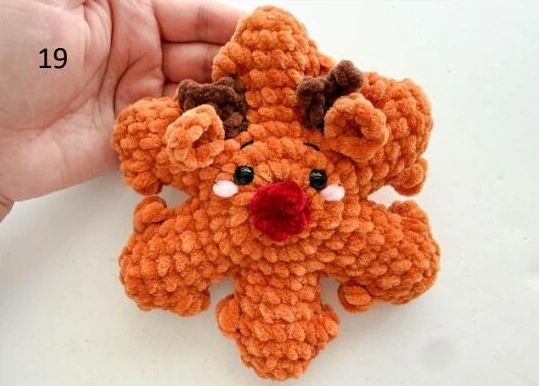
Stuff each arm lightly, close its end, and close any gap between the arms with the tail.
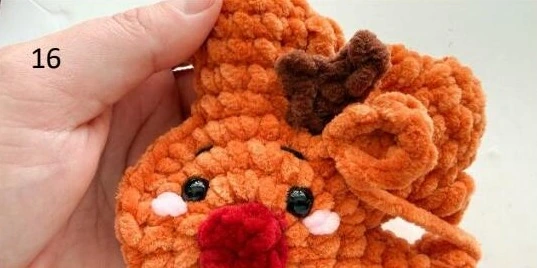
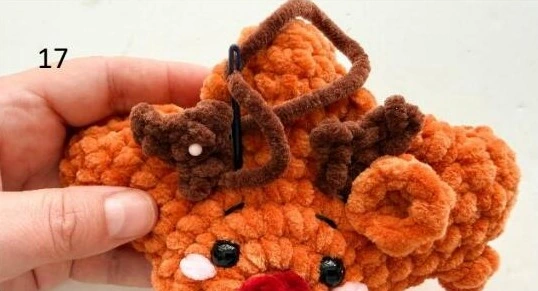
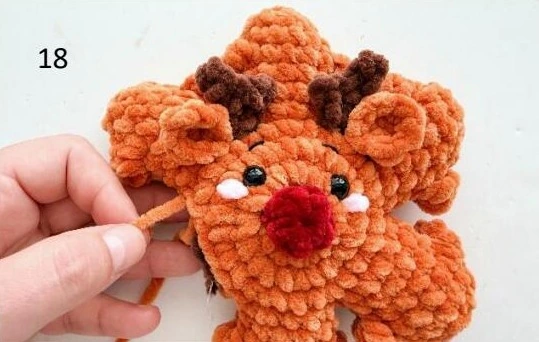
Attach the antlers and ears before finishing the fifth and sixth arms. Place the right antler between round 4 of the body and round 1 of the third and fourth arms. Bring its tails to the wrong side, secure through the back loops, and tie two knots.
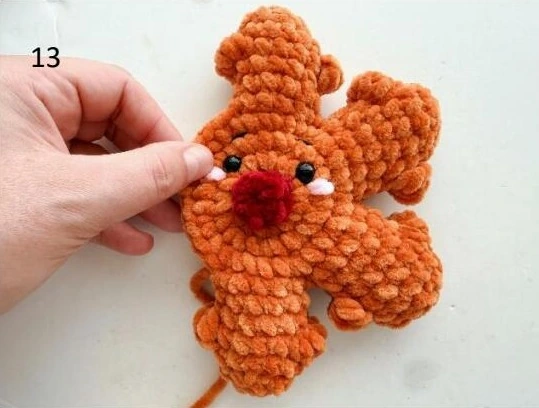
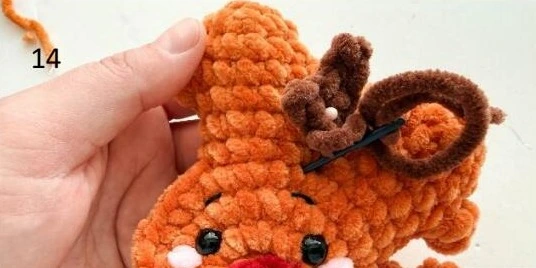
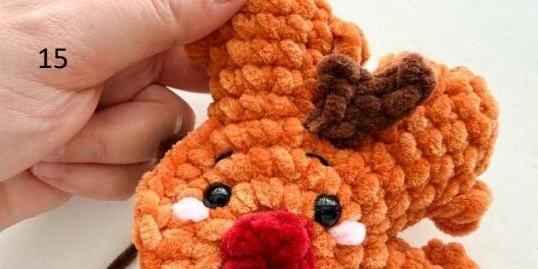
Place the right ear beside the antler in the same row and secure it in the same way. Attach the left antler and ear before crocheting the sixth arm. Add a small amount of stuffing to the center before completing the last arm.
Step 6 — Add the White Embroidery
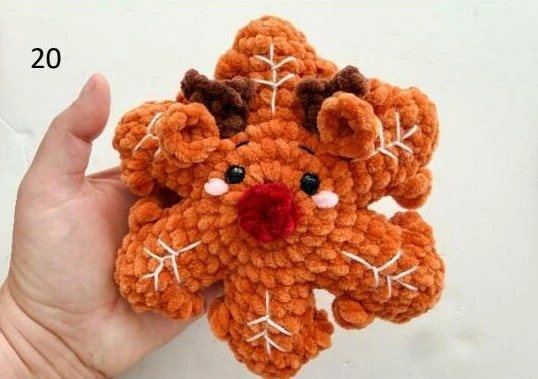
Use white embroidery yarn to stitch the branching, tree-shaped motif on every arm. Follow the same embroidery sequence shown in snowman photos 37–41.
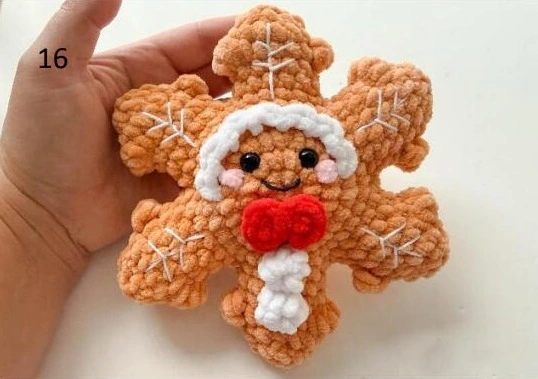
3. Gingerbread Snowflake — Step-by-Step Tutorial
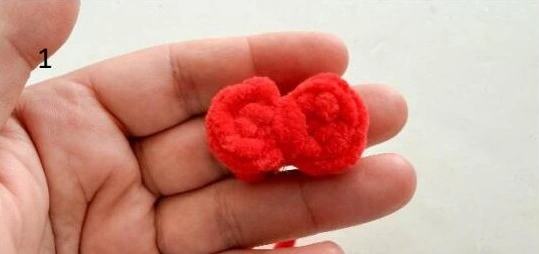
Step 1 — Make the Red Bow
Use red YarnArt Dolce (748). Leave the starting tail. Chain 2 and work into the second chain from the hook.
Rnd 1: 2 hdc, ch 1 + slst for the first petal; ch 1, 2 hdc, ch 1 + slst for the second petal.
Cut the yarn, leaving a long tail. Wrap the tail around the center of the bow a few times and secure it with two knots.
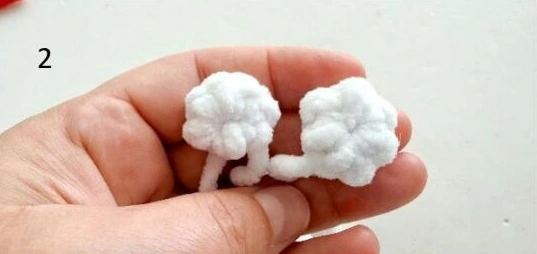
Step 2 — Make Two White Buttons
Use white YarnArt Dolce (741). Make the same buttons as the snowman, changing only the color.
Foundation: Leave the starting tail. Ch 2; work in the second chain from the hook.
Rnd 1: 5 sc. [5]
Cut the yarn, leaving an attachment tail, and fasten off. Make two buttons.
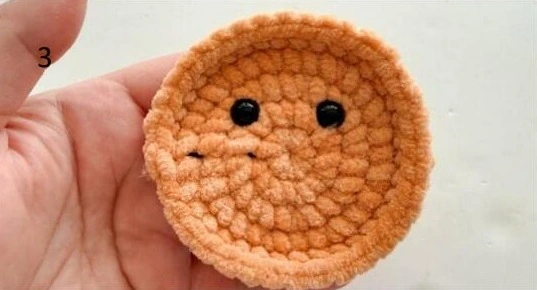
Step 3 — Crochet Two Camel-Colored Circles
Use camel YarnArt Dolce (855). Make two circles. Chain 2 and start in the second chain from the hook.
Rnd 1: 9 sc. [9]
Rnd 2: inc × 9. [18]
Rnd 3: (inc, sc) × 9. [27]
Rnd 4: (2 sc, inc) × 9. [36]
Rnd 5: sc around. [36]
Cut the yarn. Finish round 5 with an invisible stitch. Keep the marker in the second circle as an eye-placement guide.
Place the eyes between rounds 2 and 3, with 4 stitches between them. Count 3 stitches from the end of round 2 for the first eye; skip the next 4 stitches, then attach the second eye.
Step 4 — Add the White Icing Decoration
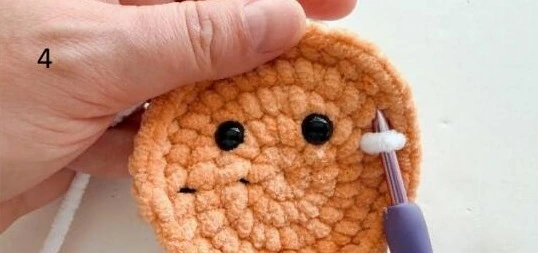
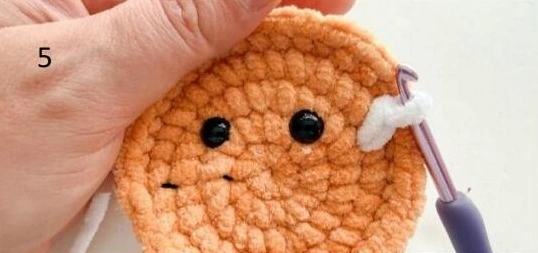
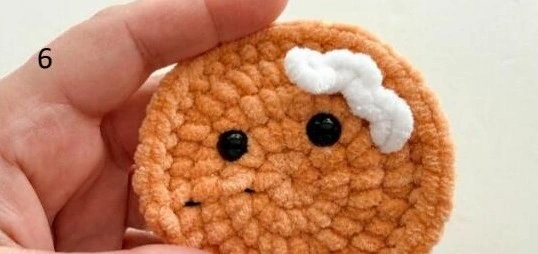
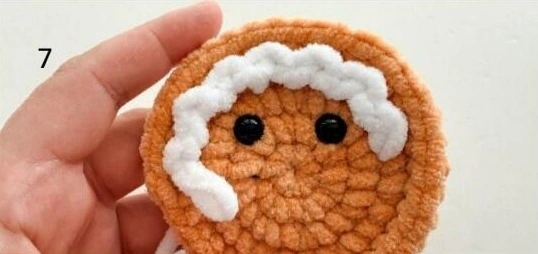
Use white yarn to make a zigzag decoration, working into every other stitch. Attach the yarn between rounds 3 and 4, two stitches below the right eye, and pull it through.
- Insert the hook one stitch above and make a slip stitch. Keep it loose.
- Insert the hook one stitch below and make another slip stitch. This completes the first zigzag.
- Repeat the same sequence six more times to complete the decoration.
- Cut the yarn and fasten off.
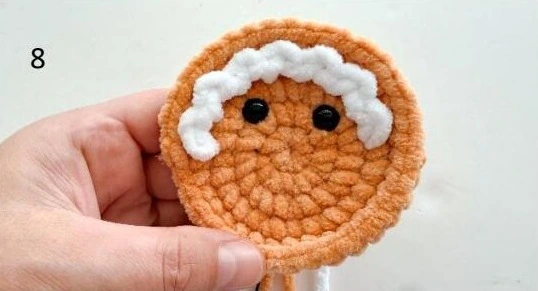
Step 5 — Embroider the Face and Attach the Bow
Use black embroidery yarn for the mouth and pink yarn for the cheeks below the eyes. Place the red bow in the center of the second round. Bring the tails to the wrong side, secure them through the back loops, and tie two knots.
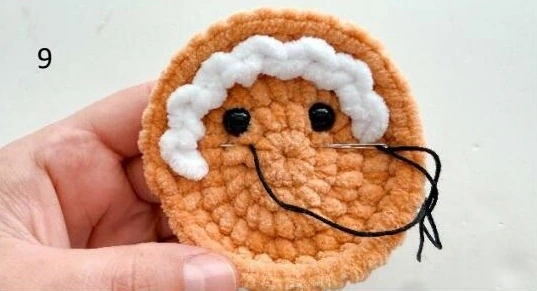
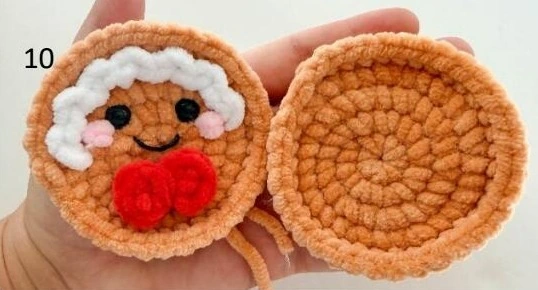
Step 6 — Crochet the Arms and Add the Buttons
Use camel YarnArt Dolce (855). Work the arms as in snowman steps 6–9, joining 6 stitches from each circle per arm.
Rnd 1: ch 1, 6 sc from each circle; turn and join as in the base tutorial. [12]
Rnd 2–3: sc around. [12] — 2 rounds
Rnd 4: (bobble st, 5 sc) × 2. [12]
Rnd 5: sc around. [12]
Rnd 6: (dec, sc) × 4. [8]
Stuff each arm lightly and close it. Before crocheting the second arm, attach both white buttons to the first arm. Bring their tails to the wrong side, secure through the back loops, and tie two knots.
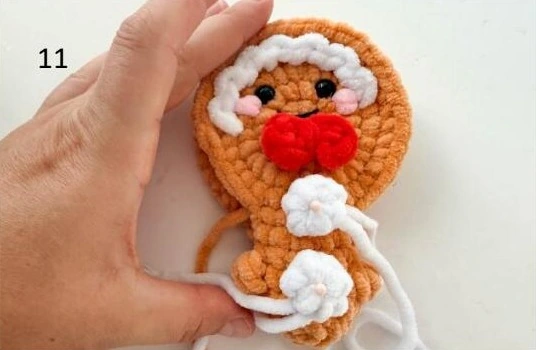
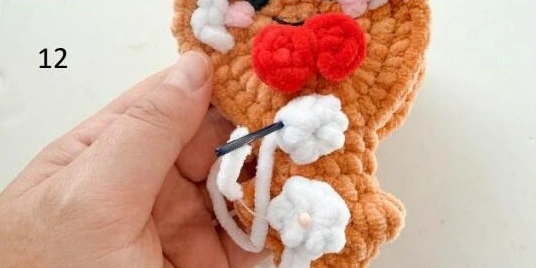
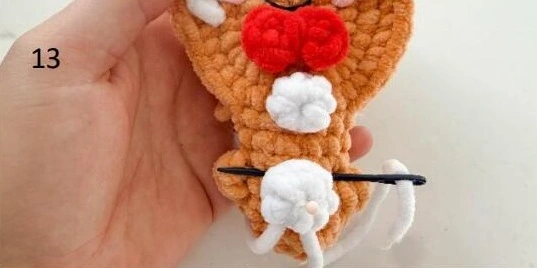
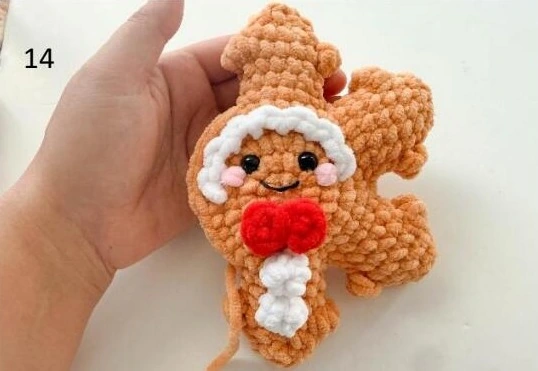
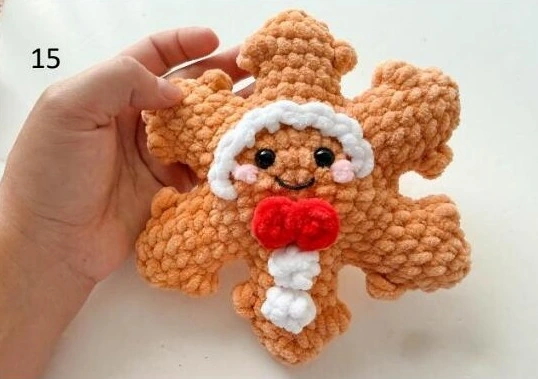
Continue until all six arms are finished. Add a small amount of stuffing to the body before the final arm, and close the small gaps between the arms.
Step 7 — Embroider Each Arm
With white embroidery yarn, add the same branching, tree-shaped motif shown in snowman photos 37–41. Repeat on all six arms.
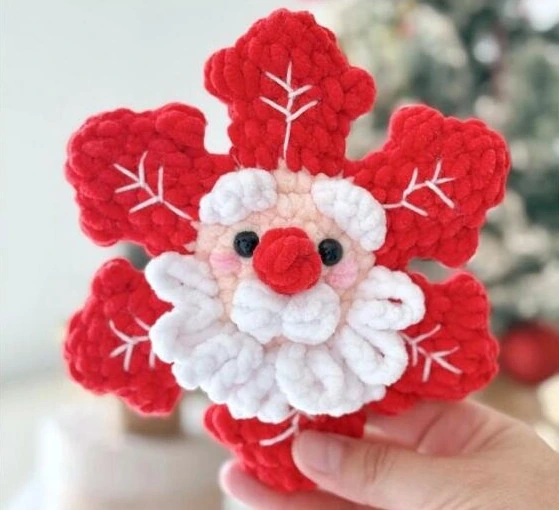
4. Santa Snowflake — Step-by-Step Tutorial
Step 1 — Make the Red Nose
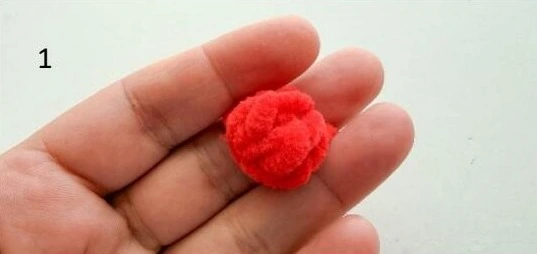
Use red YarnArt Dolce (748). Leave the starting tail. Chain 2 and work into the second chain from the hook.
Rnd 1: 1 bobble stitch. [1]
Cut the yarn, leaving a tail.
Step 2 — Make the White Mustache
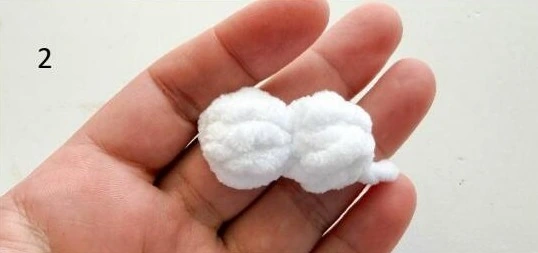
Use white YarnArt Dolce (741). Leave the starting tail.
Rnd 1: (ch 2, work a bobble stitch in the second chain from the hook) × 2. [2]
Cut the yarn, leaving a tail for attachment.
Step 3 — Make Two White Eyebrows
Use white YarnArt Dolce (741). Leave the starting tail. Chain 4.
Rnd 1: Starting in the second chain from the hook, sc in the next 3 sts, slst in the last chain.
Cut the yarn, leaving a tail. Make a second eyebrow.
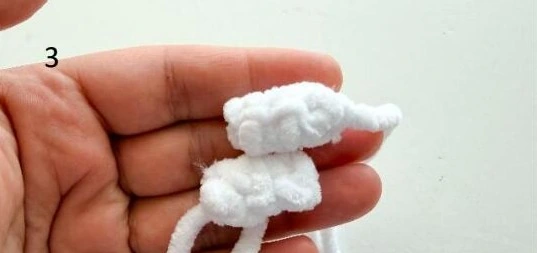
Step 4 — Crochet the Front Face and Red Back
Use shell YarnArt Dolce (779) for the front and red (748) for the back. For the front face, follow the central-circle base through rounds 1–3:
Foundation: ch 2; start in the second chain from the hook.
Rnd 1: 9 sc. [9]
Rnd 2: inc × 9. [18]
Rnd 3: (inc, sc) × 9. [27]
Rnd 4: Working BLO: (2 sc, inc) × 4. Continue through both loops: (2 sc, inc) × 5. [36]
The unused front loops will hold the beard. Cut the yarn and fasten off. Make the red back circle using the standard base:
Foundation: ch 2; start in the second chain from the hook.
Rnd 1: 9 sc. [9]
Rnd 2: inc × 9. [18]
Rnd 3: (inc, sc) × 9. [27]
Rnd 4: (2 sc, inc) × 9. [36]
Fasten off. Place the eyes on the face as in the snowman: between rounds 2 and 3, with 4 stitches between them.
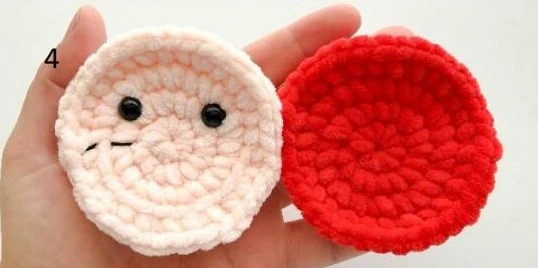
Step 5 — Crochet the White Beard
Use white YarnArt Dolce (741). Turn Santa’s face upside down. Attach the white yarn to the first front loop of round 4.
Rnd 1: (ch 7, slst in the next stitch) × 11.
Cut the yarn and fasten off.
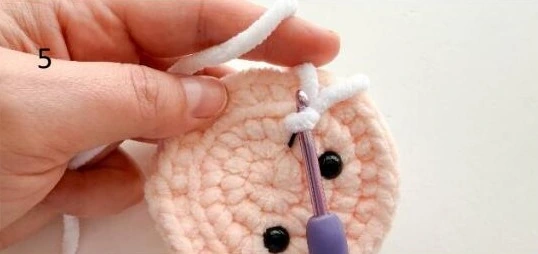
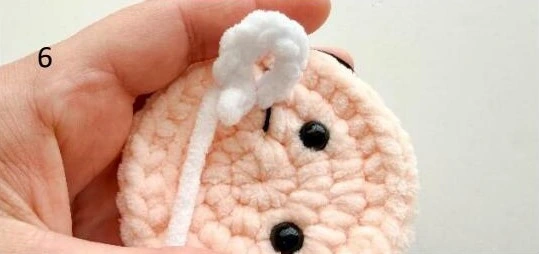
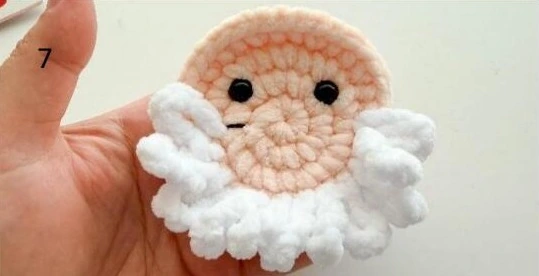
Step 6 — Attach the Nose and Mustache
Place the nose in the center of round 1. Bring its tails to the wrong side, secure through the back loops, and tie two knots. Place the mustache in the center, just below the nose. Sew it in place and secure it in the same way.
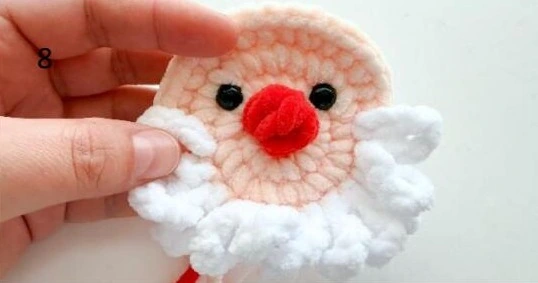
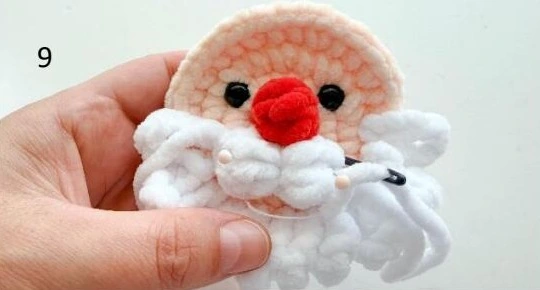
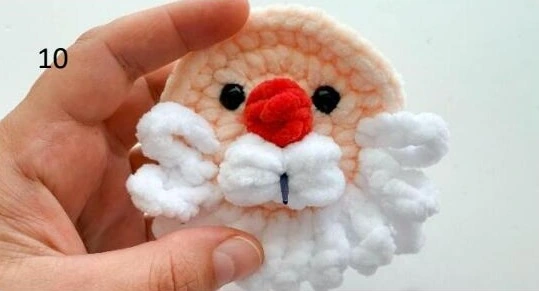
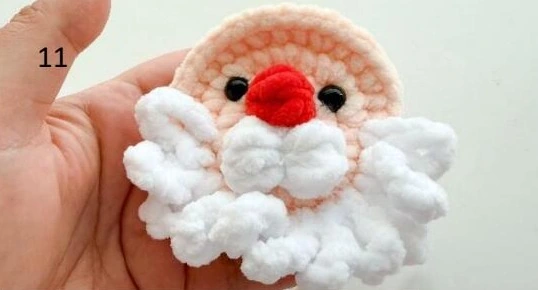
Step 7 — Attach the Eyebrows
Position and sew the eyebrows on round 4 of the face, leaving 3 stitches between them. Use the photographs to check the position before securing the yarn.
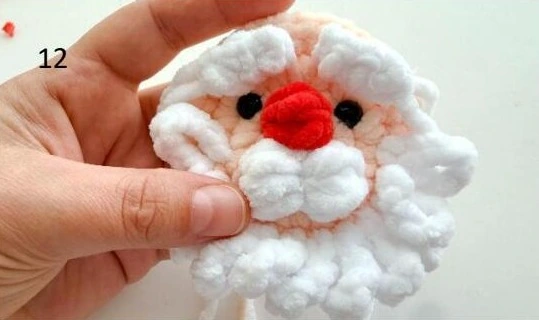
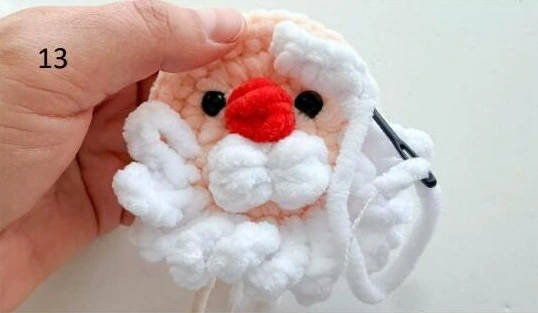
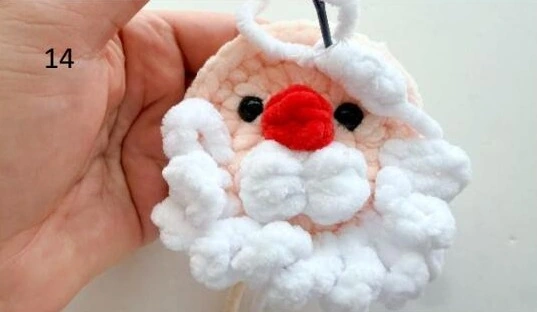
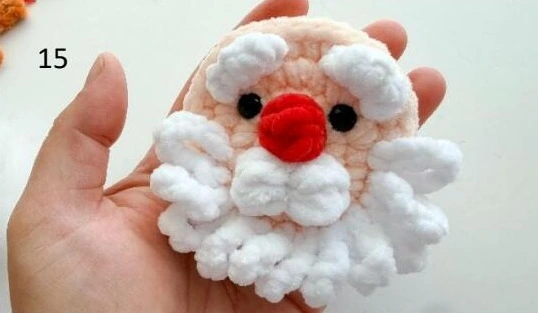
Step 8 — Crochet the Six Red Arms
Use red YarnArt Dolce (748). Work the arms as in snowman steps 6–9: mark 6 stitches for the first arm and join 6 stitches from the front circle with 6 from the back circle.
Rnd 1: ch 1, 6 sc from each circle; turn and join as in the base tutorial. [12]
Rnd 2–3: sc around. [12] — 2 rounds
Rnd 4: (bobble st, 5 sc) × 2. [12]
Rnd 5: sc around. [12]
Rnd 6: (dec, sc) × 4. [8]
Stuff each arm lightly. Close the end by weaving the tail through the front loops and pulling tight. Repeat around the circles to make all six arms, and close the small gaps between them.
Add a small amount of stuffing to the center before working the last arm. Keep the beard loops clear of the red stitches while joining the face and back.
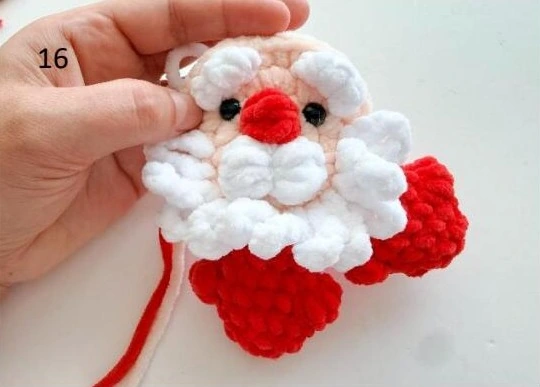
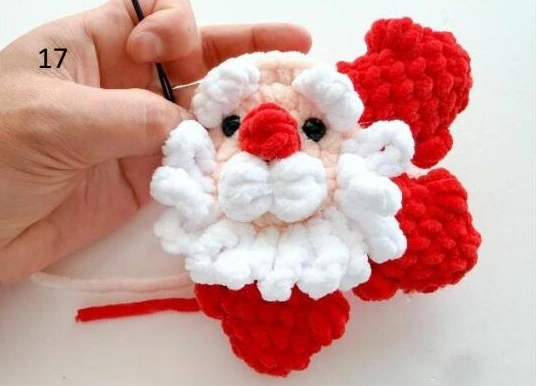
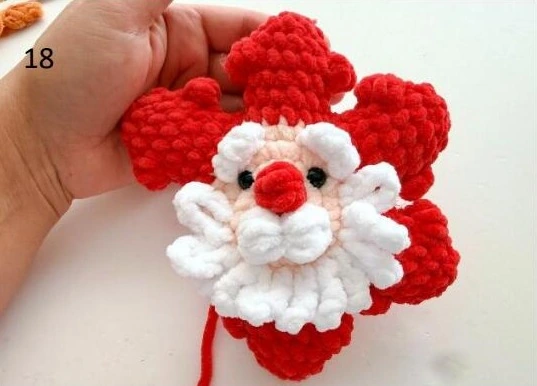
Step 9 — Add the White Snowflake Embroidery
Use white embroidery yarn for the branching motifs on the red arms. Follow the embroidery sequence in snowman photos 37–41, repeating it on each arm.
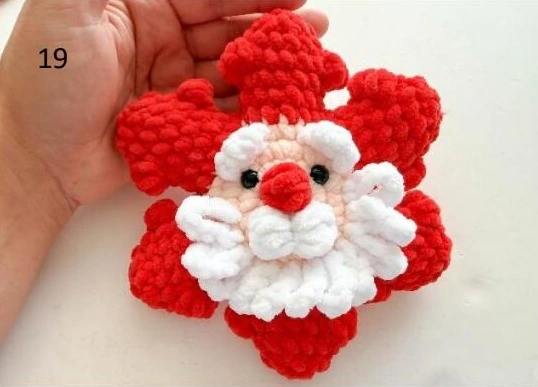
Finishing Checks
- Check that all six arms are lightly stuffed and securely closed.
- Close any small gaps between the arms.
- Secure and hide the yarn tails on the inside or back.
- Check that the eyes, noses, ears, antlers, bow, eyebrows, and buttons are firmly attached.
- Compare the embroidery with the finished character photographs.
Your four-character Christmas Snowflakes Crochet Pattern collection is complete. Keep the original designer credit with the project.
Frequently Asked Questions
Which instructions should I follow first?
Start with the snowman. It explains the shared four-round central base, the joining method for the two circles, the six-arm sequence, and the branching embroidery.
Are all four centers identical?
No. The gingerbread center has an extra fifth round. Santa’s front circle uses BLO for part of round 4 so the beard can be attached. Follow the character-specific section.
When should I stuff the body?
Add a small amount of stuffing to the center before crocheting the last arm. Stuff each arm lightly before closing it.
Can I use other colors?
Yes. The original pattern allows color changes. Keep contrast between the base, face details, and embroidery.
What size will the snowflakes be?
The original gives a height of about 16–17 cm with its listed materials. Yarn, hook size, and tension can change the result.
Do the PDF buttons download a free pattern?
No free-download claim is made here. The buttons should link to the store’s PDF product listing, where availability and purchase details are shown.




