

MY CROCHET UNIVERSE · CHILDREN’S CROCHET
Crochet Fox Hoodie Pattern: A Woodland Jacket in 6 Sizes
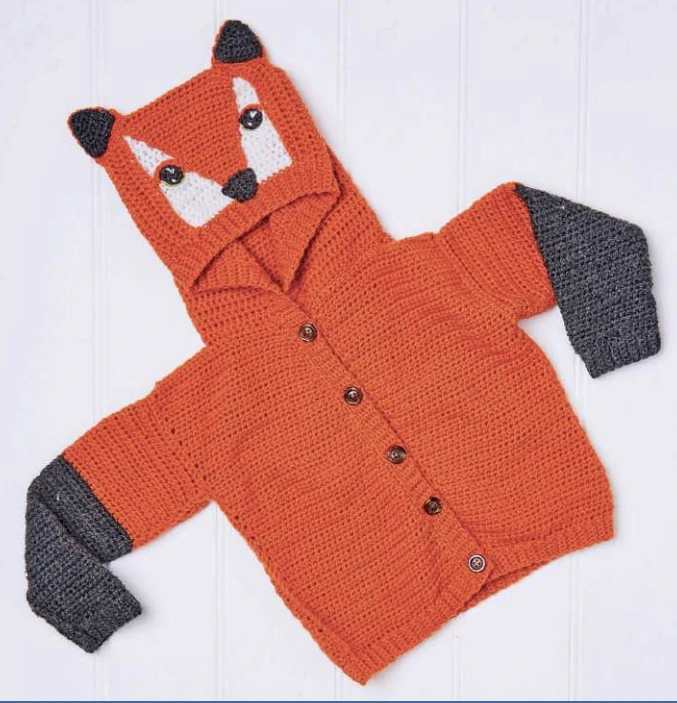
This crochet fox hoodie pattern combines a practical little jacket with a wonderfully playful hood. The orange body, charcoal cuffs, pointed ears, and white face patches create the fox look without covering the garment in extra decoration. There are six sizes, from 0–6 months to 4–5 years.
The jacket is worked in separate flat pieces and joined afterward. You’ll make a back, two fronts, two sleeves, and a shaped hood, then add ribbed edging and the small face details. The instructions below keep the original UK stitch terminology and put the size information into easy-to-check tables.
Before you start: UK terms, not US terms
In this crochet fox hoodie pattern, dc means UK double crochet = US single crochet, and htr means UK half treble = US half double crochet. Do not work US double crochet when you see dc. That substitution would change the fabric, gauge, and fit.
Crochet Fox Hoodie Pattern Sizes, Yarn, and Gauge
Choose the size using the child’s chest measurement rather than age alone. The finished chest includes wearing ease, while the sleeve and body lengths help you compare the jacket with a garment that already fits. All measurements below are in centimeters.
| Size | To fit chest | Finished chest | Length to hem | Sleeve to cuff |
|---|---|---|---|---|
| 0–6 months | 43 | 48.5 | 26.5 | 14.5 |
| 6–12 months | 45.5 | 53 | 28.5 | 18 |
| 12–18 months | 48 | 59.9* | 32 | 23.5 |
| 18–24 months | 53 | 62.5 | 34 | 29 |
| 2–3 years | 56 | 66.5 | 35.5 | 30.5 |
| 4–5 years | 61 | 69 | 38.5 | 31.5 |
*The supplied sizing table prints 59.9 cm for the 12–18-month finished chest. That figure is retained here rather than silently changed. Check the full original publication if you need to confirm a possible correction.
Yarn and tools
- King Cole Merino Blend DK: Cinnamon 3298 for the main color (MC), Graphite 702 for contrast color 1 (CC1), and White 001 for contrast color 2 (CC2).
- MC: 4 (5, 5, 6, 7, 9) balls. CC1 and CC2: 1 ball each for every size.
- The yarn specification in the supplied pages is 104 m per 50 g, with 96% wool and 4% viscose. Check your own yarn label for current fiber content and care instructions.
- 3.5 mm hook for cuffs, ribbing, and small features; 4 mm hook for the main fabric.
- Locking stitch markers; 2 mm buttons, quantity as desired, as printed in the source; an oddment of light green DK yarn for the eyes.
- Practical finishing tools: a yarn needle, scissors, measuring tape, and pins.
Button-size check
The source lists “2 mm buttons,” which is unusually small for this garment. It may be a printing error, but the intended size cannot be confirmed from these screenshots. Test the actual buttons against the two-chain buttonholes before sewing them on; do not assume a corrected measurement.
Gauge: 17 stitches × 18 rows = 10 cm
Measure over the alternating stitch pattern using the larger hook. Make a generous swatch, wash and dry it according to the yarn label, and measure the central area. Adjust your hook size if needed. Matching stitch gauge alone is not enough: the body and hood lengths also depend on row gauge.
UK Crochet Terms and How the Hoodie Is Built
| Term | Meaning |
|---|---|
| ch | Chain |
| dc | UK double crochet / US single crochet |
| htr | UK half treble / US half double crochet |
| htr2tog | Work two half trebles together / US hdc2tog |
| sl st | Slip stitch |
| BLO | Back loop only |
| RS / WS | Right side / wrong side |
| MC / CC1 / CC2 | Main color / contrast color 1 / contrast color 2 |
| PM / rem / rep / beg | Place marker / remaining / repeat / beginning |
| st(s) / ch-sp / tog | Stitch(es) / chain space / together |
Read all six-value sequences in this order: 0–6m (6–12m, 12–18m, 18–24m, 2–3y, 4–5y). Circle your size before beginning. The beginning ch-1 does not count as a stitch unless specifically stated otherwise, and a marker on the right side of every piece makes assembly easier.
The hoodie is worked bottom up. The sleeves run from cuff toward shoulder, while the hood starts as a separate flat panel with a narrower section in contrast white. The hem, cuff ribbing, and buttonbands are added after the main pieces. Fox features are sewn or worked onto the hood near the end.
Crochet Fox Hoodie Pattern: Back and Front Panels
Back — make one
Foundation: With MC and the larger hook, ch 42 (46, 52, 54, 57, 60).
Row 1 (WS): Starting in the second chain from the hook, dc to the end. Turn. 41 (45, 51, 53, 56, 59) sts.
Row 2: Ch 1, htr to the end. Turn.
Row 3: Ch 1, dc to the end. Turn.
Lower body: Repeat Rows 2–3 until there are 25 (29, 33, 35, 37, 39) total rows, ending with a repeat of Row 3. Place markers at the beginning and end of this last row for sleeve placement.
Upper body: Continue alternating Rows 2–3 until there are 43 (47, 53, 57, 61, 65) total rows, ending with a repeat of Row 3. Fasten off.
Front panels — make two
Foundation: With MC and the larger hook, ch 20 (21, 24, 26, 27, 28).
Row 1 (WS): Starting in the second chain from the hook, dc to the end. Turn. 19 (20, 23, 25, 26, 27) sts.
Continue: Work the same Row 2–3 repeat as for the back. Place sleeve markers at total Row 25 (29, 33, 35, 37, 39), then continue to total Row 43 (47, 53, 57, 61, 65). End with a dc row and fasten off.
Keep both fronts identical. If one panel looks slightly longer, compare the row counts before blocking it into shape. The small gap between the fronts is finished later with the buttonbands, so don’t add extra body stitches to close it now.
Sleeves and Charcoal Ribbed Cuffs
Sleeves — make two
Foundation: With CC1 and the larger hook, ch 26 (28, 28, 29, 29, 31).
Row 1 (WS): Dc from the second chain to the end. Turn. 25 (27, 27, 28, 28, 30) sts.
Row 2: Ch 1, htr to the end. Turn.
Row 3: Ch 1, dc 1, work 2 dc in the next stitch, then dc to the end. Turn. 26 (28, 28, 29, 29, 31) sts.
Row 4: Ch 1, htr to the end. Turn.
Row 5: Ch 1, dc across to the final 2 stitches, work 2 dc in the next stitch, and dc in the last stitch. Turn. 27 (29, 29, 30, 30, 32) sts.
Contrast section: Repeat Rows 2–5 until there are 17 (17, 21, 27, 33, 39) total rows. End with a repeat of Row 5 (5, 5, 3, 5, 3). Fasten off CC1, leaving a long seaming tail. 33 (35, 37, 41, 44, 49) sts.
Orange section: Join MC with a sl st in the first stitch and continue without shaping. Row 1: ch 1, htr to the end; turn. Row 2: ch 1, dc to the end; turn. Repeat these two rows until the sleeve has 22 (28, 38, 48, 50, 52) total rows from its beginning. Fasten off.
Cuffs
Join: With the smaller hook and RS facing, join CC1 with a sl st into the first foundation chain of the sleeve.
Row 1 (RS): Ch 6. Starting in the second chain from the hook, dc 5. Sl st into the next 2 stitches on the underside of the sleeve foundation chain. Turn. 5 dc, 2 sl sts.
Row 2 (WS): Skip the 2 slip stitches and dc 5 in BLO. Turn. 5 sts.
Row 3: Ch 1, dc 5 in BLO, then sl st into the next 2 stitches on the underside of the foundation chain. Turn. 5 dc, 2 sl sts.
Repeat: Repeat Rows 2–3 across the cuff edge. Secure the yarn when complete.
A ribbing rhythm that helps
The two slip stitches anchor each rib to the garment; they are not worked as part of the five-stitch rib on the return row. Keeping that distinction clear prevents the cuff from gradually widening.
Shaped Hood and Front Edging
Main hood panel
Foundation: With MC and the larger hook, ch 57 (59, 63, 64, 64, 66).
Row 1 (WS): Dc from the second chain to the end. Turn. 56 (58, 62, 63, 63, 65) sts.
Row 2: Ch 1, htr to the end. Turn.
Row 3: Ch 1, dc to the end. Turn.
Repeat: Repeat Rows 2–3 until there are 31 (33, 35, 35, 37, 37) total rows, ending with Row 3. Fasten off.
Narrow white section
Position: With RS facing, skip the first 19 (19, 21, 21, 21, 22) stitches on the last row. Join CC2 with a sl st in the next stitch.
Row 1: Ch 1. Starting in the same stitch as the join, htr across the next 18 (20, 20, 21, 21, 21) stitches. Leave the remaining 19 (19, 21, 21, 21, 22) stitches unworked. Turn. 18 (20, 20, 21, 21, 21) sts.
Row 2: Ch 1, dc to the end. Turn.
Row 3: Ch 1, htr to the end. Turn.
Repeat: Repeat Rows 2–3 until this narrower section has 20 (20, 22, 22, 22, 24) total rows, ending with Row 2. Fasten off and block to shape if needed.
Shape the hood: Seam the row ends of the narrow section to the adjacent unworked stitches on the last row of the wider section. Seam both sides with WS facing you.
Hood edging
Join: With the smaller hook and WS facing, join MC with a sl st at the bottom front of the hood.
Row 1 (WS): Work dc evenly along the front opening: 32 (34, 36, 38, 38, 40) dc up the first side, 18 (20, 20, 20, 20, 22) dc across the top, and 32 (34, 36, 38, 38, 40) dc down the second side. Turn. 82 (88, 92, 96, 96, 102) sts.
Row 2 (RS): Ch 6. Dc 5 from the second chain, then sl st into the next 2 stitches of Row 1. Turn. 5 dc, 2 sl sts.
Row 3: Skip the 2 slip stitches, dc 5 in BLO, and turn.
Row 4: Ch 1, dc 5 in BLO, then sl st into the next 2 stitches of Row 1. Turn.
Repeat: Repeat Rows 3–4 around the front opening. Fasten off.
Crochet Fox Hoodie Pattern
Choose Your Size Before the First Chain
Keep the six-size chart close while making the back, fronts, sleeves, and hood. A quick measurement check now is easier than unpicking a finished seam.
Assembly, Hem, and Buttonbands
Join shoulders and sleeves
Place the two fronts against the back with wrong sides together. With the larger hook, slip-stitch the shoulder seams through one loop from each piece, working from the outside edge inward. Make each shoulder seam 4 (5.5, 6.5, 6.5, 7, 7.5) cm long, or 7 (9, 11, 11, 12, 13) stitches. Leave the remaining stitches open for the neckline.
Before attaching the hood, check its placement and the sleeve length. If you changed the sizing, ease any remaining width as needed rather than forcing the pieces together. Use the placement markers to match the sleeve ends to the marked row ends on the fronts and back, then sew the sleeves into position.
Finish the side and sleeve seams using a dc seam through one loop of each piece. Start at the bottom of the hoodie, work up to the underarm, then continue down the sleeve. Change yarn color when you reach the contrast section. Keep the seam relaxed so it does not pull the sleeve shorter.
Hem ribbing
Join: With RS facing and the smaller hook, join MC with a sl st at a front hem corner. Work at right angles to the hem into the foundation chains.
Row 1 (RS): Ch 6, dc 5 from the second chain, then sl st into the next 2 stitches on the underside of the foundation chain. Turn.
Row 2: Skip the 2 slip stitches, dc 5 in BLO, and turn.
Row 3: Ch 1, dc 5 in BLO, then sl st into the next 2 foundation-chain stitches. Turn.
Repeat: Repeat Rows 2–3 along the hem. Fasten off.
First buttonband — button side
Join: With WS facing and the smaller hook, join MC with a sl st at the top or bottom of the front panel that will carry the buttons.
Row 1: Work 46 (50, 54, 60, 62, 66) dc evenly across the row ends. Make sure the total is even. Turn.
Row 2 (RS): Ch 6, dc 5 from the second chain, sl st into the next 2 stitches of Row 1, and turn.
Row 3 (WS): Skip the 2 slip stitches and dc 5 in BLO. Turn.
Row 4: Ch 1, dc 5 in BLO, sl st into the next 2 stitches of Row 1, and turn.
Repeat: Repeat Rows 3–4 to the opposite end of the front panel. Fasten off. Place markers where the buttons will be attached; the first buttonhole on the other band is made in Row 5 of its edging.
Second buttonband — buttonhole side
Foundation row (WS): Join MC with the smaller hook at the bottom or top of the second front. Repeat Row 1 of the first side, using the same stitch total. Mark the corresponding buttonhole positions on this row.
Row 2 (RS): Work as Row 2 of the first side.
Row 3 (WS): Skip the 2 slip stitches, dc 5 in BLO, and turn. The source says “sl sts” here; these are the two anchoring slip stitches, not an extra instruction to create new stitches.
Row 4: Ch 1, dc 5 in BLO, sl st into the next 2 stitches of Row 1, and turn.
Buttonhole Row A (WS): Skip the 2 slip stitches, dc 1 in BLO, ch 2, skip 2 stitches, and dc 2 in BLO. Turn. 2 dc and 1 ch-2 space, plus the first dc.
Buttonhole Row B (RS): Ch 1, dc 2 in BLO, dc 2 into the ch-2 space, dc 1 in BLO, then sl st into the next 2 stitches of Row 1. Turn. 5 dc, 2 sl sts.
Continue: Repeat Rows 3–4 to the end, replacing Row 3 with Buttonhole Row A and Row 4 with Buttonhole Row B whenever you reach a marked position. Fasten off. Sew buttons to the first band, aligned with the holes.
Source stitch-count clarification
Buttonhole Row A is printed with a count of “2 dc, 1 2ch-sp,” although its written actions include 1 dc before the space and 2 dc after it. Follow the written sequence above; Row B returns the rib to five dc. Test one buttonhole before completing the band.
Fox Features: Nose, Ears, Muzzle, and Eyes
Nose
Start: With CC1 and the smaller hook, ch 4.
Row 1 (RS): From the second chain, dc 2, then work 2 dc in the last chain. 4 sts.
Row 2 (WS): Ch 1, dc 1, work 2 dc in the next stitch, then dc to the end. 5 sts.
Rows 3–4: Repeat Row 2, reaching 7 sts. Fasten off. Turn the piece between rows.
Outer ears — make two
Start: With MC and the smaller hook, ch 3.
Row 1 (RS): Dc 1 from the second chain, then work 2 dc in the last chain. 3 sts.
Row 2 (WS): Ch 1, dc 1, work 2 dc in the next stitch, and dc to the end. 4 sts.
Rows 3–9: Repeat Row 2, reaching 11 sts. Turn between rows. Fasten off.
Inner ears — make two
Start: With CC1 and the smaller hook, ch 3.
Rows 1–2: Work as Rows 1–2 of an outer ear. 4 sts.
Rows 3–7: Repeat Row 2 of an outer ear, reaching 9 sts. Fasten off.
Assemble: Lay an outer ear RS up. Place an inner ear on it, also RS up, with the tips aligned. Sew the two layers together around the edge. Repeat for the second ear.
Muzzle
Join: With MC and the larger hook, join to the first MC stitch above the white CC2 section of the hood.
Row 1 (WS): Ch 1. Work around the posts of the MC stitches across the color change, making 18 (20, 20, 21, 21, 21) dc. Turn.
Row 2 (RS): Ch 1, htr2tog, dc to the final 2 stitches, then htr2tog. 16 (18, 18, 19, 19, 19) sts. Turn.
Row 3: Ch 1, dc to the end. Turn.
Rows 4–17 (19, 19, 19, 19, 19): Repeat the last two rows. Finish with 2 (2, 2, 3, 3, 3) sts and fasten off.
Eyes — make two
Round 1: With CC1 and the smaller hook, work 6 dc into a magic ring. Join with a sl st to the beginning dc. 6 sts.
Round 2: Ch 1, counting it as the first dc for this round only. Work 1 dc in the first stitch, then 2 dc in each remaining stitch. Join with a sl st to the beginning ch-1. 12 sts. Fasten off.
Round 3 — colored edge: Join light green DK yarn with a sl st to any stitch. Sl st into the next 4 stitches; leave the rest unworked and fasten off. The join plus these stitches makes 5 green stitches.
White edge: Join CC2 with a sl st in the stitch before the green section, slip-stitch across the green stitches, then sl st into the next stitch. Fasten off. 7 CC2 stitches.
Orange edge: Starting in the next stitch, pull through a loop of MC. Ch 1. Starting in the next stitch, dc 4, keeping these stitches loose. This gives 5 MC stitches including the chain. Fasten off.
Highlights: Tidy the color joins with the yarn tails. Using CC2 and the photograph as a placement guide, embroider highlights onto the eyes.
Finishing the Crochet Fox Hoodie Pattern
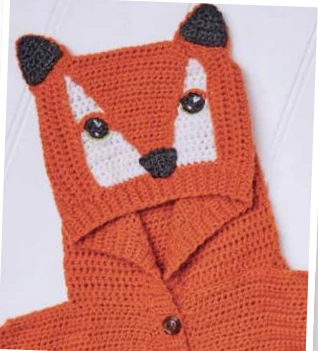
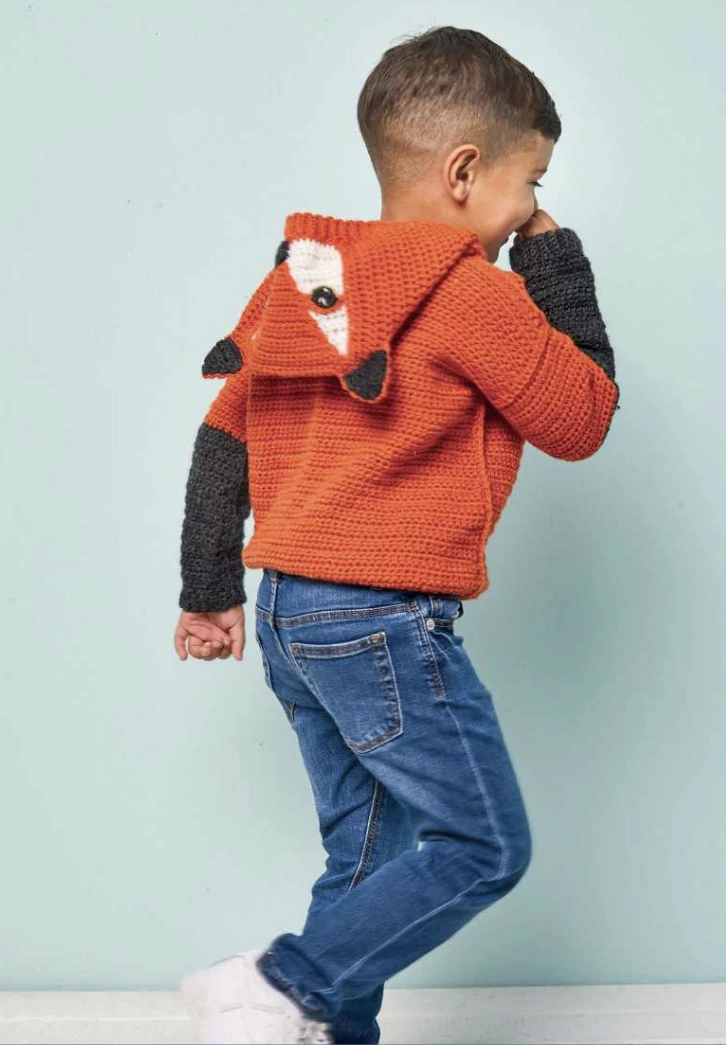
Fold the muzzle downward and pin it in position. When its placement looks right, sew it securely. Position the eyes, nose, and ears using the photos as a guide, check that both sides look balanced, and sew each piece to the hood. Pinning first is much easier than undoing a stitched-on eye.
With right sides together, pin the hood’s foundation row around the neckline. The front edges of the hood should sit flush with the tops of the buttonbands. Sew the hood to the neckline and weave in every remaining end. Check the cuffs, underarms, and hood seams for tails that may have escaped during assembly.
Small checks that make a better jacket
If the ribbing flares, check that every return row still has exactly five dc and that the two anchoring slip stitches are skipped. If a buttonband pulls upward, your joining slip stitches may be too tight. Relax those stitches rather than stretching the whole front into place.
For yarn substitutions, compare meterage, thickness, fiber behavior, and the washed gauge—not just the DK label. A cotton version can hang differently from the wool-blend sample. Make your swatch in the alternating dc/htr pattern, then check whether the fabric feels comfortable and whether it springs back after washing.
Care and child-safety check
Use the care instructions on your actual yarn label. Sew buttons and decorative pieces firmly, check attachments regularly, and do not add loose cords or drawstrings around the hood. Embroidered details can replace separate eye pieces if you prefer fewer attachments.
Frequently Asked Questions
Is this crochet fox hoodie pattern suitable for beginners?
It is an intermediate project. The main body uses straightforward rows, but the shaped sleeves, hood seams, attached BLO ribbing, buttonholes, and colorwork eye details require careful reading. A confident beginner can practice the cuff ribbing and one buttonhole on a small swatch first.
Does the pattern use US or UK crochet terms?
It uses UK terms throughout. UK dc is US single crochet, and UK htr is US half double crochet. Keep the conversion table nearby if you usually follow US patterns; do not mix systems within the garment.
Which size should I make?
Measure the child’s chest and compare it with both the “to fit” and finished-chest columns. Use the age label as a guide, not a guarantee. Check body and sleeve length against a well-fitting jacket before you commit to a size.
Can I make it in different colors?
Yes. Keep the main, dark-contrast, and light-contrast roles distinct if you want the face to read clearly as a fox. You can also use softer earth tones, but make a small color sample before working the hood and eyes.
How many buttons do I need?
The source leaves the quantity to your preference. Mark the first band, transfer those positions to the buttonhole side, and test the spacing. Confirm the button diameter against the finished holes because the printed 2 mm measurement is uncertain.
Ready for a Little Woodland Adventure?
This crochet fox hoodie pattern rewards a little planning: choose the size, check the washed gauge, and keep the UK terms consistent from the first chain to the final seam. The separate-piece construction lets you check the fit as you go, and the fox details turn an everyday jacket into something full of character.
Crochet Fox Hoodie Pattern
Save the Fox-Face Details for Finishing Day
Return to the nose, ear, muzzle, and eye instructions when the garment pieces are ready. Keep the photos nearby while pinning everything into place.




