

ABIGAIL CARDIGAN • SOURCE-BASED GUIDE • US TERMS
Bobble Stitch Crochet Cardigan: 10-Step Guide
A bobble stitch crochet cardigan brings together a relaxed longline shape, textured sleeves, and useful patch pockets. This toffee-colored Abigail design pairs a plain body with raised bobbles, so the finished fabric has contrast without needing several yarn colors.
Work through the sizing, separate panels, sleeve shaping, pockets, and finishing below. Read the editorial corrections before starting: the supplied pages contain a few stitch-count inconsistencies, and this explanatory adaptation has not been independently crocheted or fit-tested.
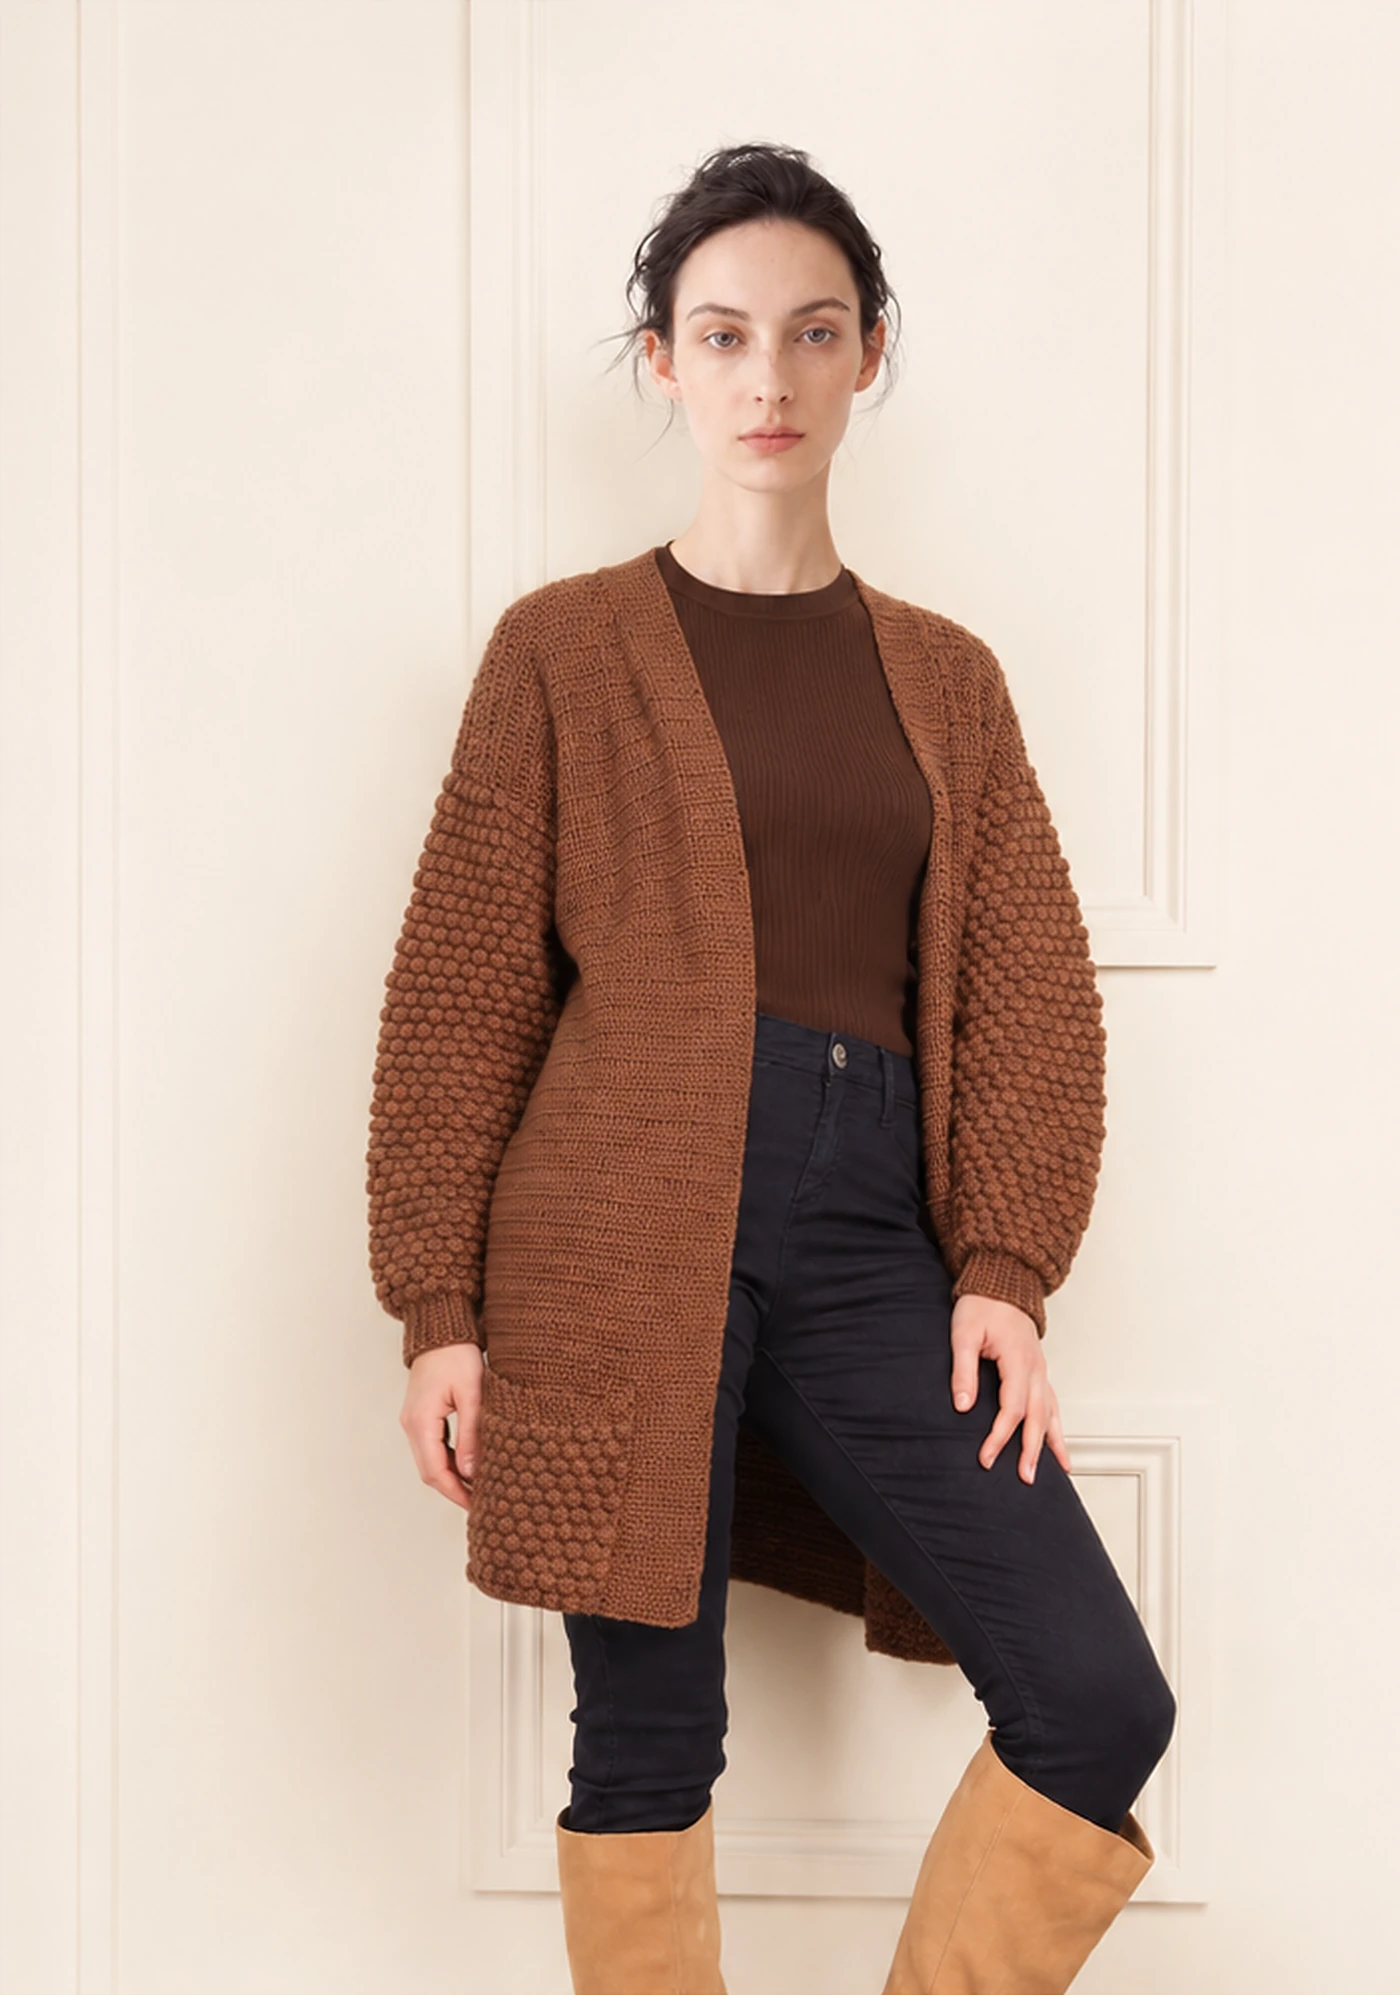
Before Starting Your Bobble Stitch Crochet Cardigan
The supplied three-page Abigail Cardigan pattern credits designer Emma, whose biography lists emmaknitted.co.uk and @emmaknitted. This is a source-based instructional adaptation, not an original My Crochet Universe design. Confirm the necessary permissions before republishing this source-based adaptation; the store links below simply open the My Crochet Universe store and do not offer this design as a PDF.
Treat this bobble stitch crochet cardigan as an intermediate project. You’ll need consistent gauge, shaping, back-loop ribbing, and seaming. Source measurements and stitch counts are retained except for the clearly flagged arithmetic proposals below. The three original product photographs are extracted from the supplied references without the surrounding page text. The separate measurement schematic is a clean source-based redraw; no AI-generated photographs are used.
Use the written counts for your bobble stitch crochet cardigan, and stop if your swatch or shaping disagrees. The assembly sequence is an editorial explanation inferred from the flat-piece construction because the supplied extract does not spell out the main seams.
Step 1 — Bobble Stitch Crochet Cardigan Materials
- Yarn: Rowan Alpaca Soft DK, 70% wool / 30% alpaca, 50 g / 125 m / 137 yd, shade Toffee 203. Ball counts for all sizes appear below.
- Hook: 4 mm to start; change size if needed to match washed and dried gauge.
- Extras: tapestry needle, scissors, removable stitch markers, tape measure, and suitable blocking pins or mats.
- Substitution: choose a DK yarn with comparable meterage and drape. Swatch both fabrics; a heavy cotton or springy acrylic may change the fit and weight.
For this bobble stitch crochet cardigan, check dye lots before buying a large quantity. Bobbles use substantial yarn, and a nearly finished second sleeve is an awkward place to discover a color change. The listed quantities are the source estimates, not newly tested consumption figures.
Step 2 — Choose Your Bobble Stitch Crochet Cardigan Size
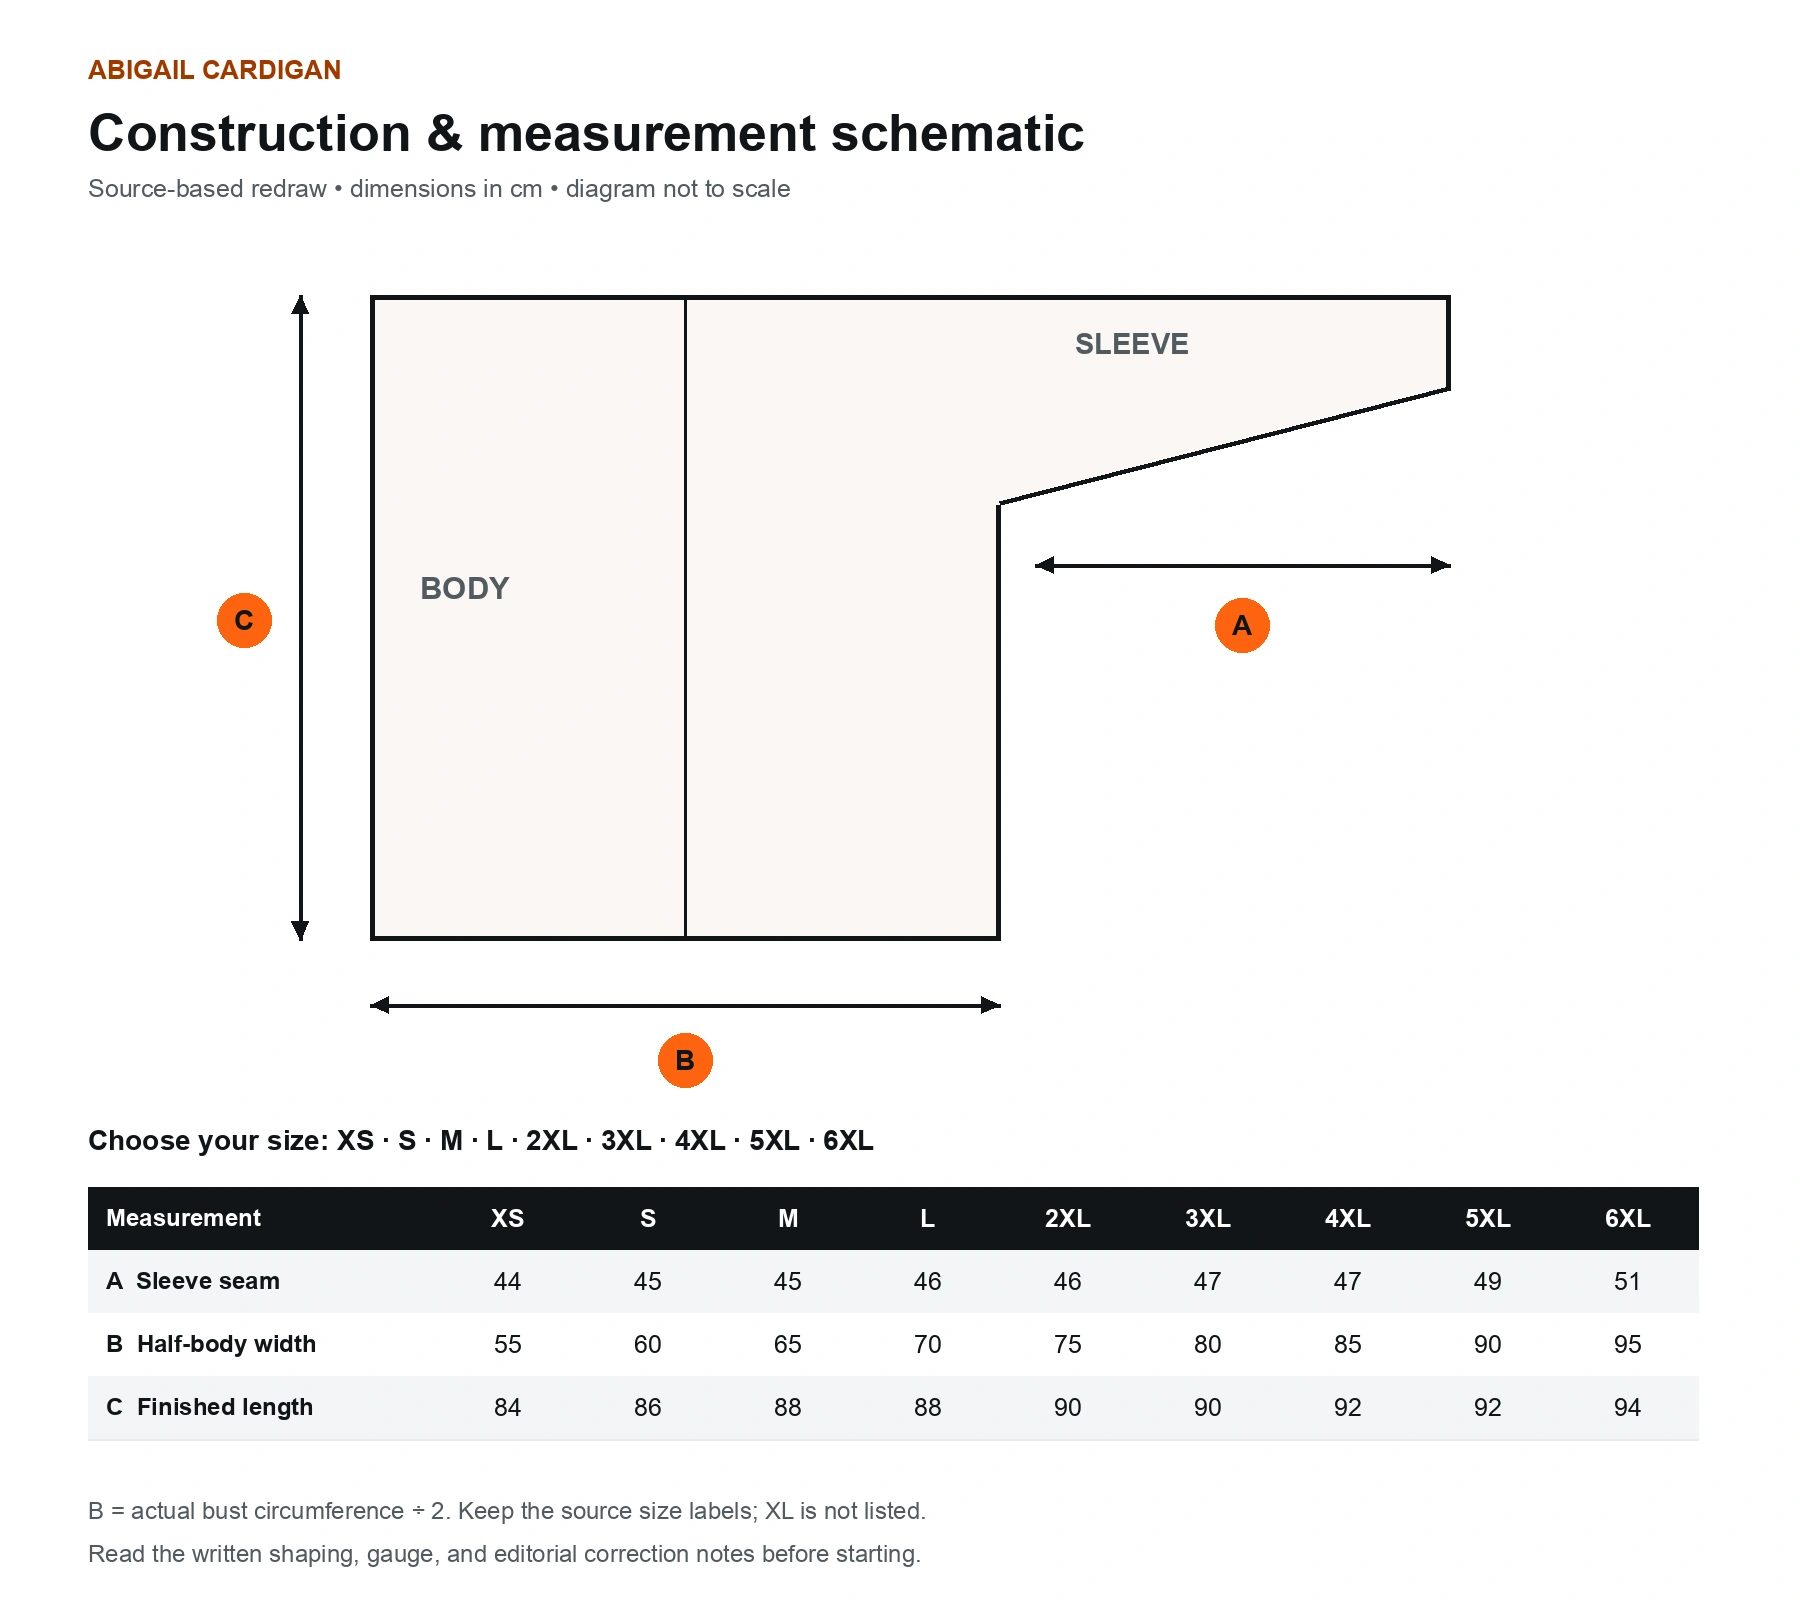
Follow this exact size order throughout: XS (S, M, L, 2XL, 3XL, 4XL, 5XL, 6XL). The supplied chart skips the label XL; this guide preserves that labeling rather than silently renaming sizes. Mark one column of numbers before starting.
Sleeve measurement note: the source sleeve text and schematic give 45 cm for size M, while the final size chart prints 46 cm. This guide and the redrawn schematic follow the written 45 cm instruction; confirm the intended length with the designer before making size M.
| Size | To fit bust, cm | Actual bust, cm | Length, cm | Sleeve seam, cm | 50 g balls |
|---|---|---|---|---|---|
| XS | 71–76 | 110 | 84 | 44 | 18 |
| S | 81–86 | 120 | 86 | 45 | 19 |
| M | 91–97 | 130 | 88 | 45 | 19 |
| L | 102–107 | 140 | 88 | 46 | 19 |
| 2XL | 112–117 | 150 | 90 | 46 | 20 |
| 3XL | 122–127 | 160 | 90 | 47 | 21 |
| 4XL | 132–137 | 170 | 92 | 47 | 21 |
| 5XL | 142–147 | 180 | 92 | 49 | 21 |
| 6XL | 152–157 | 190 | 94 | 51 | 22 |
This bobble stitch crochet cardigan has generous positive ease: the actual bust is about 33–39 cm larger than the suggested body bust. Compare that width with a cardigan you already enjoy wearing. The schematic shows a half-body width of 55–95 cm; inches can be calculated by dividing centimeters by 2.54.
A longer bobble stitch crochet cardigan can stretch under its own weight. Measure your blocked swatch before changing the length, and remember that changing the body or sleeve dimensions changes yarn needs and may alter the finishing pickup counts.
Step 3 — Swatch the Bobble Stitch Crochet Cardigan Fabrics
The supplied pattern uses UK terminology. This guide uses US terminology throughout: UK dc = US sc; UK htr = US hdc; UK tr = US dc. Changing names does not change the actual stitch. The conversion matters most on the plain body, which is US double crochet, not US treble crochet.
| Abbreviation | Action |
|---|---|
| ch | Chain |
| sc | Single crochet |
| hdc | Half double crochet |
| dc | Double crochet |
| sl st | Slip stitch |
| BLO | Back loop only |
| dc2tog | Double crochet two together; decreases one stitch |
| RS / WS | Right side / wrong side |
| MB | Make the special bobble described below |
For your bobble stitch crochet cardigan, make two generous swatches. After washing and drying as the yarn label permits, measure the center: plain fabric: 16 dc × 9 rows = 10 × 10 cm; bobble fabric: 15 stitch positions × 17 rows = 10 × 10 cm. The bobble gauge width uses seven repeats of (sc, MB), plus one sc. An MB occupies one stitch position.
Dc2tog: yarn over, insert into the next stitch, draw up a loop, yarn over and pull through 2 loops; yarn over, insert into the following stitch, draw up a loop, yarn over and pull through 2 loops; yarn over and pull through all 3 remaining loops. Two base stitches become one stitch.
Make the source’s special bobble (MB)
- Yarn over, insert the hook into the next stitch, yarn over, and draw up a loop: 3 loops on the hook.
- Repeat (yarn over, insert into that same stitch, yarn over, draw up a loop) four more times. You now have 11 loops.
- Yarn over and draw through all 11 loops. Chain 1 to secure. This securing chain does not count as a stitch.
- Make the next sc in the next base stitch. Keep the bobble on the RS of the fabric; adjust it gently outward if needed.
This bobble stitch crochet cardigan uses the source’s 11-loop bobble, not a generic dc5tog bobble. Keep the loop height even and the hook head slightly downward when pulling through. Tight closure loops make the following plain row harder to work.
Four-row bobble repeat — odd stitch count
- Row 1, RS: ch 1, sc in every stitch, turn.
- Row 2, WS: ch 1, sc in first stitch, *MB in next stitch, sc in next stitch; repeat from * to end, turn.
- Row 3: repeat Row 1.
- Row 4: ch 1, sc in first 2 stitches, *MB in next stitch, sc in next stitch; repeat from * until 1 stitch remains, sc in last stitch, turn.
Across the bobble stitch crochet cardigan sleeves and pockets, repeat Rows 1–4 in order. Turning chains never count as stitches in this guide. When reading a bobble row on the following pass, find the top of the MB itself and ignore its extra securing chain.
Step 4 — Make the Bobble Stitch Crochet Cardigan Back
Begin the plain back of your bobble stitch crochet cardigan with 89 (97, 105, 113, 121, 129, 137, 145, 153) ch. The source works its first UK tr into the second chain; in US terms, dc in the second chain from the hook and each remaining chain. Turn: 88 (96, 104, 112, 120, 128, 136, 144, 152) stitches.
Plain rows: ch 1, dc in every stitch, turn. Continue until the back measures approximately 82 (84, 86, 86, 88, 88, 90, 90, 92) cm from the foundation, with RS facing for the next row. This short turning chain is intentional in the supplied instructions; do not add it to the stitch count.
Shape the two back shoulders
- First shoulder, RS: ch 1, dc in next 30 (33, 37, 40, 44, 47, 51, 55, 59) stitches, dc2tog, turn. Total: 31 (34, 38, 41, 45, 48, 52, 56, 60). Leave the rest unworked.
- Next row: ch 1, dc across that shoulder. Fasten off.
- With the back RS facing, rejoin yarn at the beginning of the last 32 (35, 39, 42, 46, 49, 53, 57, 61) stitches.
- Second shoulder: ch 1, dc2tog, dc in next 30 (33, 37, 40, 44, 47, 51, 55, 59) stitches, turn. Work one further plain dc row and fasten off.
Both shoulders of the bobble stitch crochet cardigan must match at 31 (34, 38, 41, 45, 48, 52, 56, 60) stitches. The center neck remains unworked. The 4XL shoulder uses the proposed correction identified above; count before cutting the yarn.
Step 5 — Shape the Bobble Stitch Crochet Cardigan Fronts
For each bobble stitch crochet cardigan front, chain 45 (49, 53, 57, 61, 65, 69, 73, 77). Dc in the second chain from the hook and across: 44 (48, 52, 56, 60, 64, 68, 72, 76) stitches. Work plain rows as for the back until the piece measures 76 (78, 80, 80, 81, 81, 81, 82, 85) cm.
Left front: finish with RS facing. Right front: finish with WS facing. Left and right refer to the wearer. This mirrors the shaping at the neck edges. On the first shaping row, some stitches are deliberately left unworked; do not try to crochet to the old edge.
| Row | Dc before decrease, all nine sizes | Stitches after row |
|---|---|---|
| 1 | 35 (38, 42, 45, 49, 52, 56, 60, 64) | 36 (39, 43, 46, 50, 53, 57, 61, 65) |
| 2 | 34 (37, 41, 44, 48, 51, 55, 59, 63) | 35 (38, 42, 45, 49, 52, 56, 60, 64) |
| 3 | 33 (36, 40, 43, 47, 50, 54, 58, 62) | 34 (37, 41, 44, 48, 51, 55, 59, 63) |
| 4 | 32 (35, 39, 42, 46, 49, 53, 57, 61) | 33 (36, 40, 43, 47, 50, 54, 58, 62) |
| 5 | 31 (34, 38, 41, 45, 48, 52, 56, 60) | 32 (35, 39, 42, 46, 49, 53, 57, 61) |
| 6 | 30 (33, 37, 40, 44, 47, 51, 55, 59) | 31 (34, 38, 41, 45, 48, 52, 56, 60) |
Left front order: Rows 1, 3, and 5: ch 1, work the listed dc, dc2tog, turn. Rows 2, 4, and 6: ch 1, dc2tog, work the listed dc, turn. Right front order: Rows 1, 3, and 5: ch 1, dc2tog, work the listed dc, turn. Rows 2, 4, and 6: ch 1, work the listed dc, dc2tog, turn.
Finish each bobble stitch crochet cardigan front with straight dc rows at 31 (34, 38, 41, 45, 48, 52, 56, 60) stitches, until the total length is 84 (86, 88, 88, 90, 90, 92, 92, 94) cm. End with RS facing, then fasten off. Check that both fronts reach the same blocked length.
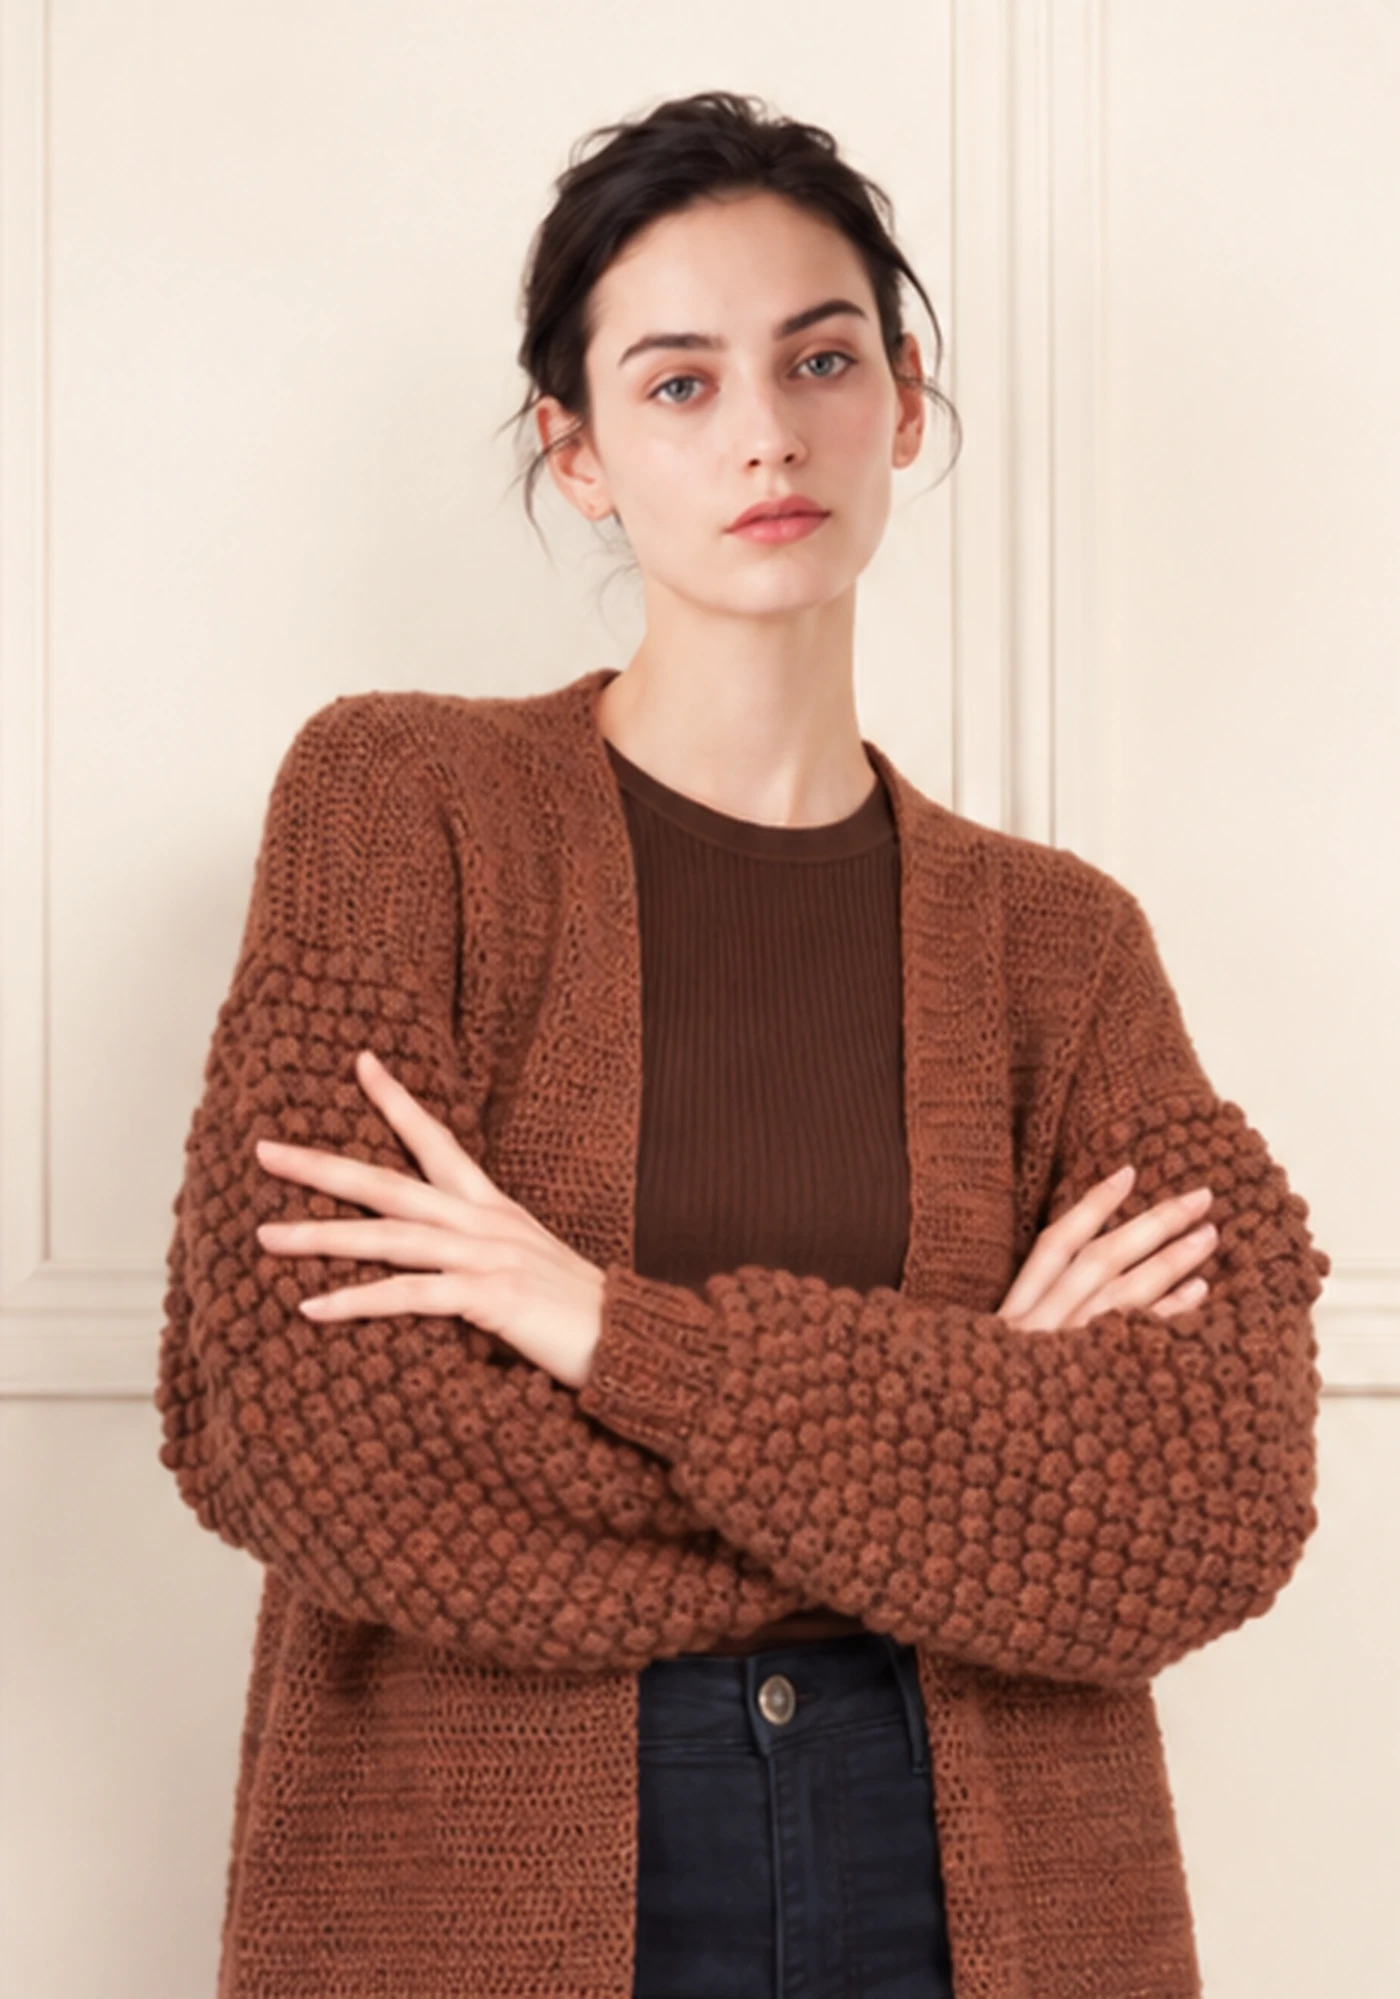
Step 6 — Crochet the Bobble Stitch Crochet Cardigan Sleeves
Make two matching sleeves for the bobble stitch crochet cardigan. Each begins with a narrow ribbed cuff worked sideways, then stitches are picked up along the long edge. Mark the RS before working the textured section.
Cuff and pickup edge
- Chain 9. Row 1, RS: hdc in second chain from hook and each chain across, turn: 8 stitches.
- Row 2: ch 2, hdc BLO in every stitch, turn. Repeat Row 2 until the cuff measures 16 (17, 18, 19, 19, 20, 20, 21, 21) cm. Finish after a RS row; do not turn.
- Keep the rib V’s oriented consistently. Work down the left long edge, placing 26 (27, 29, 30, 30, 32, 32, 33, 33) sc evenly to the starting edge of the cuff; turn.
Set up the bobble stitch crochet cardigan sleeve on WS: ch 1, repeat (sc in next 2 stitches, 2 sc in next stitch) 7 (8, 8, 9, 9, 7, 7, 8, 8) times; sc in the final 5 (3, 5, 3, 3, 11, 11, 9, 9) stitches; turn. Total: 33 (35, 37, 39, 39, 39, 39, 41, 41). The S remainder is the proposed correction, not the source’s printed 5.
Bobble section and increases
Work the four-row bobble repeat for the bobble stitch crochet cardigan sleeve. Increase on every 4th (4th, 4th, 4th, 3rd, 3rd, 3rd, 3rd, 3rd) row of the sleeve pattern until reaching the upper-arm total. Keep a separate row tally for each sleeve.
Increase row: ch 1, make 2 sc in first stitch, continue the established pattern until the last stitch, make 2 sc in last stitch, turn. You gain 2 stitches: the first increase gives 35 (37, 39, 41, 41, 41, 41, 43, 43). Continue to 51 (61, 65, 69, 73, 79, 81, 85, 87) stitches.
Keep the central bobble columns aligned in your bobble stitch crochet cardigan sleeve; work newly added edge stitches in sc until they can join the established spacing. The source calls for maintaining placement through increases but supplies no separate increase chart. On a bobble row, preserve the existing center pattern rather than restarting its offset from the new outermost stitch.
Once the target width is reached, continue without increases until the sleeve measures approximately 44 (45, 45, 46, 46, 47, 47, 49, 51) cm in total, including its cuff, matching the source sleeve-seam dimension. End with RS facing and fasten off. Compare both sleeves flat before seaming.
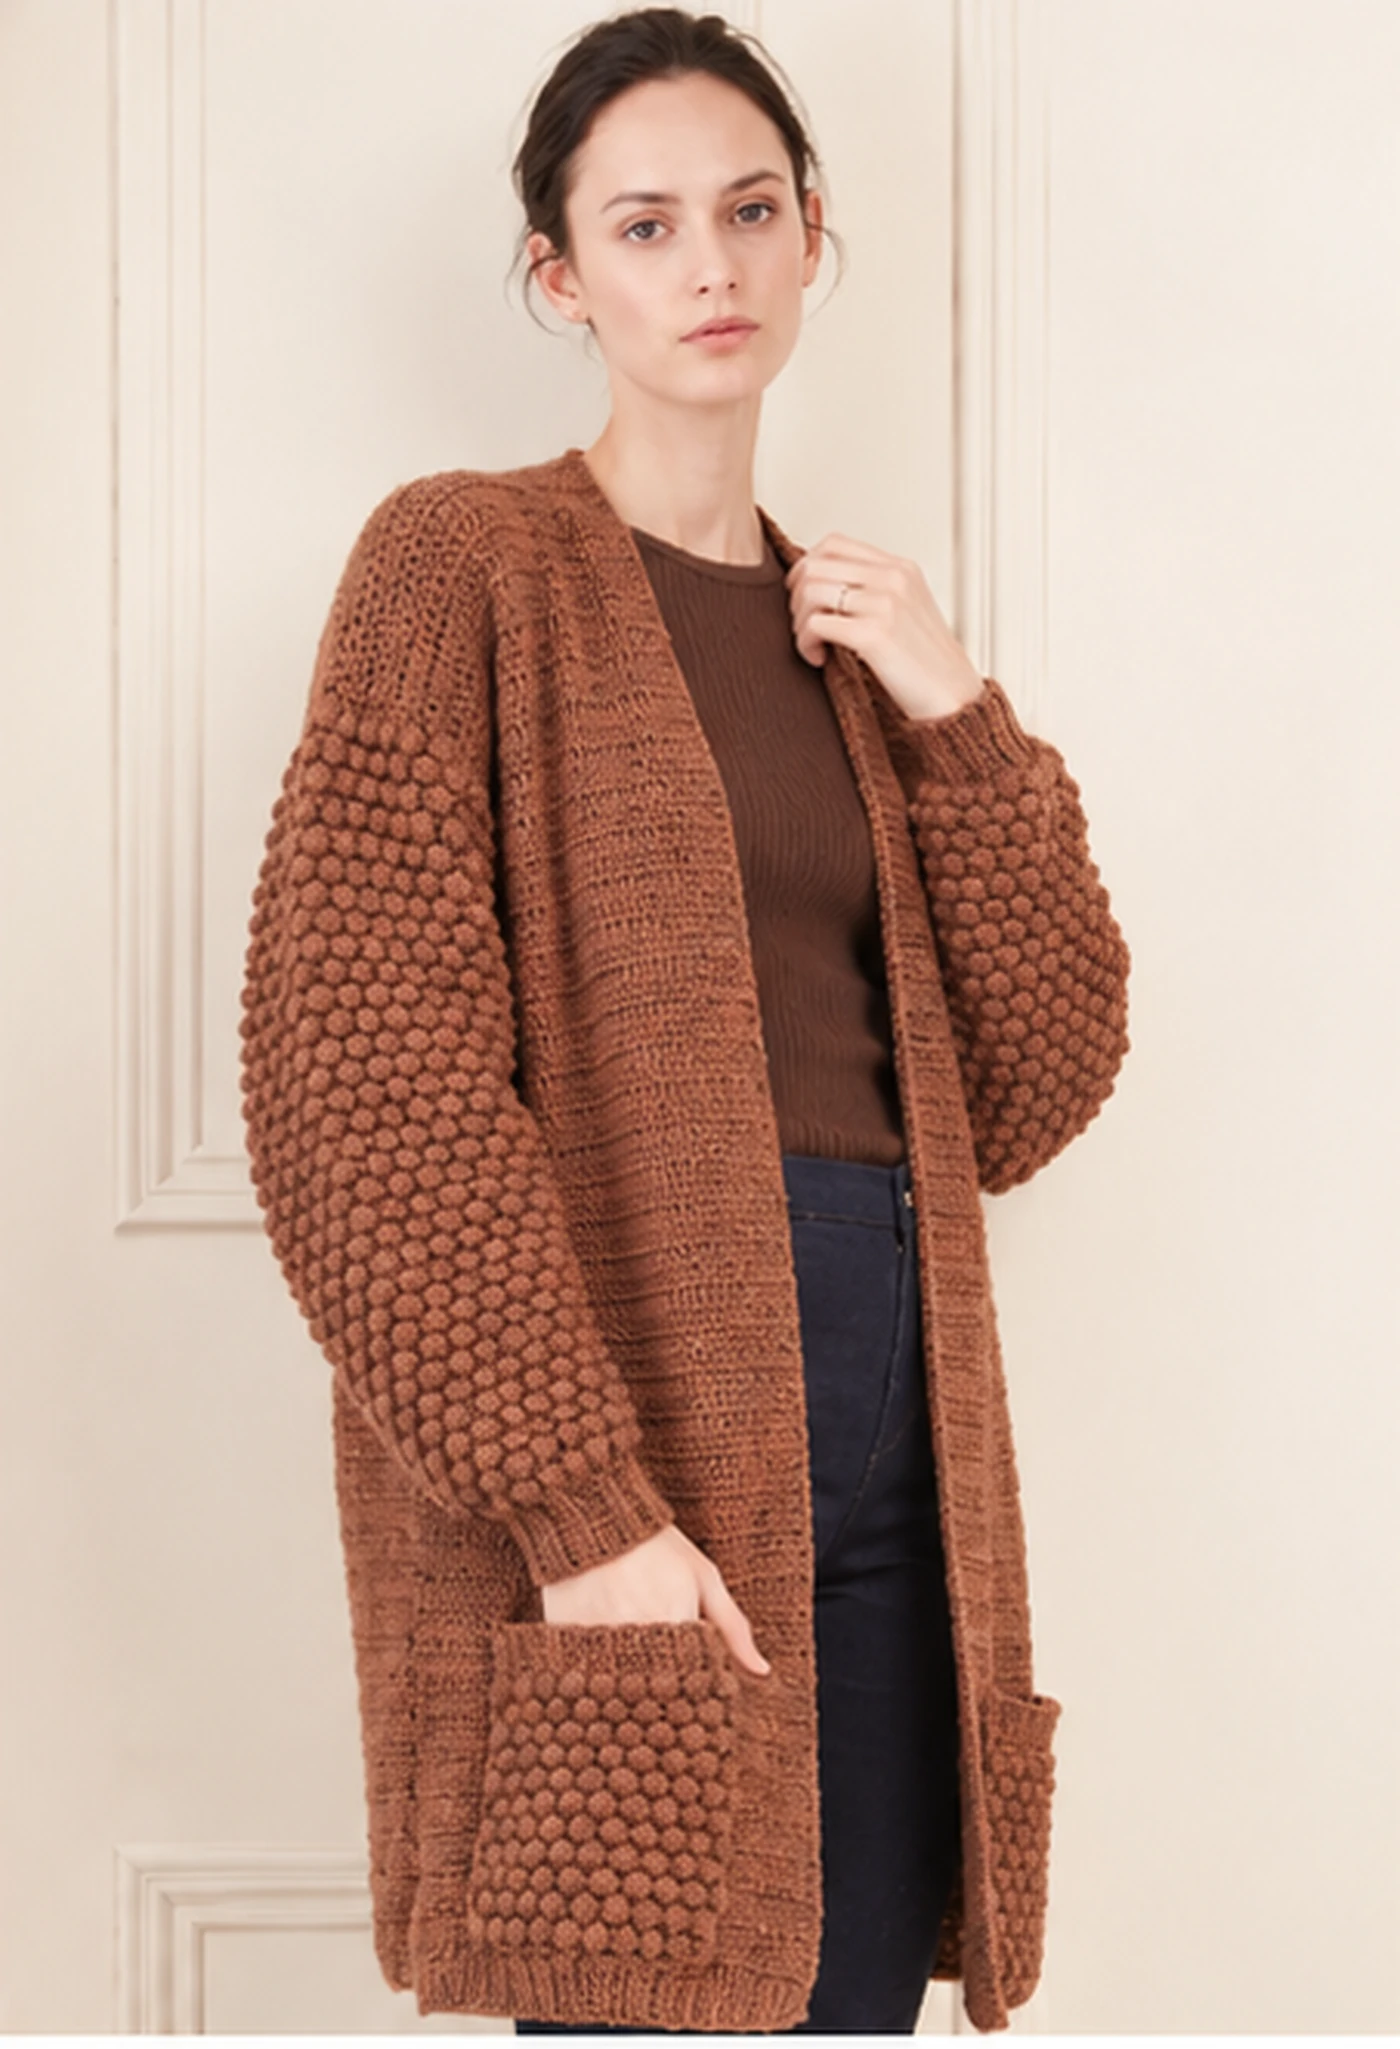
Step 7 — Make Two Bobble Stitch Crochet Cardigan Pockets
Each bobble stitch crochet cardigan pocket starts with 22 ch. With RS facing, sc in second chain from hook and each remaining chain: 21 stitches. Count this foundation sc row as Row 1 of the bobble repeat; turn and continue with Row 2. Repeat Rows 1–4 until the pocket measures about 13 cm, finishing after a Row 1 or Row 3 plain row.
- Chain 6. Hdc in second chain from hook and next 4 chains: 5 hdc. Sl st into the first sc at the top of the pocket to join; turn.
- Rib Row A, RS: ch 1, hdc BLO across the 5 rib stitches, turn.
- Rib Row B: ch 1, hdc BLO across, skip 1 sc along the pocket top, sl st into the next sc to join; turn. Joining slip stitches never count as rib stitches.
- Repeat Rib Rows A and B until the rib spans the top edge, then fasten off. Keep the second pocket the same height and width.
Pin both bobble stitch crochet cardigan pockets at the same height on the fronts after blocking. Do not sew them permanently until you have tried on the assembled body. The pocket rib is the opening edge; leave it unsewn so the pocket remains usable.
Step 8 — Block and Assemble the Bobble Stitch Crochet Cardigan
Before assembling the bobble stitch crochet cardigan, gently block the separate pieces according to the yarn’s care instructions. Support wet wool-alpaca fabric instead of lifting it by one corner. Lay it flat to dry; avoid pressing the raised bobbles flat.
- Place back and fronts together with matching shoulders aligned. Seam each front shoulder to its corresponding back shoulder, stitch for stitch. Keep the central back neck open.
- Find the center of each sleeve’s top edge. Pin that center to the shoulder seam; pin each half evenly down the body edges, without stretching. This is a drop-shoulder construction, not a shaped sleeve cap.
- Sew each sleeve top to the body edge. Use the actual blocked sleeve-top width to establish the armhole depth; the supplied pages give no separate armhole-depth instruction.
- Fold the garment along its shoulders. Seam from each cuff along the sleeve underside to the underarm, then down the body side to the hem. Match row landmarks and avoid bulky knots.
This bobble stitch crochet cardigan assembly sequence is explanatory guidance inferred from the schematic. Try on before adding the finishing rows. If the armhole is restrictive or distorted, unpin and recheck the gauge and sleeve position rather than stretching the seam into place.
Step 9 — Finish the Bobble Stitch Crochet Cardigan Edges
The bobble stitch crochet cardigan has a short neckline edging and separate straight front edgings, not an added wide ribbed button band. Refer to the original supplied photographs and follow the written source-based edging below.
Neckline: three rows of sc
With 4 mm hook and RS of the right front facing, work 15 (16, 16, 17, 17, 18, 18, 18, 18) sc evenly up the shaped front neck to the shoulder seam; 28 (30, 30, 32, 32, 34, 34, 34, 34) sc across the back neck; then 15 (16, 16, 17, 17, 18, 18, 18, 18) sc down the left front neck. Turn: 58 (62, 62, 66, 66, 70, 70, 70, 70) stitches.
Next row, WS: ch 1, sc across, turn. Repeat once more and fasten off. Back-neck pickup counts are stitches distributed evenly along the edge, not necessarily one pickup in each unworked back stitch. Spread them without pulling the neck tight.
Straight front edgings and pockets
With RS of right front facing, join yarn at the garment hem and work 136 (140, 144, 148, 146, 146, 148, 148, 154) sc evenly up the straight front edge to the end of the neckband. Turn; ch 1, sc across. Repeat that plain row once more and fasten off.
For the left front, begin at the neckband with RS facing and use the same count for your size down to the hem; work two further sc rows. The bobble stitch crochet cardigan edge should lie flat. Distribute pickups evenly rather than automatically placing one in every row end.
Finally, pin both pockets at matching hip positions. Sew the sides and bottom securely with matching yarn, leaving the ribbed top open. Reinforce the upper corners gently; oversized knots can show through the fabric. Weave ends through several stitches without cinching the surface.
Step 10 — Bobble Stitch Crochet Cardigan Finishing Checks
- Counts: both shoulder seams have matching counts; fronts are equal; sleeve totals match your selected size.
- Texture: bobbles face outward, with the four-row offset intact. No securing chains were counted as extra stitches.
- Shape: front edges lie flat, cuffs match, pockets are level, and underarms move comfortably.
- Care: follow the actual yarn label, reshape flat, and store folded rather than stretching this heavy garment on a narrow hanger.
If your bobble stitch crochet cardigan edging waves, the pickup spacing may be too dense or its tension too loose. If it draws inward, the opposite may be happening. Rework a short section and reassess. Blocking can soften a mild unevenness, but it cannot reliably fix the wrong number of stitches.
For more projects, explore our crochet wearables collection, browse the crochet pattern library, or visit all crochet pattern categories. For terminology, consult the Craft Yarn Council crochet abbreviation guide. For care, use Rowan yarn information alongside your specific ball band.
Bobble Stitch Crochet Cardigan FAQ
Is this bobble stitch crochet cardigan suitable for a beginner?
It is best for an intermediate crocheter or a confident beginner who can already swatch, decrease, maintain pattern alignment, and seam. Practice the 11-loop bobble and a small ribbed cuff before starting the full garment.
Does this bobble stitch crochet cardigan use US or UK terms?
This guide uses US terms. The supplied Abigail pattern uses UK terms, so UK tr becomes US dc, UK dc becomes US sc, and UK htr becomes US hdc. The plain body is worked in US double crochet.
Can I substitute yarn for the bobble stitch crochet cardigan?
Yes, but match both washed gauges and compare drape. The source uses DK wool-alpaca yarn at 125 m per 50 g. A different fiber can change weight, stretch, warmth, and the amount needed even when the yarn-weight label matches.
Why is there no XL in the bobble stitch crochet cardigan size chart?
The supplied chart labels its nine sizes XS, S, M, L, 2XL, 3XL, 4XL, 5XL, and 6XL. This guide preserves those labels. Choose by the actual centimeter measurements rather than assuming a missing size has been added.
Which bobble stitch crochet cardigan images are included?
Three original product photographs are extracted from the supplied reference pages, with all surrounding page text removed. A clean redrawn measurement schematic is also included. The photographs are not AI replacements. Use the written counts and measurements for construction; this adaptation is not independently sample-tested.
Where can I visit the My Crochet Universe store?
Use any of the three store buttons on this page to open the My Crochet Universe store. They are general store links, not offers for a PDF version of the Abigail Cardigan. Check the store for current product details.
Finish Your Bobble Stitch Crochet Cardigan With Confidence
A bobble stitch crochet cardigan rewards careful swatching and steady counting more than speed. Keep the shoulders even, preserve the sleeve texture through increases, and check the fit before the final edging. Once the seams and pockets are secure, give everything a gentle final reshape and enjoy that satisfying handmade texture.




