

Animal Baby Booties: 3 Sweet Crochet Designs
Tiny ears, a rounded nose, and a few embroidered stitches can turn a simple pair of crochet shoes into a whole little character. These animal baby booties offer three different personalities: a blue mouse with round ears, a rust-colored fox with pale cheeks, and a cream-faced hedgehog with a softly textured back.
The designs share a compact, rounded shape, while the ears, colors, tails, and surface details do the storytelling. Start by getting the bootie structure even, then take your time with the expression. For the hedgehog, a sequence of small chain loops creates the textured finish without adding bulk under the foot.
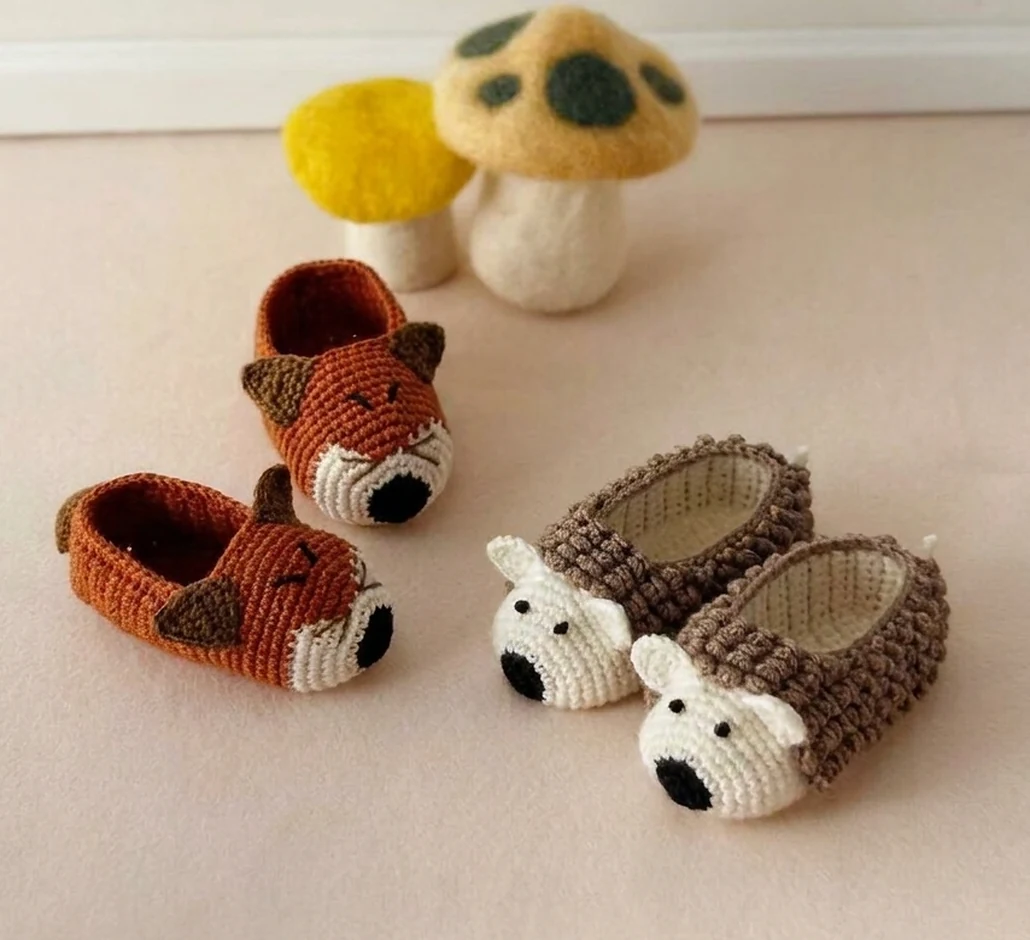
Animal Baby Booties: Meet the Three Designs
The charm of animal baby booties comes from proportion rather than complicated decoration. A generously rounded toe gives each face enough room, small ears define the species, and a neat opening keeps the character from overwhelming the shoe itself.
| Design | Palette | Defining details |
|---|---|---|
| Mouse | Light blue, navy, black | Rounded ears, embroidered whiskers, narrow tail |
| Fox | Rust orange, brown, natural cream, black | Triangular ears, pale cheek bands, fuller tail |
| Hedgehog | Natural cream, taupe, black | Small ears, cream face, rows of chain-loop texture |
Choose the animal first, then keep its palette consistent across both shoes. Making animal baby booties as a pair is easier when the two pieces stay beside each other during shaping and finishing. Compare the toe width, opening, and ear placement before tightening any final sewing tails.
Yarn, Hook, and Finishing Supplies
These animal baby booties use Hamanaka Exceed Wool and a Japanese size 4/0 crochet hook. Keep the yarn label with the project so fiber information and washing instructions stay available after the pair is finished. Substituting yarn changes the fabric, so make a sample rather than assuming a similar-looking ball will produce the same fit.
| Design | Yarn planning amounts |
|---|---|
| Mouse | Light blue 244: 21 g; navy 226: 3 g; black 230: 1 g |
| Fox | Orange 240: 20 g; brown 205: 5 g; natural 201: 2 g; black 230: 1 g |
| Hedgehog | Natural 201: 15 g; taupe 203: 15 g; black 230: 1 g |
Have a yarn needle, scissors, removable markers, and a small amount of stuffing available for the shaped details. Use black yarn or thread for the faces instead of adding hard beads or buttons. Keep the inside smooth, with no long ends or raised knots against the foot.
When preparing animal baby booties, check your tension on both a flat section and a curved toe. The fabric for animal baby booties can look tidy yet feel too firm when bent. For abbreviation questions, the Craft Yarn Council US crochet terminology guide explains single crochet, slip stitches, chains, increases, and decreases.
Understand the Toe and Bootie Shape
The toe establishes the width and expression of these animal baby booties. It begins small, widens gradually, and then holds its count while the face gains depth. The toe-count progression is the same across the three designs, although the color changes and textured working method differ.
| Toe round | Stitch total | Checkpoint |
|---|---|---|
| 1 | 5 | Start the small circular toe |
| 2 | 10 | Increase by 5 |
| 3 | 15 | Increase by 5 |
| 4 | 20 | Increase by 5 |
| 5 | 25 | Increase by 5 |
| 6 | 30 | Increase by 5 |
| 7 | 33 | Increase by 3 |
| 8 | 36 | Increase by 3 |
| 9 | 38 | Increase by 2 |
| 10–15 | 38 each | Maintain the count |
Count animal baby booties before changing color or moving into the side section. An extra stitch near the nose can shift the face, and a missed increase can make the pair visibly uneven. Use a marker to track the round boundary and compare the two toes while they are still easy to adjust.
The bootie shape combines the rounded toe with a flat-worked side section that continues through Row 19 before the heel is joined. Think of the sewing as part of the shaping: the heel edges meet first, then the remaining base seam closes into a T-shaped arrangement. The opening receives a final single-crochet edging.
The finished sole target is approximately 11 cm long, with a depth of about 4 cm. Measure the completed crochet rather than assigning animal baby booties an age label from appearance alone. Yarn substitution, tension, and finishing can all change the usable space inside.
Create the Mouse, Fox, or Hedgehog Face
Mouse: rounded ears and a quiet expression
The mouse animal baby booties keep the face simple: a black nose, small dark eyes, and short whisker stitches against light blue. Work the first three toe rounds in black, then change to light blue from Round 4. Navy ears and a narrow navy tail repeat the darker accent without crowding the face.
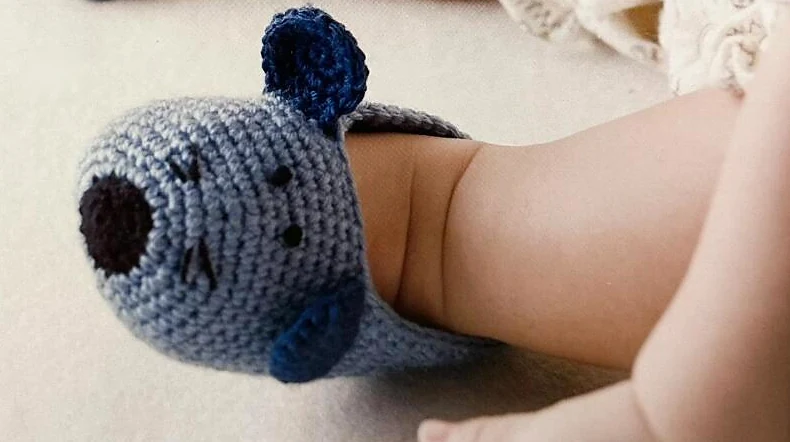
Make four rounded ear pieces for the pair and compare them before sewing. The round shape is what distinguishes the mouse from the fox, so avoid pinching the top into a point. Keep the eyes level and the whiskers short enough to sit flat against the fabric.
Fox: pointed ears and pale cheeks
Fox animal baby booties combine a black nose with a rust-orange upper and natural-cream cheeks. Work the first three toe rounds in black, then begin the shaped cream-and-orange colorwork from Round 4. Keep the pale cheek markings balanced on both sides of the nose rather than treating them as simple all-around stripes.
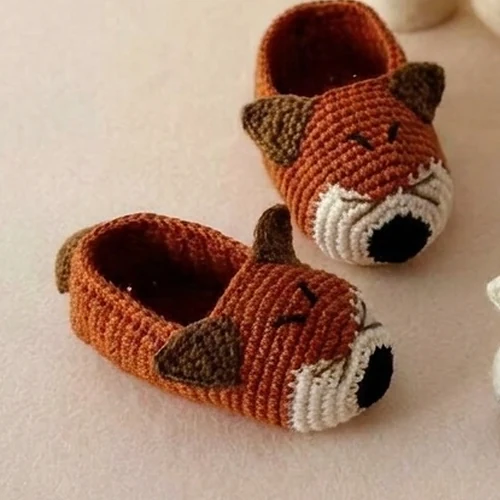
Small brown triangular ears provide the other strong clue. Position both ears before securing either one, and check their tilt from the front. A short angled embroidery detail can suggest a sleepy expression without adding extra materials.
Hedgehog: cream face and soft surface loops
The hedgehog animal baby booties pair a black nose with a natural-cream face and taupe texture over the upper. Small cream ears sit close to the head. The textured back should frame the smooth face, not creep over the eyes or cover the underside of the shoe.
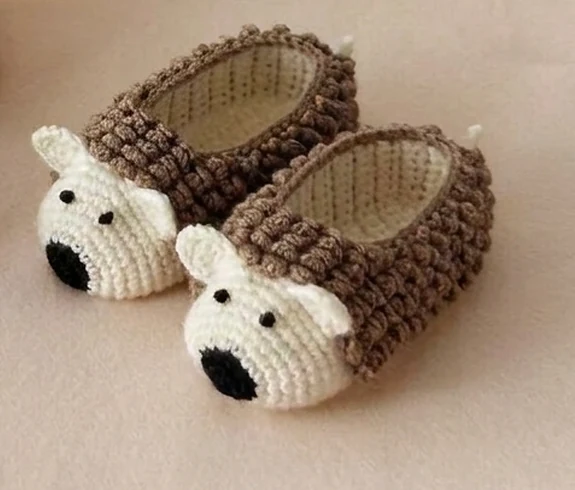
The loops are crocheted onto retained surface bars. That construction keeps the decorative layer separate from the smooth base fabric. Work one controlled loop at a time and resist making the chains much longer for a fluffier result; longer loops are easier to snag.
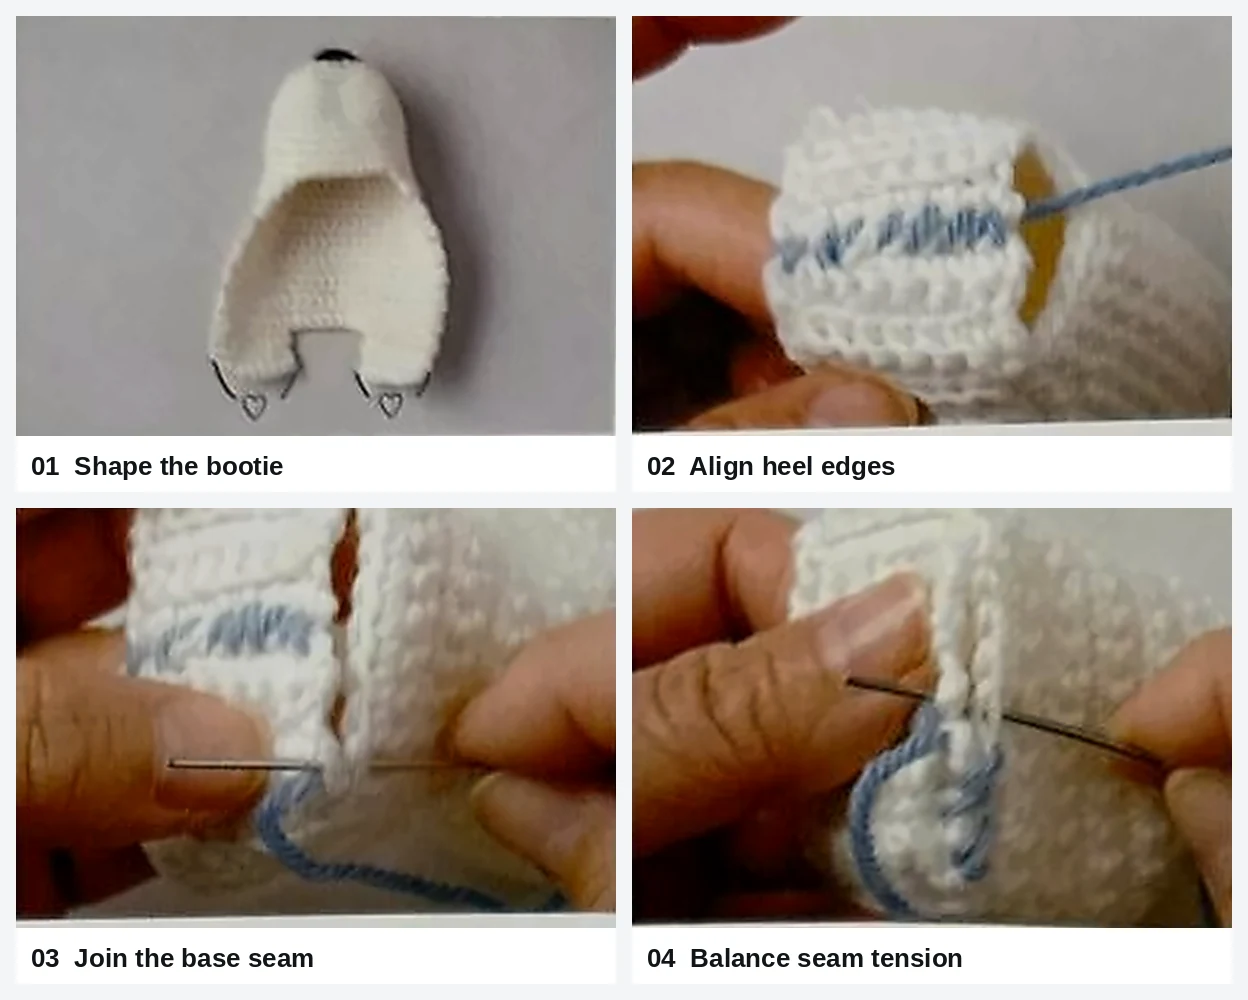
Steps 1–4: Shape and Close the Heel
Start the finishing sequence with a complete bootie shell. For animal baby booties, the aim is a heel that sits squarely and a seam that feels unobtrusive inside. The contrasting joining yarn in the close-ups makes the seam path easy to follow; match the yarn to the finished bootie when sewing your own pair.
1. Check the shaped shell
Lay the shell flat with the opening visible. Identify the two heel edges and the base opening before threading the needle. Smooth the fabric by hand rather than stretching it into alignment.
2. Join the heel edges
Bring the matching heel edges together and whipstitch them evenly. Pick up corresponding edge points so one side does not finish higher than the other. Keep the seam secure without pulling it into a stiff ridge.
3. Continue along the base join
With the heel join as the center reference, align the remaining base edges. Continue the seam through corresponding points, keeping the same tension on both sides of the center.
4. Settle the seam tension
Draw the joining yarn through gradually and inspect the shape before securing it. The shell should hold its outline without puckering. Feel the inside with a fingertip and correct any firm, bunched section now.
Steps 5–8: Start the Hedgehog Texture
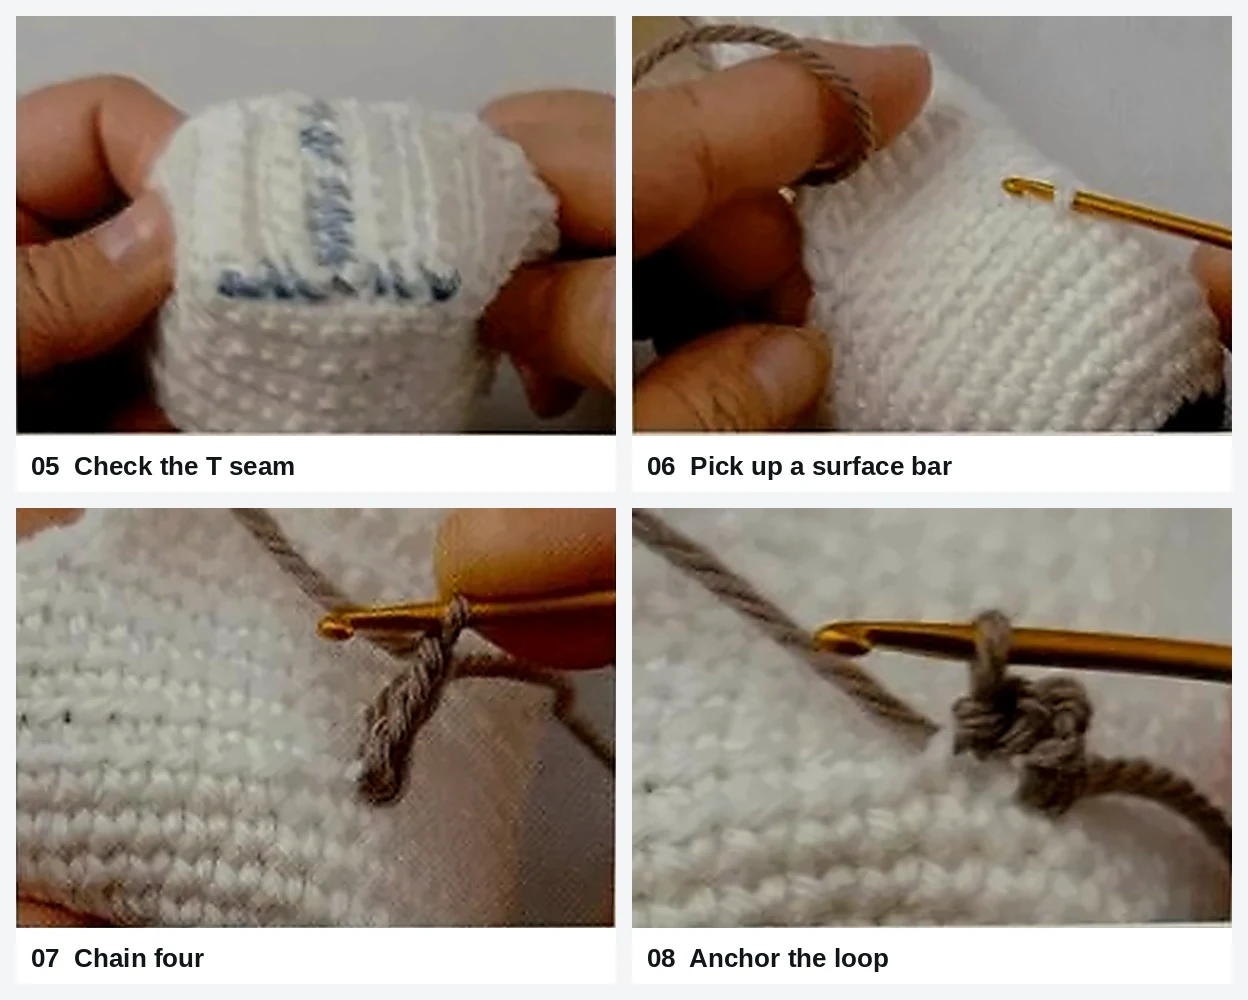
The next steps give hedgehog animal baby booties their textured surface. Work into the retained bars on the outside of the cream fabric. Keep the hook close to the bootie so the surface loops remain short, even, and separate from the interior.
5. Confirm the T-shaped join
Turn the shell and inspect the heel-and-base seam. The joining lines should meet neatly rather than twisting the toe. Check both booties side by side before starting the surface decoration.
6. Pick up one surface bar
Insert the hook under the designated retained bar and draw the taupe yarn through. Catch the surface strand cleanly without pushing the hook through the entire bootie and creating a loose strand inside.
7. Chain four
Work four chain stitches to form the first small loop. Keep the chain relaxed enough to curve, but do not lengthen it by pulling on the hook. Consistent chain tension matters more than speed.
8. Anchor the loop
Slip stitch into the next adjacent surface bar to secure the loop. Check its size before moving on. It should sit above the fabric as a small soft arch rather than a long free-hanging strand.
Ready for your next little crochet project?
Browse the My Crochet Universe store for more baby crochet and character-inspired patterns. Check each listing for its materials, format, and construction details.
Steps 9–12: Build the First Loop Row
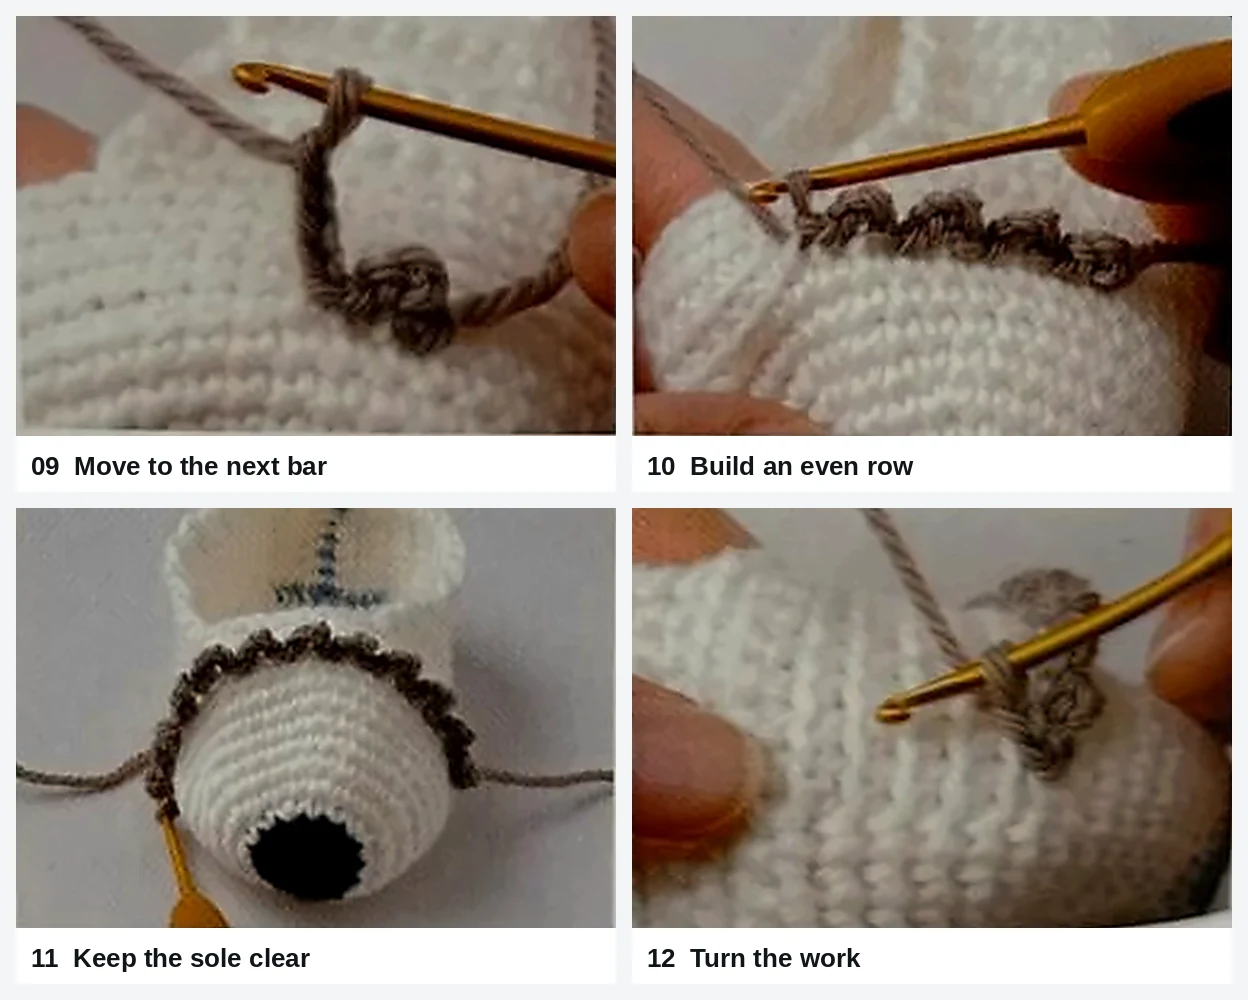
An even first row sets the rhythm for textured animal baby booties. Follow the available surface bars around the upper and keep checking where the smooth sole begins. The texture belongs on the back and sides, not under the foot.
9. Move to the next bar
Make the next slip stitch into the adjacent retained bar before beginning another chain-four loop. Continue the slip-stitch, chain-four, and anchoring sequence along the surface, keeping the spacing regular.
10. Compare the first few loops
Pause after several loops and compare their height. If one is much larger, correct it while it is still close to the hook. Small differences become more noticeable when several rows are stacked together.
11. Leave the underside clear
Complete the first surface row while avoiding the sole area. The illustrated sequence shows twelve loops across the first completed row. Use that as a checkpoint alongside even spacing, not a reason to squeeze extra loops into the underside.
12. Turn the work
At the row end, turn the bootie and make the turning chain. Keep the completed loops clear of the hook so they are not accidentally caught into the next row.
Steps 13–16: Finish the Texture and Details
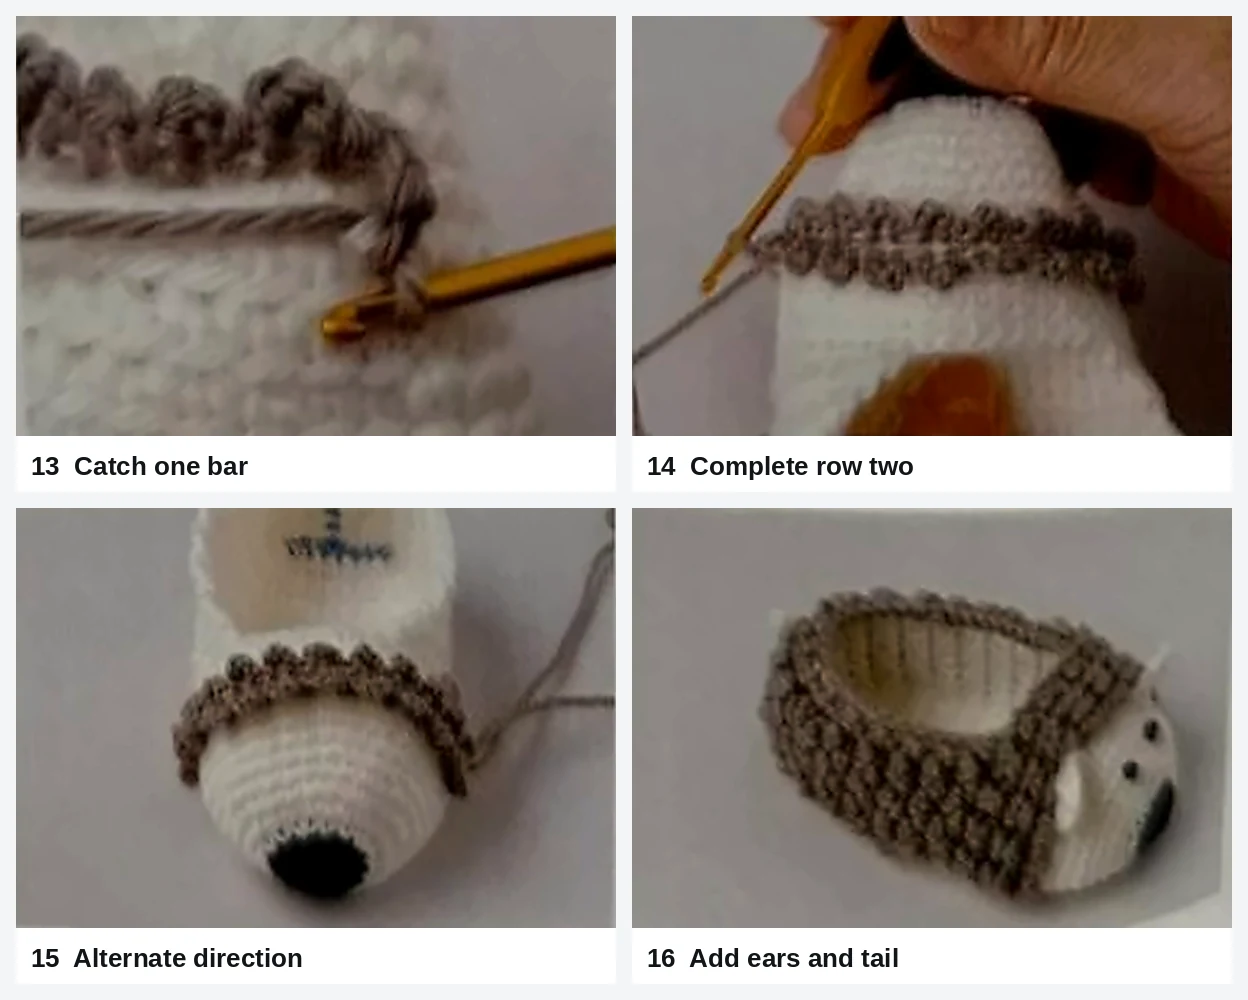
Finish hedgehog animal baby booties by building the remaining texture in alternating directions. The retained bars guide the placement, while the smooth face and sole remain visible. Check the surface frequently instead of waiting until every row is complete.
13. Catch one bar at a time
Work into the retained horizontal strand for the current row. Check that the hook has caught the intended bar rather than a finished loop from the row below. The base fabric should remain flat beneath the texture.
14. Complete the second row
Continue the same short-loop method across the second row. Compare the surface from the side as well as the front; this makes uneven loop heights and crowded areas easier to notice.
15. Alternate the direction again
The third row returns to the working direction used for the first. Keep alternating as the textured section develops. Move completed loops gently out of the way rather than flattening or stretching them.
16. Add ears and tail
Finish the surface, then attach the small ears and tail securely. Embroider the eyes, inspect every sewing end, and complete the opening edge neatly. Repeat the inspection on the matching bootie before calling the pair finished.
Animal baby booties look most polished when the two faces feel related rather than mechanically identical. Match the ear height, eye position, and overall texture coverage, but allow the softness of handmade crochet to remain.
Fit, Comfort, and Care
Check animal baby booties with both your eyes and fingertips. The opening should flex, the heel should stay aligned, and the inside should feel smooth. A decorative face should not pull the toe inward or create hard knots where the foot rests.
- Measure the sole of each bootie and compare the pair.
- Use securely worked embroidery rather than beads, buttons, or detachable eyes.
- Inspect ears, tails, embroidery, and loops before each use.
- Keep ties, elastic, and extra loose decorations off the opening.
- Use only for brief, adult-supervised keepsake wear; remove before sleep or unattended time.
- Do not treat soft crochet soles as walking shoes or a source of traction.
Wash animal baby booties according to the actual yarn label and the needs of every added material. Support the shape while damp, avoid twisting the small ears, and dry the pair completely before storage. Recheck the seams and details after cleaning.
For a gift, put the fiber information, sole measurement, care instructions, and supervision reminder on a separate card. Keep ribbons and tags on the outer packaging, not attached to the booties. A plain keepsake box protects the shape without adding anything inside the opening.
More Baby Crochet Ideas
These related guides offer more finishing and gifting ideas for animal baby booties. Use them for general inspiration without substituting another design’s stitch counts or size targets.
- Soft finishing ideas for crochet baby booties — choosing fabric by feel and keeping the inside smooth.
- Baby-shower bootie gift ideas — simple packaging and a useful care card.
- Balancing smooth and textured crochet — letting decorative texture support a clear character shape.
Frequently Asked Questions
Which animal baby booties are simplest to finish?
The mouse and fox have smoother uppers, while the hedgehog adds a separate surface-loop sequence. Choose based on your comfort with shaped pieces, embroidery, and sewing rather than assuming a particular animal is automatically beginner-level.
What size are these animal baby booties?
The sole target is approximately 11 cm, with a depth of about 4 cm. Measure the finished pair and compare the usable space with the intended foot. Do not assign an age range from the animal design or photographs alone.
How are the hedgehog loops made?
Pick up the retained surface bars, work four-chain loops, and anchor them with slip stitches. Build the rows in alternating directions, keeping the face and underside clear and the loops short and consistent.
Can I use different yarn for animal baby booties?
Yes, but the stitch counts alone will not guarantee the same measurements. Make a fabric sample, check the sole size early, and confirm that the opening and finished interior remain soft and comfortable-looking.
Can these be used as walking shoes?
No. Soft crocheted soles do not provide a protective or tested traction sole. Treat the pair as supervised keepsake wear, inspect every decorative detail, and remove the booties before sleep or unattended time.
A Thoughtful Handmade Finish
The appeal of animal baby booties is in the little choices: a round mouse ear, a pointed fox ear, a tidy whisker, or a row of soft hedgehog loops. Keep the shell balanced first, then let those small details create the character.
Finish one pair carefully, record the yarn and actual sole measurement, and save the notes for the next make. Neat seams, smooth interiors, and well-secured features give a handmade gift a more thoughtful finish than extra decoration ever could.
Ready for your next little crochet project?
Browse the My Crochet Universe store for more baby crochet and character-inspired patterns. Check each listing for its materials, format, and construction details.




