

WOODLAND AMIGURUMI • SOURCE PHOTO TUTORIAL • US TERMS
Mushroom Crochet Pattern: Step-by-Step Forest Sprite Guide
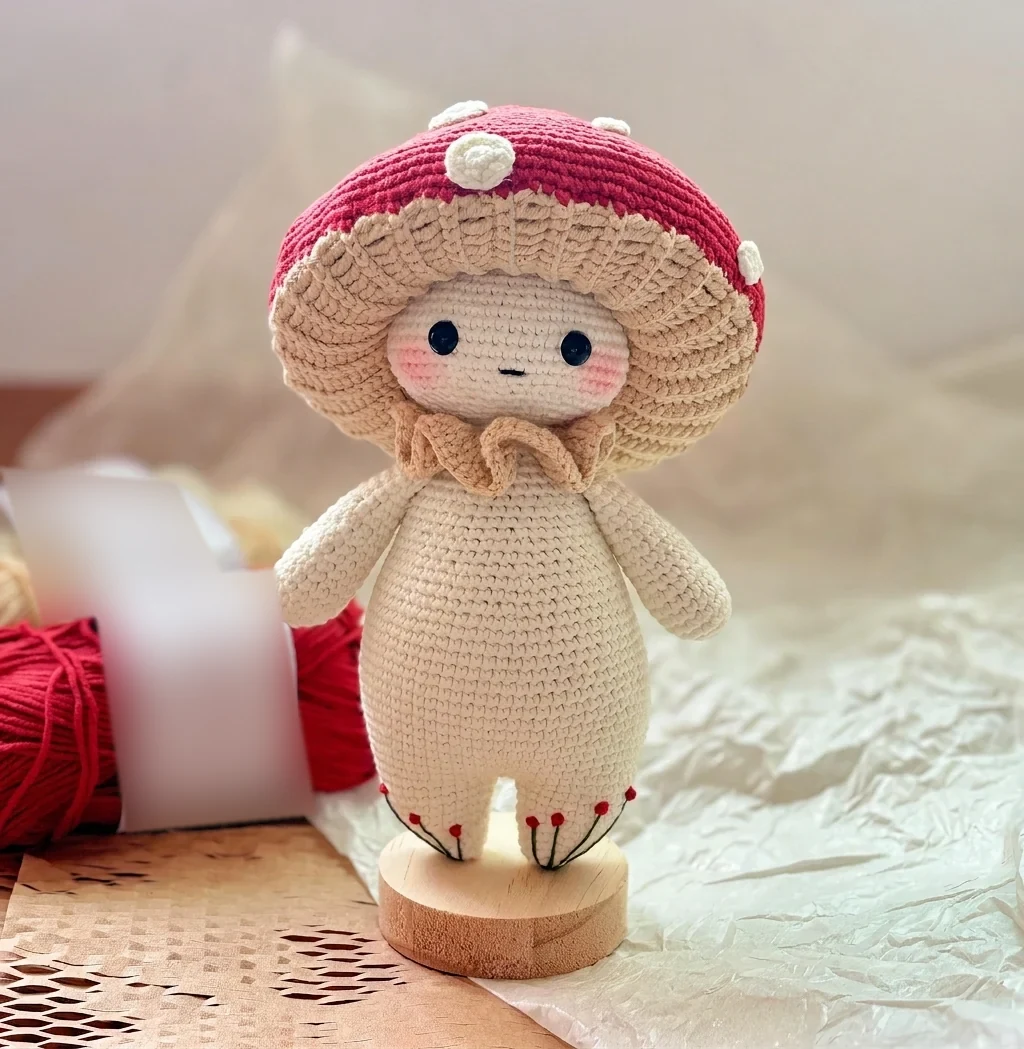
This mushroom crochet pattern brings a woodland character to life with a cream body, tiny arms, a ruffled collar, and a red cap dotted with white spots. The sculpted gills underneath the cap give the little forest sprite its distinctive silhouette.
Follow this mushroom crochet pattern from the rounded head and joined legs to the ribbed cap underside, finishing stitches, and embroidered flowers. The supplied finished-view and process photographs are placed beside the relevant instructions, including the collar, head attachment, cap pickup, stuffing, and sewing sequences.
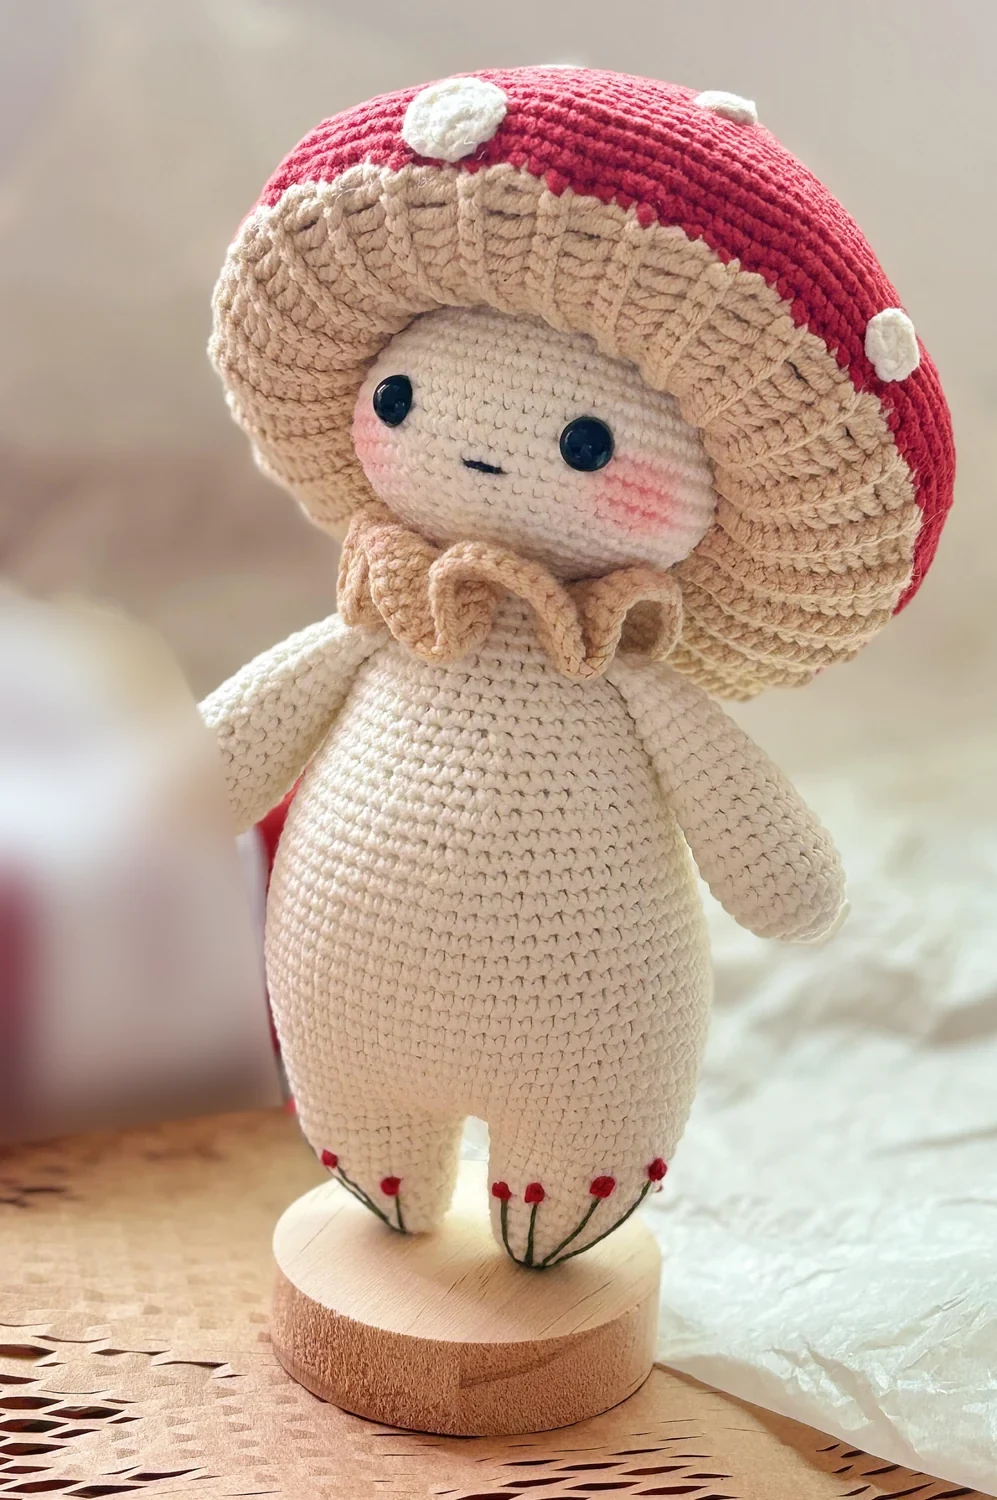
THE PROJECT AT A GLANCE
A tiny forest sprite.
A wonderfully textured cap.
An intermediate mushroom crochet pattern made from separate head, body, arms, collar, and a sculpted mushroom cap.
Before You Start the Mushroom Crochet Pattern
The supplied Chinese-language pages name Critter Stitch as the original designer and shi_yyqx as translator. This English mushroom crochet pattern guide is a source-based translation and explanation, not an original My Crochet Universe design. Confirm permission to publish the pattern adaptation and photographs.
Work the mushroom crochet pattern from the original supplied instructions, translated below. Watermark-restored photographs are visual aids; small retouched areas are not reliable stitch charts. Read the full instructions before fastening off, especially the leg marker, cap pickup, and head attachment.
Step 1 — Mushroom Crochet Pattern Materials and Stitches
- Colors: cream for the head, body, legs, arms, and spots; beige for the collar and gills; red for the cap and flowers; green and black embroidery thread for stems and facial details.
- Suggested yarn: smooth cotton or a cotton blend suitable for amigurumi. The source does not identify a weight or total yardage; use the same thickness for all structural pieces.
- Hook: choose a hook that produces a dense fabric with no visible stuffing. A hook smaller than your yarn’s normal garment recommendation is often useful; make a sample first.
- Polyester stuffing, stitch marker, tapestry needle, scissors, pins, and optional eye components. For a child-accessible item, embroider the eyes rather than adding small detachable parts.
- An optional wooden display base like the reference photograph. The source gives no mounting instructions; do not add exposed wire or sharp supports.
A consistent fabric matters more than matching an unprovided height. Before starting this mushroom crochet pattern, make a small cream sample and stretch it gently. If stuffing would show through, adjust the hook or tension. Write down the yarn and hook you choose so the cap and body remain compatible.
On small screens, swipe this table sideways to see every column.
| Source symbol | US term | How to read it |
|---|---|---|
| X | sc | Single crochet |
| V | inc | 2 sc in the same stitch |
| A | dec | Single crochet decrease; invisible decrease is suitable |
| T | hdc | Half double crochet |
| F | dc | Double crochet |
| 2-wrap long stitch | tr | US treble crochet: yarn over twice |
| FV | dc inc | 2 dc in the same stitch |
| BLO | Back loop only | Insert into the back strand of the stitch top |
| MR / ch | Magic ring / chain | Round start / chain stitch |
Brackets followed by “× 6” mean repeat the bracketed sequence six times. Counts at the end of a row or round are the completed stitch total. Unless a section says otherwise, work continuous spiral rounds without joining or turning. Move the marker to the first stitch of each new round.
Step 2 — Crochet the Mushroom Crochet Pattern Head
Use cream yarn for the mushroom crochet pattern head. Start with a magic ring and keep the increases distributed as written. Staggered increases help avoid a strongly hexagonal shape.
On small screens, swipe this table sideways to see every column.
| Round | Instructions | Stitches |
|---|---|---|
| 1 | 6 sc in MR | 6 |
| 2 | inc × 6 | 12 |
| 3 | [sc, inc] × 6 | 18 |
| 4 | [sc, inc, sc] × 6 | 24 |
| 5 | [3 sc, inc] × 6 | 30 |
| 6 | [2 sc, inc, 2 sc] × 6 | 36 |
| 7 | sc around | 36 |
| 8 | [5 sc, inc] × 6 | 42 |
| 9 | sc around | 42 |
| 10 | [3 sc, inc, 3 sc] × 6 | 48 |
| 11 | sc around | 48 |
| 12 | [7 sc, inc] × 6 | 54 |
| 13 | [4 sc, inc, 4 sc] × 6 | 60 |
| 14–17 | sc around for 4 rounds | 60 |
| 18 | [4 sc, dec, 4 sc] × 6 | 54 |
| 19 | [7 sc, dec] × 6 | 48 |
| 20 | [3 sc, dec, 3 sc] × 6 | 42 |
| 21 | [5 sc, dec] × 6 | 36 |
| 22 | [2 sc, dec, 2 sc] × 6 | 30 |
| 23 | [3 sc, dec] × 6 | 24 |
| 24 | [sc, dec, sc] × 6 | 18 |
If using backed eyes, decide their position and install them before the opening becomes too small. The source gives no eye size, spacing, or round number. Use the front-view photo for proportion, mark both positions symmetrically, and check the face before securing anything. Embroidered eyes are the safer choice for an item intended for young children.
Fasten off after Round 24, leaving a sewing tail, and stuff the head gradually. Shape the cheeks without forcing stuffing between stitches. The mushroom crochet pattern head keeps an 18-stitch opening for assembly; do not add unsourced closing rounds. Embroider a small black mouth and add blush only with a material suitable for the item’s intended use.
Step 3 — Make the Mushroom Crochet Pattern Legs
Make two legs in cream, preferably in continuous rounds. The mushroom crochet pattern builds the lower body from these two pieces, so match their stitch counts carefully before joining.
On small screens, swipe this table sideways to see every column.
| Round | Instructions | Stitches |
|---|---|---|
| 1 | 5 sc in MR | 5 |
| 2 | inc × 4, sc | 9 |
| 3 | [inc, 2 sc] × 3 | 12 |
| 4 | [inc, sc] × 3, 6 sc | 15 |
| 5 | [inc, 2 sc] × 3, 6 sc | 18 |
| 6 | [inc, 3 sc] × 3, 6 sc | 21 |
| 7 | sc around | 21 |
| 8 | [inc, 4 sc] × 3, 6 sc | 24 |
| 9 | 10 sc, inc, 10 sc; mark the last of these 10 sc, then 3 sc | 25 |
Fasten off the first leg and repeat for the second. The source marks a stitch before the final 3 sc of Round 9; keep this orientation marker distinct from the beginning-of-round marker. Those 3 sc belong to the same 25-stitch round—they are not three extra stitches added after a completed round.
The source says to connect the second leg to the first at the marked position using ch 1. Arrange the legs side by side so the shaped areas face the same way. Rejoin working yarn to the second leg if you have fastened both off, then use the marked position as the joining reference.
Step 4 — Shape the Mushroom Crochet Pattern Body
For this mushroom crochet pattern body, the two 25-stitch legs plus both sides of the one-chain bridge create a 52-stitch first round. Do not count the chain itself as an additional third bridge stitch.
On small screens, swipe this table sideways to see every column.
| Round | Instructions | Stitches |
|---|---|---|
| 1 | 25 sc around first leg, sc on one side of joining ch, 25 sc around second leg, sc on the other side of joining ch | 52 |
| 2 | inc, 18 sc, [inc, 5 sc] × 3, 10 sc, inc, 4 sc | 57 |
| 3–4 | sc around for 2 rounds | 57 |
| 5 | [inc, 18 sc] × 3 | 60 |
| 6 | sc around | 60 |
| 7 | [inc, 9 sc] × 6 | 66 |
| 8–12 | sc around for 5 rounds | 66 |
| 13 | [dec, 3 sc] × 3, 46 sc, dec, 3 sc | 62 |
| 14 | sc around | 62 |
| 15 | [4 sc, dec] × 2, 38 sc, [4 sc, dec] × 2 | 58 |
| 16 | [5 sc, dec] × 2, 30 sc, [5 sc, dec] × 2 | 54 |
| 17–18 | sc around for 2 rounds | 54 |
| 19 | [dec, 7 sc] × 6 | 48 |
| 20–21 | sc around for 2 rounds | 48 |
| 22 | 14 sc, [dec, 3 sc] × 6, 4 sc | 42 |
| 23–24 | sc around for 2 rounds | 42 |
| 25 | [inc, 3 sc] × 2, 9 sc, [dec, 3 sc] × 3, 6 sc, inc, 3 sc | 42 |
| 26–27 | sc around for 2 rounds | 42 |
| 28 | [dec, 5 sc] × 6 | 36 |
| 29 | sc around | 36 |
| 30 | 10 sc, [dec, sc] × 3, 8 sc, [sc, dec] × 3 | 30 |
| 31 | dec, 6 sc, [dec, sc] × 3, 7 sc, [dec, sc] × 2 | 24 |
| 32 | [dec, 2 sc] × 6 | 18 |
| 33–36 | sc around for 4 rounds | 18 |
| 37 | [dec, sc] × 6 | 12 |
| 38 | dec × 6 | 6 |
Stuff the legs and lower body while they are easy to reach. Continue adding small amounts as the torso narrows; keep the body plump but not rigid. After Round 38, leave a long tail and draw the final opening closed through the remaining front loops. The narrow upper tip supports the head and should not be flattened.
The increases and decreases in Round 25 deliberately balance each other, leaving 42 stitches. It is a shaping round, not an error. Check the front and back against the mushroom crochet pattern process photo before attaching the arms.
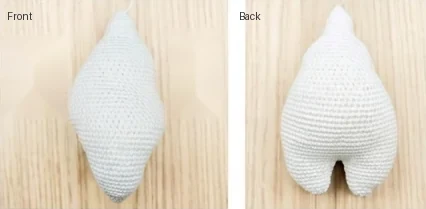
Step 5 — Add the Mushroom Crochet Pattern Arms
Make two cream arms for the mushroom crochet pattern. Work both with the same tension so they hang at matching lengths.
On small screens, swipe this table sideways to see every column.
| Round | Instructions | Stitches |
|---|---|---|
| 1 | 6 sc in MR | 6 |
| 2 | inc × 6 | 12 |
| 3 | [inc, sc] × 6 | 18 |
| 4–7 | sc around for 4 rounds | 18 |
| 8 | [dec, 7 sc] × 2 | 16 |
| 9–10 | sc around for 2 rounds | 16 |
| 11 | [dec, 6 sc] × 2 | 14 |
| 12 | sc around | 14 |
| 13 | [dec, 5 sc] × 2 | 12 |
| 14–17 | sc around for 4 rounds | 12 |
Lightly stuff the lower arms if needed, keeping the upper ends flexible. The source allows the top to be folded flat and closed with 6 sc through both layers, or left open for sewing. Leave a long tail. Pin the arms symmetrically at the upper body sides and sew securely. No exact attachment round is specified.
Step 6 — Crochet the Mushroom Crochet Pattern Collar
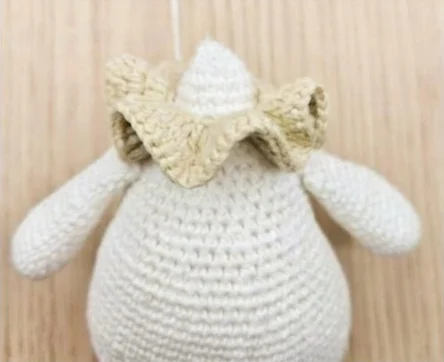
Use beige yarn for the ruffled collar. This mushroom crochet pattern collar is worked flat, then joined into a ring. The source gives a 28-chain version and mentions that the translator used a shorter 22-chain foundation to fit their own neck.
- Foundation: ch 28.
- Row 1: begin in the third chain from the hook. Work 2 dc in each of the remaining 26 chains: 52 dc. Turn.
- Row 2: work 2 dc in each of the 52 stitches: 104 dc. Fasten off with a sewing tail.
For this written version, the skipped foundation chains and a ch-2 turning lift are not counted among the 52 or 104 dc. The source does not explicitly define turning-chain counting; this convention keeps its stated totals consistent.
Bring the short ends together and sew them into a ring. Fit the collar over the narrow body tip before attaching the head. For the source’s optional ch-22 version, the same method calculates to 40 dc in Row 1 and 80 dc in Row 2; those counts are an editorial calculation, not additional printed source counts. Check the neck circumference rather than assuming one length will fit every yarn.
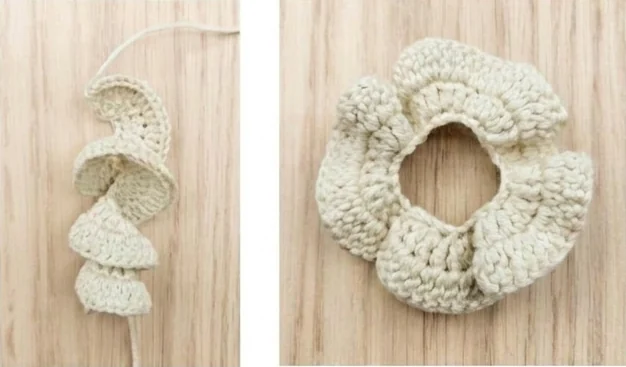
Step 7 — Attach the Mushroom Crochet Pattern Head
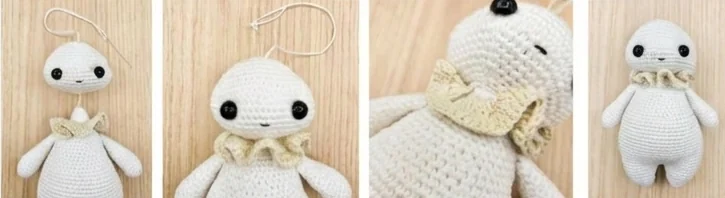
Place the stuffed head over the tapered neck. Pin the mushroom crochet pattern face forward, then check the arms and collar from the front and side. The head opening should cover the neck tip rather than sit on top of it like a separate ball.
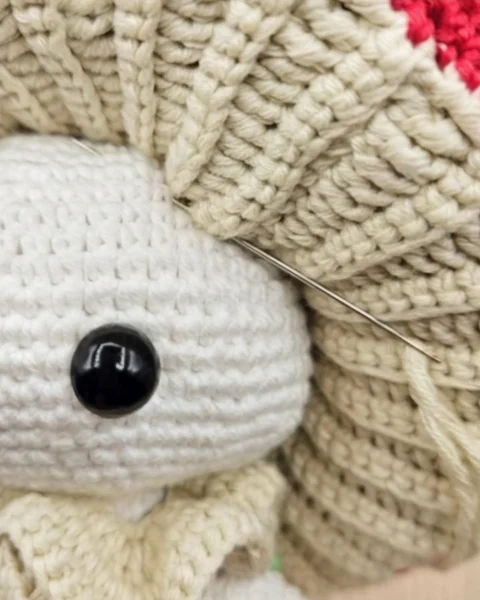
The source shows a thread passed up and down between the head and body to form a simple pivot-style connection. The photo sequence illustrates the route but does not specify exact entry points, the number of passes, or knot placement. This is not a complete engineered toy-joint specification.
For an experienced adult making a display piece, follow the illustrated thread route, pass through sturdy fabric rather than loose surface loops, repeat to secure the connection, and bury the knot. Do not overtighten if retaining movement. If reliable security is more important than movement, sew the head opening firmly around the neck instead; this is an editorial fixed-head alternative.
Step 8 — Make the Mushroom Crochet Pattern Gills
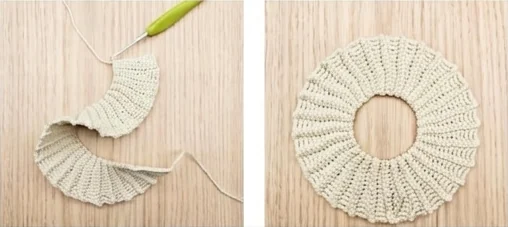
The beige underside is what makes this mushroom crochet pattern special. Work a narrow strip with stitches of different heights, alternating it with a single-crochet return row. The strip becomes a textured ring.
- Foundation: ch 14.
- Row 1: from the second chain, work 4 sc, 3 hdc, 3 dc, and 3 tr: 13 stitches. Turn.
- Row 2: sc across all 13 stitches, working BLO; turn.
- Continue alternating the mixed-height row and the 13-sc return row until you have 56 rows total, or 28 two-row repeats. Work subsequent rows BLO as stated in the source. Leave a long tail and sew the strip’s short ends together.
Keep the tall-stitch edge on the outside and the short-stitch edge around the center opening. When joined, the mushroom crochet pattern underside should form radiating gills, not a tightly twisted tube. The source photo is the shape checkpoint.
Step 9 — Crochet the Red Mushroom Cap
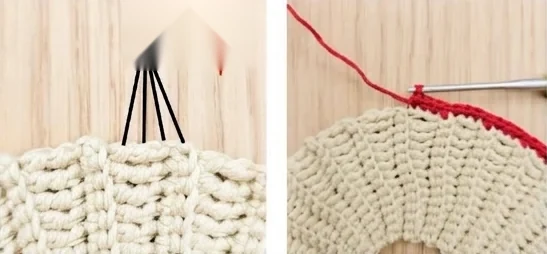
Turn the gill ring so its right side faces you. Join red yarn at the tall outer edge. For this mushroom crochet pattern cap, the red dome is worked directly into that outer edge, not sewn on as a separate flat circle.
Pickup Round 1: work 3 sc into each tall tr row-end and 1 sc into each short sc row-end. With 28 of each row-end type, this gives 28 × 3 + 28 × 1 = 112 sc. Use the picture to identify the row-end insertion points.
On small screens, swipe this table sideways to see every column.
| Round | Instructions | Stitches |
|---|---|---|
| 1 | Pick up around gill ring as described above | 112 |
| 2 | [3 sc, inc, 3 sc] × 16 | 128 |
| 3–5 | sc around for 3 rounds | 128 |
| 6 | [7 sc, dec, 7 sc] × 8 | 120 |
| 7 | [5 sc, dec, 5 sc] × 10 | 110 |
| 8 | sc around | 110 |
| 9 | [4 sc, dec, 4 sc] × 11 | 99 |
| 10–11 | sc around for 2 rounds | 99 |
| 12 | [9 sc, dec] × 9 | 90 |
| 13 | [13 sc, dec] × 6 | 84 |
| 14 | sc around | 84 |
| 15 | [6 sc, dec, 6 sc] × 6 | 78 |
| 16 | [11 sc, dec] × 6 | 72 |
| 17 | sc around | 72 |
| 18 | [5 sc, dec, 5 sc] × 6 | 66 |
| 19 | [9 sc, dec] × 6 | 60 |
| 20 | sc around | 60 |
| 21 | [4 sc, dec, 4 sc] × 6 | 54 |
| 22 | [7 sc, dec] × 6 | 48 |
| 23 | sc around | 48 |
| 24 | [3 sc, dec, 3 sc] × 6 | 42 |
| 25 | [5 sc, dec] × 6 | 36 |
| 26 | [2 sc, dec, 2 sc] × 6 | 30 |
| 27 | [3 sc, dec] × 6 | 24 |
| 28 | [sc, dec, sc] × 6 | 18 |
| 29 | [sc, dec] × 6 | 12 |
| 30 | dec × 6 | 6 |
Work the cap in a spiral, as the translator preferred, unless you deliberately choose joined rounds and can keep the same stitch totals. After Round 30, fasten off and close the final 6-stitch opening. Stuff the cavity later through the underside’s central opening; do not force filling through the closed crown.
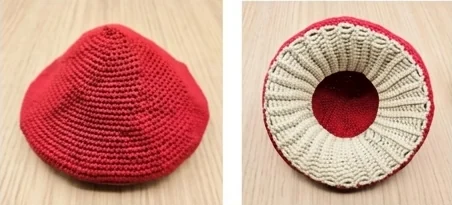
Step 10 — Add Spots and Stuff the Mushroom Cap
White spots give the mushroom crochet pattern its classic toadstool look. The source suggests approximately five small and five large circles, with the final quantity and arrangement adjusted to suit the cap.
On small screens, swipe this table sideways to see every column.
| Spot size | Instructions | Finish |
|---|---|---|
| Small | 6 sc in MR (6) | Fasten off; leave a sewing tail |
| Large | Round 1: 6 sc in MR (6). Round 2: inc × 6 (12). | Fasten off; leave a sewing tail |
Pin the circles around the red dome, varying the sizes and leaving breathing room between them. Sew them securely with matching yarn. Although the source also mentions glue, sewn attachment is the more controllable choice for a washable crochet object; adhesive is not used in this written method.
Add a small amount of stuffing between the red dome and beige gills through the underside opening. Spread it evenly rather than packing the rim tightly. The source specifically warns that too much stuffing makes the mushroom crochet pattern top-heavy.
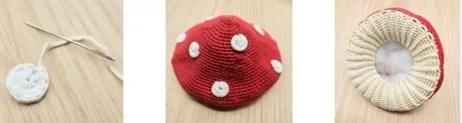
Step 11 — Finish the Mushroom Crochet Pattern Sprite
Position the cap over the finished head with the face visible beneath its front rim. Pin it securely before sewing. Check from the front, back, and both sides so the mushroom crochet pattern cap does not tilt unexpectedly.
Following the source assembly photo, sew the gill fabric to the head using small, even stitches. Catch strong fabric loops without pulling the brim out of shape. The source does not specify a head attachment round, so choose the position by the photographed proportions and your actual yarn tension.
Embroider fine green stems near the lower legs and small red French-knot flowers at their tips, as shown in the finished mushroom crochet pattern photographs. Keep embroidery tails inside the body and avoid long loose surface loops. The source identifies the flowers as knot embroidery but does not provide an exact placement chart.
Bury all ends, smooth the stuffing, and check every sewn joint. If you use a display stand, support the piece without pushing sharp fixings through the fabric. A wooden base and optional small eye parts make the photographed arrangement a decorative display, not automatically a child-safe toy.
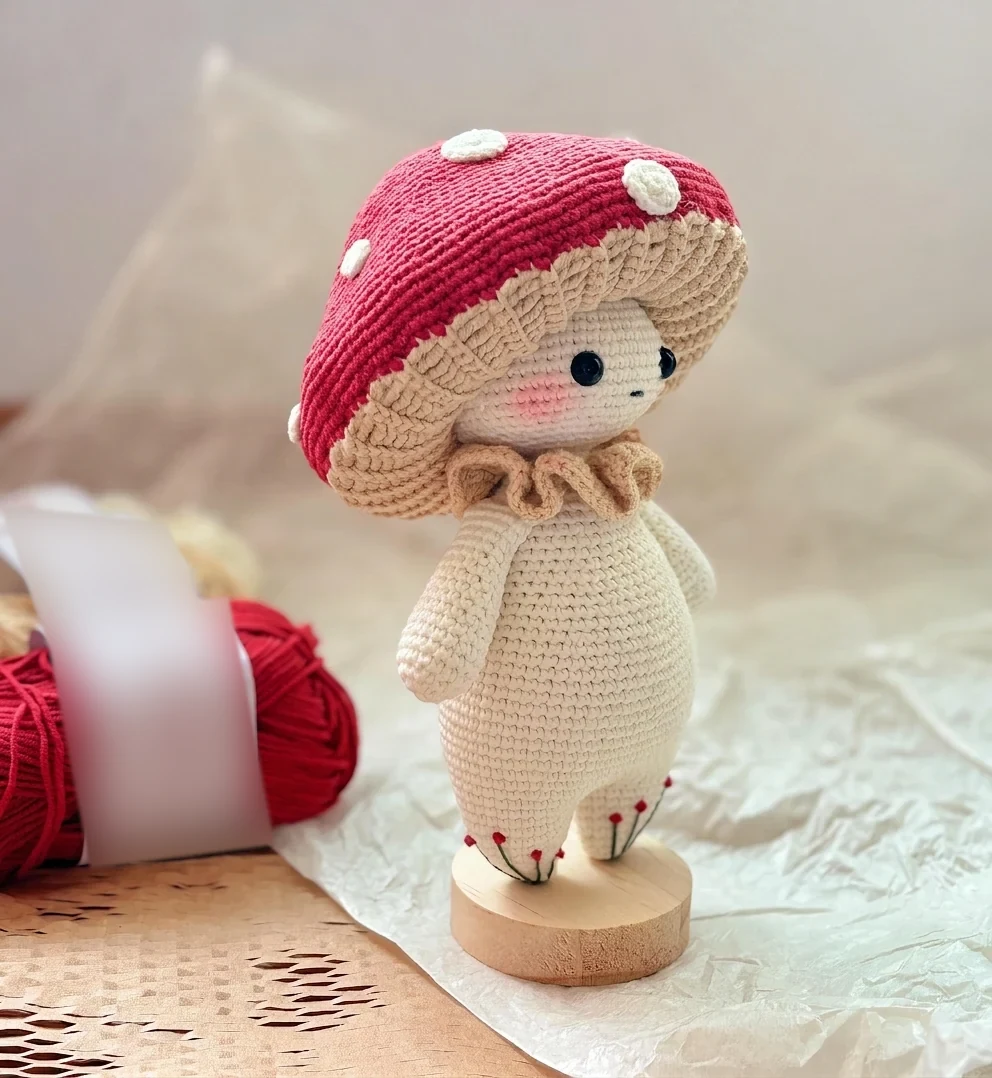
Mushroom Crochet Pattern: All Finished Reference Views
These four additional mushroom crochet pattern views come from the supplied collage. Together with the front and side photographs above, they show every finished-view panel included in the reference set. Use them for overall proportions rather than counting stitches from photographs.
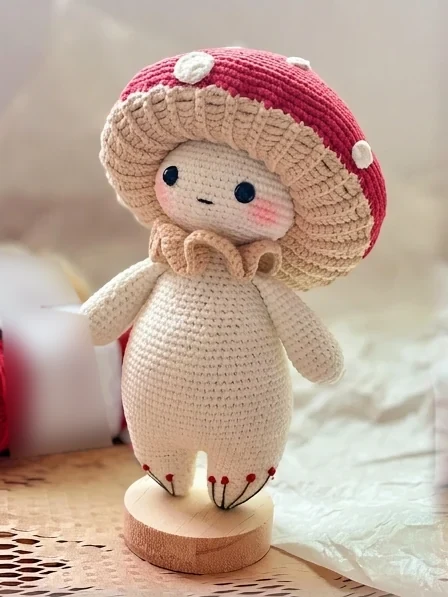
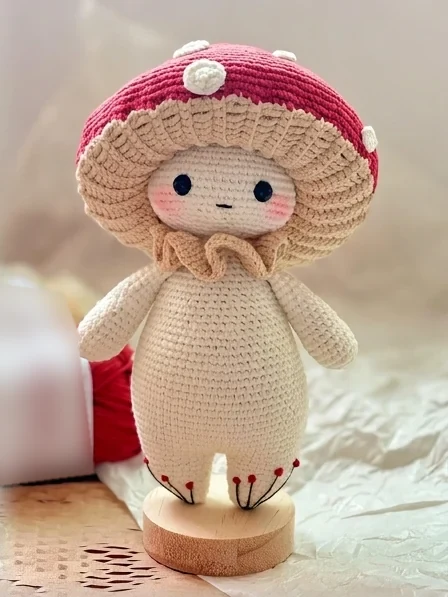
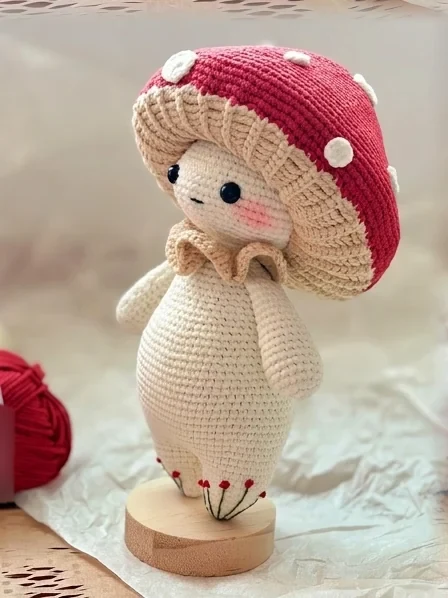
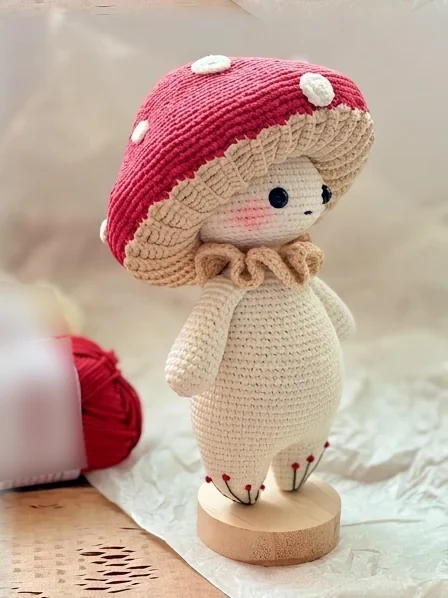
Mushroom Crochet Pattern FAQ
Is this mushroom crochet pattern beginner-friendly?
It is an intermediate project. Most rounds use single crochet, but the shaping, mixed-height gill rows, row-end pickup, embroidery, and sewing benefit from amigurumi experience. Practice a small gill sample first.
What yarn and hook does the original mushroom crochet pattern use?
The supplied pages do not state them. Choose a smooth amigurumi yarn and a hook that makes a dense, flexible fabric. Keep structural colors the same thickness. No finished size or yardage can be verified from these pages alone.
Why does the body stay at 42 stitches in Round 25?
That round contains three increases and three decreases, so the stitch total stays the same while the shape changes. Keep the full sequence rather than replacing it with an ordinary straight round.
How does the mushroom crochet pattern cap start with 112 stitches?
The gill ring contains 56 rows: 28 tall-stitch row ends and 28 sc row ends. Picking up 3 sc into each tall end and 1 into each short end gives 84 + 28 = 112 stitches.
Do I need a movable head?
No. The source illustrates a simple thread connection intended to allow movement, but does not supply exact joint engineering. A securely sewn fixed head is an editorial alternative if movement is not important.
Can I shorten the ruffled collar?
The source mentions ch 22 instead of ch 28. Starting in the third chain gives 20 working chains, so the same increases calculate to 40 dc, then 80 dc. Check the actual neck circumference before joining the ends.
How much stuffing belongs in the mushroom cap?
Use a light, evenly spread layer. Too much filling makes the large cap heavy and can distort the gills. Try the cap on the head before sewing it permanently.
Are all process photographs included?
Yes. The body comparison, collar preparation, collar placement, four-frame head connection, gill strip and ring, annotated cap pickup, finished cap views, spots/stuffing strip, and cap-sewing close-up are included, plus all finished reference views. Source-based images were retouched to remove watermark overlays.
Has this mushroom crochet pattern translation been physically tested?
No. Stitch-count arithmetic has been checked, but the source lacks several supply, positioning, and assembly details. This is a translated explanatory guide, not an independently tested or safety-certified toy pattern.
Explore More Crochet Patterns
After this mushroom crochet pattern, browse our crochet pattern library for your next handmade project. Explore all crochet pattern categories for a wider mix of toys, gifts, and accessories, or visit the crochet wearables collection when you are ready for a wardrobe project.




