

CROPPED JUMPER • CHUNKY TEXTURE • US CROCHET TERMS
V-Neck Crochet Sweater: A Step-by-Step Cropped Jumper Guide
Make a V-neck crochet sweater with touchable raised texture, relaxed sleeves, and playful pink-and-blue edging. This cropped jumper combines a pearl-gray body with a bold neckline, creating a cozy layer that looks lovely with high-waisted jeans.
This V-neck crochet sweater guide explains the yarn, gauge, six chest widths, body panels, neckline shaping, sleeves, and finishing. Read the editorial checkpoints first: the supplied magazine pages contain conflicting instructions, and this working adaptation has not been crochet-tested.
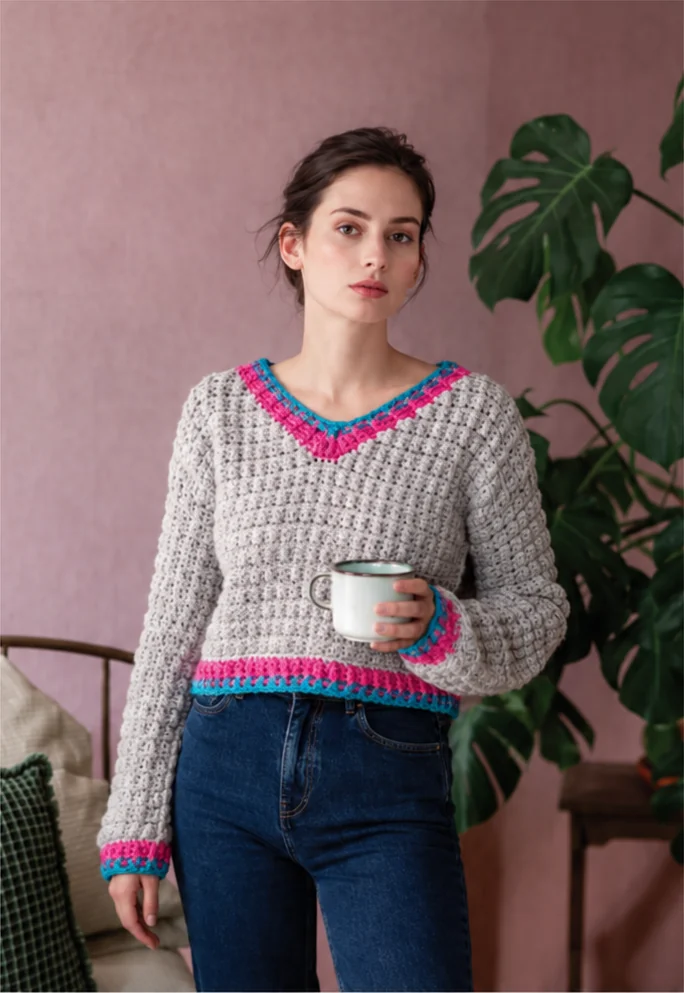
THE PROJECT AT A GLANCE
Raised texture.
A colorful V-neck finish.
An intermediate V-neck crochet sweater worked as front and back panels, with flat sleeves and contrast ribbing.
Before You Start Your V-Neck Crochet Sweater
The supplied Cropped V-Neck Jumper pages credit Rhian Drinkwater. This is an explanatory adaptation, not an original My Crochet Universe design. The photographs and schematic below are cropped from your supplied reference pages. Confirm publication rights before publishing the source images or pattern adaptation.
All instructions below use US terminology. The magazine uses UK terms: its dc becomes US sc; dtr becomes US tr; htr becomes US hdc; tr becomes US dc. Keep one system throughout your V-neck crochet sweater. Ch 1 never counts as a stitch. The ch 2 in edging rounds counts as the first indicated post stitch or hdc.
1. Materials for the V-Neck Crochet Sweater
The reference V-neck crochet sweater uses Malabrigo Chunky, 100% merino wool, 100 g / 95 m / 104 yd. Match both gauge and fabric feel when substituting: a stiff yarn can change the drape, especially around the shoulders.
On small screens, swipe this table sideways to see every column.
| Size label* | A: Pearl CH036 | B: Shocking Pink CH184 | C: Bobby Blue CH027 |
|---|---|---|---|
| S | 7 skeins | 1 skein | 1 skein |
| M | 8 skeins | 1 skein | 1 skein |
| L | 9 skeins | 1 skein | 1 skein |
| XL | 10 skeins | 1 skein | 1 skein |
| 2XL | 11 skeins | 1 skein | 1 skein |
| 3XL | 12 skeins | 1 skein | 1 skein |
Yarn A totals approximately 665 (760, 855, 950, 1045, 1140) m, or 728 (832, 936, 1040, 1144, 1248) yd. Each contrast color supplies 95 m / 104 yd. The source warns that almost all of A is used: an extra skein in the same dye lot is sensible for swatching or length adjustments.
- 8 mm crochet hook, or size needed for gauge.
- Tapestry needle, scissors, removable markers, and tape measure.
- Blocking mat or clean towels and rustproof pins.
- A notebook to track your chosen size, row numbers, and stitch counts.
Set aside the contrast colors until the main V-neck crochet sweater is assembled. Leave generous tails at joins; chunky wool can work loose when tails are too short.
2. Size and Gauge for Your V-Neck Crochet Sweater
Choose your V-neck crochet sweater by finished chest circumference, not by its letter label alone. Measure your chest and a relaxed sweater you already enjoy wearing. Positive ease is the difference between the garment measurement and your body measurement.
On small screens, swipe this table sideways to see every column.
| Working label* | Finished chest | Approx. inches | Body stitches | Shoulder stitches |
|---|---|---|---|---|
| S | 103 cm | 40.6 in | 57 | 13 |
| M | 113 cm | 44.5 in | 63 | 17 |
| L | 123 cm | 48.4 in | 67 | 17 |
| XL | 133 cm | 52.4 in | 73 | 19 |
| 2XL | 143 cm | 56.3 in | 79 | 21 |
| 3XL | 153 cm | 60.2 in | 85 | 23 |
*Source label caution: the materials list and measurement chart cover six sizes. The back-panel row lists appear to contain an extra repeated size entry. This working version uses six back finishing rows: 36 (38, 38, 40, 42, 42). That row assignment is editorial, not a confirmed erratum. The supplied “to fit bust” labels contain conflicting ranges. They are not repeated as reliable sizing advice.
The source lists 24 cm / 9½ in from hem to underarm for every size, and sleeve seam lengths of approximately 47 (47, 48, 48, 49.5, 49.5) cm, including the drop-shoulder area and trim. The gray sleeve itself is worked to about 42 cm / 16½ in from the body edge. These are different measurement points, not interchangeable targets.
Swatch before you commit
Target gauge is 11 stitches and 9 rows = 10 × 10 cm / 4 × 4 in in the alternating texture pattern. A measured section contains six tr and five sc on the texture row. Make a swatch larger than 10 cm, wash it as you will wash the garment, dry it flat, then count away from the edges.
For a practical V-neck crochet sweater swatch, ch 20 and work 19 sc, then repeat the texture and ridge rows in Step 3 until the fabric is at least 15 cm tall. If you have more than 11 stitches per 10 cm, try a larger hook; if fewer, try a smaller hook. Recheck both stitch and row gauge.
3. Learn the V-Neck Crochet Sweater Texture
On small screens, swipe this table sideways to see every column.
| Abbreviation | US meaning / action |
|---|---|
| ch / sl st | Chain / slip stitch |
| sc / sc blo | Single crochet / single crochet through back loop only |
| tr | Treble crochet: yarn over twice before inserting the hook |
| hdc / dc | Half double crochet / double crochet |
| FPdc / BPdc | Front-post double crochet / back-post double crochet |
| FPdc3tog | Join three front-post double crochets into one stitch |
| sc2tog / hdc2tog | Single / half double crochet two stitches together |
| RS / WS | Right side / wrong side of fabric |
Texture row: ch 1, sc in the first stitch, then repeat [tr in the next stitch, sc in the next stitch] to the end; turn. The tall tr stitches are pushed outward to form small bumps. This is not a multi-stitch bobble cluster.
Ridge row: ch 1, sc blo in every stitch; turn. Work into only the back strand of each stitch’s top V. Together, these two rows create the V-neck crochet sweater texture without adding or removing stitches.
Post stitches: for FPdc, yarn over and insert the hook from front to back to front around the next stitch’s post; complete a dc. For BPdc, insert from back to front to back. Alternate them to create ribbing. For hdc2tog, start an hdc in each of the next two stitches without finishing either, then yarn over and pull through all five loops.
To make sc2tog, insert the hook in the next stitch and pull up a loop, repeat in the following stitch, then yarn over and draw through all three loops. When a ridge row calls for this decrease, insert into the back loops of the two stitches. Mark the RS now: odd body rows are RS; even body rows are WS.
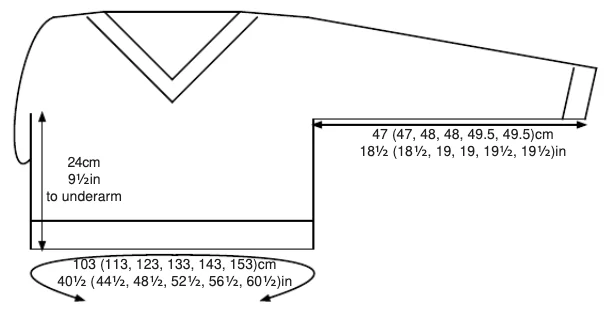
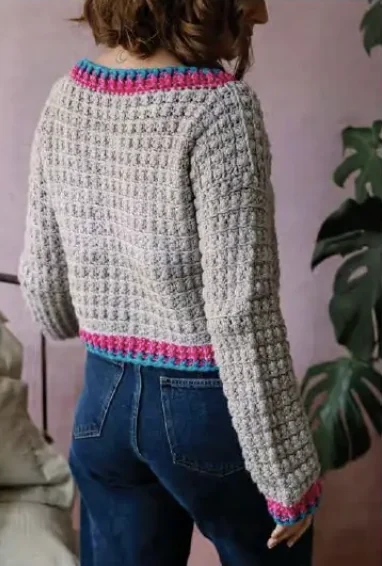
4. Crochet the Back of the V-Neck Crochet Sweater
Read numbers in this order throughout: S (M, L, XL, 2XL, 3XL). Highlight one column before starting the V-neck crochet sweater back. Use yarn A and your gauge hook.
- Foundation: ch 58 (64, 68, 74, 80, 86).
- Row 1 — RS: sc into the back bump of the second chain from the hook and each chain across. Turn. You have 57 (63, 67, 73, 79, 85) stitches.
- Row 2 — WS: ch 1, sc in first stitch, [tr in next stitch, sc in next stitch] to the end. Turn.
- Row 3 — RS: ch 1, sc blo across. Turn.
- Continue: repeat Rows 2–3 through Row 35 (37, 37, 39, 41, 41), keeping the same stitch count.
Divide the back shoulders
On Row 36 (38, 38, 40, 42, 42), ch 1, sc, then work [tr, sc] 6 (8, 8, 9, 10, 11) times. This forms the first shoulder with 13 (17, 17, 19, 21, 23) stitches. Fasten off.
Leave the next 31 (29, 33, 35, 37, 39) stitches unworked for the back neck. Rejoin yarn at the first stitch of the other shoulder with WS facing. Work sc, then [tr, sc] the same number of times. Fasten off. Each V-neck crochet sweater shoulder must have an identical stitch count.
5. Shape the Front of the V-Neck Crochet Sweater
Begin the V-neck crochet sweater front exactly as the back, using the same foundation and alternating texture rows. The following is a revised editorial shaping schedule, not a verbatim transcription. It aligns the final shoulder row with the back; it still requires a physical test for neckline depth and fit.
On small screens, swipe this table sideways to see every column.
| Size | Last full row | Split row | Stitches per half | Decrease rows | Final row |
|---|---|---|---|---|---|
| S | 21 | 22 | 27 | 14 | 36 |
| M | 24 | 25 | 30 | 13 | 38 |
| L | 22 | 23 | 32 | 15 | 38 |
| XL | 23 | 24 | 35 | 16 | 40 |
| 2XL | 24 | 25 | 38 | 17 | 42 |
| 3XL | 23 | 24 | 41 | 18 | 42 |
Split at the center
After the last full row in the table, mark the middle three stitches. On the split row, work the first 27 (30, 32, 35, 38, 41) stitches in that row’s established texture and stop at the marker. Leave the center three stitches unworked. Turn to work this half separately.
On odd-numbered rows, use sc blo throughout. On even-numbered rows, keep the alternating sc/tr sequence positioned as on the established fabric: identify each column rather than restarting the repeat blindly. At a partial row endpoint, work only the stitches present. Do not add a stitch to complete a pair.
Decrease along the V only
On every subsequent row, reduce one stitch at the neck edge: if the row begins at the neck, work sc2tog over the first two stitches; if it ends at the neck, work sc2tog over the last two. Work all other stitches in the established row texture. Use back loops for the decrease on ridge rows. Keep the outer side edge straight.
Make 14 (13, 15, 16, 17, 18) decrease rows. The shoulder now has 13 (17, 17, 19, 21, 23) stitches and ends on the final row shown in the table. Fasten off. This V-neck crochet sweater adaptation uses sc2tog instead of the source’s skipped-stitch/slip-stitch shaping, giving one explicit decrease on every shaping row.
Return to the split row, skip the marked center three stitches, and rejoin A to work the remaining half in the same row texture. Mirror the shaping: decrease at the neck only, with the same number of rows and final stitches. Place both front halves beside the back to check that the shoulder heights match.
6. Join the V-Neck Crochet Sweater Shoulders
Lightly block both panels to matching measurements. With RS together, match each front shoulder to its back shoulder, stitch for stitch. Use a neat slip-stitch seam or a sewn seam without working an additional full body row. The source joins while crocheting a further row; this adaptation uses a separate seam to preserve the revised row schedule.
Open the joined V-neck crochet sweater flat with RS facing. On each side, mark Row 18 on the front and on the back, counting from the hem. The sleeve pickup runs from one marker, across the shoulder join, to the other marker. Keep the same marker positions on both sides.
7. Crochet the V-Neck Crochet Sweater Sleeves
The V-neck crochet sweater sleeves are worked flat directly from the body edges, not as separate tapered tubes. Join yarn A at the Row 18 marker with RS facing.
- Pickup Row 1 — RS: ch 1 and work 37 (41, 41, 45, 45, 49) sc evenly along the marked armhole edge, including the shoulder join. Turn.
- Row 2 — WS: ch 1, sc, then [tr, sc] 18 (20, 20, 22, 22, 24) times. Turn.
- Row 3 — RS: ch 1, sc blo in every stitch. Turn.
- Repeat Rows 2–3 without shaping until the gray sleeve measures approximately 42 cm / 16½ in from the body edge. End both sleeves on the same type of row; fasten off.
For the opposite sleeve, repeat the pickup between the matching markers and keep the same graded count. The source’s left-sleeve text ends one line with “37 sts” for all sizes; that conflicts with its own repeats. The consistent count is 37 (41, 41, 45, 45, 49).
Before committing to the full sleeve length, pin the V-neck crochet sweater sides and try it on carefully. Drop shoulders change where the sleeve begins on your arm. A shorter or longer sleeve changes yarn use, so record any adjustments and repeat them on the other side.
8. Seam the V-Neck Crochet Sweater
Fold the V-neck crochet sweater with RS together. Match underarms, hems, cuffs, and corresponding texture rows. Pin first, then seam from the hem up the body side and along the sleeve underside. Repeat on the other side. Keep the seam flexible and avoid pulling tight at the underarm junction.
Turn the garment RS out and check that the side seams lie straight. If one sleeve appears longer, compare row counts before adding edging: blocking cannot reliably disguise a missing row repeat.
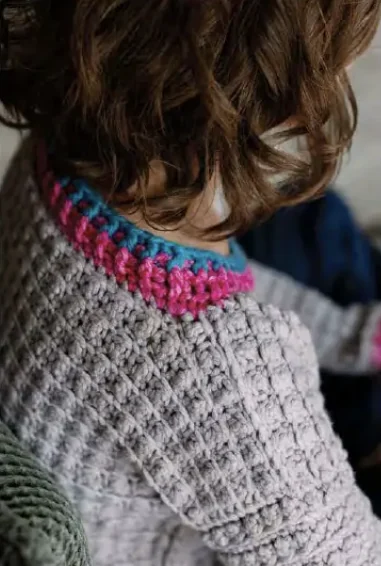
9. Add the V-Neck Crochet Sweater Neckband
Work the V-neck crochet sweater neckband in joined rounds with RS facing. Do not turn. Start at the back-right neck corner in yarn B. Keep the joining slip stitches loose enough to avoid a tight ridge.
- Round 1 — B: ch 1; sc across the back-neck stitches, along the first sloping front-neck row ends, across the center-front opening, and up the second slope. Join with sl st to the first sc.
- Pickup checkpoint: the source places four sc across the three-stitch center opening. Mark its center and aim for an even total around the neck. Adjust pickup spacing at the back, not by crowding the V point. No fixed neckline count is supplied.
- Round 2 — B: ch 2 (counts as one BPdc), FPdc around the next sc, then alternate BPdc and FPdc around; join to the top of ch 2.
- Round 3 — B: ch 2, FPdc around the next FPdc; keep matching post stitches until the FPdc immediately before the V point. Work FPdc3tog across the next three FPdc posts, skipping the two BPdc posts between them. Resume matching the post stitches and join. Fasten off B.
- Round 4 — C: join C at the back; repeat the post-rib round with a centered FPdc3tog at the V. Use the previous decrease as the middle front post, skip intervening back posts, and join. Fasten off.
How to work FPdc3tog: yarn over, insert around the first front post, pull up a loop, yarn over and draw through two loops; leave the stitch unfinished. Repeat around the next two selected front posts, then yarn over and pull through the four remaining loops.
The V-neck crochet sweater border should sit flat without pulling the shoulders inward. The source repeats a “Round 3” label after changing color; this guide calls that final blue round Round 4. Because neck pickups are uncounted and the front shaping is revised, swatch this border and verify the center-post alignment before finalizing it.
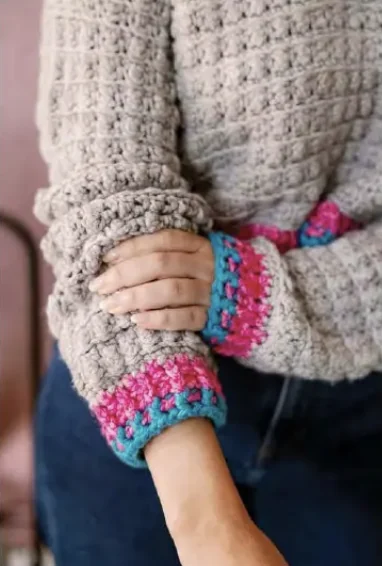
10. Finish the V-Neck Crochet Sweater Hem and Cuffs
Waistband: two pink rounds, then one blue
Join B at the right side seam of the V-neck crochet sweater with RS facing. Round 1: ch 2, work hdc in the reverse side of the foundation chain around the hem, then join. The starting chain counts as one hdc; do not work another stitch into its base. Aim for an even total, making a discreet adjustment near the seam if necessary.
Round 2: ch 2 (counts as BPdc), FPdc around the next hdc, then alternate BPdc and FPdc around; join. Round 3: ch 2, FPdc around the next front post, then work BPdc around each back post and FPdc around each front post; join and fasten off B. Round 4: join C and repeat Round 3. Fasten off.
Cuffs: controlled gathering at the wrist
Join B at the sleeve seam with RS facing. Round 1: ch 2 (counts as hdc), hdc in the next stitch, then repeat [hdc2tog over the next two stitches, hdc in the next stitch] around. Join without turning. This gathers the straight sleeve into the cuff.
Remainder clarification: the source does not explain incomplete repeats for every sleeve count. Work any final unpaired stitch as one hdc; if two stitches remain, work hdc2tog. Count the completed round. If it is odd, undo the last decrease and replace it with two hdc to obtain an even count for ribbing. This is an editorial finishing adjustment.
Work cuff Rounds 2–3 in B and Round 4 in C exactly as for the waistband. Repeat on the second sleeve with the same final cuff count. Check wrist comfort before fastening off your V-neck crochet sweater cuffs; a very tight post-stitch band can make the sleeves difficult to put on.
11. Block and Check the V-Neck Crochet Sweater
Weave in ends securely along matching-color stitches, leaving enough flexibility for the fabric to stretch. Follow your yarn’s care instructions: gently wash or soak if appropriate, support the wet garment, roll it in a towel without wringing, and lay it flat. Never hang a wet chunky-wool sweater.
- Align both side seams and smooth the neckline into a clean V.
- Match the finished chest to the chosen measurement without aggressive stretching.
- Check both sleeve lengths, the hem, and both cuff openings.
- Let the V-neck crochet sweater dry completely before wearing or storing it.
The finished V-neck crochet sweater should feel relaxed through the chest, comfortable at the wrists, and stable at the shoulder seams. Record the hook, blocked gauge, yarn use, and any changes so a second version is easier to reproduce.
V-Neck Crochet Sweater Troubleshooting
On small screens, swipe this table sideways to see every column.
| Problem | Check first | Practical adjustment |
|---|---|---|
| Body too wide or narrow | Blocked stitch gauge and foundation count | Reswatch and change hook size before remaking a panel. |
| Shoulders do not align | Final row and shoulder count | Use the revised front schedule consistently; do not mix schedules. |
| V band ripples | Too many edge pickups or loose tension | Remove the border and space pickups more evenly. |
| V band pulls inward | Too few pickups, tight joins, or excessive decreases | Recheck pickup spacing and center-post placement on a sample. |
| One cuff tighter | Final count and post-stitch tension | Rework to match the other cuff; try on before cutting yarn. |
V-Neck Crochet Sweater FAQ
Is this V-neck crochet sweater suitable for beginners?
It is better suited to intermediate crocheters. You should be comfortable counting rows, working into back loops, making decreases, reading graded numbers, and sewing seams. Practice the two-row texture and post ribbing on a small swatch first.
Does the guide use US or UK crochet terms?
The tutorial uses US terms throughout. The supplied magazine pattern uses UK terms, so do not combine its dc or dtr abbreviations with the US instructions here. The conversion note above explains the main differences.
Can I use a different yarn for the V-neck crochet sweater?
Yes, if the washed swatch matches 11 stitches and 9 rows per 10 cm and has a similar flexible, chunky fabric. Compare meterage rather than buying by ball count alone. Fiber changes can affect weight, warmth, stretch, and drape.
How do I choose my V-neck crochet sweater size?
Use the finished chest measurements of 103–153 cm, then compare with your own chest and a favorite sweater. The source’s body-size labels are inconsistent, so the letter labels should not be your only guide.
Can I make the cropped body longer?
You can add complete two-row texture repeats below the neckline shaping, but it changes yarn requirements and the row numbering. Move the armhole markers and shaping schedule by the same added rows to preserve the intended armhole depth; make a written plan before starting.
Why does my V-neck crochet sweater neckline curl or wave?
A tight band can mean too few pickups, tight joining stitches, or too much decrease pressure. A wavy edge usually has excess pickups or loose tension. Test a small section, check the center marker, and rework the border rather than stretching it into shape.
Where do the V-neck crochet sweater photographs come from?
These are the original garment photographs cropped from the supplied pattern pages, not AI replacements. They show the source design and its details. They do not verify the editorial shaping changes in this guide, which still need independent crochet and fit testing.
Is this V-neck crochet sweater pattern independently tested?
No. The guide documents editorial changes needed to reconcile the supplied pages. The revised front schedule, neckline pickup, and cuff remainder method should be crochet-tested before publication as a verified pattern or use as a paid design.
Where can I find more crochet PDF patterns?
Use the store buttons to browse My Crochet Universe’s general PDF pattern collection. Each listing explains its own contents. This article does not claim that a PDF of this sweater is currently available.
More Crochet Projects to Explore
If the V-neck crochet sweater has inspired your next wardrobe project, explore our crochet wearables collection. For a wider mix of accessories and handmade gifts, visit the crochet pattern library or browse all crochet pattern categories.




