

Crochet Frog Pattern: A Playful Long-Neck Charm Guide
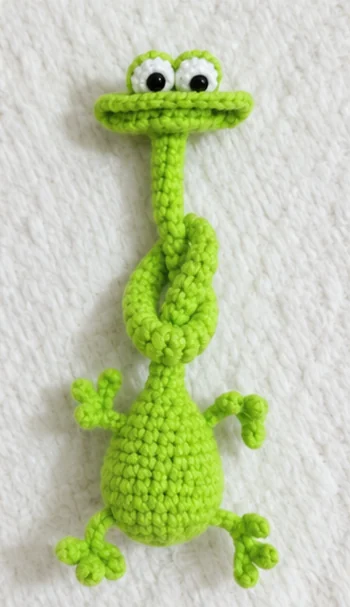
This crochet frog pattern has a tiny rounded body, a very long narrow neck and a broad mouth that carries the whole expression. Raised white eyes sit above the green mouth edge, while a small red tongue adds a bright detail inside. Four branched limbs make the outline look lively without giving the body much bulk.
The construction of this crochet frog pattern is different from a conventional stuffed frog with a large round head. Here, a shaped circular mouth piece sits at the top of a six-stitch neck. This guide follows that structure, with separate count maps, eye instructions, a tongue sequence and practical assembly advice.
Crochet Frog Pattern: Understand the Long-Neck Build
The visual balance of this crochet frog pattern comes from three separate shapes: the compact body, the slim neck and the broad face. The body reaches twenty-four stitches at its widest point. It then narrows to six stitches, which continue upward for the long neck. Keeping that transition even helps the head face the intended direction.
Make the small face components of this crochet frog pattern as pairs and keep them in separate groups. The green eye bases each contain ten stitches; the white centers each contain six. Those are not the same counts as the duck in the collection. Check the frog instructions instead of transferring a familiar eye size from another animal.
PREFER TO KEEP YOUR PATTERN PAGES TOGETHER?
A small frog, part of a bigger character collection
Enjoy this crochet frog pattern guide, then visit the store to explore digital crochet patterns. The long-neck frog belongs to the six-design Long-Neck Animal Charms collection.
Digital patterns, not finished crochet items.
Crochet Frog Pattern Yarn, Hook and Materials
- Lime-green yarn for the body, neck, mouth piece, limbs and outer eye bases.
- White yarn for the eye centers and red yarn for the tongue.
- Yarn described as 4-ply milk cotton, with a 2.0 mm crochet hook.
- A stitch marker, tapestry or yarn needle, scissors and fiberfill for the body.
- Two 4.0 mm safety eyes, or black yarn for embroidered pupils.
- 1.0 mm craft wire for the supported-neck construction.
- Suitable joining supplies. The assembly instructions allow sewing or hot glue; the guidance here emphasizes checking placement before attachment.
Choose a fabric that keeps its shape
For this crochet frog pattern, the yarn description is not a complete fiber label or an exact international weight category. Read the packaging of the yarn you actually buy. A label saying “4-ply milk cotton” does not establish a particular blend or guarantee that every substitute will produce the same size.
Work a small test with the 2.0 mm hook. Look for stitches you can identify without large gaps opening between them. Extremely tight tension can make the narrow neck hard to work, while loose fabric may show the body stuffing or fail to hold the eye layers neatly.
Keep the wire-supported version decorative
The neck in this crochet frog pattern is supported by craft wire and left unstuffed. Treat that construction as decorative. Internal wire, small eyes and attached limbs mean the finished piece is not automatically suitable for babies, young children or pets. Embroidered pupils do not remove the other construction hazards.
Read the Stitches Before Starting
| Term | Meaning in US terminology |
|---|---|
| MR | Magic ring |
| ch | Chain |
| sc | Single crochet |
| sl st | Slip stitch |
| inc | Increase: work 2 sc in one stitch |
| dec | Decrease: single crochet 2 stitches together |
| Rnd / Rnds | Round / rounds |
| st / sts | Stitch / stitches |
This crochet frog pattern uses US stitch names. If you normally use UK terminology, translate the names before starting rather than switching halfway through a round. The Craft Yarn Council abbreviation guide provides a useful reference for the general terms.
Start the Ring and Keep the Round Boundary Clear
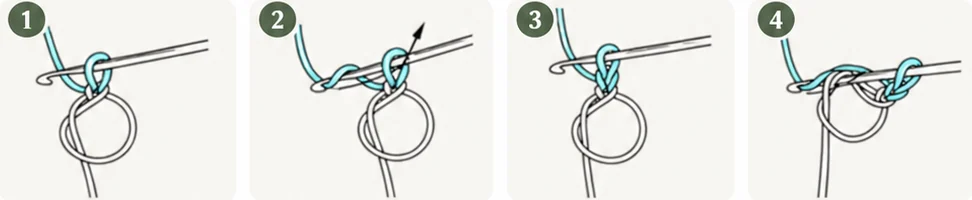
Secure the magic ring
The body, mouth and eye circles in this crochet frog pattern begin with a magic ring. Make the starting chain without counting it as a stitch, work the required single crochets into the ring, then pull the center closed. Count the actual sc stitches before joining so the starting loop cannot be mistaken for an extra stitch.
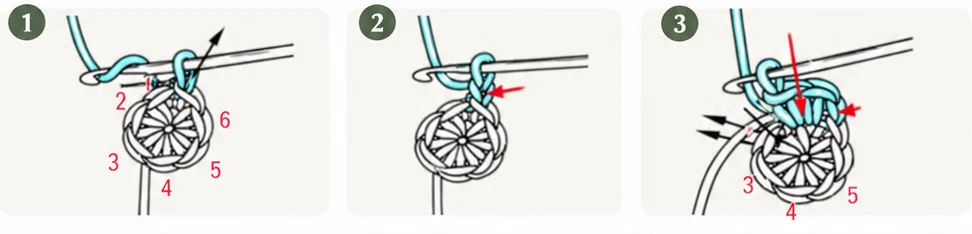
Use joined rounds, not an unmarked spiral
Work this crochet frog pattern in joined rounds. Join with a slip stitch into the first actual sc of the round, then make ch 1 to begin the next round. The slip stitch and starting chain are not included in the working stitch count. Put the marker in the first sc, not in the chain above the join.

That distinction matters most on the six-stitch neck. Adding the join to the count can turn the narrow tube into seven stitches without looking obviously wrong at first. Move the marker deliberately after each round and keep a separate tally for the number of completed rounds.
Crochet Frog Pattern Body and Long Neck
BODY COUNT MAP · 6 → 12 → 18 → 24 → 18 → 12 → 6
The body of this crochet frog pattern starts at the base and continues directly into the neck. Use the table to check the end-of-round totals. It separates the shaping checkpoints from the even rounds so you can spot a count error before working the long repeat.
| Round | Checkpoint / action | Sts |
|---|---|---|
| 1 | MR, 6 sc, pull tight; join to first sc. | 6 |
| 2 | Ch 1, 6 inc; join. | 12 |
| 3 | Expansion checkpoint. | 18 |
| 4 | Expansion checkpoint. | 24 |
| 5–7 | Ch 1, 24 sc; join each round. | 24 |
| 8 | Narrowing checkpoint. | 18 |
| 9–10 | Ch 1, 18 sc; join each round. | 18 |
| 11 | Narrowing checkpoint. | 12 |
| 12 | Ch 1, 12 sc; join. | 12 |
| 13 | Ch 1, 6 dec; join. | 6 |
| 14–55 | Ch 1, 6 sc; join in every round. | 6 |
The checkpoint rows in this crochet frog pattern map give totals, not a new placement sequence for increases or decreases. Use them to audit the shape while following the working instructions. A correct final number alone does not establish that the shaping has been distributed as intended.
Fill the body, not the neck
Add fiberfill to the body while the opening is still accessible. Small portions are easier to distribute around the curved sides than one tightly packed wad. Keep the body supported without stretching the stitches far enough to reveal gaps. For the wire-supported version, keep the neck section clear of stuffing.
Track all forty-two neck rounds
Rounds 14–55 of this crochet frog pattern contain forty-two rounds of six sc. A first-stitch marker tells you where a round begins; it does not tell you how many rounds you have completed. Use a written tally or row counter as well, especially when stopping halfway through the neck.
The neck length may be adjusted, but the written range is the reference for the pictured proportions. Insert the shaping wire before closing the neck opening, then sew the opening closed, fasten off and weave in the ends. No wire length or end-treatment specification is provided; do not leave sharp ends exposed or force wire through the fabric.
Shape the Crochet Frog Pattern Mouth
MOUTH COUNT MAP · 6 → 12 → 18 → 24 → 30 → 36
The face in this crochet frog pattern starts as a separate circular green piece. Its broad curved edge forms the mouth rather than a conventional stuffed ball-shaped head. Compare the width of that piece with the eye layers before attaching it to the neck.
| Round | Mouth checkpoint | Sts |
|---|---|---|
| 1 | MR, 6 sc; pull tight and join. | 6 |
| 2 | Ch 1, 6 inc; join. | 12 |
| 3 | Expansion checkpoint. | 18 |
| 4 | Expansion checkpoint. | 24 |
| 5 | Ch 1, [3 sc, inc] × 6; join. | 30 |
| 6 | Ch 1, [2 sc, inc, 2 sc] × 6; join. | 36 |
Leave a long tail for sewing when fastening off the mouth piece, and secure the other ends. The shaping photo shows how a curved opening can sit beneath the eyes. It is a visual guide to the form, not a stitch chart or a promise of an exact finished width.
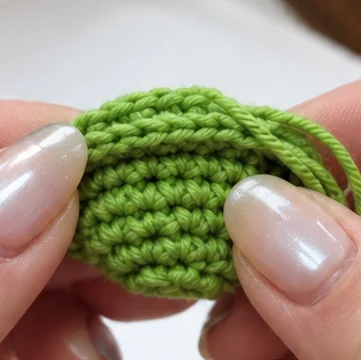
Check the opening before placing the eyes
On this crochet frog pattern, a mouth pulled too tight can hide the tongue and crowd the eye whites. Hold the mouth in the intended shape, then test both eye stacks above it. Compare the front and side views before fastening the face to the neck so the lip does not tilt unexpectedly.
LONG-NECK CHARACTERS · DIGITAL PATTERNS
Make room for another expressive character
The character in this crochet frog pattern joins ducks, a goose and two chicken variations in the wider collection. Browse the pattern store and review the available PDF listings.
Check the listing for contents and purchase terms.
Crochet Frog Pattern Eyes: Make Matching Layers
Green outer eyes — make two
For each green eye base in this crochet frog pattern, make a magic ring and work 10 sc into it. Pull the ring tight and join with a slip stitch to the first sc: 10 stitches. Ch 1 to finish, fasten off and weave in the ends. Compare the two circles before adding their white centers.
White eye centers — make two
For each white center, make a magic ring and work 6 sc into it. Pull tight and join to the first sc: 6 stitches. Ch 1 to finish, fasten off and weave in the ends. Keep the white circles together so neither gets mixed with the larger green pieces.
Fit the pupils while the backs remain accessible
The eyes in this crochet frog pattern sit above the broad green mouth. Position one white piece above each outer green base, with the pupil centered in the white area. If using safety eyes with washers, follow the manufacturer’s fitting instructions while the backs are still accessible; gluing a pupil on top is not the same fitting method.
Set both assembled eyes in position at once. Look at how much white is visible above the mouth and whether the pupils point in the same direction. No exact row number or stitch spacing is specified, so do not treat an invented spacing measurement as part of the pattern.
Make the Small Red Tongue
The tongue gives this crochet frog pattern a useful color contrast without requiring another large component. With red yarn, ch 8. Starting in the second chain from the hook, work 7 sc. Ch 1 to finish, fasten off and weave in the ends.
Test the tongue inside the mouth opening before attaching it. Keep enough red visible to read clearly from the front without covering the whole green face. The seven-stitch strip is the written construction; a longer or wider tongue would be a modification rather than the same piece.
Plan Four Matching Branched Limbs
Four small limbs complete this crochet frog pattern. Their branching tips create the frog-like outline, so compare all four before sewing. Keep the pair near the upper body and the pair at the lower body visually balanced without pulling them tightly into position.
The detailed branch sequence is outside this guide. Use the finished-character photo to compare shape and attachment, not to infer hidden chain counts. A short branch must have enough available chain stitches for its return stitches; do not force an extra slip stitch into a chain that is not there.
Assemble the Face, Neck and Four Limbs
- Position the two green outer eye pieces at the sides of the head area, then place one white piece above each. Check the pupil alignment before securing the layers.
- Place the red tongue inside the mouth opening and attach it without hiding the opening.
- Attach the shaped mouth/head assembly to the top of the neck. Support the neck while sewing so the face does not pull sideways.
- Sew the four limbs to the body. Compare both sides and the upper and lower pairs before tightening the final seams.
- Weave in the ends, remove all temporary markers and pins, and inspect the small attachments individually.
Sewing this crochet frog pattern lets you adjust the attachment angle as you work. Hot glue is also allowed for the decorative assembly, but follow the adhesive instructions and keep it out of visible stitch gaps. Neither method by itself turns the figure into a tested toy or a load-bearing keychain.
Crochet Frog Pattern Troubleshooting
The neck has seven stitches instead of six
Check the round boundary first. In this crochet frog pattern, the starting chain and joining slip stitch do not add to the total. If an extra stitch appears, undo the affected round and identify the first actual sc. Hiding it with an unplanned decrease can leave a visible change in the tube.
The mouth hides the red tongue
Test the shape before pulling the last sewing stitches tight. The opening may have been drawn too narrow, or the tongue may sit too far back. Check the front view while supporting the neck, then adjust the attachment rather than stretching the lip until the fabric distorts.
The two eyes seem different sizes
Lay the green bases together and compare them separately from the white centers. A tighter magic ring or different tension can change the visible diameter even when both pieces contain the right count. Correct the mismatched component before trying to disguise it with uneven placement.
The pose changes after handling
A long neck gives this crochet frog pattern its character, but it should not be twisted repeatedly at one point. Inspect the face join and internal support if the head begins to lean. Do not keep bending it to compensate for a loose seam or an attachment that needs repair.
Display and Care for Your Frog
Treat the finished crochet frog pattern project as a decorative piece. Keep the neck and branched limb ends away from places where they can snag or be pulled. No hanging-loop or hardware attachment sequence is included here, so do not assume a keyring connection is established by the construction guide.
Clean according to the actual yarn, wire, eye components and adhesive used. A glued or wire-supported ornament should not automatically be treated as machine-washable. Let the piece dry fully and inspect the attachments afterward. Avoid hanging it where it can obstruct a driver’s view or interfere with vehicle controls.
Explore the Long-Neck Animal Charms Collection
This crochet frog pattern guide keeps the focus on the green long-neck character. The other designs have their own color choices, hook details and small pieces. When you move to another animal, use its own instructions instead of copying the frog’s neck length or eye counts across.
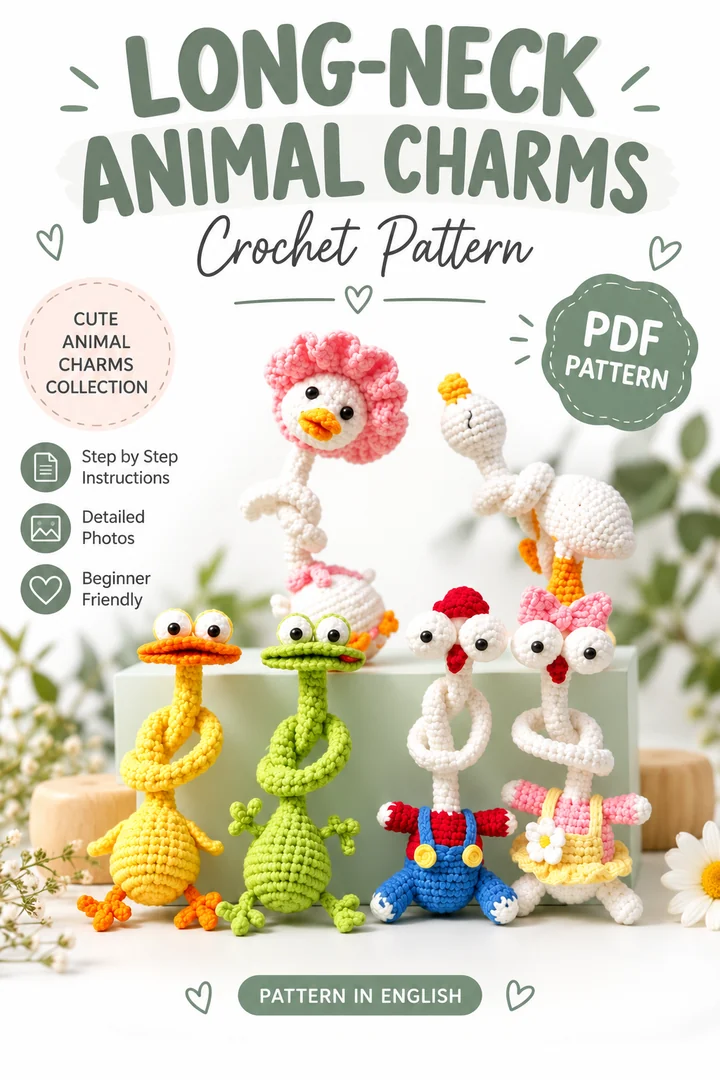
LONG-NECK ANIMAL CHARMS
Like the frog? Explore the Long-Neck Animal Charms collection.
This crochet frog pattern guide focuses on one green character. The English-language collection also features Sunny Duck, Goose, Little White Duck and two Screaming Chicken variations.
Visit the store to browse digital patterns and check the current listing details before choosing your next project.
PDF pattern collection · No physical item included
More Expressive Crochet Projects
For another approach to large eyes and broad mouths, explore these expressive crochet animal designs. They are separate projects, not substitute shaping instructions for this frog. You can also browse the crochet pattern library for other character ideas.
Frequently Asked Questions
What hook does this crochet frog pattern use?
Use the specified 2.0 mm hook with the yarn described as 4-ply milk cotton. Check the yarn label and your fabric rather than assuming all yarn sold under that description has the same thickness or fiber blend.
Are the rounds joined or continuous?
They are joined. Slip stitch to the first sc at the end of the round and make ch 1 for the next round. Neither the chain nor the join is counted as a working stitch.
How long is the narrow neck section?
The written narrow-neck repeat runs from Round 14 through Round 55: forty-two rounds of six sc. That is a round count, not a finished measurement in centimeters or inches.
Are the frog eye counts the same as the duck?
No. Each frog outer eye base contains 10 sc and each white center contains 6 sc. Keep the components for the separate animals in clearly marked groups.
Can I leave the wire out?
The supported version relies on craft wire and leaves the neck unstuffed. Omitting the support is a modification, and the guide does not promise the same shaped pose or an equivalent wire-free result.
Is this crochet frog pattern a complete stand-alone tutorial?
No. This guide provides count maps, clear eye and tongue instructions, and construction and finishing advice. It does not rewrite uncertain shaping placements or supply the detailed branched-limb sequence.
What is the finished size and yarn amount?
No formal gauge, finished measurement, yarn quantity or completion time is specified. Measure and record your own sample rather than treating the cover photo as a scale reference.
Let the Face Lead the Finished Character
The strongest feature of this crochet frog pattern is the relationship between the wide mouth, raised eyes and slender neck. Keep the body count steady, track the long repeat and test the eye and tongue placement together. Those checks help the finished frog keep a clear expression without adding unnecessary decoration.




