

Crochet Duck Pattern: A Playful Long-Neck Charm Guide
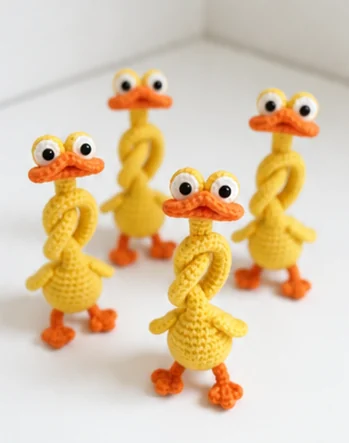
This crochet duck pattern pairs a small yellow body with a wonderfully long neck, wide orange beak and two round eyes. The face is built from separate layers rather than a large stuffed head. That difference matters: the eye circles and curved bill do much of the work of creating the duck’s puzzled expression.
This crochet duck pattern guide walks through the body, long neck, shaped bill and layered eyes, then explains how to arrange the small wings and orange feet. You can follow the construction notes without sorting through the other five animals in the collection.
Crochet Duck Pattern: Know the Construction First
The body and neck in this crochet duck pattern are one continuous piece. You begin with eight stitches, widen the body to twenty-four, then decrease until only six stitches remain. Those six stitches continue up the long neck. Because there is no separate neck seam, counting the narrowing rounds correctly is more important than trying to reshape an uneven tube afterward.
| Project detail | What to plan for |
|---|---|
| Character | Yellow long-neck duck; decorative charm or display figure |
| Construction | Joined rounds; body and neck in one piece; separate face, eyes, wings and feet |
| Suggested experience | Comfort with a magic ring, small single crochet rounds, increases, decreases and sewing |
| Hook and yarn | 2.0 mm hook; yarn described as 4-ply milk cotton |
| Finished size, gauge and yardage | Not specified; no fixed measurement or yarn quantity is promised |
| Before starting | Plan the eye fit, small-part placement and decorative neck support. |
This crochet duck pattern is a small-piece project, but not automatically a first-ever crochet project. The narrow neck and layered face ask for more control than a large basic sphere. If your hook catches only part of the yarn or the stitches are difficult to identify, practice a short section before committing to all the matching pieces.
PREFER A PDF COLLECTION?
Keep the long-neck characters together
Enjoy this crochet duck pattern guide, then browse the store for printable crochet projects. The duck belongs to the six-design Long-Neck Animal Charms collection.
Digital patterns, not finished crochet items.
Crochet Duck Pattern: Yarn, Hook and Materials
- Yellow yarn for the body, neck, wings, face base and outer eye pieces.
- Orange yarn for the final beak round and both feet; white yarn for the eye whites.
- A 2.0 mm crochet hook, removable stitch marker, yarn needle and scissors.
- Fiberfill for the body.
- Two 4.0 mm safety eyes, or black yarn for embroidered pupils.
- 1.0 mm craft wire if following the supported-neck construction.
- Suitable joining supplies. Sewing is used in the assembly guidance below; the supplied instructions also allow hot glue.
Check the fabric rather than guessing a yarn category
For this crochet duck pattern, “4-ply milk cotton” is the yarn description, not a complete fiber label or a guaranteed international yarn-weight category. Check the actual yarn packaging. If substituting, make a small sample with the 2.0 mm hook and look for clear stitches and a firm fabric that does not expose the stuffing when gently opened.
Use similar yarn thicknesses for the yellow eye bases and white centers. A much thicker white yarn can overwhelm the yellow edge, while a much finer one may leave more of the base visible than intended. Compare one assembled eye before making every component.
Treat the wire version as decorative
The supported neck in this crochet duck pattern uses craft wire and is left unstuffed. A piece with internal wire, small eyes and attached parts is not automatically a child-safe toy. Keep it away from babies, young children and pets. Embroidered pupils remove the plastic eye components, but do not make the wire-supported construction a tested toy.
Read the Stitches and Joined Rounds
| Abbreviation | Meaning in this pattern |
|---|---|
| MR | Magic ring |
| ch | Chain |
| sc | Single crochet |
| sl st | Slip stitch |
| inc | Work 2 sc in the same stitch |
| dec | Single crochet 2 stitches together |
| st / sts | Stitch / stitches |
| Rnd / Rnds | Round / rounds |
| [ … ] × N | Repeat the bracketed sequence N times |
| (N) | Total working stitches at the end of the round |
These are US terms. For a broader terminology reference, see the Craft Yarn Council crochet abbreviation list. Use the definitions above for this duck; a special stitch in another project does not automatically apply here.
Keep the joining stitches out of the count
Work this crochet duck pattern in joined rounds. Unless a step says otherwise, join with a slip stitch into the first single crochet of the round, then start the next round with ch 1. Neither that chain nor the joining slip stitch counts as a working stitch. Put your marker in the first actual sc, not in the chain.
For a six-stitch neck round, the count is six sc—not six sc plus the join. Pull the joining slip stitch small enough to keep the seam tidy, but do not tighten it until you can no longer find the correct first stitch.
Crochet Duck Pattern Body and Long Neck
COUNT CHECKPOINTS · 8 → 16 → 24 → 18 → 12 → 6
Begin the crochet duck pattern body with yellow yarn. Keep the first three rounds flat enough to count before the body begins to curve. The table includes the starting chains and joins so the round boundary stays consistent throughout the piece.
| Round | Instruction | Sts |
|---|---|---|
| 1 | MR, 8 sc into ring, pull tight, sl st to 1st sc. | 8 |
| 2 | Ch 1, 8 inc, sl st. | 16 |
| 3 | Ch 1, [sc, inc] × 8, sl st. | 24 |
| 4–6 | Ch 1, 24 sc, sl st. Repeat for each of these three rounds. | 24 |
| 7 | Ch 1, [sc, dec, sc] × 6, sl st. | 18 |
| 8 | Ch 1, 18 sc, sl st. | 18 |
| 9 | Ch 1, [sc, dec] × 6, sl st. | 12 |
| 10 | Ch 1, 12 sc, sl st. | 12 |
| 11 | Ch 1, 6 dec, sl st. | 6 |
| 12–42 | Ch 1, 6 sc, sl st. Work this sequence in each round. | 6 |
Add the body stuffing before the opening narrows
After Round 10 of this crochet duck pattern, stuff the rounded body firmly with fiberfill while the twelve-stitch opening is still accessible. Add small portions and spread them toward the sides rather than pushing one large wad into the center. Firm should mean supported, not stretched so far that gaps appear between the stitches.
Round 11 reduces the opening to six stitches. Keep the neck clear of stuffing when using the craft-wire support. Check the transition before continuing: the body should feel filled, while the narrow tube remains available for the support.
Track the long repeat without losing your place
The crochet duck pattern neck uses Rounds 12 through 42: thirty-one rounds of six sc each. Keep a separate round tally as well as the first-stitch marker. Counting only the six stitches around the opening will not tell you how much neck you have completed.
The neck length may be adjusted, but changing it changes the look of the duck. For the written version, retain the full repeat. Insert the shaping wire before sewing the neck opening closed, fastening off and weaving in the ends. No wire length or end-finishing method is specified; do not leave exposed sharp ends or force a support through the crochet fabric.
Shape and Position the Small Wings
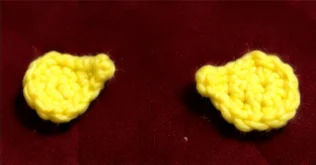
The small wings in this crochet duck pattern start with eight single crochets in a yellow magic ring. Pull the center closed and compare the pair. This guide focuses on their matching shape and sewing position; a separate wing-edge stitch sequence is not included.
Before attaching the finished pair, compare the width and the direction of the small projecting tips. Position both against the body at the same time. That makes it easier to keep the duck balanced than sewing on one wing and trying to match the second afterward.
Shape the Face Base and Orange Beak
FACE BASE · 6 → 12 → 18 → 24 → 30
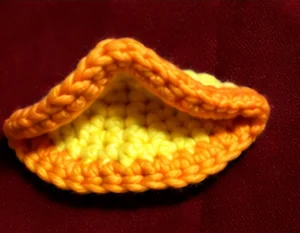
The face base in this crochet duck pattern starts with yellow yarn. This circular piece forms the front of the face; the orange edge becomes the visible bill. It is not a separate stuffed head. Check the increase rounds before adding the edging, because the later eye layers depend on the face base keeping its intended width.
| Round | Instruction | Sts |
|---|---|---|
| 1 | MR, 6 sc into ring, pull tight, sl st to 1st sc. | 6 |
| 2 | Ch 1, 6 inc, sl st. | 12 |
| 3 | Ch 1, [sc, inc] × 6, sl st. | 18 |
| 4 | Ch 1, [sc, inc, sc] × 6, sl st. | 24 |
| 5 | Change to dark orange yarn. Ch 1, [3 sc, inc] × 6, sl st. | 30 |
Ch 1 to finish, fasten off and weave in the ends. Keep the orange round easy to see when shaping the face. The reference shows a curved opening; do not pull the edging so tight that the front collapses into a narrow line.
FROM ONE DUCK TO A CHARACTER COLLECTION
Prefer to keep your pattern pages together?
The duck in this crochet duck pattern is one character in a wider collection. Visit My Crochet Universe to explore the available PDF patterns and check the current product details.
Check the listing for contents and purchase terms.
Position the Orange Feet
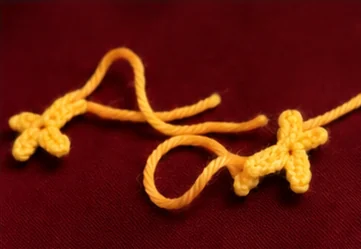
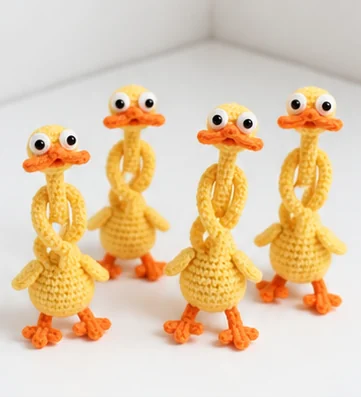
The orange feet echo the beak color and finish the lower silhouette. In this crochet duck pattern, each foot has three toe-like branches and a long sewing tail. Use the photograph to compare their outline and placement; the detailed toe-branch sequence is not included in this guide.
Crochet Duck Pattern Eyes: Build the Layers
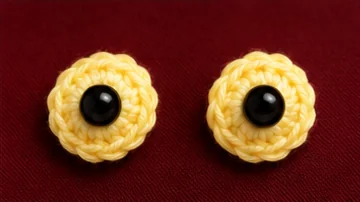
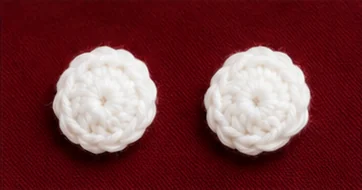
EYE LAYERS · 12-STITCH BASE + 8-STITCH WHITE
Outer eye bases — make two in yellow
For each outer eye in this crochet duck pattern: MR, 12 sc into ring, pull tight, sl st to the first sc. You have 12 stitches. Ch 1 to finish, fasten off and weave in the ends. Lay the two bases side by side and check that neither ring center is loose.
Eye whites — make two in white
For each white piece: MR, 8 sc into ring, pull tight, sl st to the first sc. You have 8 stitches. Ch 1 to finish, fasten off and weave in the ends. Keep the white pieces separate from the larger yellow bases until you are ready to test the face layout.
Plan the pupil placement before closing the layers
To assemble the crochet duck pattern eyes, center each pupil on a white piece, then position that white piece above its yellow base. If using safety eyes with washers, follow the component manufacturer’s fitting instructions while the back is still accessible. A pupil simply glued onto the front is not the same construction as a correctly fitted post-and-washer eye.
Look at both eye stacks above the bill before attaching either one permanently. Small changes in their spacing and tilt can alter the expression. No exact eye-placement row or stitch spacing is specified, so use the photographed layout as a visual reference rather than inventing a precise measurement.
Crochet Duck Pattern Assembly: Shape the Character
- Arrange the two yellow outer eye pieces on either side of the upper face area. Check both from the front before sewing.
- Position one white eye piece above each yellow base, with the pupil centered in the white area. Keep the bill opening visible below the eyes.
- Attach the assembled face to the upper end of the neck. Support the neck while sewing so the face does not pull sideways.
- Attach the two wings to the body at comparable heights, leaving room between them and the base of the neck.
- Attach both feet to the lower body, then check the finished figure from the front and side.
- Weave in all loose ends, remove every temporary pin and marker, and inspect each attachment. Shape the supported neck gently without repeatedly bending the same point.
For this crochet duck pattern, sewing gives you control over the angle of each small part and lets you inspect the attachment afterward. Hot glue is another option for a decorative piece, but follow the adhesive instructions and keep it out of the visible stitch openings. Neither method alone establishes toy safety or suitability for heavy keychain use.
Crochet Duck Pattern Troubleshooting
The neck is wider than expected
For the crochet duck pattern neck, count actual sc stitches, not the chain and joining slip stitch. If the count is seven instead of six, check whether you worked into the previous join. Undo the affected round rather than hiding the extra stitch inside the next one; otherwise the same error may continue up the tube.
The body is uneven at the narrowing rounds
Check Round 7 first. Each [sc, dec, sc] repeat uses four stitches from the previous round and makes three. Six repeats turn twenty-four stitches into eighteen. Round 9 then turns eighteen into twelve, and Round 11 turns twelve into six. Confirm each checkpoint before working the long neck.
The beak or eyes look off-center
To balance the face in this crochet duck pattern, place both eyes and the face base together before securing the final seam. Judge the arrangement at face level rather than only looking down at it. If one eye appears larger, compare the individual discs before changing placement; different tension in the white pieces may be the cause.
The figure leans or an attachment loosens
Check the face angle, body stuffing and foot position without forcing the neck into a compensating bend. A photographed standing pose does not guarantee that every version will stand unsupported. Repair a loose attachment before display and avoid lifting the duck by an eye, wing or foot.
Explore the Long-Neck Animal Charms Collection
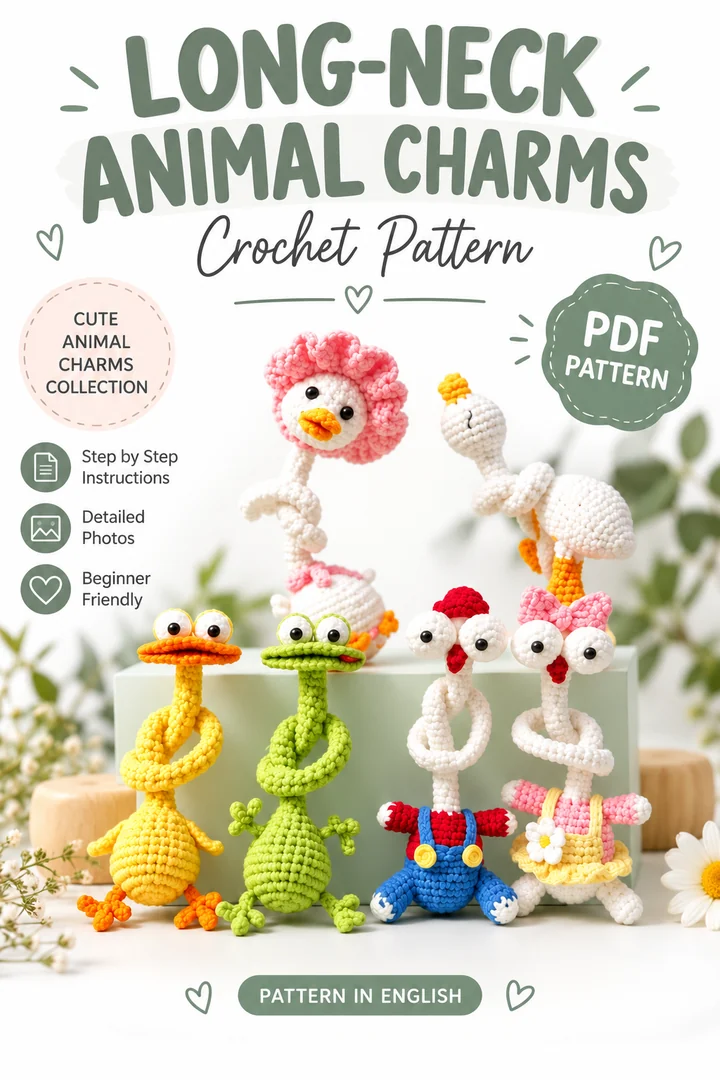
This crochet duck pattern guide concentrates on one yellow long-neck duck. The wider collection includes other characters with different colors and details. When you move on to another animal, follow that animal’s own instructions rather than carrying the duck’s hook size or stitch sequence across automatically.
LONG-NECK ANIMAL CHARMS
Love the duck? Meet the rest of the collection.
The crochet duck pattern sits alongside Frog, Goose, Little White Duck and two Screaming Chicken variations in the English-language collection.
Browse the store to explore digital patterns and review the listing that fits your next project.
PDF pattern collection · No physical item included
Display and Care for the Finished Charm
When finishing this crochet duck pattern, choose a dry display area where the long neck cannot snag or be pulled. The instructions do not specify a hanging loop or hardware attachment, so this guide does not invent a load-bearing keyring connection. Do not hang it where it can obstruct a driver’s view or interfere with vehicle controls.
Follow the care guidance for the actual yarn, support, eye components and adhesive used. Avoid assuming a wire-supported or glued piece is machine-washable. After cleaning, let it dry fully and inspect the seams before putting it back on display.
More Character Crochet Ideas
For a different approach to oversized faces, explore these expressive crochet animal designs. They are separate projects, not replacement instructions for this duck. You can also browse the crochet pattern library for your next make.
Frequently Asked Questions
What yarn and hook does this crochet duck pattern use?
The crochet duck pattern uses yarn described as 4-ply milk cotton with a 2.0 mm hook. Yellow, orange and white are the main colors. Check the yarn label rather than assuming the description guarantees a particular fiber blend or standardized weight.
Is the duck worked in a spiral?
No. These instructions use joined rounds. Join to the first sc with a slip stitch, then make the starting chain for the next round. Neither the join nor ch 1 is included in the working stitch total.
How many rounds form the long neck?
After Round 11 reduces the opening to six stitches, Rounds 12–42 continue with six sc per round. That is thirty-one repeated rounds. The neck length may be adjusted, but changing it changes the proportions.
Can I make the duck without craft wire?
The written neck construction relies on a wire support and leaves the tube unstuffed. A wire-free version is a modification, not a confirmed equivalent. It may hang or bend differently, and this guide does not promise the same shaped pose.
What is the finished size?
No finished measurement or formal gauge is specified for this crochet duck pattern. Yarn, hook, tension and neck length affect the result. Measure your own sample before planning packaging or describing a finished item for sale.
Is this suitable for a baby or young child?
Treat the wire-supported version as a decorative item, not a baby toy. Plastic eyes, internal wire and small attached parts need careful assessment. Replacing the pupils with embroidery does not remove the other hazards.
Is this the complete six-animal bundle?
No. This crochet duck pattern guide is about the yellow duck only. The six-design collection is a separate digital PDF product. Check the actual listing before purchase for its current contents, format and terms.
Finish Your Long-Neck Duck with Character
The long neck gives this crochet duck pattern its outline, while the wide bill and layered eyes create its expression. Keep the six-stitch tube consistent, count the face increases before changing to orange, and compare the eye stacks before sewing. A careful placement check is worth more than rushing the last few seams.




