

FROG CROCHET · BLUE OVERALLS · STAR DETAIL
Crochet Frog Bag Pattern: 7 Fun Steps with Blue Overalls
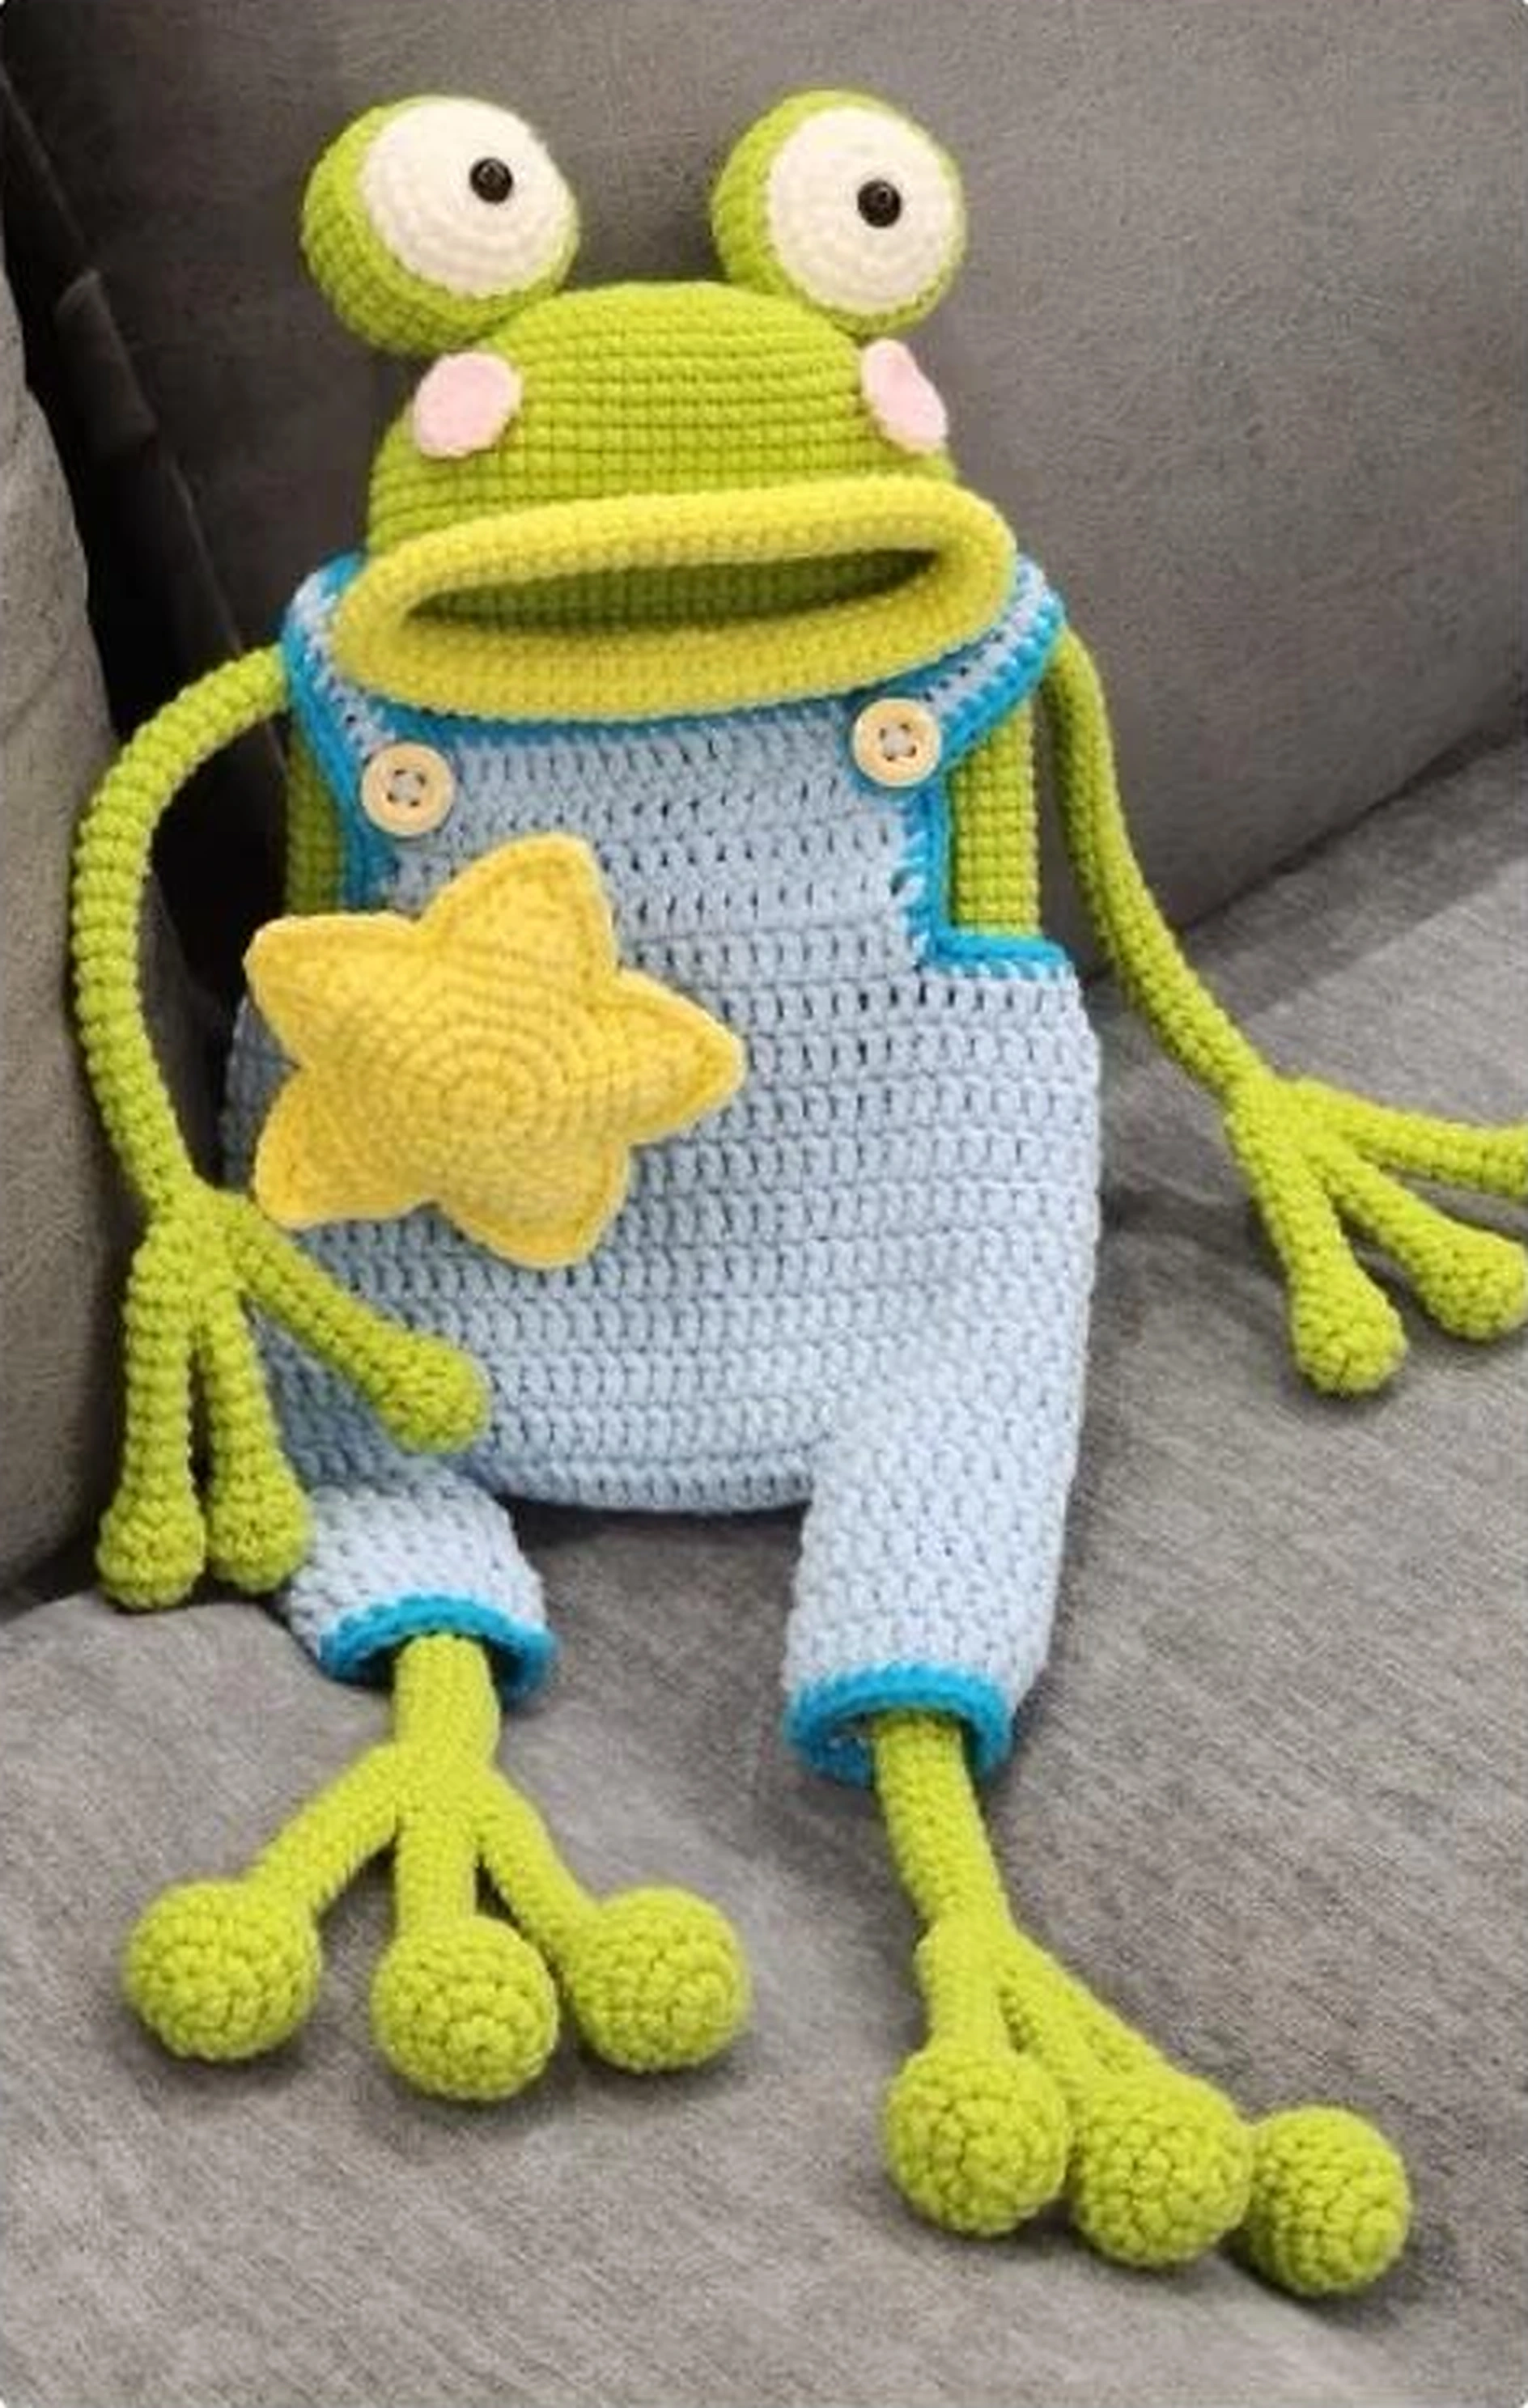
This crochet frog bag pattern pairs a wide green mouth with raised eyes, long limbs and blue overalls. A small yellow star sits on the front like a cheerful badge. The rounded fingers and toes take a little patience, but they are the details that give the frog its loose, friendly pose.
Work through the pieces in order: toes, legs, body and head, then hands, eyes, clothes and star. The body grows directly from the joined legs. The overalls are made separately and fitted before the straps are finished. Keep a stitch marker close and count at every joining round.
Crochet Frog Bag Pattern
The appeal of this crochet frog bag pattern is the contrast between a simple body and a very expressive face. The mouth sits low enough to leave space for two eye assemblies above it. Long arms hang beside the clothing, while the three-toed feet remain visible below the trouser cuffs.
Plan for a careful construction project
This crochet frog bag pattern is best approached as a project for a crocheter comfortable with joined pieces, shaping and sewn assembly. That is an editorial skill recommendation, not a tested difficulty rating. The stitch tables organize the construction, but the mouth, clothing fit and bag finish still need hands-on checks.
Decide how the opening will be used
The wide mouth in this crochet frog bag pattern is formed by a chain-and-skip opening in the body. A lining, secure closure and carrying strap are not specified here. Do not treat the overall suspenders as bag handles. If you want a practical carry bag rather than a decorative frog pouch, plan those extra components separately and test them with the intended contents.
Crochet Frog Bag Pattern: Materials and Planning
Gather the colors and tools
- Green yarn for the frog, with a lighter yellow-green for the mouth if desired.
- White yarn for the eyes; pink for two small cheeks.
- Light blue yarn for the overalls, plus a deeper blue or turquoise for the edging.
- Yellow yarn for the two-sided star.
- A hook that makes a firm, even fabric with your chosen yarn.
- Stuffing for the toe tips, finger tips and star; a yarn needle, scissors and removable stitch markers.
- Two overall buttons and suitable pupils or embroidery yarn. Choose components for the intended user.
Yarn, gauge and size
No yarn weight, yarn quantity, hook size, gauge or finished measurements are established for this crochet frog bag pattern. Make a small fabric sample before starting. It should hold its shape without being so tight that the hook is difficult to insert. A different yarn and hook can change both the frog’s size and the clothing fit.
When planning this crochet frog bag pattern, do not buy yarn by the color numbers alone. The palette can be matched by eye: fresh green, a lighter lip color, pale blue, deeper blue, white, pink and yellow. Keep the frog and clothing yarns compatible in thickness, then try the trousers on the body before the bib is finished.
US Crochet Terms and Counting
| Term | Meaning |
|---|---|
| MR | Magic ring |
| ch | Chain |
| sc | Single crochet; X in compact notation |
| inc | 2 sc in one stitch; V |
| dec | Work 2 stitches together as one; A |
| dc | Double crochet; F |
| sl st | Slip stitch |
| skip | Leave a stitch unworked; K |
| (…) × n | Repeat the bracketed sequence n times |
Read the totals before working
In this crochet frog bag pattern, numbers in the last column are the stitch totals after a round. A range such as R6–R38 means work the same instruction in every round from 6 through 38, inclusive. The finger and toe numbering continues into the arm and leg sections; the body numbering then restarts at R1.
Use a marker throughout the crochet frog bag pattern to identify the round start. Join with a slip stitch where a join is explicitly described; the instructions do not establish a universal turning or joining method for every section. For familiar stitch names, see the Craft Yarn Council crochet abbreviations. This article uses US terminology throughout.
New to shaping small pieces? Read our amigurumi mistakes and practical fixes for help with counting rounds and pinning parts before sewing. Keep the stitch counts in this crochet frog bag pattern separate from those in other projects.
Step 1: Make Six Toes and Two Legs
Toes — make six
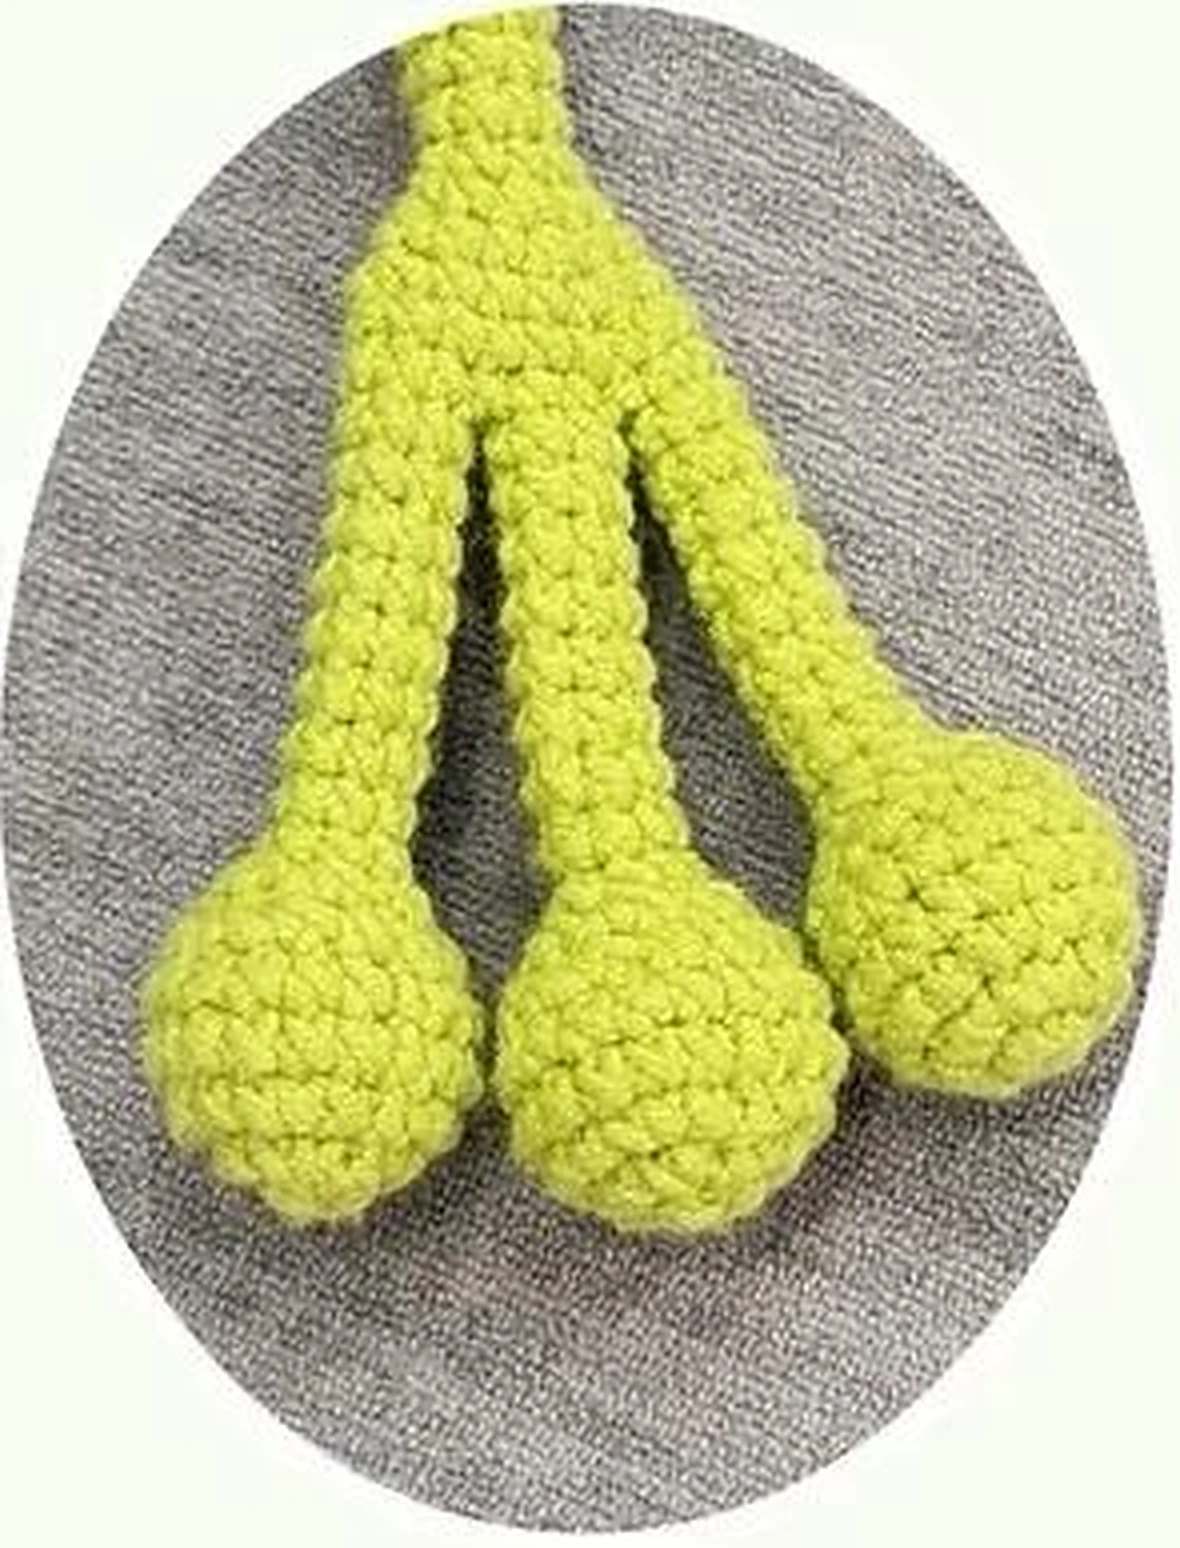
Begin the crochet frog bag pattern with six matching toes in green. Each foot uses three. Finish off four toes and leave the yarn attached to two, so one live toe can begin each foot join.
| Round | US instructions | Total |
|---|---|---|
| 1 | 6 sc in MR | 6 |
| 2 | 6 inc | 12 |
| 3 | (sc, inc) × 6 | 18 |
| 4–5 | 18 sc each round | 18 |
| 6 | (sc, dec) × 6 | 12 |
| 7 | 6 dec | 6 |
| 8–16 | 6 sc each round | 6 |
For the toes in this crochet frog bag pattern, add stuffing to the rounded tip after R7, while it is accessible. Keep the narrow stem flexible. Make the remaining toes to the same length and avoid pulling the finishing tails so hard that the open six-stitch ends close.
Join three toes for each foot
R17: Starting with the toe that still has the working yarn attached, work 6 sc around it. Do not slip stitch at the end. Join the second toe and work 3 sc; join the third toe and work all 6 sc. Work the remaining 3 sc on the second toe, then slip stitch to the first stitch of the first toe. The combined perimeter has 18 stitches.
| Round | US instructions | Total |
|---|---|---|
| 18 | 18 sc | 18 |
| 19 | (4 sc, dec) × 3 | 15 |
| 20 | (dec, 3 sc) × 3 | 12 |
| 21 | (sc, dec) × 4 | 8 |
| 22–45 | 8 sc each round | 8 |
Make the second leg of the crochet frog bag pattern in the same way. Fasten off the first completed leg. Leave the working yarn attached to the second leg for the body join. Place both feet beside each other before continuing so the toes face the intended direction.
Step 2: Join the Legs and Crochet the Body
Bridge the legs with a chain
To begin the body of the crochet frog bag pattern, slip stitch to close the round on the live leg, then ch 20. Slip stitch to the other leg. Use the fastened-off leg as the starting point for the first body round. The chain forms a bridge; the body is worked around both legs and both sides of that bridge.
| Round | US instructions | Total |
|---|---|---|
| 1 | 8 sc around one leg, 20 sc along one side of the chain, 8 sc around the other leg, 20 sc along the other side | 56 |
| 2 | 56 sc | 56 |
| 3 | 3 sc, 2 inc, 3 sc, 20 sc, 3 sc, 2 inc, 3 sc, 20 sc | 60 |
| 4 | 60 sc | 60 |
| 5 | 3 sc, 4 inc, 3 sc, 20 sc, 3 sc, 4 inc, 3 sc, 20 sc | 68 |
| 6–38 | 68 sc each round | 68 |
| 39 | 3 sc, 4 dec, 3 sc, 20 sc, 3 sc, 4 dec, 3 sc, 20 sc | 60 |
| 40 | 60 sc | 60 |
| 41 | 4 sc, dec, 4 sc, 20 sc, 4 sc, dec, 4 sc, 20 sc | 58 |
| 42 | 58 sc | 58 |
| 43 | 6 sc, ch 26, skip 26 stitches, 6 sc, 20 sc | 58 |
| 44–48 | 58 sc each round, working into the chain on the first round above the opening | 58 |
Keep the mouth opening clear
R43 creates the mouth opening in this crochet frog bag pattern. Its count includes the 26 chains replacing the 26 skipped stitches. Mark both corners before working above the opening. Do not sew or stuff this opening shut. Keep the two sides of the body aligned so the mouth does not drift toward one shoulder.
For this crochet frog bag pattern, the body forms the main pouch area. Full-body stuffing would occupy that space. The instructions do not give a complete stuffing or lining plan for the finished bag, so settle the intended use before final assembly.
Step 3: Shape the Head and Mouth
Head shaping — continue from the body
| Round | US instructions | Total |
|---|---|---|
| 49 | 2 sc, dec, 28 sc, dec, 2 sc, 22 sc | 56 |
| 50 | sc, dec, 28 sc, dec, sc, 22 sc | 54 |
| 51 | sc, dec, 26 sc, dec, sc, 22 sc | 52 |
| 52 | sc, dec, 24 sc, dec, sc, 22 sc | 50 |
| 53 | sc, dec, 22 sc, dec, sc, 22 sc | 48 |
| 54 | (4 sc, dec) × 8 | 40 |
| 55 | (dec, 3 sc) × 8 | 32 |
| 56 | (2 sc, dec) × 8 | 24 |
| 57 | (dec, sc) × 8 | 16 |
| 58 | 8 dec | 8 |
To finish the head in this crochet frog bag pattern, secure the remaining opening with the yarn tail. Before closing, consider how the top will retain its shape while the pouch area stays usable. No tested internal support system is specified. Do not claim a particular carrying capacity or finished structure without making a sample.
Work the wide mouth edge
For the lip edge in this crochet frog bag pattern, join the mouth color around the opening. The six lip rounds are described by their shaping rather than by full stitch totals. Treat “add two” or “decrease four” as a total change at each mouth corner, not as a change in every corner stitch.
| Round | US instructions | Total |
|---|---|---|
| 1 | One round of sc without increases or decreases | Not specified |
| 2 | Add 2 stitches at each mouth corner | Not specified |
| 3 | Add 4 stitches at each mouth corner | Not specified |
| 4 | One round of sc without increases or decreases | Not specified |
| 5 | Decrease 4 stitches at each mouth corner | Not specified |
| 6 | One round of sc without increases or decreases | Not specified |
Exact corner stitch placement, lip attachment and the final lip fold are not defined. Mark the corners and distribute the shaping evenly, but test the result before securing the edge permanently. Stop if the lip twists or closes the opening; do not force it flat with tight sewing.
Find your next crochet project
Ready for another character? Browse the My Crochet Universe pattern collection and choose your next make.
Want to compare a different frog shape? Our classic crochet frog crossbody bag tutorial uses a separate construction and carrying strap. It is a different design from this crochet frog bag pattern, so do not transfer its body counts or materials to the overalls version.
Step 4: Make Six Fingers and Two Arms
Fingers — make six
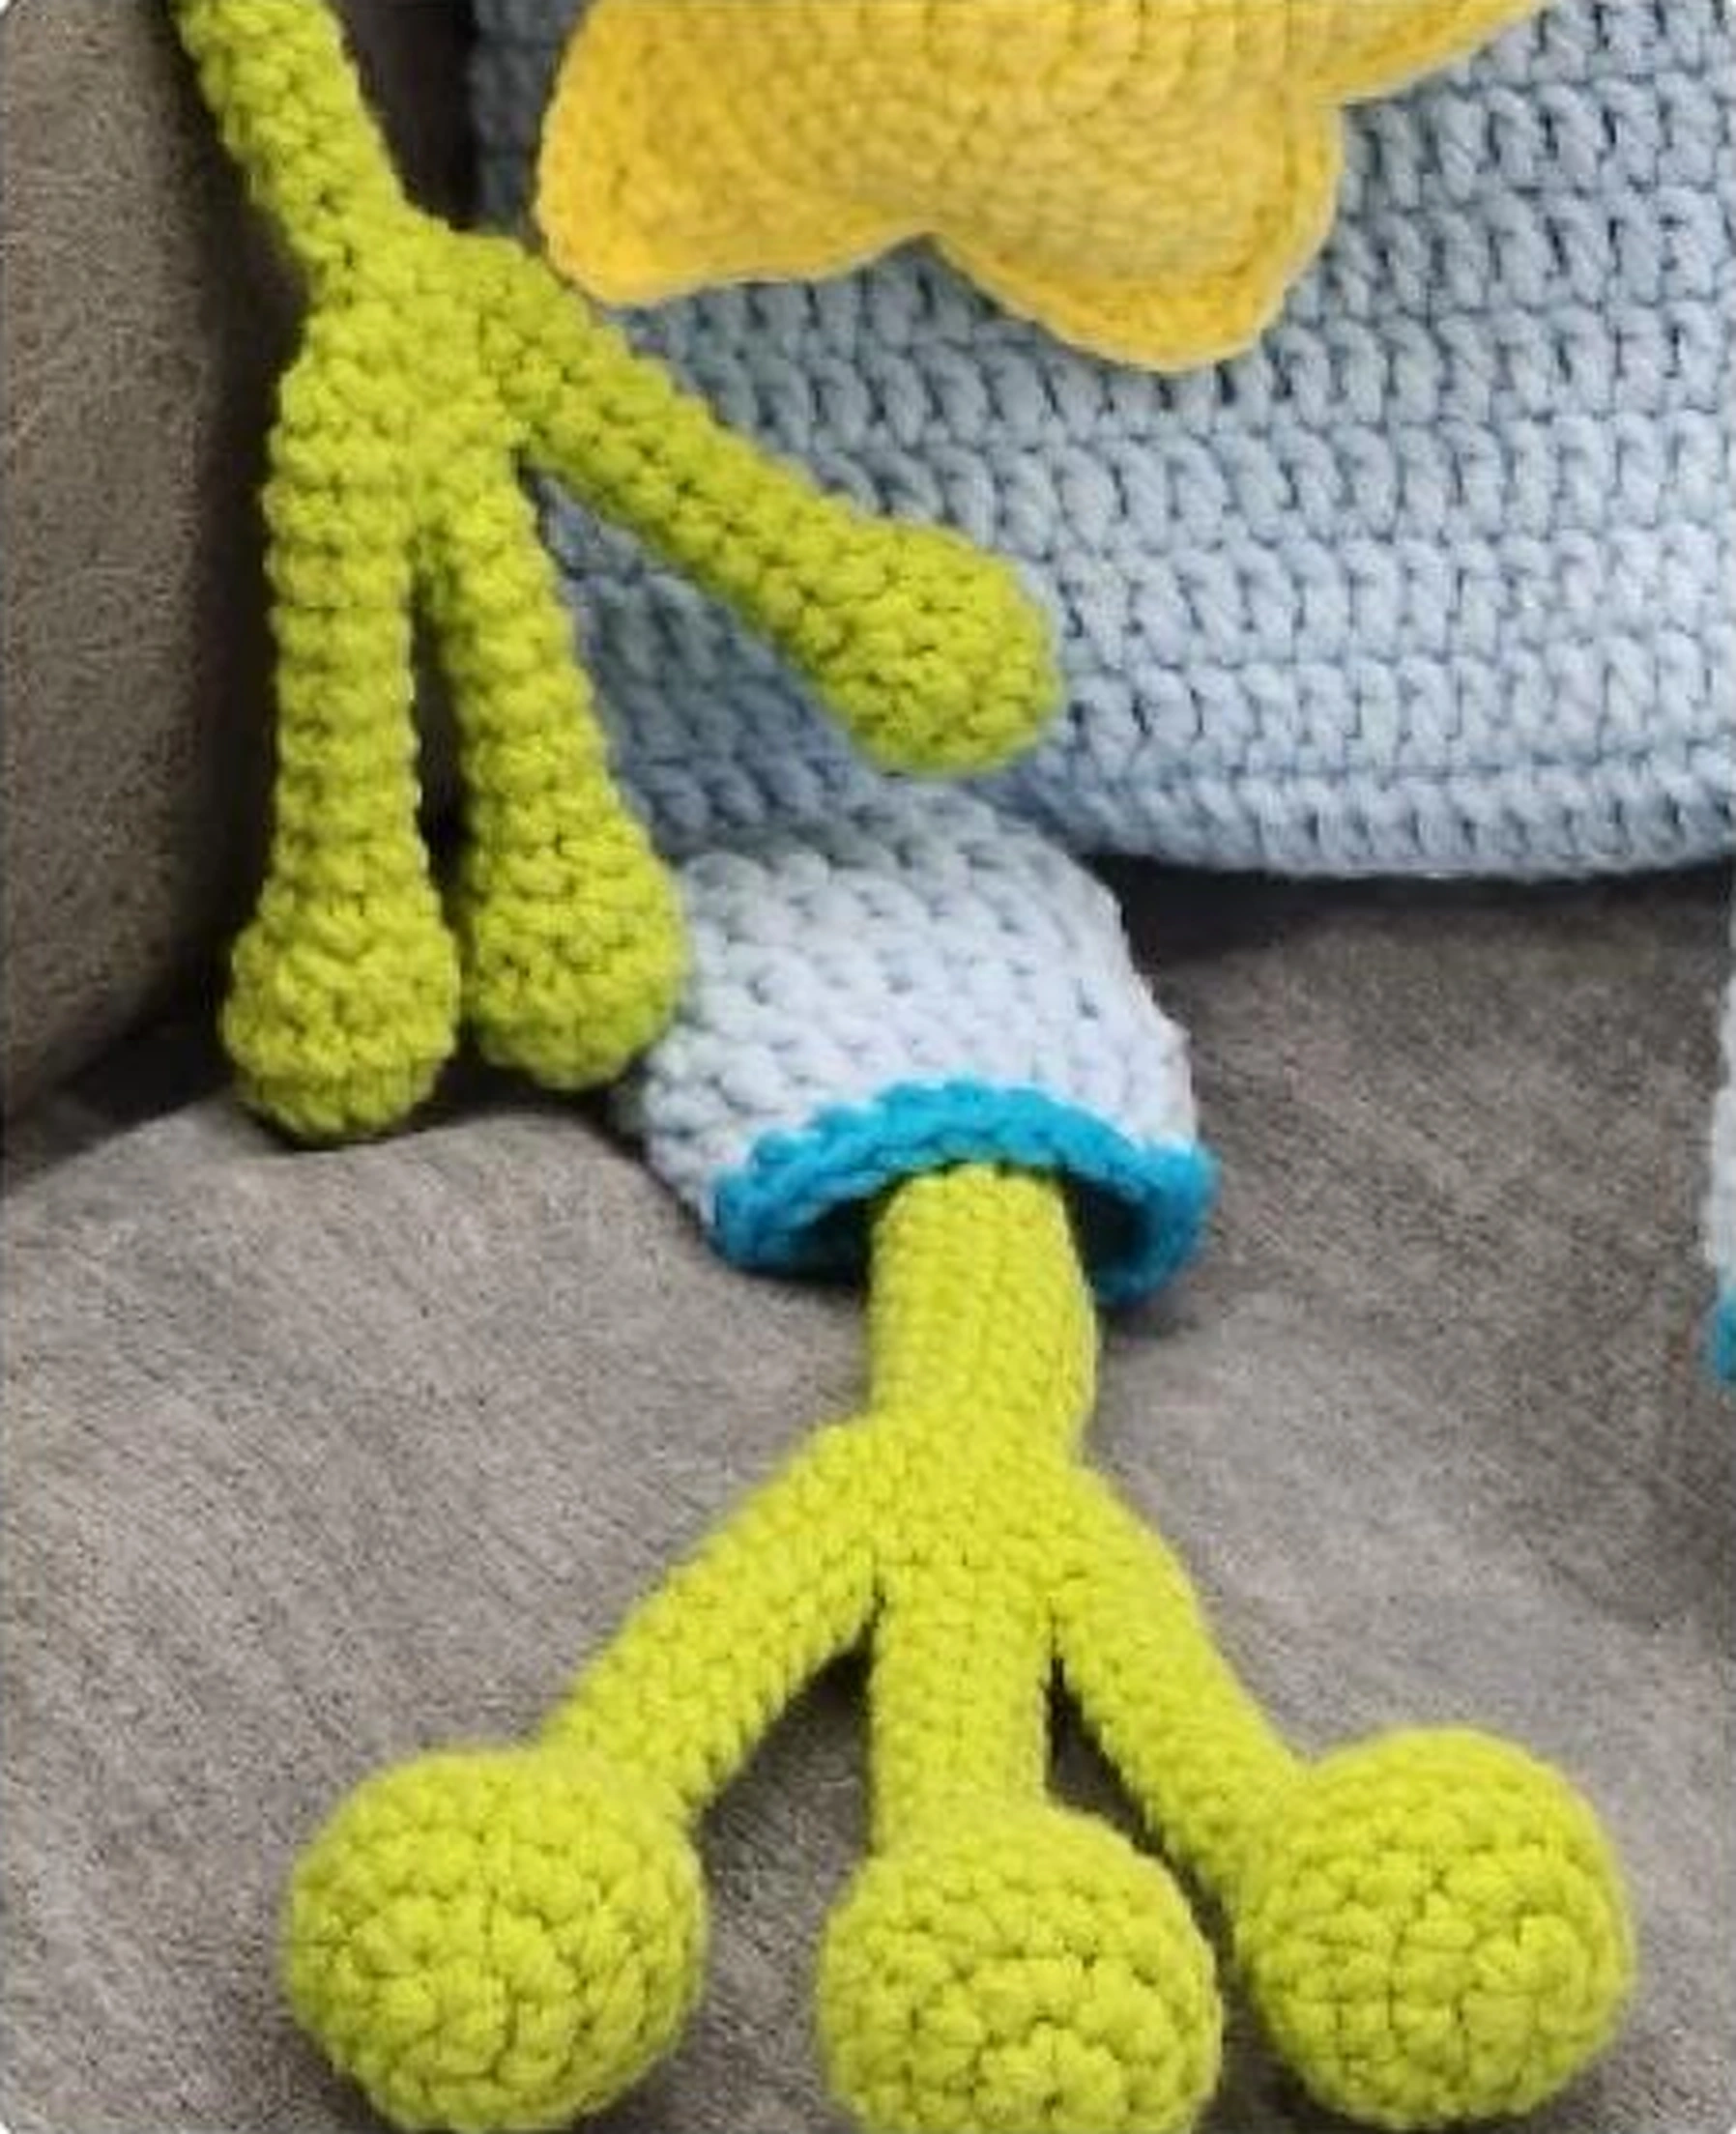
The hands in this crochet frog bag pattern repeat the three-piece join used for the feet. Their rounded tips are smaller, and their stems are shorter. Finish off four fingers and keep the yarn attached to two.
| Round | US instructions | Total |
|---|---|---|
| 1 | 6 sc in MR | 6 |
| 2 | 6 inc | 12 |
| 3 | 12 sc | 12 |
| 4 | 6 dec | 6 |
| 5–11 | 6 sc each round | 6 |
Stuff the rounded tips after R4. Keep the stems even so one finger does not disappear into the hand join. Lay each set of three together before joining.
Join the fingers and make two arms
R12: Work 6 sc around the live finger without a closing slip stitch. Join the second finger and work 3 sc. Join the third finger and work all 6 sc. Work the remaining 3 sc of the second finger, then slip stitch to the first stitch of the first finger. The hand perimeter has 18 stitches.
| Round | US instructions | Total |
|---|---|---|
| 13 | 18 sc | 18 |
| 14 | (sc, dec) × 6 | 12 |
| 15 | 6 dec | 6 |
| 16–40 | 6 sc each round | 6 |
Leave a long tail on each arm of the crochet frog bag pattern for sewing. Compare their lengths without stretching the chains of stitches. A narrow tube can look longer simply because it has been pulled while weaving in an end.
Step 5: Build the Eyes and Add the Cheeks
White eye pieces — make two
| Round | US instructions | Total |
|---|---|---|
| 1 | 6 sc in MR | 6 |
| 2 | 6 inc | 12 |
| 3 | (sc, inc) × 6 | 18 |
| 4 | (2 sc, inc) × 6 | 24 |
| 5–7 | 24 sc each round | 24 |
Green eye covers — make two
| Round | US instructions | Total |
|---|---|---|
| 1 | 6 sc in MR | 6 |
| 2 | 6 inc | 12 |
| 3 | (sc, inc) × 6 | 18 |
| 4 | (2 sc, inc) × 6 | 24 |
| 5 | (3 sc, inc) × 6 | 30 |
| 6–10 | 30 sc each round | 30 |
To assemble the eyes for the crochet frog bag pattern, fit a white piece into each green cover and compare the pair before sewing. The green cover is wider, so do not force a stitch-for-stitch match around unequal rims. Distribute the seam evenly. Pupil size, exact attachment position and eye stuffing amounts are not specified.
Pink cheeks — make two
For each cheek in this crochet frog bag pattern, work 8 sc in a magic ring, then secure the ring. Place the cheeks below the eyes and above the mouth corners. Pin the whole face first and check it from the front and both sides. Small changes in the eye angle can make a large difference to the expression.
Step 6: Crochet the Blue Overalls
Trouser legs — make two
Begin the overalls for the crochet frog bag pattern in light blue: ch 20 and slip stitch to the first chain to make a ring. Work 20 dc for R1, then 20 dc in each of R2–R5. The note allowing a 19-chain start does not explain how to retain a 20-stitch round; use the explicit 20-chain version here rather than silently changing the count.
Join the trousers and shape the waist
To join the trousers in this crochet frog bag pattern, fasten off one trouser leg. From the live leg, ch 15 and slip stitch to the other. Work around both legs and both sides of the chain bridge.
| Round | US instructions | Total |
|---|---|---|
| 6 | 20 dc, 15 dc, 20 dc, 15 dc | 70 |
| 7–13 | 70 dc each round | 70 |
| 14 | Decrease 1 stitch at each side and 1 at each front/back center position: 4 decreases total | 66 |
| 15 | Decrease 1 stitch at each side: 2 decreases total | 64 |
Bib and crossed straps
For the bib of the crochet frog bag pattern, center 20 stitches on the front of the trousers. Work back and forth for five rows. The bib stitch is not restated in the instructions; continuing in dc is a working interpretation, not a confirmed extra specification. Check the height against the frog before fastening off.
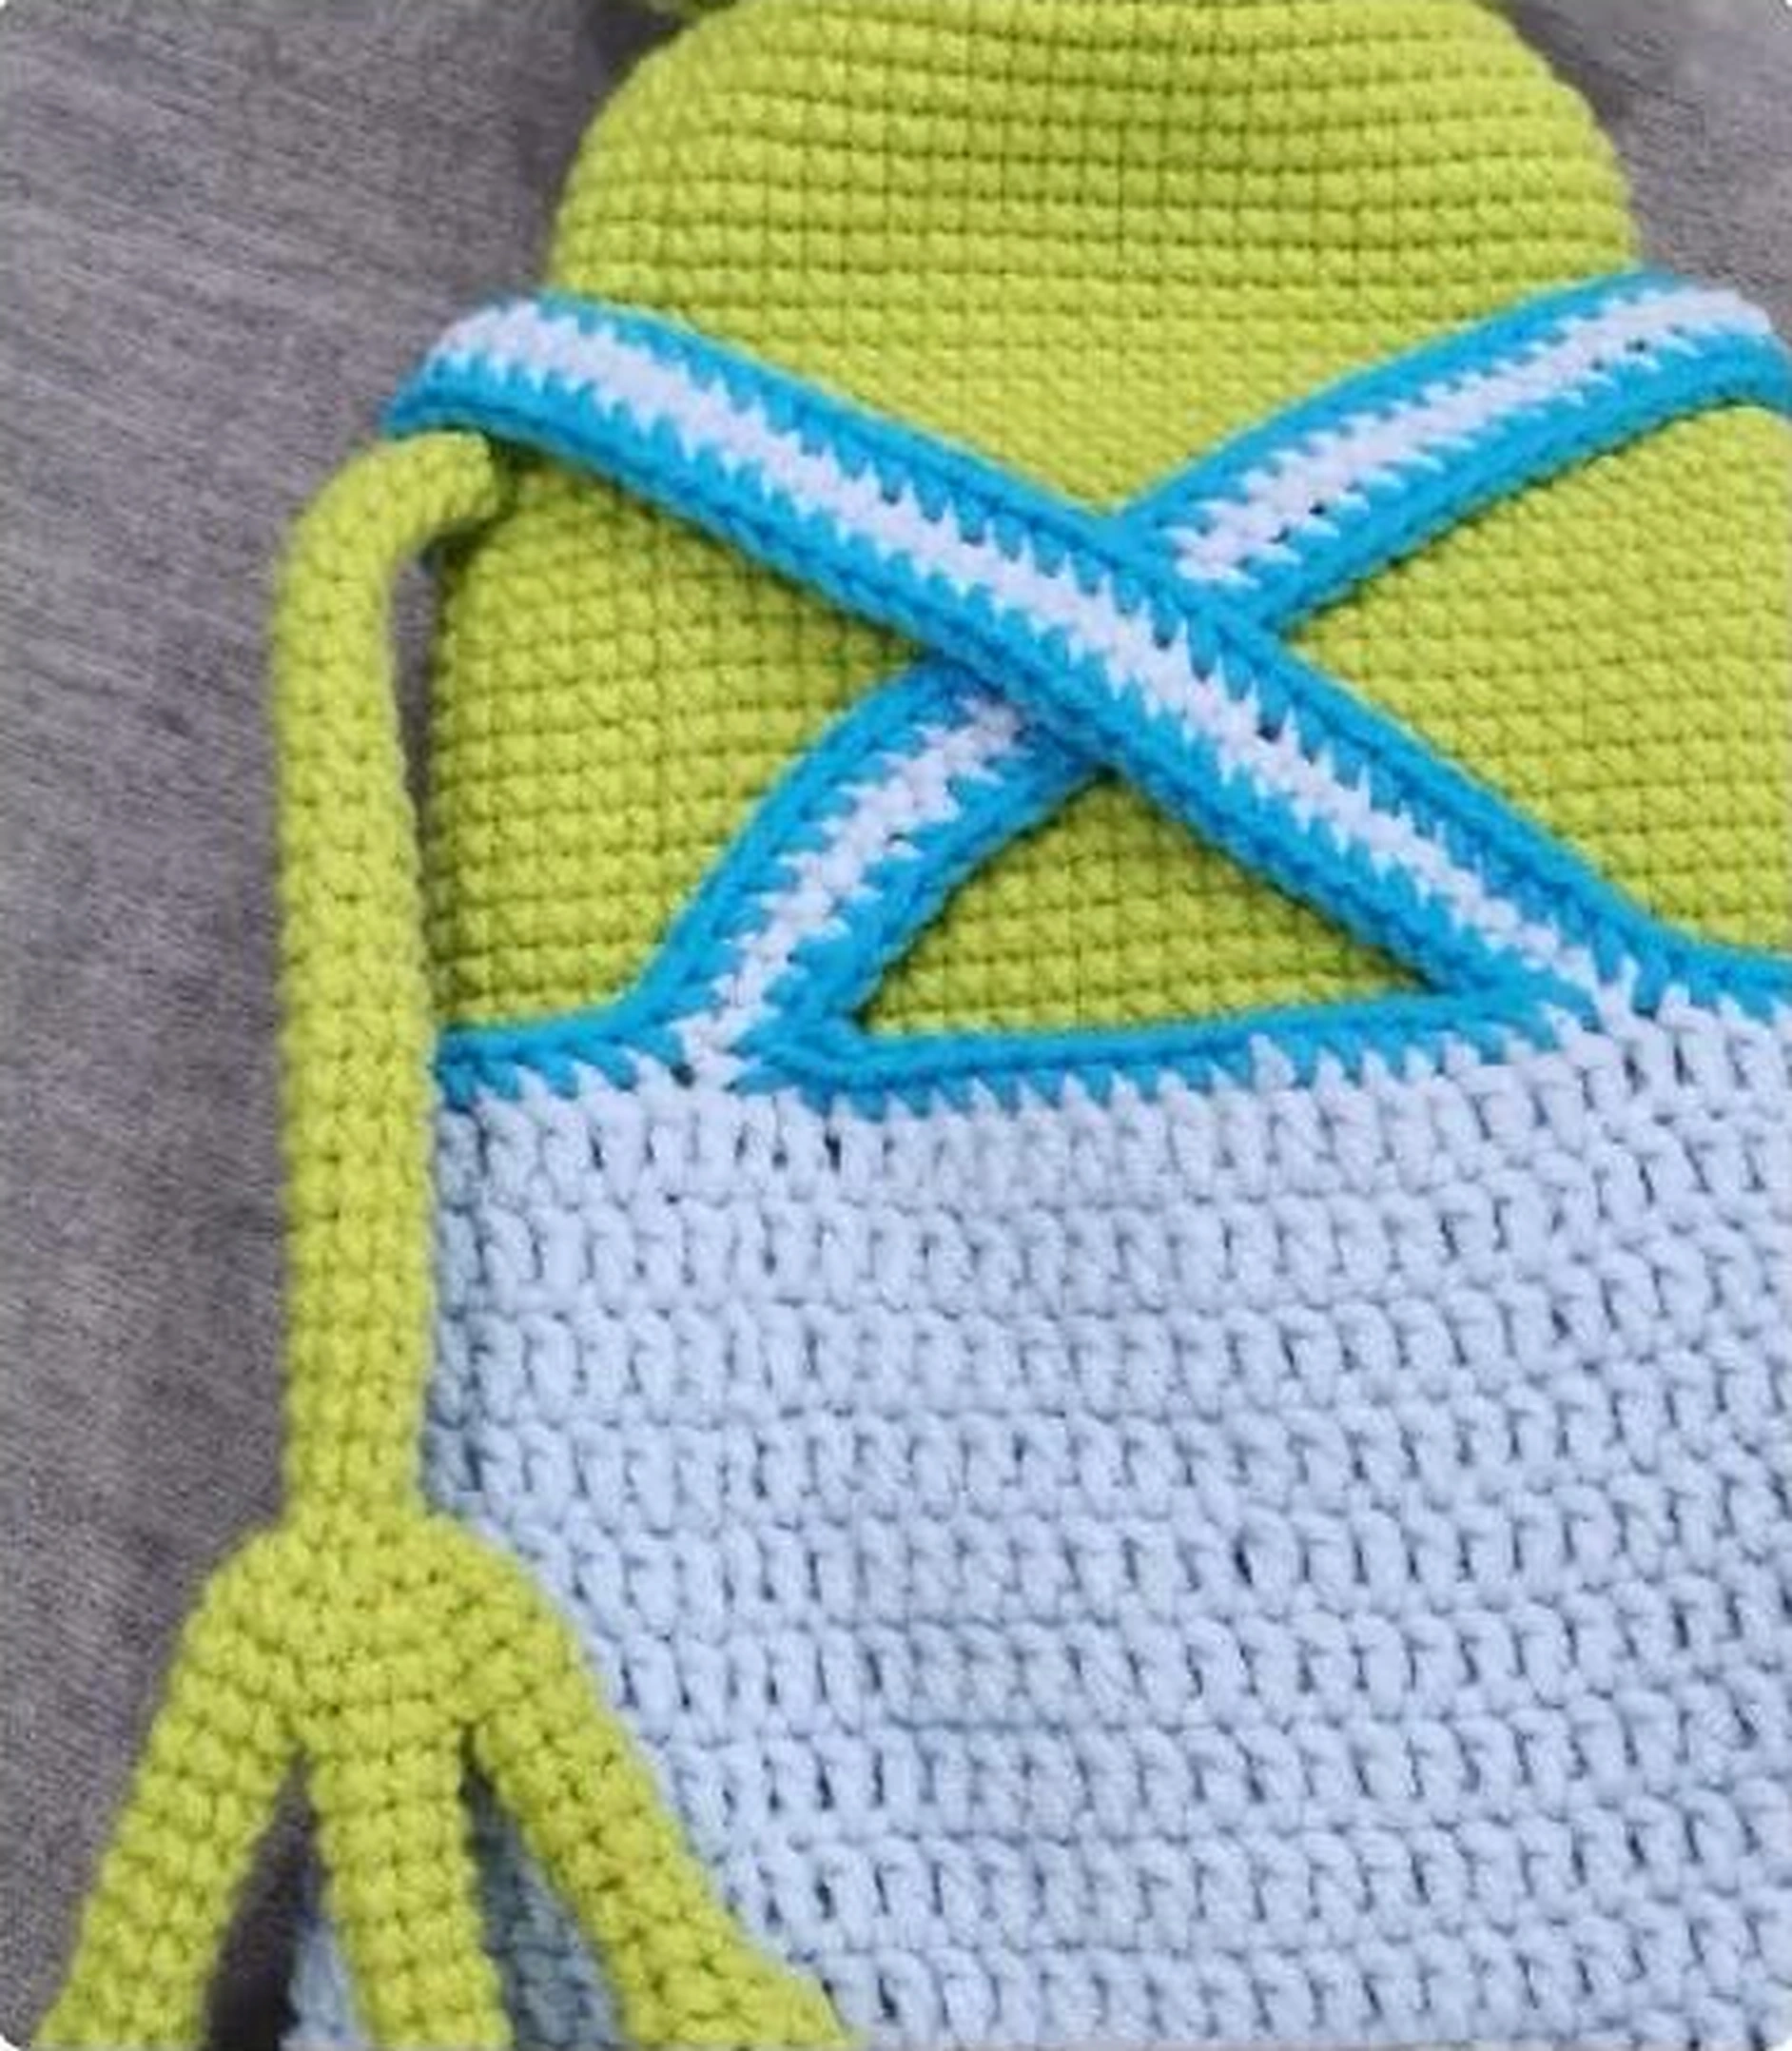
For each strap position, count 10 stitches inward from the corresponding back side toward the center. Chain about 46 for each strap. Leave a buttonhole near the end by slip stitching into the sixth chain from the hook, then work sc along the remaining chain. The exact return attachment and fit depend on the assembled piece, so pin the straps crossed at the back before sewing.
Add the blue edging
Work one round of sc around the clothing edges in deeper blue. Fit the overalls to the frog, then sew the two front buttons in positions that meet the strap loops without stretching. The buttons should hold the clothing, not support the weight of a carried bag.
Step 7: Make the Yellow Star
Star center — make two matching pieces
| Round | US instructions | Total |
|---|---|---|
| 1 | 8 sc in MR | 8 |
| 2 | 8 inc | 16 |
| 3 | (sc, inc) × 8 | 24 |
| 4 | (2 sc, inc) × 8 | 32 |
| 5 | (3 sc, inc) × 8 | 40 |
Shape the five points
To make the star for the crochet frog bag pattern, divide the 40 stitches into five groups of eight. Each group forms one point. Work the point rows back and forth over that group, turning where indicated. Rejoin the yarn for the next group as needed.
| Round | US instructions | Total |
|---|---|---|
| 6 | 8 sc across one group | 8 |
| 7 | Turn; dec, 4 sc, dec | 6 |
| 8 | Turn; dec, 2 sc, dec | 4 |
| 9 | Turn; 2 dec | 2 |
| 10 | Turn; dec | 1 |
Repeat the point sequence across all five groups, then make the second complete star. Sew the two stars together with a small amount of stuffing between them. Attach the star securely to the front of the overalls. The star is a decorative detail, not a closure for the pouch.
Crochet Frog Bag Pattern: Assembly and Finishing
Pin the frog before permanent sewing
Before sewing the crochet frog bag pattern together, place the eyes as a pair and check that they face forward. Pin the arms beside the body, clear of the lip. Their exact attachment round is not specified, so use the clothing and mouth as visual guides rather than inventing a fixed round number. Check that both arms hang at a similar height.
Check the crochet frog bag pattern as a whole
Dress the frog before committing to the arm seams and button positions. The trouser cuffs should leave the green feet visible. The crossed straps should lie flat rather than pull the bib upward. If the clothing is too tight, reassess the fabric and fit instead of stretching the frog into it.
Secure every seam and weave in the ends. Remove all pins and markers. Open the mouth gently to make sure the lip edge still moves as intended. If adding a lining or carrying strap, design the attachment to distribute weight into the body fabric; do not hang a load from the eyes, lip or overall straps.
Troubleshooting and Care
A count is wrong after a join
At a three-digit join, the route is 6 stitches around the first piece, 3 along the middle, 6 around the third and 3 along the other side of the middle. That makes 18. A marker at each transition helps you see whether a stitch was skipped or worked twice.
The lip ripples or pulls inward
Check that both mouth corners received the same total shaping. Corner placement is not fully mapped, so work slowly and inspect each round before continuing. Undo an uneven round rather than hiding it under tight sewing. The opening must remain usable if the frog is to function as a pouch.
Care and small-part safety
Follow the care instructions for the yarn, stuffing and components you actually choose. Clean gently and avoid pulling the long limbs. Dry the piece fully before storage. Buttons, pupils, stuffing and long straps require care around children; this is not a certified or age-rated toy pattern. Embroidered pupils avoid detachable eye components but do not establish overall toy safety.
Crochet Frog Bag Pattern FAQs
Is this crochet frog bag pattern beginner-friendly?
It uses familiar stitches, but joining three fingers or toes, shaping the mouth and fitting the clothes take confidence. A crocheter who can count shaping rounds, join pieces and sew curved surfaces will find it easier to manage.
What hook size and yarn weight should I use?
Neither is established. Choose a compatible yarn and hook, make a firm fabric sample and check the clothes against the body. No exact yarn quantity, gauge or finished size can be promised from these instructions.
Do I stuff the entire frog?
Not if you want the body cavity to hold items. Stuffing is explicitly called for in the finger tips, toe tips and star. A complete structural or lining plan for the pouch is not specified; decide that finish before closing and assembling the body.
Is a shoulder strap included?
No carrying-strap pattern is included. The crossed blue straps belong to the overalls. A separate carrying strap, attachment method and any closure need their own design and load testing.
How many toes and fingers do I need?
Make six toes for two feet and six fingers for two hands. Each foot or hand uses three pieces. In each set of six, finish off four and leave the working yarn attached to two for the joins.
Can I use different colors?
Yes. Keep a clear contrast between the green head, white eye pieces and lip edge. Match the clothing yarn thickness to the frog yarn as closely as possible, then check the trouser fit before finishing the bib and straps.
Where can I find more crochet projects?
Browse the My Crochet Universe store for the current collection. Check individual listings for their materials and contents; no separate product listing for this frog is assumed here.
For another project after this crochet frog bag pattern, browse our crochet pattern collection. Choose a new design by its construction and finishing details, and check its own materials list before starting.
Bring Your Frog Together
Take this crochet frog bag pattern one section at a time. Start with even sets of toes and fingers, keep the body count under control, and leave time for fitting the eyes, lip and clothes. The yellow star and blue crossed straps work best when the basic frog already sits in balance.
Before treating it as a working bag, finish and test the opening, any lining and the carrying attachments. The stitch counts have been checked for arithmetic consistency, but a physical sample has not been made. A careful sample is still the best way to settle the open construction details.
Find your next crochet project
Ready for another character? Browse the My Crochet Universe pattern collection and choose your next make.




