

Crochet Baby Sneakers: 7 Charming Steps + Sole Guide
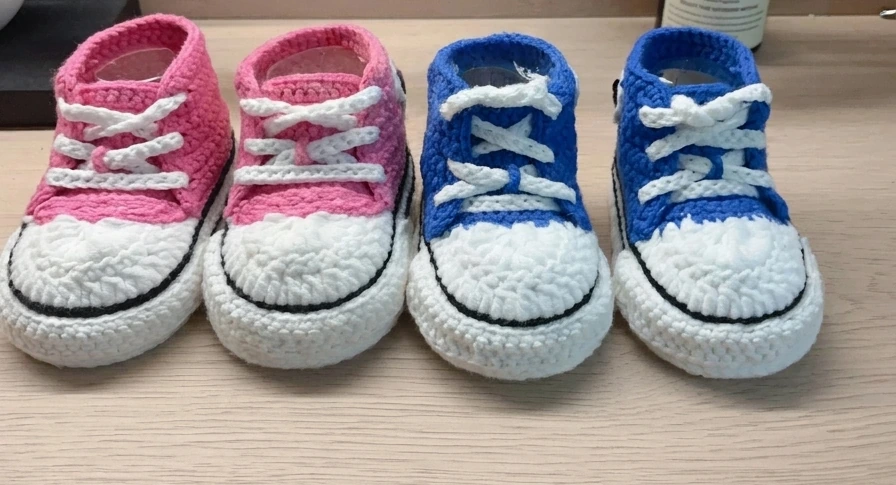
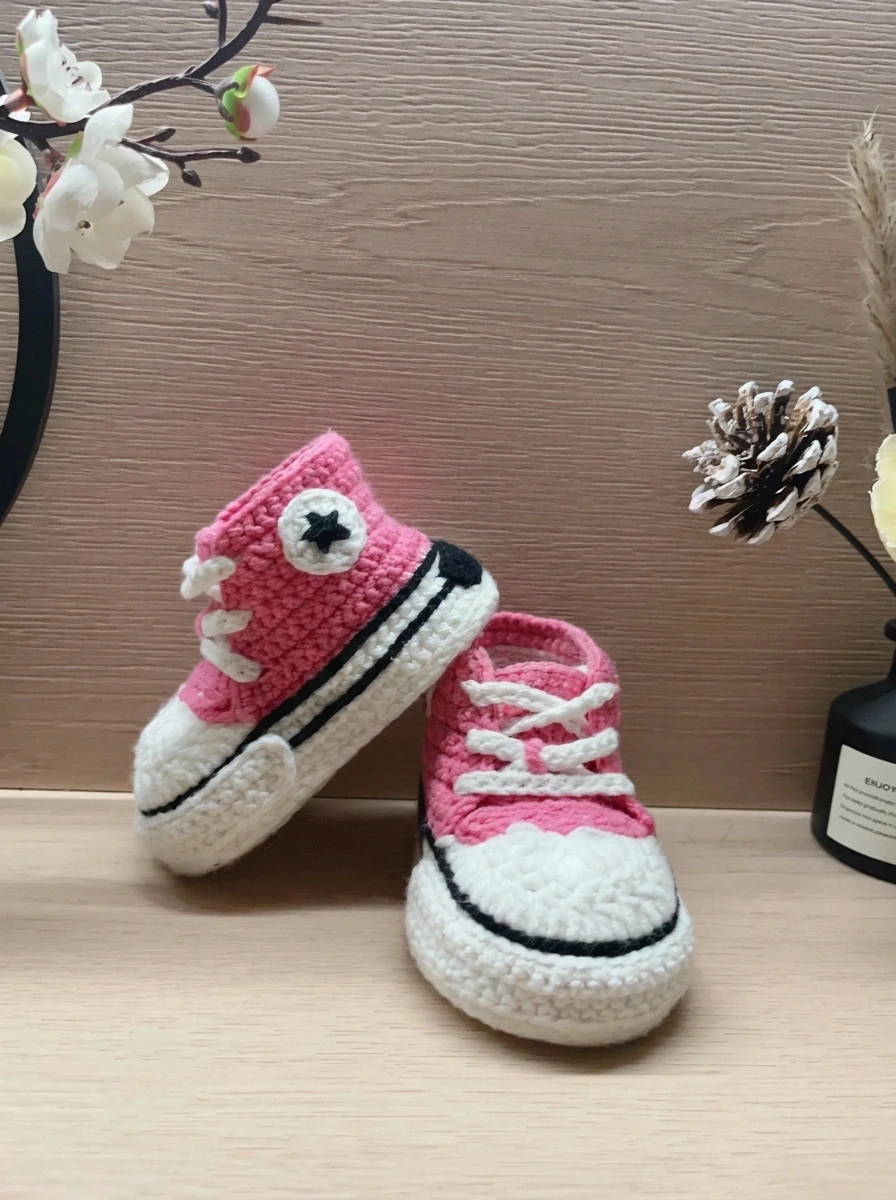
Crochet baby sneakers bring a familiar high-top shape into a soft handmade bootie. White toe caps, bright pink or blue uppers, slim black sole stripes and little star patches create the look. The double-layer sole gives the outline depth without turning the pair into outdoor footwear.
These crochet baby sneakers are organized into seven construction stages, with four sole diagrams to help you choose a measured starting point. Make one complete sample before repeating the second shoe. The tongue and upper notes are not fully graded for every sole option, so check their fit instead of treating an age label as a guarantee.
Crochet Baby Sneakers
What makes crochet baby sneakers read like tiny high-tops? The key is proportion. A rounded white toe sits below a narrower colored tongue, while the side panels rise around the ankle. The white lace bars repeat the toe color and the black line separates the sole from the upper.
Understand the construction order
Start crochet baby sneakers from the soles, then work four lower body rounds before shaping the toe. Pick up the tongue across the toe area. Build the upper around the remaining opening, adding three pairs of eyelets. Laces, edging, heel tabs and star patches complete the finish.
Treat them as soft keepsake booties
Crochet baby sneakers are not tested walking shoes, non-slip footwear or sleepwear. Laces and decorative pieces need careful inspection and close adult supervision. Keep them off during sleep and whenever cords or small parts could be pulled or mouthed. Use the measured fit and the intended setting to guide every finishing choice.
Crochet Baby Sneakers: Materials and Hooks
Match the hook to the section
| Section | Hook in the instructions |
|---|---|
| Soles, toe and lower body rounds 1–4 | 3 mm |
| High-top upper, tongue and laces | 2.5 mm |
The crochet baby sneakers instructions distinguish a thicker lower-section yarn from a finer upper-section yarn, but the yarn labels use shorthand that does not establish a reliable standard weight or fiber content. Confirm the actual yarn labels before buying. Do not assume that either hook automatically means DK, worsted or a particular brand.
Gather the small tools
- White yarn for the soles, toe caps and laces.
- Pink, blue or another main color for the uppers and tongue.
- Black yarn for the sole stripe, heel tab and embroidered star.
- 3 mm and 2.5 mm crochet hooks, plus any adjustment needed after sampling.
- A yarn needle, scissors, removable markers and a tape measure.
- Optional felt only if choosing that star finish; no adhesive, brand or attachment strength is specified.
For crochet baby sneakers, a smooth interior matters as much as a crisp outside. Keep sewing tails accessible until the fit is checked, then weave them in securely without leaving hard knots. No yarn quantity, formal gauge, total making time or certified finished size is provided.
Choose a Measured Sole Size
| Reference age / sole | Sole start | Toe decrease group |
|---|---|---|
| 0–3 months / about 9 cm | 10 ch | 10 dc2tog |
| 3–6 months / about 10 cm | 12 ch | 11 dc2tog |
| 6–9 months / about 11 cm | 14 ch | 12 dc2tog |
| 9–12 months / about 12 cm | 16 ch | 13 dc2tog |
These crochet baby sneakers age ranges are approximate reference labels, not a fitting promise. Measure the foot and the completed sole. Yarn, hook, tension and the thickness of the double sole can change the usable inside space. A child may need a different option from the one suggested by age alone.
Keep one size plan beside you
Write down the chosen sole diagram, measured length and toe decrease group before starting crochet baby sneakers. The notes suggest that changing one foundation chain can alter length by about 0.5 cm, but that is not a universal gauge rule. Measure your fabric rather than adding chains blindly.
The largest example is described as a pair for a ten-month-old, using 13 toe decreases. That example does not establish a standard ten-month size. Tongue pickup and row counts are given as one working example, not as a separate complete set of counts for all four sizes.
US Crochet Terms
| Term | Meaning |
|---|---|
| ch | Chain |
| sc | Single crochet |
| hdc | Half double crochet |
| dc | Double crochet |
| dc2tog | Work two double crochets together as one decrease |
| sc2tog | Single crochet decrease |
| sl st | Slip stitch |
| Unfinished dc | Stop before the final pull-through, leaving a loop for the collective closure |
Crochet baby sneakers use US stitch names here. Turning-chain heights and whether those chains count as stitches are not established for every section. Mark the first and last working stitches so the edges do not grow by accident. For common terminology, see the Craft Yarn Council crochet abbreviation guide.
Step 1: Make the Double Soles
Select the matching oval diagram
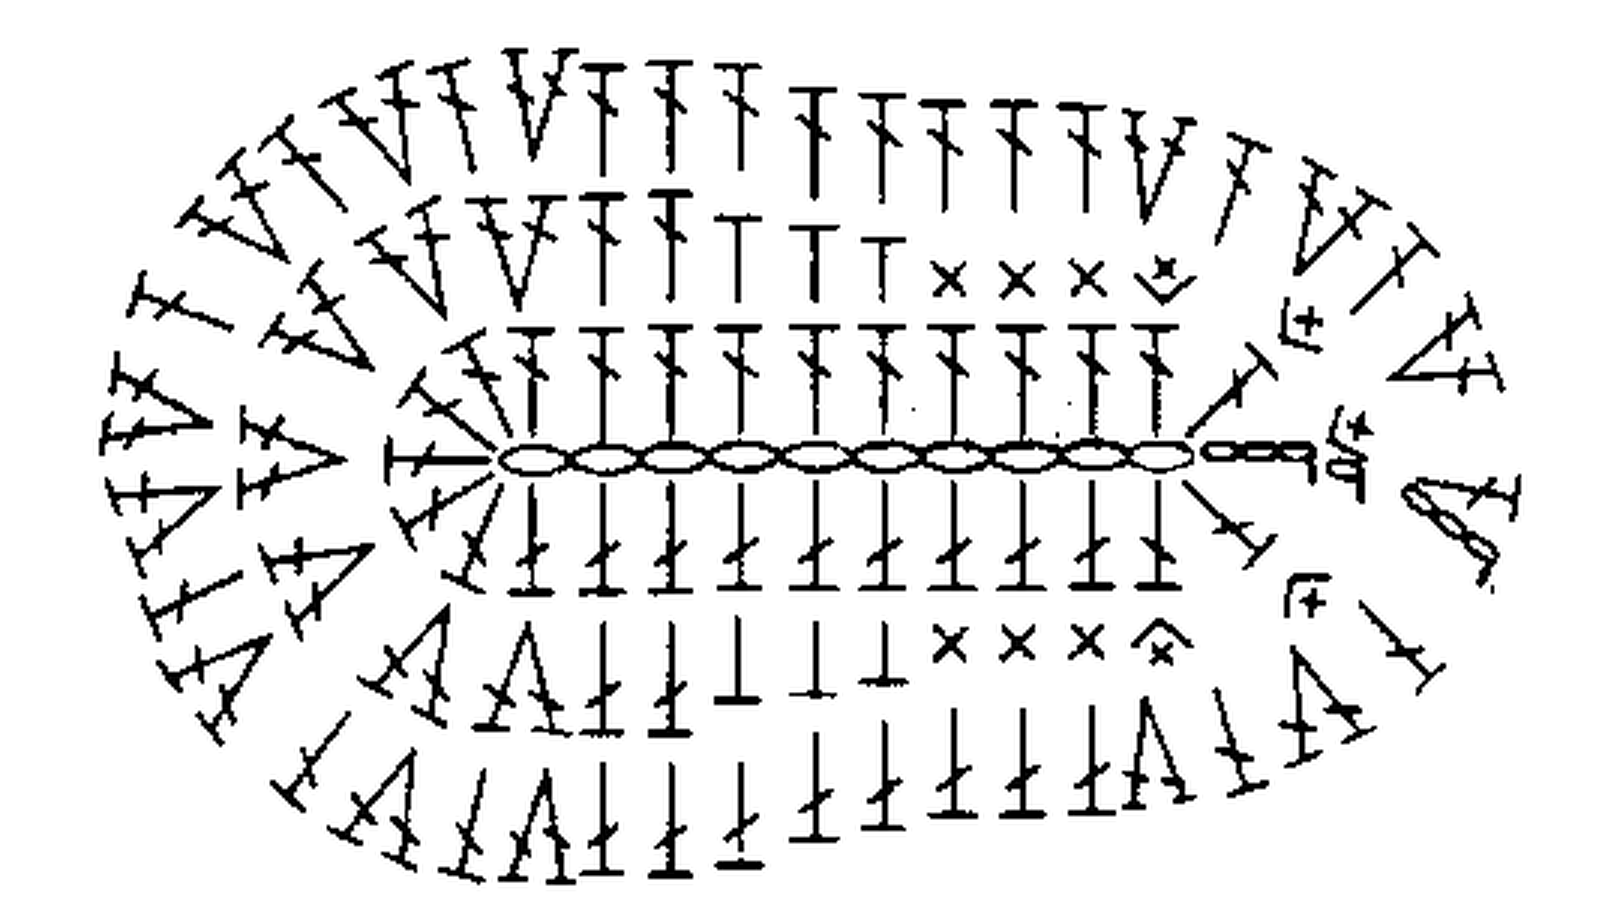
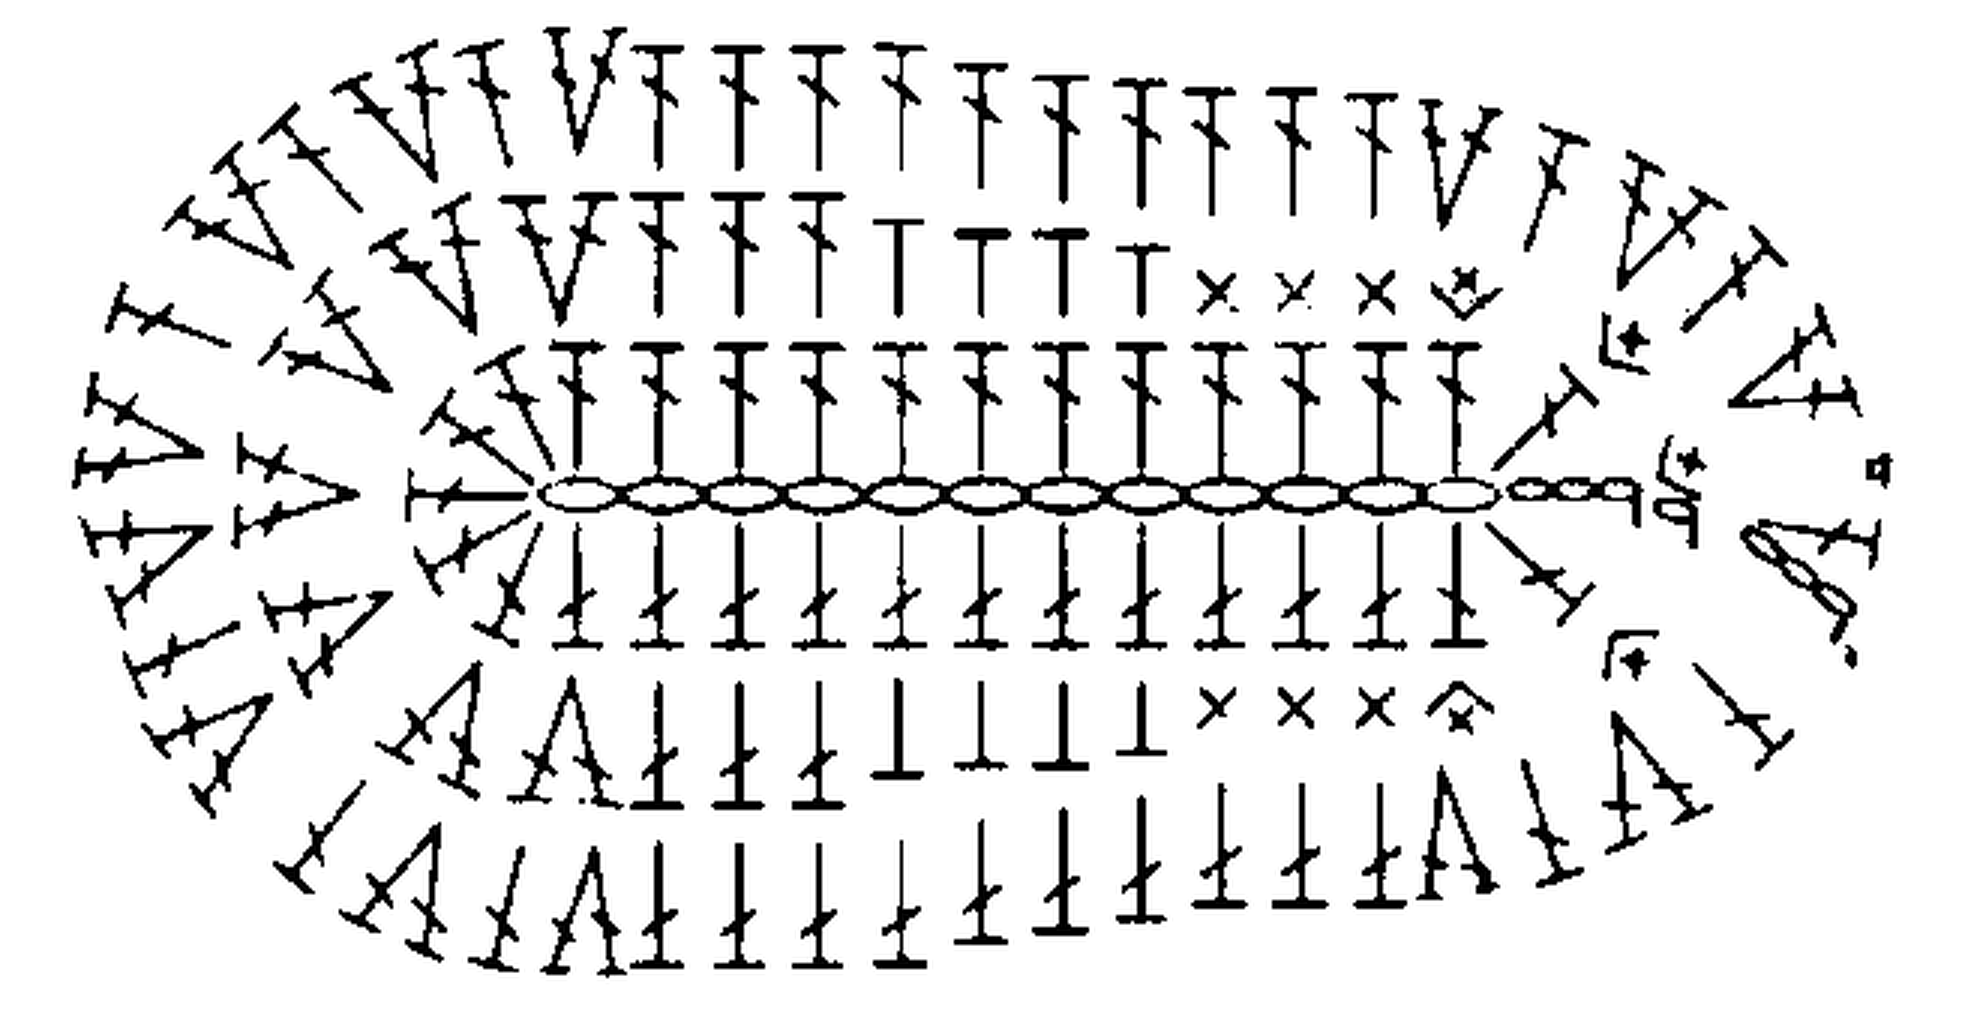
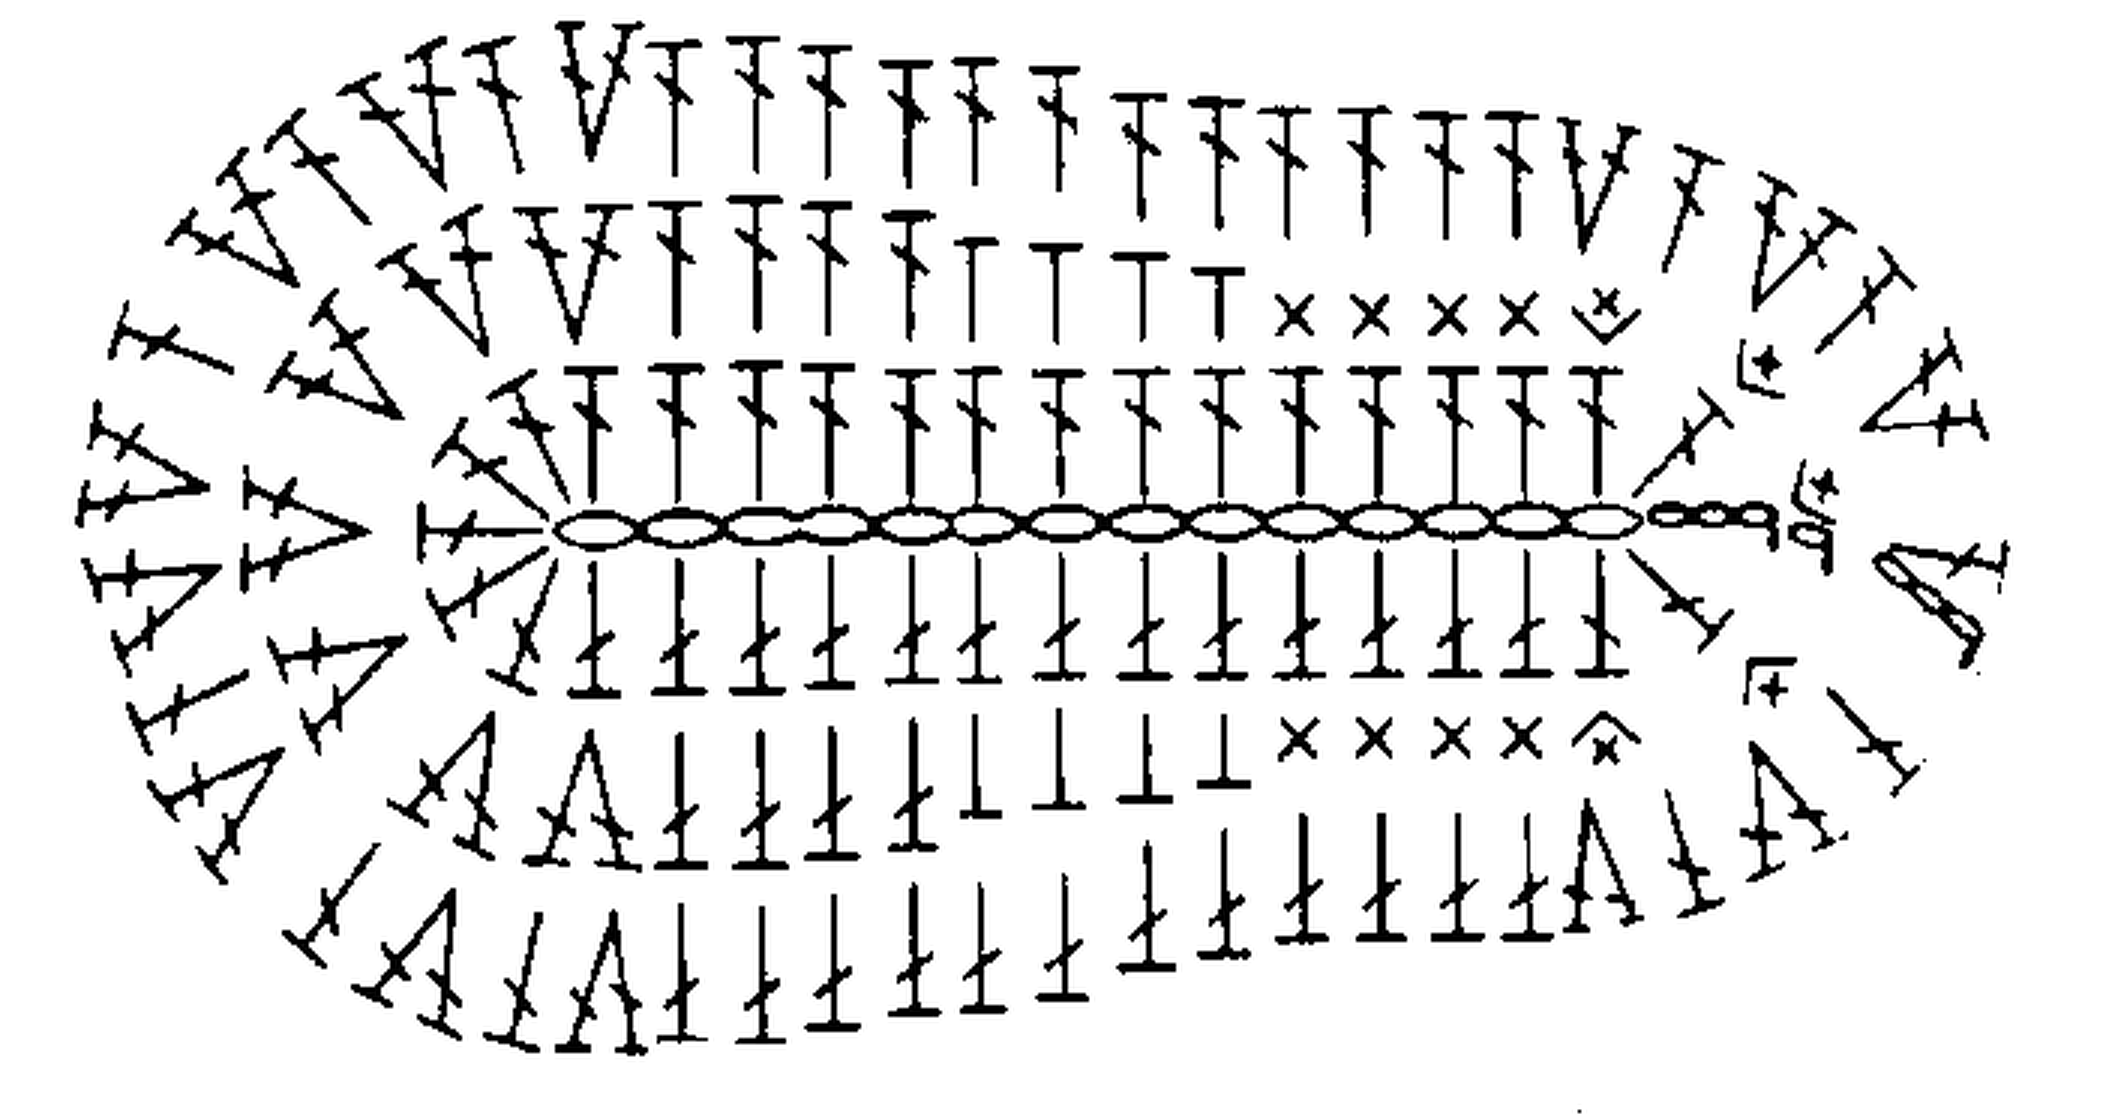
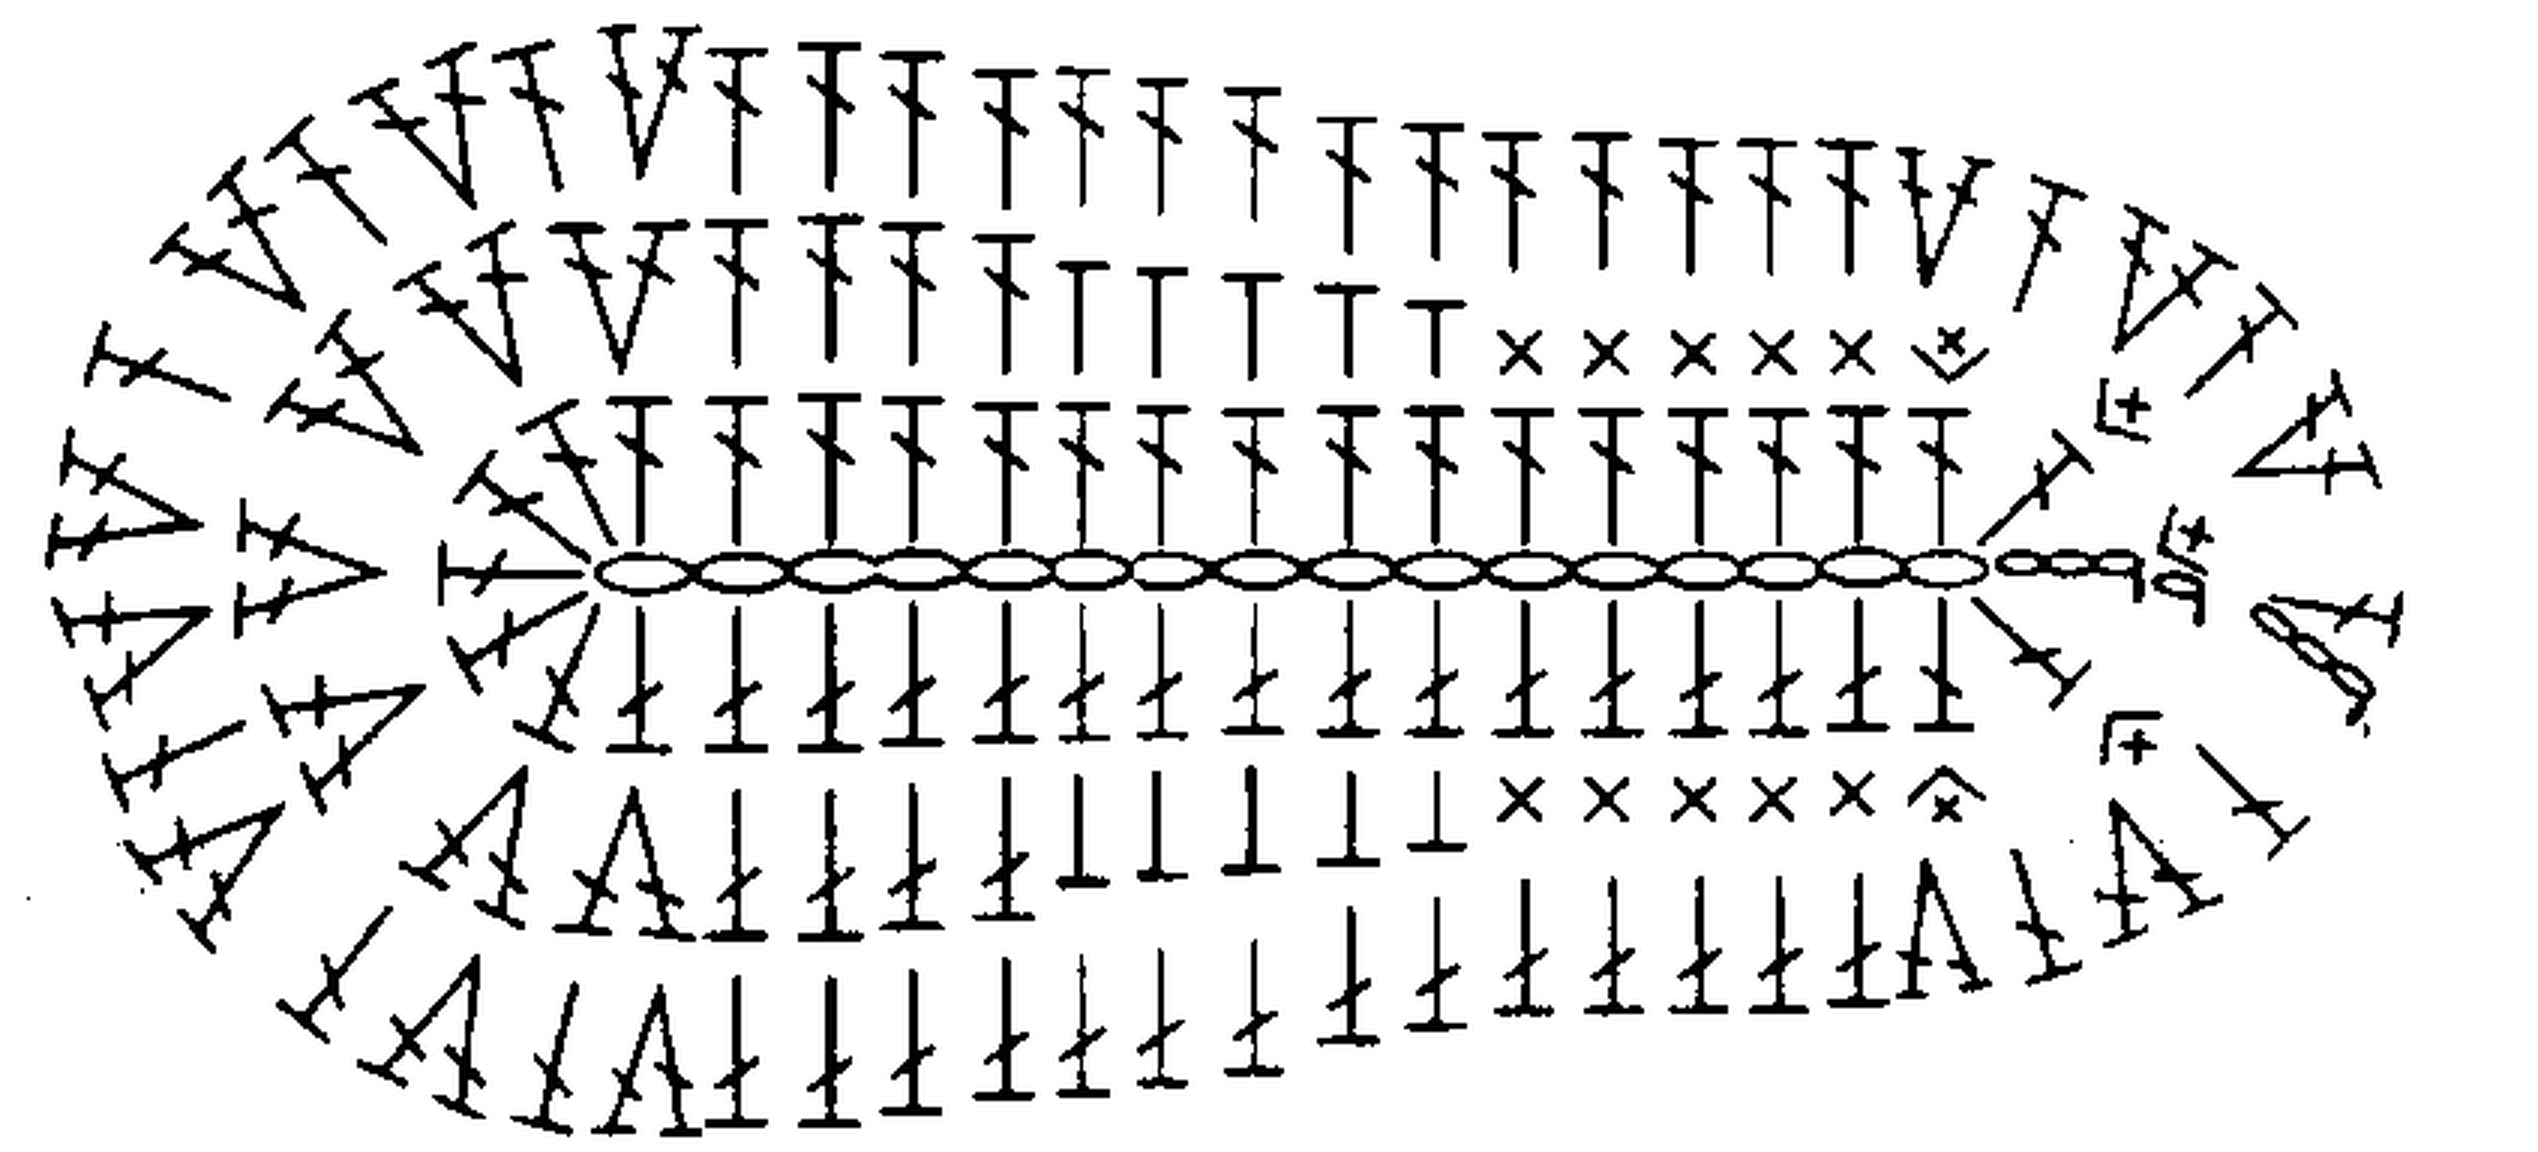
For crochet baby sneakers, the sole is the size test. Work around both sides of the selected foundation chain, following the oval diagram for stitch types and end increases. The symbols carry the round-by-round shaping; a complete written total for each sole round is not supplied here.
Use the 3 mm hook for this section. Make matching layers for a double sole and compare their outlines before combining them. The exact joining method and resulting body pickup total are not specified, so sample that join before building the upper.
10-chain sole — approximately 9 cm
12-chain sole — approximately 10 cm
14-chain sole — approximately 11 cm
16-chain sole — approximately 12 cm
Check both layers without stretching
Lay the crochet baby sneakers soles flat on a table and compare heel width, toe curve and overall length. Ripples or cupping should be addressed before the sides are added. Do not steam an incorrect oval into a shape that only holds while it is pinned.
Step 2: Build the Lower Sides and Toe
Lower body — four even rounds
Work rounds 1–4 of the crochet baby sneakers body in sc without increases or decreases, using the lower-section yarn and 3 mm hook. Fasten off before beginning the toe. The starting pickup count depends on the chosen sole and is not stated as one universal number.
Center the toe shaping
Face the front of the shoe toward you. Find the center, then count to the right by the number associated with the chosen toe group: 10, 11, 12 or 13. Begin the dc decreases there. Check the span against the front center before working across; the shaping should not drift toward one side.
| Stage | Instruction |
|---|---|
| Toe row 1 | Work the selected group of 10, 11, 12 or 13 dc2tog across the toe area. |
| Toe row 2 | Turn and work hdc across without further increases or decreases. |
| Toe row 3 | Work an unfinished dc in each toe stitch, then draw the yarn through all remaining loops together. Tighten, secure and fasten off. |
The last toe row of crochet baby sneakers is one collective closure, not another row of separate dc2tog decreases. Work slowly so each unfinished stitch remains on the hook until the closing pull-through. Do not substitute a guessed sequence just because the number of loops feels unusual.
Step 3: Work the Tongue
Pick up 13 stitches across the toe
For the example tongue of crochet baby sneakers, pick up 13 sc evenly across the toe. Turn and work 11 more rows of sc without shaping, then fasten off. This produces 12 working rows including the pickup row. Keep the tongue centered so it can sit behind both eyelet edges.
Choose the tongue edge finish
Beginning at the first tongue pickup position, work an sc edging around the tongue for a tidier outline. The edging is optional: the alternative is the plain 12-row tongue without that extra border. No precise border pickup total is specified.
Before making the second tongue for crochet baby sneakers, compare the first with the selected shoe size. The 13-stitch example is not separately graded for all four soles. Confirm the width and length if choosing a smaller option rather than pretending the same counts guarantee the same fit.
Find your next crochet project
Enjoy small handmade pieces and thoughtful finishing? Browse the My Crochet Universe store for your next make.
Step 4: Shape the High-Top Upper
Begin beside the shaped toe
Use the 2.5 mm hook for the crochet baby sneakers upper. Join at the last stitch of the toe decrease area, work sc around the heel with one decrease at the heel, and finish at the first toe decrease stitch. Turn to work back across the upper rather than closing the lace opening.
| Row | Instruction |
|---|---|
| 1 | Sc from the last toe decrease position around the heel to the first; decrease once at the heel. |
| 2 | Turn and work sc back across. A heel decrease is described for the thicker 5-strand version; the finer 4-strand version may omit it. Confirm with the actual yarn used. |
| 3 | Sc 1, ch 2, skip 2 stitches; sc across until 3 stitches remain; ch 2, skip 2, sc 1. |
| 4 | Work the first sc into the eyelet opening, then sc across. At the far end, decrease the eyelet space and final stitch together as described. Exact pickup totals are not given. |
| 5–6 | Sc without increases or decreases. |
| 7 | Repeat row 3. |
| 8 | Repeat row 4. |
| 9–10 | Sc without increases or decreases. |
| 11 | Repeat row 3. |
| 12 | Repeat row 4; fasten off. |
Check the three pairs of eyelets
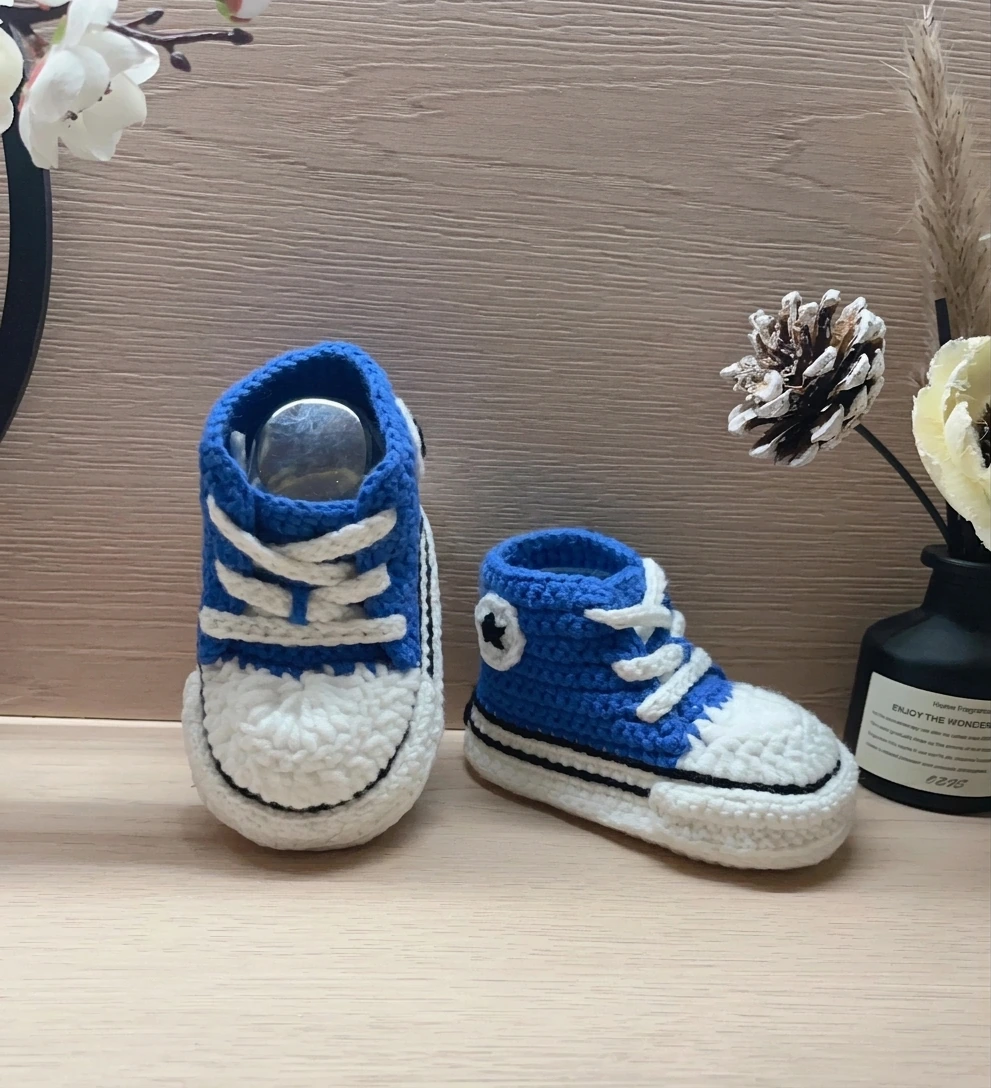
The crochet baby sneakers lace openings are made in rows 3, 7 and 11. Compare both edges as you work. The return rows describe how to work into the openings but do not give a complete stitch total, so keep a sample note instead of inventing counts.
After the upper is finished, rejoin at the start position of the first body round and work an sc edging around that body boundary. The upper should sit evenly around the heel without pulling the tongue sideways. Check its height before copying the second shoe.
Step 5: Crochet the Laces
Chain 130 for the example lace
The crochet baby sneakers lace begins with ch 130, followed by sc worked back along the chain. The exact return starting chain is not stated. The notes allow fewer chains when using the thicker 5-strand yarn, but give no replacement count. Compare the actual lace with the shoe instead of guessing a fixed alternative.
Thread without tightening the opening
Thread the laces through the three eyelet pairs and keep the tongue centered underneath. Crochet baby sneakers should not need tightly pulled cords to compensate for an incorrect size. Check that the upper opens freely and that the fabric does not gather around the ankle.
Long laces are a foreseeable cord hazard for a baby. A 130-chain instruction is a construction detail, not a safety endorsement. Treat the laced version as a supervised keepsake or display piece, keep cords inaccessible to the child and remove the booties for sleep. Do not add elastic or hardware simply to force a fit.
Step 6: Add the Toe Edge and Sole Stripes
White toe-edge strip
Make a separate toe edging strip for crochet baby sneakers, using the width associated with the selected toe decrease group. Work four rows of sc without shaping. Keep the yarn attached and sew the strip into place. The strip foundation-chain allowance is not separately specified, so check its width against the actual toe before sewing.
Full and partial sole stripes
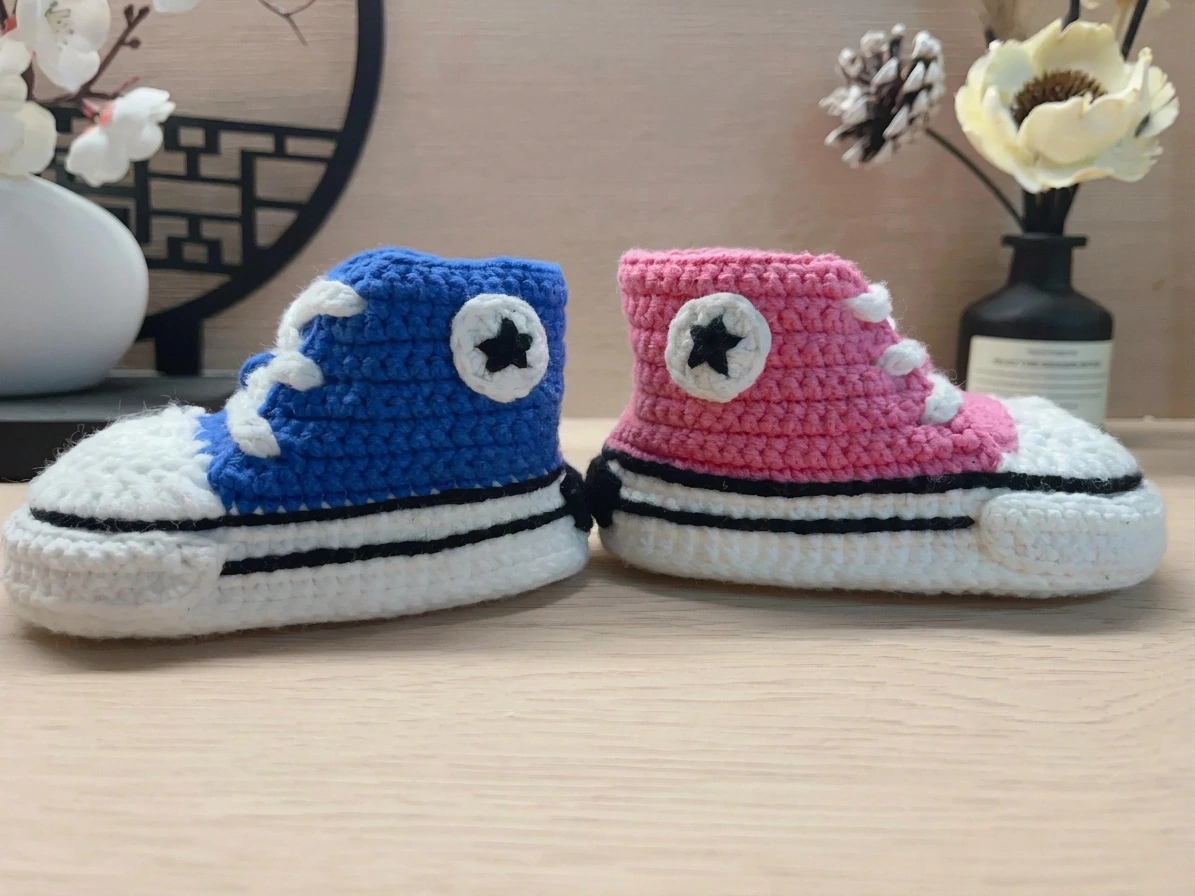
Work the full stripe around the boundary between body round 4 and upper row 1, using an sc line as directed. For the partial stripe, count two rows down from the upper/lace junction and work a half-circuit of slip stitches through the middle of the four lower body rounds.
On crochet baby sneakers, a narrow, level stripe reads more clearly than a thick line pulled tight. Check the side profile before hiding the yarn ends. The stripe should define the sole boundary without reducing the opening or denting the toe.
Step 7: Finish the Heel and Star Patch
Black heel tab
For the crochet baby sneakers heel tab, ch 9 and work 8 sc beginning in the second chain from the hook. The notes then call for three even rows. They do not make clear whether that count includes the foundation working row, so confirm the intended tab height on the sample before making its partner.
Keep the yarn attached for sewing and center the tab at the back of the shoe. Sew it flat without leaving an inside ridge. It should act as a decorative patch, not a pulling loop for lifting a child or repeatedly tugging the bootie onto a foot.
White circle and black star
Work 12 dc into a ring for the round ankle patch of crochet baby sneakers. The notes do not specify the ring start, join or turning-chain convention. Embroider the star in black yarn, or use a cut felt shape if choosing that finish. No full crocheted star sequence is provided.
For a baby keepsake, securely embroidered detail avoids a separate felt piece that could detach, but embroidery alone does not certify the finished item as safe. Inspect the patch seam and the inside surface before any supervised use. No adhesive type or attachment performance is established.
Check the Pair and Plan Safe Use
Compare the pair side by side
- Both sole layers match in length and outline.
- Toe shaping is centered and the white caps have similar depth.
- Tongues are comparable in width and height.
- Both uppers have three eyelet pairs at matching levels.
- Stripes sit at the same height and heel tabs are centered.
- Patches are secure, ends are woven in and no inside knots feel rough.
- Laces and decorations are kept away from the child’s mouth and hands.
Wash crochet baby sneakers only according to the yarn and attachment materials actually used. Dry them fully before packing or use. Check fit after cleaning because crochet fabric can change size. A display support seen inside a photographed shoe is a photography prop, not something to leave inside the finished pair.
Keep fit information honest
When gifting crochet baby sneakers, record the measured sole length, known fiber content and care instructions. Explain that the pair is for supervised keepsake use, not sleep or walking. Do not sell an approximate age label as a guaranteed fit or claim testing that has not been done.
More Baby Crochet Projects
For more help with smooth interiors and measured soles, read ways to make crochet booties extra cozy. Those are different booties: use the finishing ideas, not their stitch counts, for crochet baby sneakers.
Planning a present? Our baby-bootie gift presentation ideas offers ways to package a handmade pair without adding loose decorations to the shoes. Include a measurement and care card with crochet baby sneakers rather than tying tags to the cuffs.
For a separate clothing project, explore the crochet baby jacket pattern guide. It has its own materials and sizing; do not transfer those yarn or gauge figures to crochet baby sneakers.
Crochet Baby Sneakers FAQs
Are crochet baby sneakers walking shoes?
No. These are soft keepsake booties with no tested traction, support or walking performance. The laces and decorative pieces also require supervision. They are not sleepwear.
What hook sizes are used?
The sole, toe and first four body rounds use a 3 mm hook. The high-top upper, tongue and laces use a 2.5 mm hook. The exact standard yarn weight and fiber are not reliably established by the shorthand yarn labels.
How do I choose a size for crochet baby sneakers?
Compare the foot with the measured completed sole. The four diagrams begin with 10, 12, 14 or 16 chains and have approximate sole lengths of 9, 10, 11 or 12 cm. Age ranges are reference labels only.
Is every size fully graded?
No. Sole starts and toe decrease groups are supplied, but the tongue and upper notes use a working example rather than a complete separate set of totals for all four sizes. Make and measure a sample before claiming an exact fit.
How are the eyelets made?
Upper rows 3, 7 and 11 use ch-2 spaces made by skipping two stitches near each edge. Rows 4, 8 and 12 work back into those spaces. Exact return pickup totals are not given.
Do I need to add felt stars?
No. The star can be embroidered in black yarn instead. A separate felt shape is an optional finish, not a required stitch component. All decoration needs secure attachment and inspection.
Where can I find more crochet projects?
Browse the My Crochet Universe store for the current collection. Check individual listings for materials, contents and construction; no separate product listing for these shoes has been assumed.
Finish with a Balanced Pair
Crochet baby sneakers look polished when the basics agree: flat matching soles, centered toes, even tongues and balanced lace openings. The pink and blue palettes are playful, but the neat black stripe and white edging are what make the small shape readable.
Take crochet baby sneakers one stage at a time and keep the sample measurements beside you. Confirm the ungraded details before repeating the second shoe, then finish the interior with as much care as the outside. A thoughtful keepsake starts with honest sizing and secure, comfortable construction.
Find your next crochet project
Enjoy small handmade pieces and thoughtful finishing? Browse the My Crochet Universe store for your next make.




